03.18.15
In a SN@P!
Hello everyone, it’s so wonderful to be back with you again! Chantalle [1] here and I’m hoping to inspire you to create with the new and incredibly fun SN@P! Packs! There are six different sets [2] to choose from, with something to suit every style of scrapping, from retro hues, to fabulously fresh and luxurious gold foil. You are sure to love them as much as I do!
My first page is entitled ‘You & Me’ and features my parents on their wedding day, many moons ago! The Gold SN@P! Pack [3] with it’s beautiful gold foil touches and love inspired sentiments lended themselves perfectly to the theme and black & white image.

I have used a grid design (based on a sketch I saw online) The super sweet 2x2 squares line up nicely, with the addition of an altered one, which I have turned into a mini pocket. I have used my Silhouette Cameo to cut the title ’You & Me’. This file is available in the Silhouette Store. I have used embroidery floss and hand stitched a running stitch into the title for a bit of texture and some detail.

I created my little pocket by cutting out the top part of the printed envelope located on one of the black-based 2x2 cards (shown above) I then mounted this cut piece onto a piece of spare white cardstock, which was the same width at the 2x2 but a teeny bit taller in height, to create a flap which I can open and close. As you can see, I machine stitched the top black part to the bottom piece of plain white cardstock so I got maximum space inside the pocket. If I had used double sided tape, I would’ve lost valuable space or run the risk of the small photo sticking to the edges of the glue. Wet glue would be a good alternative if you don’t like stitching. Make sure it’s completely dry before adding anything to your pocket. You can keep your mini envelope pocket closed with a small peg or paperclip.

Part of my journalling has been adhered onto a decorative clip, which I then slid over my photo.

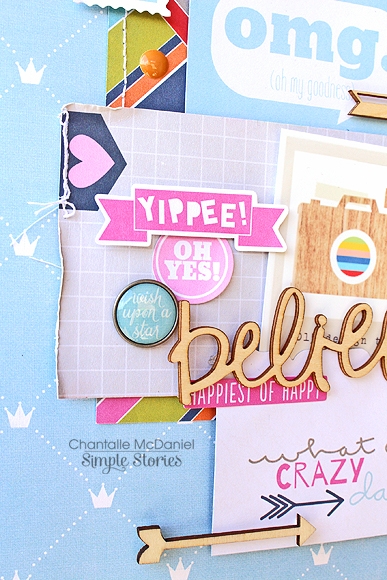
A great thing about the SN@P! Packs is that they come with lots of different sized SN@P! cards, as well as some die cuts! I have used some of them to embellish some of the 2x2 cards. Try mount gold on gold with some foam tape or add enamel dots over a polka dot print.

My next page is all about the day I found out I would be joining the Simple Stories Design Team. For me, it was a dream come true!! I’ve used the ‘Fresh’ SN@P! Pack [4] for this page.

Again, using the various sized cards in the pack, I have formed a base for my layers. By using the long strips down the left hand side of my page, I can continue hints of the darker shades in my colour palette. For this layered 3X4 card (shown below), I have cut up the postage stamp print 3x4 card and placed them over a zigzag pattern card. I have machine stitched the cut ’stamps’ to secure them down. I like to use top stitch thread, which is nice and bold. Then, I cut the ‘Happy, Happy, Happy’ printed card into three bits and raised the words onto bits of foam tape. I’ve left the bits of thread on for a relaxed finish.

So many of the sentiments on the cards in this pack express how I felt on the day perfectly! Can’t-believe-what-I’m-reading sheer elation! Cluster the die cuts you find in the pack with fun Bradz and wood veneer.
I have also created a simple pocket out of a section cut from a 12x12 sheet of Color Vibe Bolds ’Navy’. Inside, I have placed a bright pink 3x4 Sn@p card from the collection as well as the email I received at the time, which I have printed off and folded up. Add interest by punching little shapes, like this small circle on my pocket.

My final page has a retro vibe, thanks to the ‘Epic’ SN@P! Pack [5]. This little pack is bursting with fun. I especially liked the vintage retro elements, like the cassette tape! My Sister and I are rocking the corduroy dungaree look!

Two 4x6 Sn@p cards form the base, with lots of smaller elements layered over the top. The wood veneer speech bubble has been backed with a bit of orange print from one of the 3x3 cards in the pack. The printed star on the die cut tag (behind the photo) has been punched with a small star hand punch to echo the star shape.

I love backing up the ‘big idea’ on my pages with lots of smaller bits of supporting text. Expression stickers are a wonderful way to add a bit more chatter to your projects.

Make your wood veneer go further by snipping larger pieces in half with some sturdy scissors. I get to use the other half of this awesome view finder on another project!

Thank you so much for stopping by today!