Tara Chaussee's Blog Posts

Howdy friends!  Layle here - happy Friday and happy day 5 of our week long Simple Stories & Maya Road Product Swap! 

Both design teams have swapped products & teamed up for some great inspiration all week long!

Today creative team member Traci Chaussee joins us with a super summery mini book with products from our Summer Days collection -

__________________________________

What an exciting month to get not only adorable products from Simple Stories but to ALSO get amazing products from Maya Road which I adore!  Of course I received a sweet Maya Road mini chipboard album so I knew it was the perfect time to combine it with the Summer Days collection for an amazing mini scrapbook!

The Maya Road Recollection Chipboard Binder is a chunky little book with 4 tabbed chipboard pages. I decided to not add any additional pages to the album but made each of the chipboard pages interactive with the adorable 'Summer Days' paper, chipboard, stickers and Bits & Pieces! Wait until you see all the fun inside!

The cover of this fun and colorful Summer album is pretty much dedicated to the Maya Road products I received! I used a large Ken Oliver metal button to create a charming 'knob' for the front complete with some hanging charms! I also made the long charm on the spine of the album using the sweet metal embellishments along with another tassel and a paper rose. These were attached to some jewelry chain with jump rings and then secured to the album from the inside with a twine knot.

I used the adorable mason jar stamp and die from Maya Road to create a mini mason jar shaker that I filled with small stickers from the 'Summer Days' collections as shaker elements! For extra shine, I added small glittery hearts and stars! Too cute! The die cuts a whole mason jar but I used an exacto knife to cut the center out and then covered it with acetate.

Of course, no mini album of mine would be complete without a pocket! I created this large one on the inside front cover by using two of the 4x6 vertical elements cut to size and angled for easier use! Even though these elements are already super cute,  I added on more with a sticker, chipboard flowers and enamel dots!

When I saw this Summer Bucket List on one of the 4x6 cards, I just knew it would be on the first page of this album! Who doesn't make a bucket list for the season?! For a colorful and interesting background, I cut out mini frames from the fun patterned papers and added stickers from the 4x6 sticker pack to the inside of each. Super cute!

For the second page, I used some of the journaling card elements to create a small flip book. The journaling cards were mounted on solid color card stock and embellished with stickers, chipboard pieces and ephemera! Adorable both closed and open!

I cut a section of the 4x6 vertical elements and scored them before folding them back and forth to create this fun pull-out section that is all ready for Summer photos. I took two decorative brads, snipped off the prongs and adhered  them together for a small tab and embellished the pages with cute pieces from the collection!

A large fishtail flag from the horizontal elements for this page! There is room for small photos on the front and then it lifts up to reveal more photo spots and charming embellishments! You can see some of the 'Summer Days' washi tape on the side of this page. Such a colorful addition!

For this page I made a large pocket from a square of the 4x4 elements that was cut to fit. I used two more of the 4x4 elements to make a double sided slide out tab that can hold pictures or mementos!

Another pull-out on this page, made with the cute 4x4 element cards. I used the smaller stickers to create the tab for this one and also to decorate these smaller pages! There is a rectangular pocket at the top of the page that is perfect for holding smaller journaling cards or photos!

Since there are so many super cute 3x4 journaling cards, I couldn't resist making a double flip book! Each section has a fun front and then space on the back for photos! I added in lots of the adorable chipboard and stickers to embellish this page!

More cuteness on the last page with a large frame ready for that perfect Summer photo! I cut 1.25" x 1.5" chipboard rectangles for the frame and covered them with the patterned paper before adding stickers, metal embellishments and enamel dots! A great way to end this super cute Summer mini album!

__________________________________

Now for even more fun!!  Enter via the Rafflecopter widget below and we'll draw one lucky winner next Monday to win both a Summer Days & Cabin Fever collection kit!   

a Rafflecopter giveaway

After you enter, head on over to the Maya Road blog to see what their team has created.  

Want to follow Maya Road and keep up with all of their great projects & products?  Here you go!

Join us again here tomorrow for more inspiring projects!


Supplies

Hi everyone! Tara, from Secretbees Studio here today with a super cute home project that is not only functional but looks awesome too! Sometimes we (our family) need a little reminder of the things that have to be done around the house. Using a regular picture frame and the adorable Simple Stories 'Domestic Bliss' paper collection, you can create a charming way to help them remember!


I picked up a simple 8x10 frame at my local craft store for this project. You can use any size, but this one is great for showing off the beautiful 'Domestic Bliss' papers and embellishments! You will also need dry erase markers for this - any color will do. Gather all of your supplies and get ready to make something awesome!

I started by using some of the letters from the 4x6 stickers to create a title for my chart. It's always a good idea to use a ruler, or another piece of paper to align your letters evenly! Once positioned where you want them, press firmly so they stay in place.

 
I also layed out  how I wanted my chart to look with the patterned papers, stickers and embellishments before I put it in the frame. The colorful weekly list is one of the 4x6 vertical element cards in the paper pack and worked perfectly! Keep in mind that if you are layering lots of paper together with thick embellishments, it may be harder to fit behind the glass.
 
 
The finished product is sweet and charming and so much better than the actual housework! My favorite part is the kitty sitting in the laundry basket with the sentiment 'Every Day I'm Launderin'. Too funny! I added some special touches to the outside of the frame using more of the chipboard, stickers and washi tape from the collection to make it even cuter!
 
 
Writing with dry erase markers is smooth and easy and will not leave any residue behind when you need to change things up!
 
 
There are so many adorable sentiment stickers in this collection that I couldn't resist using one layered over a label sticker to make a tag for the metal slot at the bottom of the frame.
 
 
A close up of the tag I made using one from the Bits & Pieces layered with stickers and chipboard! I just love the laundry basket brad in the center of the twine bow!
 
 
This home project was so easy and fun to create that I made another one for the weekly dinner menu! The 'Domestic Bliss' collection even has cute embellishments for that!
 
 
Once the week is over and you need to write something new in, just take a tissue or paper towel and wipe off the old. Easy peasy!
 
 
Thanks for taking the time to check out my project! I hope this inspires you to create something cute and functional for your home!


Supplies

Hi everyone! It's Tara from Secretbees Studio! This is my first post for the Simple Stories Creative Team and since we are so close to Easter I could not resist making an adorable holiday banner! It was so easy too with this sweet paper collection- so many awesome papers and such cute stickers in the Easter Simple Set!
 
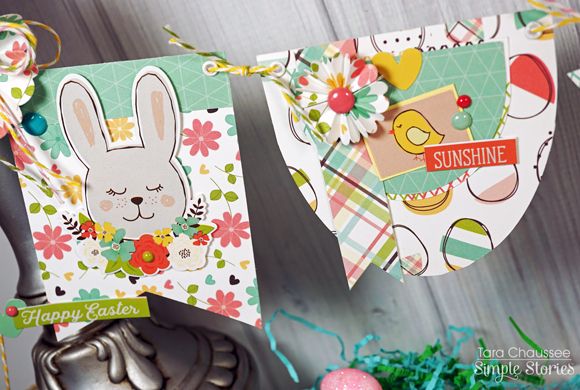
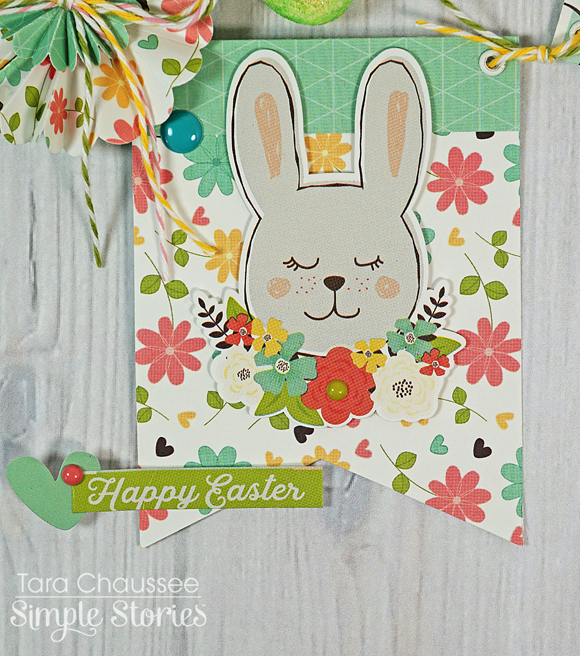
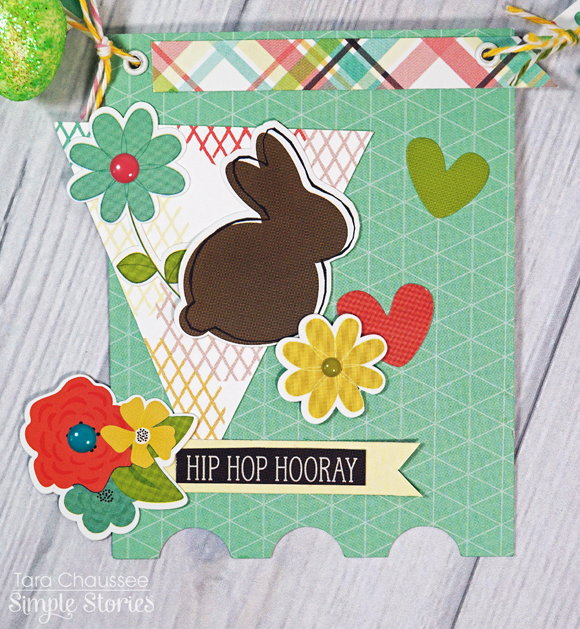
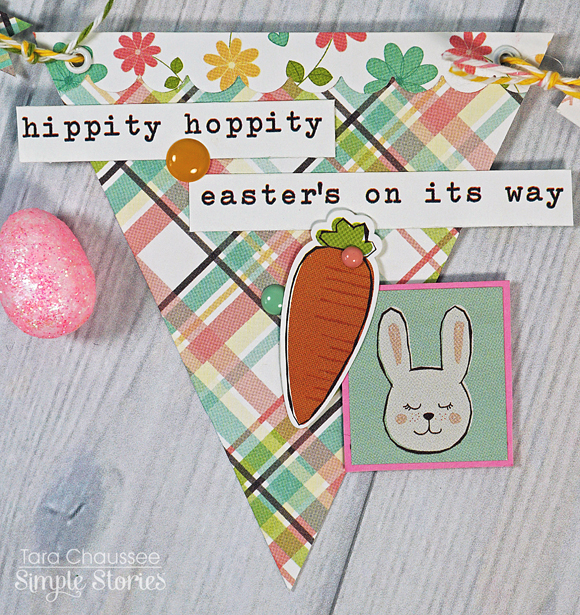
I used my Silhouette to cut an assortment of banner shapes from the beautiful paper collection. Each is approximately 3 inches wide and about the same in length but they do vary a bit. After deciding on the arrangement of the banner flags, I added in more pieces of the charming paper with smaller banner sizes, fishtail flags and scallops. Then came the fun part- adding in all of the super cute stickers!
 
 
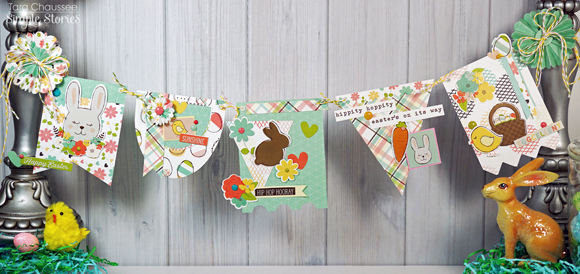
I layered and positioned all of the Easter and Spring themed stickers in fun groupings, popping some off the paper for dimension! I tucked in some happy colored enamel dots from the Domestic Bliss and Faith collections because they match so well and really added a nice pop of color!
 
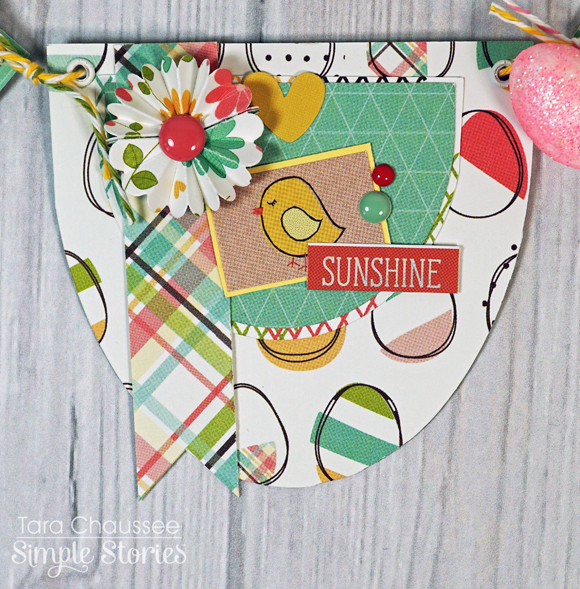
To add in more solid color variety, I cut portions of the 3x4 and 4x6 journaling card elements. The 'Hippity Hoppity' sentiment was also cut from the bottom of one of the journaling elements!


The cheery banner flags were strung on twine and I left extra at the ends so it can be tied or hung! I used some of my favorite papers from the collection to create two large rosettes and added those to the ends of the banner, hot gluing them right to the twine. Now to just display this super cute banner for the holiday so my whole family can enjoy it!
 

SaveSave

Supplies

Pages