Iris Fox's Blog Posts

Hello my fellow Simple Stories crafty peeps. Iris here with a bright, cheery layout to showcase photos when I first got to discover the magic of pretty things blooming in my backyard last year. We'd only been in our new house fall and winter, so it was all a delightful surprise.

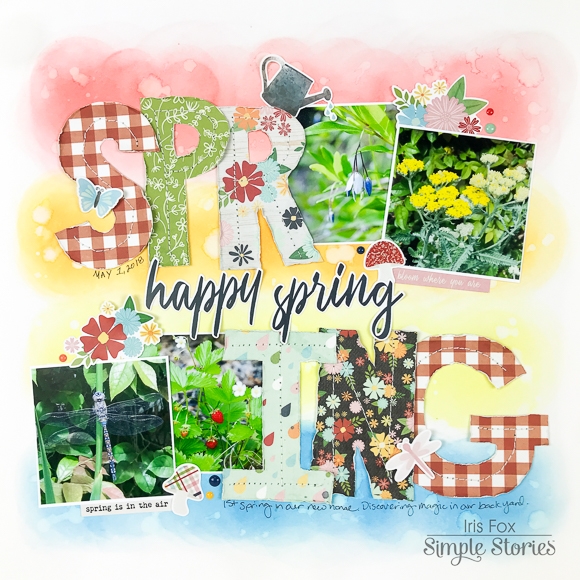
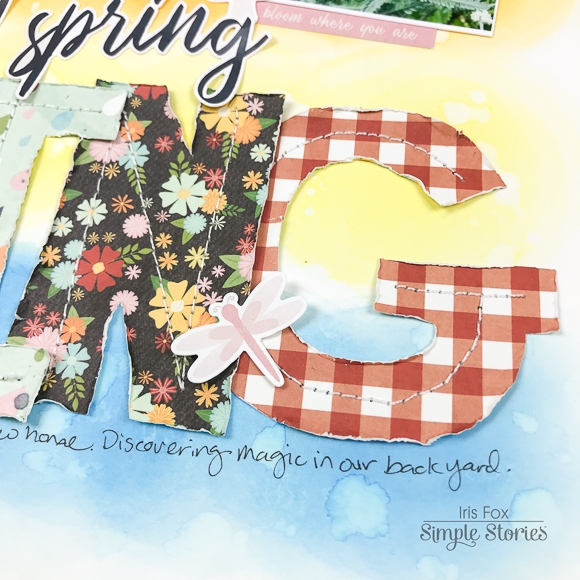
I started off by using The Cut Shoppe Open Letter Alpha cut file to cut letters on my Silhouette out of white cardstock, but I didn't use those pieces on my layout.  Instead, I used them as templates to rough cut my letters out of all the papers in the Springtime Collection because I wanted a hand-cut look.  I then played with the placement until I could fit my photos along with the large letters, switching the order in each line. 

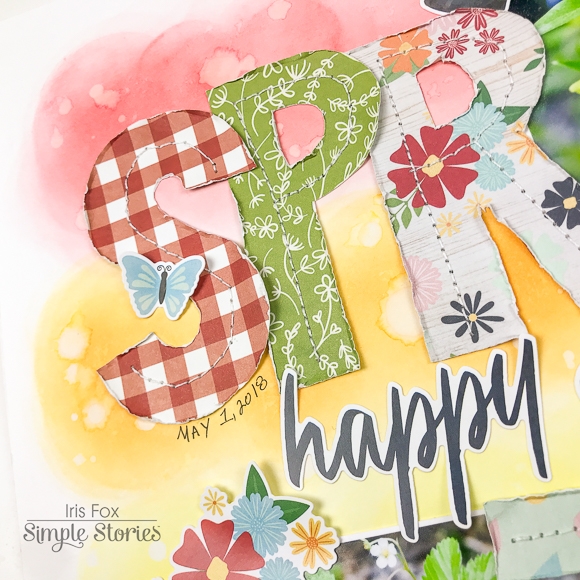
I used the Tim Holtz Distress Oxide inks in Candied Apple, Spiced Marmalade, Squeezed Lemonade, and Salty Ocean to add tons of color to my background. I used a blending tool in a circular motion to get an ombre effect and sprinkled water all over.  After letting it sit a minute for the oxides to react, I blotted the excess water off, creating a droplet effect.

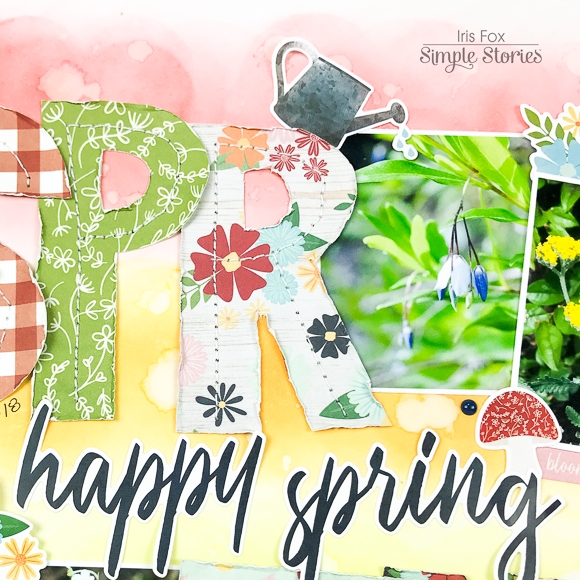
I machine stitched the letters down, and ruffled their edges.  I'd placed the two lines of letters and photos roughly equidistant from the top and bottom, leaving space in the middle, which I filled with the large scripty title from the Sticker Sheet.

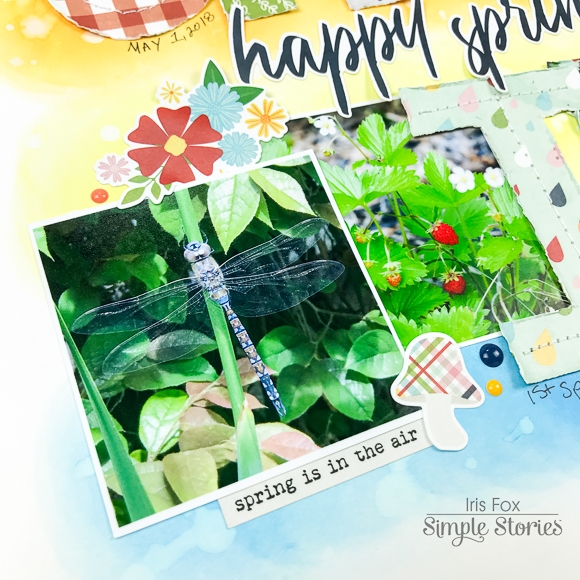
I concentrated most stickers where the photos overlap each other, flowers on top and a mushroom and word strip at the bottom, continuing the symmetry of the design. But then I also added a butterfly, dragonfly, and watering can to form a trio that stands out from all the symmetry, giving the eye some definite points to travel on. 

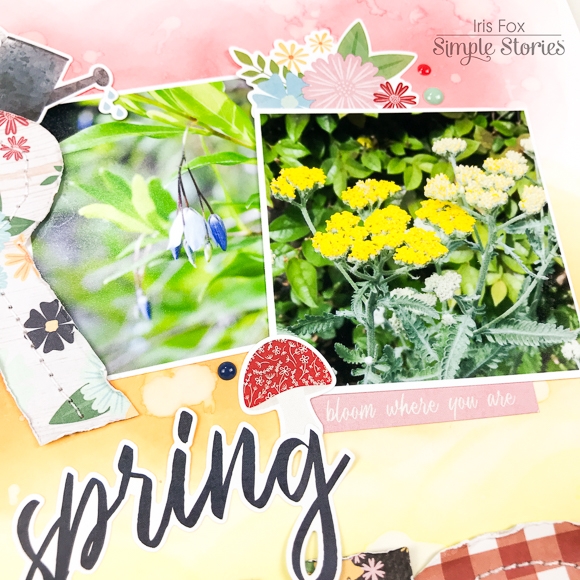
The finishing touch was journaling and enamel dots from older Simple Stories lines to fill in a few gaps. I love that I can pull out older SS product and it matches!

I had so much fun making the most of this collection, showcasing the variety of papers and Springtime icons.  It's a Simple Set, so smaller than the normal collections, but it sure packs a punch! You can find the process video for this layout by hopping over to my Youtube channel. www.youtube.com/c/whimsyfox/videos

It's been a pleasure and honor being part of the Simple Stories Team this past year. Some of the best products and the best people in the industry! I'll be moving on to some other commitments, but will continue to admire and use all the cuteness Simple Stories has to offer.

Supplies

Hello my friends, Iris here with all the farmhouse feels in a layout using the lovely Spring Farmhouse collection.  There are so many adorable - and very relevant - icons in this collection, that I wanted to use all of them.  And as you can see on my page, I used quite a bit!  

I made this layout to document one of the areas in my house, which in it's past life was a very dated, 90's (alcohol) bar, but we recently remodeled and transformed it into my very own coffee bar.  To echo the chalkboard wall we have in that space, I started off with the black solid paper from the new Simple Basics Kit that coordinates with this collection.  Having coordinating solids really is going to open up the options when scrapping with our beloved Simple Stories collections!

I built many layers behind my photo, including several papers from the 6x8 pad and one wood grain from the Snap Basics 6x6 paper pad.  I then created clusters at the bottom left and top right corners with stickers, chipboard, doilies, and one of the adorable bows that are my new favorite embellishment! 

This wasn't going to be enough for me, so I decided to build a "shelf" on my page (using the long scallop border sticker) to house #allthethings. :D Just as on my coffee bar shelves, I placed signs, lanterns, vases, greenery and a tiered organizer with cute things, all curtesy of the combo sticker sheet, the 4x6 sticker sheets, and the chipboard set. Some of the flat stickers I propped up on foam, and I also did that with the scallop border sticker.  I backed the shelf area with the soft seafoam green gingham of the Well Said paper

I wrote my journaling with a white Uni-ball Signo pen and added some artful splatters and trios of enamel dots to the background.  Yay for the return of the enamel dots!  I added a thin border from the seafoam green gingham to the bottom edge of the page to balance out the top.

Finally, I created a pocket behind my photo and layers. (yes I had to tear it off the background because I did not plan ahead, but the layers and embellishments were all stuck together so they came off in one hunk)  I cut a piece of scrap cardstock to the size of the bottom-most layers so that it wouldn't stick out, added Scor-Tape to two sides, and attached that to the background, adding all the layers on top. Then I cut a rectangle of scrap cardstock that I attached to the backside of my before photo.  I placed one of the sticker tabs with a typed "PULL ME" on the end of the cardstock rectangle, covered the gap with one of the phrase stickers, and when you slide the extra photo in the pocket, the "PULL ME" tab handily nestles in place with the other embellishments to the left of the photo.

I know that last bit was quite a mouthful, so I invite you over to my Youtube channel to check out the process video. :) I truly enjoyed working with this lovely collection and I know you will too.

Supplies

Hello Simple Stories fans.  It's the month of celebrating love, and I'm so in love with the Kissing Booth collection!  I made a sweet layout celebrating my guy and me.  

We were just out a random day at brunch, but I really loved these photos of us that I printed out with my Instax Printer.  I knew this would be a paper heavy layout because I love so many of them, but I didn't want to overwhelm the two photos, so I made them the center, with everything pointing inwards.  

Inspired by some of the cut-aparts that have a wood print background, I picked the Hickory paper from the Snap Basics as my background.  I randomly cut the papers into wedges and arranged them in a circle around the central point, leaving a few open wedges.  I also cut the pretty floral scallop border sticker from the combo sticker sheet to add more interest to the mostly angular design. 

I machine stitched down the middle of each paper to secure it down, and in three of the open areas that are roughly the same distance from each other, I did a messy stitch back and forth in shades of pink and red.  I really love how that adds so much texture, and gives the eye a few spots that are further in the background to rest on.

Two more open areas I I filled with hearts from the puffy stickers pack.

For a title I used the XOXO stickers from the combo sticker sheet on top of the largest stitched wedge.  This sits next to a tab from the 4x6 sticker pack where I stamped the date. Originally I used a tab from the combo sticker sheet, but didn't like the size in relation to the photo. I love that the Simple Stories collections come with several size stickers, giving options to find something that fits just right. 

This design already had so much visual weight, so I added just a few more embellishments to give it depth.  A couple of floral stickers peek out from behind the photos, and on top I made a small cluster with a birdy sticker and the adorable tree trunk from the chipboard set.

Also I used a journaling spot from the bits & pieces pack, topped with a puffy heart stapled on with a tiny staple. The finishing touches are a couple word strips and arrow along the wedges, and a small sprinkling of white mist. 

This collection is the sweetest for scrapping all about the sweethearts in our lives!

Supplies

Pages