Iris Fox's Blog Posts

Hello, Iris here with a layout that's all about embracing the Freezin' Season!  This whimsical collection was perfect for documenting the first time we took my girls to play in the snow!

I picked the dark, snowy Shiverin' paper as my background to provide great contrast.  I wanted a design reminiscent of snowballs tumbling down, so I printed my photos at 2", 2.5", and 3", and punched them with circle punches of those sizes.  Then I cut some Doodle Circles (Silhouette Store Design ID: 68077) from the Snuggle Up paper with my Cameo to frame them.  I arranged them across the diagonal, varying placements and leaving space to intersperse some cute elements.  The circles along the edges are cut off because that gives the design even more movement.  For texture, I machine stitched several times around the frames.

I added some of the die-cuts from the Bits & Pieces pack to fill in the gaps, including the snow globe to add some interest in the middle of all those photos.  There's stitching around the globe as well.  I placed word strips form the Combo Stickers and the 4x6 Sticker pack to caption each photo. I always delight in finding just the right little phrase to go with my photos.  Chipboard snowflakes help bring the die-cuts and word strips together into clusters.

The final piece was to add my title, which I propped up on foam, across a small gap between my photos and the journaling. For my journaling, I punched a circle out of one of the journaling cards from the 4x6 Horizontal Elements. See that cute penguin poking up from the bottom instead of another photo within the circle?  He adds something a little unexpected. 

Freezin' Season is so stinkin cute, with fresh fun colors and icons that will make documenting all those chilly winter outings super fun!

Supplies

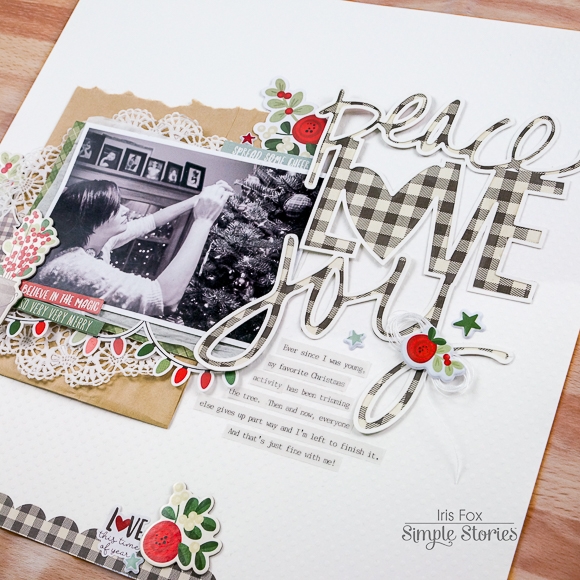
Hello! Iris here sharing another layout I made using the wonderful Merry & Bright collection. This time I was going for a clean, modern look, on-trend with the farmhouse style. 

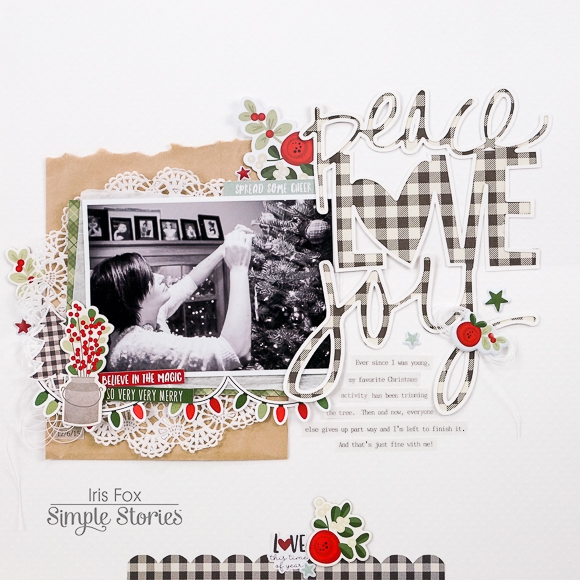
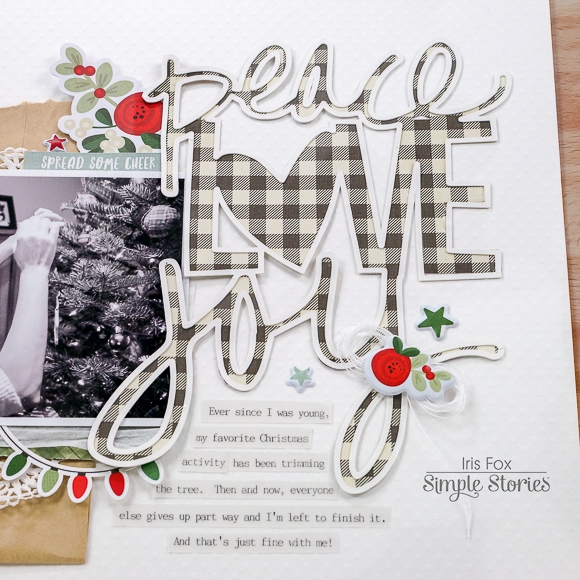
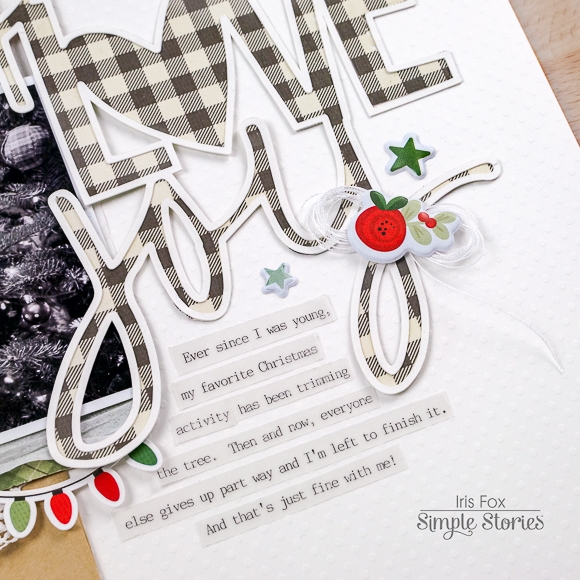
To do that, I started off with a white cardstock background. This one is a Swiss Dot texture from Bazzill.  (You can get this on Amazon or at Joann's) Then I downloaded three separate Simple Stories word cut files from the Silhouette Store.  (Peace: Design ID 67976; Love: Design ID 80540; Joy: Design ID 67980) I welded them together to make my title.  I have been obsessed with buffalo plaid and it’s all over the place in Christmas decore, so I first cut my title from the B-side of the 4x4 Elements paper.  Then I used the offset function in the Silhouette software to create an outline that I cut out of plain white cardstock and I adhered it on top of the buffalo plaid words.  

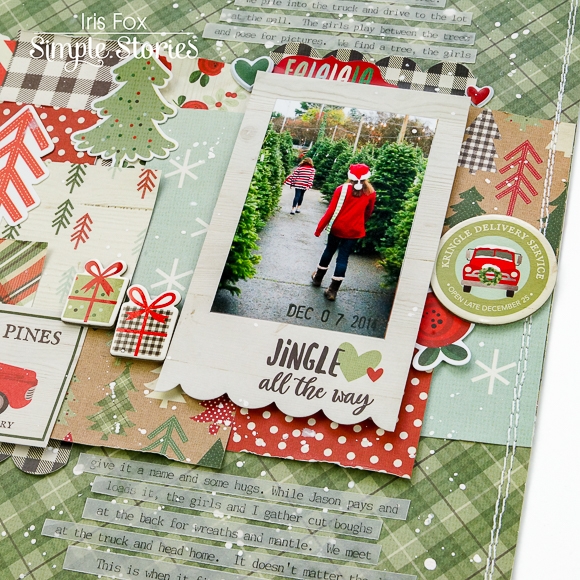
I printed my photo as a 3.5”x5” in black and white because it was dark and reddish-brown toned.  The black and white elevates it, and lets you focus more on the subject than all the color.  Behind the photo, I layered a tiny bit of tissue paper, a sliver of the green plaid paper from the 6x8 paper pad peeking out on two sides, a doily, and a brown paper bag with a torn top edge.  Then I added a cluster of stickers, chipboard, and puffy stickers at the bottom left corner.  I concentrated on icons that felt like the farmhouse style -  the tree which echoes the plaid from the right, the galvanized vase of foliage, a couple word stickers (love the mix of fonts), a puffy star, and the banner of lights to go with the lights you see in the photo.  For interest, I tucked some thread under the layers.

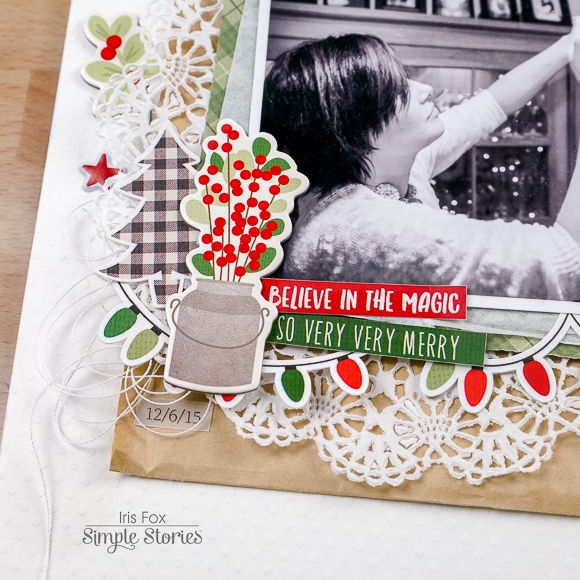
Having the buffalo plaid in two spots, I completed a visual triangle by adding the last bit of the scalloped border sticker from the Combo Sticker sheet.  I could use that on every layout and be happy! I’ve never been one for poinsettias, so I was thrilled to see this collection also has a lovely red flower that looks more like a peony, and I used that motif throughout my design. Another word sticker and puffy star complete a cluster at the bottom.  And the “love” in that sticker repeats the “love” of the title, which ties things in even further.

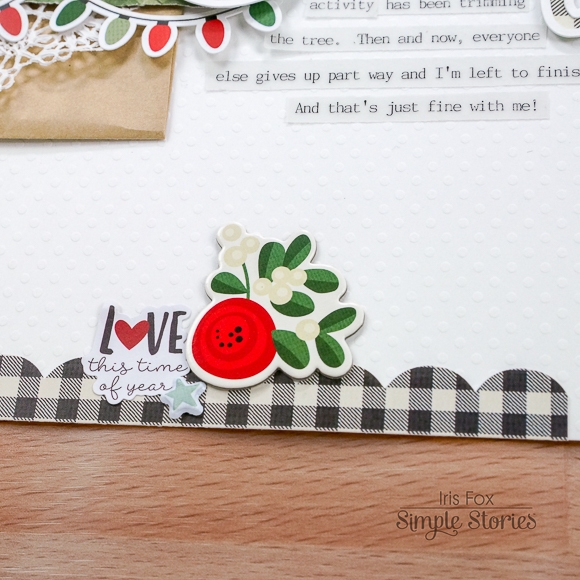
The large cut title is a prominent focal point, so I kept things simple around it by adding just another flower, word sticker, puffy star cluster at the top where it intersects the photo, and another flower on the last letter.  The flower sits atop a loop of thread.  This decorates the area where the journaling is nestled in, and is complimented with a couple more puffy stars. I turned to one of my favorite journaling looks - typed on vellum - to keep this page looking clean, light, and airy.

I welcome you to check out my Youtube channel for the process video, which includes the steps I did to make the cut file title.  There is a wonderful selection of words in the Simple Stories designs at the Silhouette Store that you can play with to match and compliment all the SS collections!

I can’t get enough of the Merry & Bright collection.  You can make a layout with a classic feel, or one that looks completely fresh and modern.  It’s such a versatile collection that will help you scrap tons of Christmas holiday memories!

Supplies

Hello friends, Iris here.  It’s the most wonderful time of the year, the time to do some Christmas scrapping!  

I’m delving into documenting our tree picking traditions with the Merry & Bright collection. I wanted to play with the smaller scale patterns of the 6x8 paper pad and some of those cute frames from the Tags & Frames pack, so I made those the focus of my layout with a layered design.

I started by picking my photos and printing them at 2x3 inches and 2x2 inches to fit my two favorite frames from the pack.  To add a little bit of texture and whimsy, I added a border of tiny pompoms to the smaller frame.  

For my background I picked the green plaid side of the Joy & Happiness paper.  I cut the papers into 2x2 squares and overlapped them randomly along with the framed photos until I reached a point where they looked balanced.  The rectangular die-cut of the truck carrying a tree from the Bits & Pieces pack was a great addition to the layers.  I cut the scalloped buffalo plaid border sticker from the Combo Sticker sheet, tucking a bit under the truck and another bit above the right photo frame. These little bits echo the left frame, providing a visual triangle.  

I added chipboard, flat stickers, and puffy stickers along many of the seams of the layers, with an emphasis on the Christmas trees.

I typed my journaling on vellum because I didn’t want a bunch of white strips taking too much visual weight away from the layers. Before sticking the journaling on, I splattered white mist up and down in line with the larger photo.  Directly at the bottom of the column of splatters, I used one of the die-cuts as my title at the very edge of the page, cutting off the bottom.  The final touch was to stitch a double line of machine stitching along the entire edge of the page.

The Merry & Bright collection has the loveliest mix of traditional and modern.  I love all the plaid, the brush script, and the cute icons in this collection, and I know you will too.

Supplies

Pages