June 2015 Blog Posts

Hi Simple Stories fans! Rebecca Keppel here today to share a couple of projects I made with the latest lines - So Fancy and So Rad. Although they are technically a girl and boy line respectively, they are pretty versatile for lots of themes. But lucky me - I conveniently have a girl AND a boy! Here is a layout I made with So Fancy:
 
 
This layout combines several of my loves of Simple Stories collections. First fabulous patterned paper designs and colors. I highlighted that by die cutting a pie chart so I could feature several different patterns without overwhelming my photos. I also love how the patterned paper looks so good with machine stitching (one of my favorite techniques).
 
 
And how about the chipboard stickers? LOVE them! Perfect amount of dimension and I am loving the foiled elements too.
 
 
I also love the new self adhesive Bradz. The fact that they don't have traditional brad wings that require you to poke a hole through your project makes me very happy indeed!
 
 
I went for a much simpler look for the So Rad layout:
 
 
So Rad has such a cool mix of elements like text paper with paint splatters and fabulous boy colors. I especially love the #Dude chipboard sticker.
 
 
I am also loving the new SN@P 4x6 Binders! I couldn't resist making each kid an album of their own featuring these fabulous collections. How about a little sneak peek of the covers? My daughter's So Fancy album:
 
 
And my son's So Rad album:
 
 
My plan is to fill these with favorite photos from each year. What are you doing with the So Fancy and So Rad collections?

Supplies

Hello everybody. Mindi here with you today sharing some pocket pages I've created using the new So Fancy collection. 
 
 
I just have to say that I am loving everything in this collection, from the colors to the embellishments. As soon as I saw it I just knew that it would be a perfect match for this project.  
 
 
Every year I put together a few pages all about each one of my three kids. 
 
My daughter has a new found love/crush for music. I took this photo of her relaxing one day listening to her favorite tunes. I used one of the chipboard frames as a photo frame and added it to this journaling card. 
 
You might hear me say this many times, but here goes ! I love, love, love the photo stickers !! I used the music headphones sticker, which was just perfect by the way, on the journaling card and then added my journaling about the photo underneath. 
 
 
My daughter has always been a reader but lately she has been in the habit of reading at night before bed. She is reading all sorts of great books, I journaled about her reading habits and included a photo of her in her room. 
 
On the next journaling card I included a list of some of her favorite things according to her. I sat down and had her list off some of her favorite things. 
 
The photo stickers are not just for photos, they can also be used on journaling cards. So of course I added some to this journaling card. I used the gold colored ones here, which might just be my current favorite !! 
 
 
This particular card I used it to kind of sum up what these two pages were about. I added a chipboard sticker and some letter stickers to spell out My Girl on the bottom of the card. I just love the patterns on these journaling cards. You can either leave them just the way they are or add a little something to them for texture and dimension. Either way it's easy and fast to get your pages done using these cards. 
 
 
Let's move on to the second page. I decided to use a Design 7 pocket page page for this page. This page protector has a good mix of 4x6 pockets and a 6x12 pocket for either a big photo, a long story, or a combination. I sat down and asked my daughter some questions the week of her birthday. I used the questions and answers as part of my journaling for this page. 
 
 
I took some fun photos of my daughter during a family photo shoot this past spring. I asked her to smile and that I wanted to see her teeth, which she didn't want to do. I continued to snap some photos while I was trying to get her to smile. 
 
I made a small photo collage of some of those photos. I left a white space so that I could add in some embellishments, which happens to be a photo sticker and a few of the other stickers from the collection.
 
The "smile" sticker was perfect for a title on this journaling card. 
 
 
Here is a closer look at the bottom of the 6x12 page. I used another one of the chipboard pieces and added in some embellishments. 
 
 
Another one of my favorite products is the Washi Tape Strips. I used some of them on the sides of the 6x12 page. I layered them underneath some of my other bigger embellishments for a fun look. 
 
 
That's a wrap for me using the So Fancy Collection. I am so glad that I was able to document a few fun facts about my daughter at this stage in her life. 

Hello, again!   This is Amber, founder and creative director of Simple Stories.  I'm here for another installment of my monthly Document IT blog feature; however, this month I'm taking a break from my regular series to talk about documenting life in a different way based on a recent experience that deeply affected our family, and particularly our teenage daughter.

At Simple Stories, we produce product that help you capture your story.  Sometimes our stories are full of love, happiness and goodness – but sometimes there’s loss, heartache and sadness.   It’s important we document ALL of our stories from the happiness to the heartache, as evidenced earlier this month.  

On Monday, June 1 our 13 year old daughter received a message that 4 of her friends were missing.  They were part of a group of 7 that were boating in a local lake when a sudden storm hit the area and they were thrown into the cold waters when their boat capsized.  Although everyone inside the boat was wearing a life jacket, the water temperature was 53 degrees.

I can’t put into words how devastating this news was, especially for our daughter.  These were our friends and neighbors; girls our daughter went to school with, hung out with and were just at our house for an end-of-year school party.   We stayed up late with her that night to wait for news.  Tuesday morning the final report was heartbreaking - 4 of the 7 boaters did not survive, including two of her friends, as well as the father and sister of one of the girls.  One of the hardest things was telling our daughter the news that her friends were gone.

Our hearts were broken and we couldn’t imagine what their families were going through.  As a mother, my heart ached for these families that had lost their girls.  I thought a lot about what I could do to help. I knew others felt the same way, especially the girls' group of friends that were struggling with the news as well.

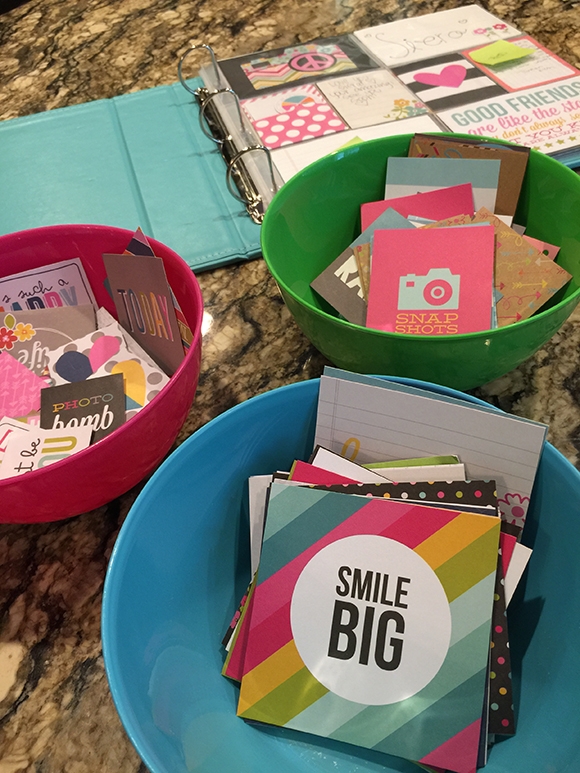
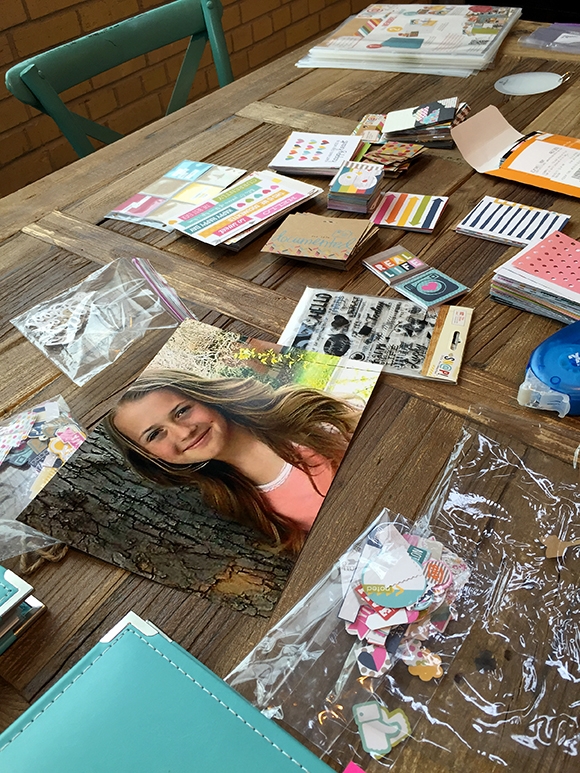
As a memory keeper,  I know two of the most precious gifts can be memories and photos.  I felt it was important for us to share this with the families that had lost so much. We wanted to do something special to remember these special girls, so we gathered our daughter's friends together to create a keepsake album for each family.   I had the kids send me photos of the girls that they'd like to share in the album.  

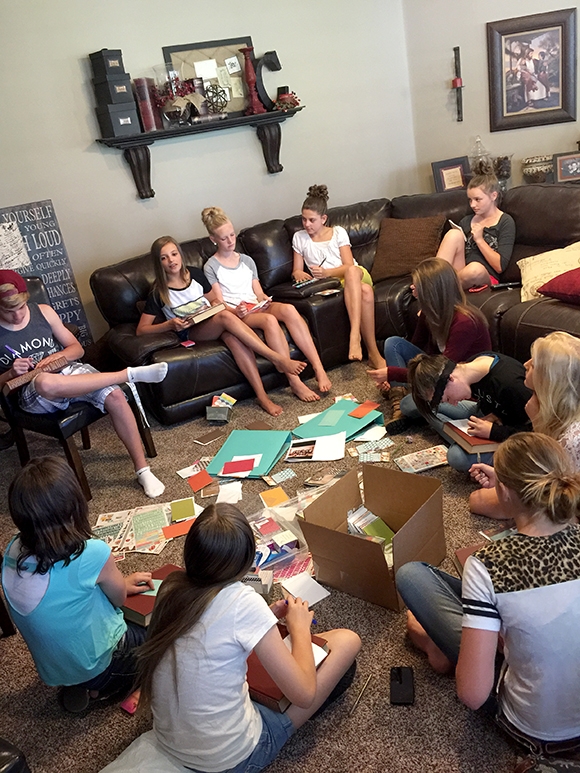
This gave our daughter and her friends a chance to talk about their feelings and unite together to support and share their love for the girls that had died - an extremely therapeutic process for these teenagers.

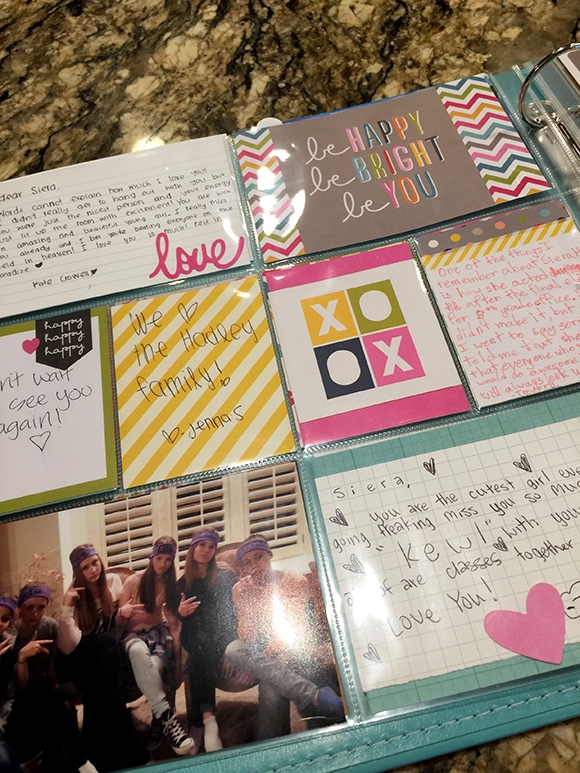
This grew from having a group of teenagers in our family room sharing their memories and writing special messages for the girls to having the albums available at the candlelight vigil for the community to also write messages to put in the albums.

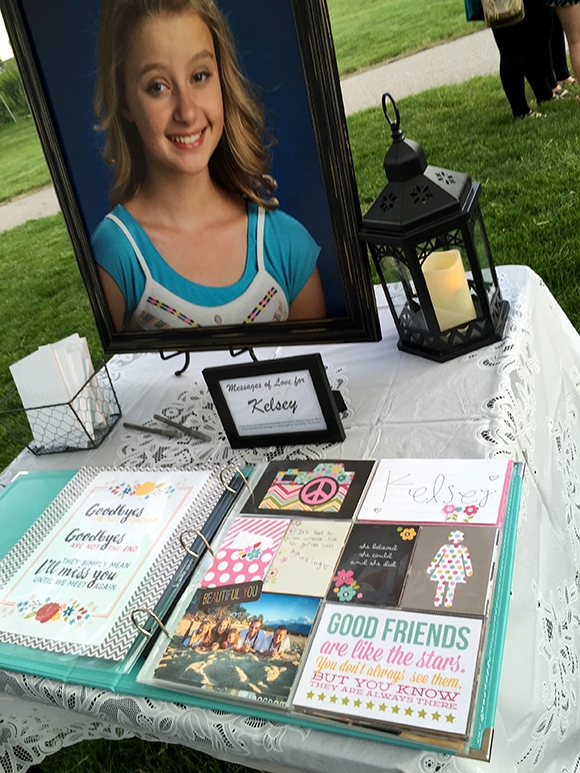
It was a very humbling experience for me to put together the final albums, combining photographs of the girls along with messages from their friends and members of the community.  I'm so thankful for the opportunity to give something to the girls' families to help remember their daugthers and to know just how much they are loved and will be missed.  

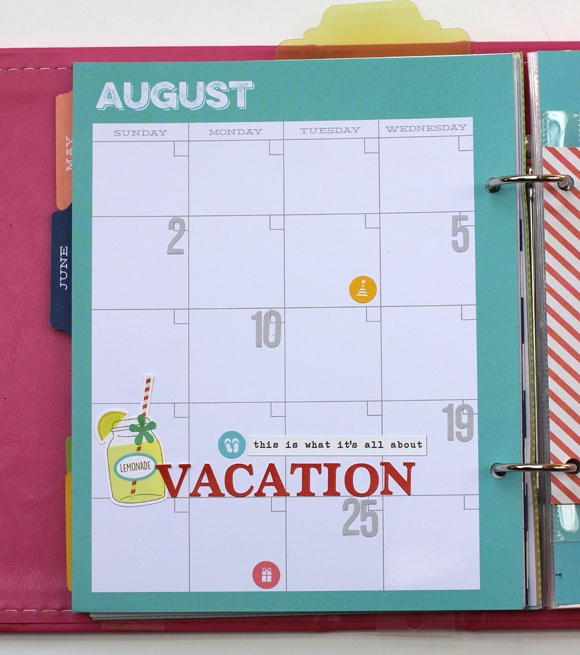
We created some special sentiments specifically for these albums that I wanted to share with you this month for the free printables.  As I mentioned earlier, It’s important we document ALL of our stories from the happiness to the heartache.  It is my hope that these printables may help you document any heartache in your life that you may have experienced.

Click here to download June's Free Life Documented Printables.

Thank you for letting me take my monthly blog post in a different direction today and sharing this experience.


Hey everyone, Amy here to share 2 layouts I created with the some of the new lines Simple Stories has just released.  I'm sure you've already checked them out, but if you haven't, head on over to the website to see them.

First, I grabbed the Summer Vibes line to work with. Oh my word, I adore this line.  The papers, the embellishments, they are all fabulous!  I couldn't wait to use it on this layout of my daughter and her brother. Here's the layout I created.

Here are some closeups.  The photo sticker was the perfect addition to the picture.

If you've followed my work, you know I usually use the frames for my journaling, but this time I cut out the cute geo tag from one of the sn@p! cards to put inside.

I mean, it this not the cutest line ever?  

 
The So Rad line was just perfect for this layout of my boy submerged in the ball pit.  The colors matched perfectly. I picked the So Much Fun Circle cut file from the Silhouette online shop to use as the base of my layout.
 
 
Here are some closeups.  The diecuts in this line are so much fun.
 
 
The street sign was cut from a sn@p! card, so I could use it as an embellishment.  Are you seeing a trend here?
 
 
Make sure you check out all the new lines, they are all amazing!  Thanks for stopping by the blog today.

Supplies

Hi there Simple Stories fans!  Suzanna here today to share with you a summer memory recap in a photo tray using the Summer Vibes collection and a layout of my boy which features So Rad!  Both collections are sublime, definitely big hits!
 
 
First up, the photo tray. What I love about the photo tray is it's like having 6 little canvases in one! It's like doing Project Life (or pocket scrapping) in a frame! I never adhere the "inserts" into the frame thus being able to remove them and slide them into pocket pages and feature another, newer, fresher look on the wall.
 
 
Captured within these 6 mini canvases are memories of our Lake Michigan beach house trip from last year. This is the second time we have returned to this house and it's a wonderful little tradition. I wanted to capture the highlights of that week at the beach with bits and pieces from the collection to support the wonderful memories.
 
 
Next, I have a layout of my son that is just stunning in amongst some wonderful boy goodies!!  It's tough finding boy papers and supporting embellishments that aren't juvenile. When you have a 12 year old who is mature for his age, the kiddie trucks and what not just don't cut it anymore. So Rad is AWESOME for all things masculine and tween or teen!
 
 
I used some cardstock embossed and debossed with various star folders to carry the star theme a bit further. The supplement "Simple Basics" papers would have been great but I really wanted the aged effect of sanding thus opted for cardstock with a colored core instead.
 
 
By converting my picture to black and white, I am able to really let the emotion of the picture stand out and let the bright colors of the papers reflect that mood! There were so many great patterned papers and patterns to choose from!
 
 
Thanks for stopping in today!


Supplies

Hello Simple Stories fans! Nancy here with a colorful and happy layout using the Summer Vibes collection. My favorite season to scrapbook is summer and this collection does not disappoint. I love the playful icons and pretty patterns.

I started with a list in mind about all the things we love to do (big and small) during the summer.

A few swipes of acrylic paint in an ombre shade created a shelf to ground the rows and rows of die cuts, chipboard and enamel dots from the Summer Vibes collection.

The title is completed neutral and almost fades into the background. I added a row of machine stitching and a date stamp to call just a little bit of attention to it.

________

Have you tried using leftover bits and pieces from your Simple Stories collections to decorate your planner? That’s just what I did with what was left on my desk after completing this layout.

I got a head start with my August calendar this month. I kept the decoration simple on the calendar with just a few stickers and grey number stickers in random days. 

I added most of my décor in the center of the calendar with a large flag die cut from the Summer Vibes Journal Pages pack.

I trimmed down another of the Journal Pages with a favorite poem and added to the banner with some machine stitching to highlight the words.

The pockets are filled with a summer photo and pretty patterns.

The opposite side includes a picture from last summer and a fun confetti pocket and chipboard camera.

I’d rather add the décor in pocket pages than right on to the calendar – I need that space for writing and planning!

Supplies

Hi, SS Fans...it's Candi here today to show you how I am getting a jump start on my July Planning and showing you how I "Get It Done" with the Basic Planner Inserts!!!
 
July 4th means.......Red Binder :) time to switch it out!  That is the best part about a ring bound planner...it just takes seconds to swap it out!!! 


The July Monthly Divider has some pretty colors, but I wanted to use the Stars & Stripes Simple Set...so it's time to change things up a bit :)  I picked out my favorite double-sided cardstock paper from the kit and trimmed it down to the same size as the divider, adhered it in place and then punched two holes using a single hole punch...now we have a 4th of July theme started!!!


Next, I took one of the double-sided cardstock elements sheet and trimmed out one of the 4x6 "cards" and adhered a longer strip of cardstock along the side so I could punch a few holes in that strip, instead of the 4x6 card.  I wanted to be able to read all the words and not have a few punched holes making it hard to read.


I have to say that I lovvvve decorating my month on two pages!!!  The Stars & Stripes Simple Set is all set with two 6x12 sticker sheets to make decorating easy and fun :)


As always, behind the monthly divider, there is a little monthly recap.  I added a few stickers from the kit...


It has been awhile since I have added an Insta-Pocket Pocket Page to my month, so I thought it was time to bring it back again!  I trimmed out a few cards from the double-sided cardstock elements sheet (4x4 size) and then trimmed those down to 2x2 squares to fit inside my pocket page.  Now I can add some favorite insta size photos from July :)


Between my Basic Dividers, I have some of the Basic Planner Inserts.  Lately I have been using the "Get It Done" inserts for my weekend tasks since Saturdays and Sundays are super busy for me!
 
 
Pictured here are my weekend tasks from a few weeks ago, but I think I might start using these sheets for a whole week (just weekdays).  For me, I don't have that many tasks to do for one weekday, but I bet I could fill that sheet up with my tasks from M-Fri!!!  Plus I can take this sheet out of my planner and take it with me and throw it in my purse!
 
 
I took my sticky notes and adhered them to the divider...easy to grab and always an easy reach!!!
 
 
Hope you look at your scrapbook paper and embellishments a different way now :) You can totally cut that paper up and use it in your planners to create so many things: dividers, pockets, page markers, etc...  I sure am having a blast using them inside my planner!  Makes planning fun...especially those not so fun to-do's...hahaha!
 
I hope you all have a great week!!!
 
Until next time...happy planning :)
Candi
xo

Supplies

Hi Simple Stories fans!  It's Ashley Horton and I'm stopping in today, to share two new layouts with you for June!  How is it June already??!!  Time flies when you're having fun!  And I must admit, that I am having tons of fun with the new collections from Simple Stories.  On today's layouts, I worked with the Summer Vibes collection and the So Fancy collection.  
 

I'll start off with my layout, using Summer Vibes, since summer is now upon us!  There is a little touch of a vintage vibe to this collection and I really love it!  I started my layout by choosing one of my favorite patterns to work with...wood grain!  The wood grain paper from the Summer Vibes Simple Basics Kit made a perfect background for my layout, and worked great with the large title I had in mind.


I chose the "You Can Never Have Too Much Happy" phrase from the Simple Stories images in the Silhouette Store.  Before cutting the phrase, I created an offset image in Silhouette Studio and used a Black sketch pen to draw out the phrase on my paper.  Then I deleted the offset lines and went back and cut the phrase by placing my blade back in the machine.  Once the cutting finished, I backed each of the words with a different patterned paper from the Summer Vibes 6x6 Patterned Paper Pad.


I enlarged the title to fill up my background, but created a space in between the last two lines of the phrase.  This gave me the perfect spot for adding my photos and a mix of embellishments from the Summer Vibes collection.  I created dimension by layering the Chipboard Frames, Chipboard Stickers, Bradz, Bits & Pieces and stickers.


If you're looking for fun ways to incorporate cut files and large titles in your layouts, then make sure you check out the Simple Stories portfolio in the Silhouette Store.  There are tons of great cut files that coordinate with each of the Simple Stories collections!
 

________________________________________________________
 

Now, it's time to go girly with the new So Fancy collection!  I have two daughters and the So Fancy papers and embellishments are perfect for your girly layouts.  I snapped a photo of our oldest daughter on a recent family vacation, and I wanted to pair it with this collection.


The idea for the design of this layout, started with the cards from the So Fancy SN@P pack.  I chose three that I wanted to use to create a grid design on my layout, along with my photo.  Before I placed the cards and photo on the background paper, I added a messy stitched circle with my sewing machine.  Then I started layering the cards and my photo.


I also did something on this layout that's a little different for me.  I didn't create a separate title for the layout.  A lot of the cards in the SN@P packs have great phrases on them, so I decided to use "You Make My World Sparkle" from the top card, as the title for my layout.  And the bottom two cards worked great as supporting sentiments for the layout.


Since I had the stitched circle in the background, I thought it would be fun to contrast the grid shape, by adding my embellishments in a circle around the grid.  I went through the Bits & Pieces pack, stickers, enamel dots and Bradz to pull out embellishments that would work well around the circle.  And I even pulled out a couple of wood veneer pieces from the I AM collection, to add a different texture to the layout!
 

So next time you're looking for a different design element on your layout, take out your SN@P! pack and build your page off of some of your favorite cards from the pack!


Supplies

Pages