August 2014 Blog Posts

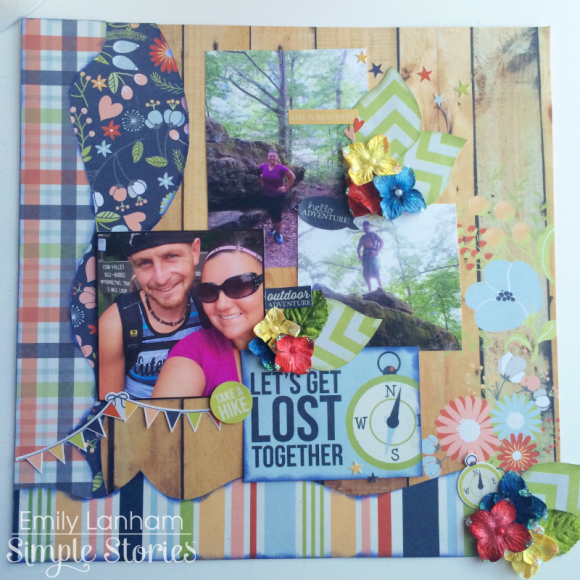
Hello again, Simple Stories fans! Teri here today, and I'm here with another Life Documented project. I'm excited to share with you a couple more  pages made with the Good Day Sunshine collection. 

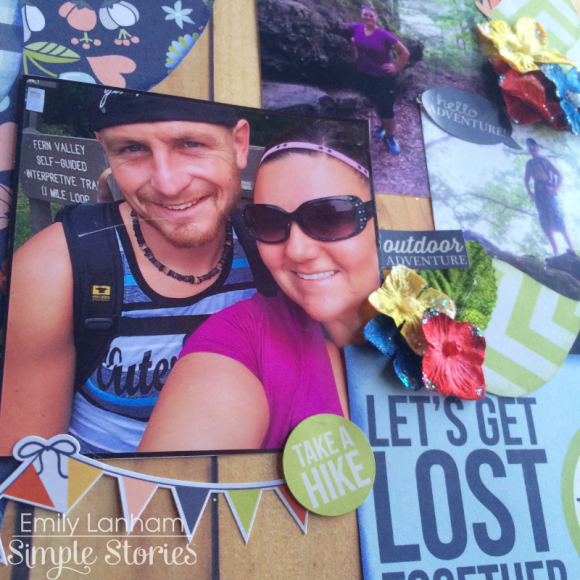
I just love the bright, happy colors of this collection. I think it just screams Summer so I thought it would be perfect to use to document a late-Summer trip to the fair. I had signed up to take part in a 5K race at the fair and then got enjoy the fair's sights and sounds afterwards. It was such a fun day and totally worth remembering!

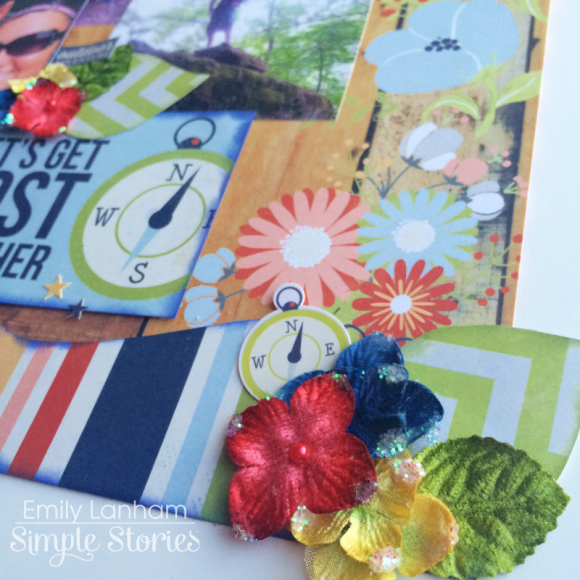
One of my favorite elements of these pages are the pockets along the top of this page. I took some of the SN@P! Cuts and then added layers of twine and paper to them. One of the things I really love about Simple Stories' products is you can use them as they come or you customize them by adding embellishments, paper and stickers to them and really make them your own. That's so cool! 

If you look really close here, you'll see one of the Good Day Sunshine SN@P! pockets. I typed some thoughts about the day on a journaling card and just slid them into the pocket. To make the pocket a little more customized, I added a die-cut and a little twine to it. 

I sure had a fun time putting together the second page of my spread. Believe it or not, I made my own decorative tape with some Good Day Sunshine patterned paper! 

It was so easy! I cut strips of patterned paper and then applied two-way tape to it. When it came time to use it, I just tore off a little bit of paper... just like real tape.

One other fun thing about the right page is that top right pocket. I had a bunch of different die-cuts, stickers and brads from Good Day Sunshine collection that were left-over from other projects I worked on and I thought, "What if I mix them up?" Sure enough. That's what I did. I went to town, mixing them randomly together to make the card for the pocket. I think it turned out pretty cool!

I also used one of Simple Stories' Photo Flips on my page so I that I could add another picture to the mix.

By the way, are you guys familiar with the Photo Flips? http://simplestories.com/products/photo-flips They are amazing! Here's why: They are like little pockets. You fill them up with photos, SN@P! Cards or anything your heart desires. Then you adhere the Photo Flips (which have adhesive on them) to your page. 

And one more thing I should mention. After I completed my pages, I still had my race bib to scrap. So what did I do? Easy! I grabbed a 6x8 Pocket Page and slapped it in it and added it right to the spread. If you run or know someone who runs and want to scrapbook those bibs, I've found those pocket pages fit many of the race bibs out there. 

So before I go, let's talk about albums. I'm using a 12x12 SN@P! faux leather album in red to document all of my 2014 adventures in. I often scrapbook out of order so it's really nice that the album's ring binding allows me to do that. I used the SN@P! Pocket Pages Design 3 for these pages. I also used one of the 6x8 Pocket Pages.  It's cool that Simple Stories offers so many different styles of pages. I dig being able to mix them together. I think it helps keeps my pages interesting!

See you again,

Teri

Supplies

Hi everyone, Marie here to share a 6x8 Sn@p! album using the new Legacy collection.  I've been researching our family's genealogy for the past couple of years, and I'm finally getting all of those stories and photos organized into an album. 

LegacyCover

Legacy1

I have to admit the Legacy collection made putting this album together a breeze.  There were blank genealogy cards and charts included, so all I had to do was add our family's information.  I was also a big fan of the colors in this collection. The muted red, aqua, and yellow colors really make a pretty backdrop for black and white photos.

Legacy2

DSC_5247 copy

I added in memorabilia in Sn@p! Pockets througout the album. I even have a copy of my grandfather's high school report card in there.  I also used vellum to print out several photos and letters in this album.  I think it adds a nice vintage touch.


Legacy4

Legacy5

The 2x2 Insta-Pocket Pages are still my favorite way to add in a lot of pictures in a small space.  I love that Simple Stories has a variety of Pocket Pages to choose from. 

For this album I used a 6x8 SNAP! Faux Leather Album in brown.  It was the perfect size and color for this project!     

Supplies

Hi everyone!  It's Emily with you today.  I've recently discovered hiking.... ok, I'm a little late to the party, but I have been out of shape for years and never thought that I would be able to "take a hike" per say. A few weeks ago my husband and I decided to go hike some trails that were located by a lake, really scenic and very beautiful! So we took a few photos. Of course, I HAD to make a layout! 

The "Under the Stars" collection isn't just for camping. This collection was perfect for my hiking photos! I love that the collection is small, so I have no problem using it all up with these photos. I'm not a campy type person, but I do love being outdoors. This collection is a must have if you are outdoorsy! 

I used some templates from Kiwi Lane Designs to add a little extra to my layout. I wanted to layer the papers in this collection because they are all such beautiful papers and need to be seen! 

Thanks for joining me today! 

Supplies

Hey everyone!  Andrea here with you today, and I’m super excited to share a cute Halloween tree I made using the new Frankie and Friends collection.  I LOVE THIS COLLECTION!  Halloween is my most favorite holiday, and I’ve been waiting for Simple Stories to make a collection specific to it for a long time - and I’m so glad they did!

Here it is:

I found a black urn and branches at my local craft store and that became the “canvas” to work with.  Think of decorating your Christmas tree; that’s exactly how I tackled this, except that I wanted to include photos of my family in their Halloween costumes from years past.

I decorated pieces of chipboard with papers from the collection and photos, and jazzed them up with the embellishments.

I strung them with ribbon and tied them to the branches.

This will sit on a table in the corner of my living room, and I’ll be able to add photos to it each year.  I had a blast doing this, and I hope it inspires you to use your scrapbook supplies to capture your memories in a fun, different way.

Thanks for joining me!

Supplies

Hello, Simple Stories friends!  Shellye here today with a sweet treat holder using the brand new "Frankie & Friends" Collection.  I found this idea for a cat-shaped treat holder using a paper plate on Pinterest and adapted it by using patterned paper instead!


The great thing is that you can make these in any size up to (almost) 12" in diameter.  If you need to make several for a class project, just use a smaller circle.  I used a dinner plate for my cat, which measures about 10" round.  After tracing and cutting out, I placed the plate back onto the circle so that it covered just the top edge.  I cut around the plate to create the crescent shape and the area that will be open for treats.  Next, make a matching back panel by tracing around the design and cutting out. 


For the ears, I cut triangle shapes and curved them a bit to follow the contour of the cat's head.  I machine-stitched them in place, but faux stitched would also work nicely. This is all of the machine-stitching that I had planned for the front of the cat's face, so next I machine stitched the back panel to the front by using a zig-zag stitch around the perimeter...just be sure to leave the opening at the top!


For the hanger, I used a heavy-gauged wire and strung it through two small holes that were made on each side of the ear.  I cut one of the 4X12 Page Elements down to roughly 3X12 and attached it to the top of the wire.  To do so, I left a margin to the left (by the "happy") and wrapped it around the wire and then glued in place.  The chipboard spider was added to the center of the bow with fabric glue.


There are so many ways that you can choose to decorate the cat's face!  I decided to go ahead and add the mouth by drawing it with a black marker, but it looks very adorable without it.  I used two different round punches to create the layered eyes and then two large black enamel dots for the centers.  The whiskers were made from small strips of black cardsock that I curled at the ends.  Pink chalk was used for blushing the cheeks.
 
Again, use a 6" circle template to make-up smaller versions...perfect to give to your favorite 'lil trick-or-treaters!
 
Thanks for joining me today at Simple Stories!

Supplies

Hi everyone! Lisa here with you today to share two layouts I made with the fabulous new Cozy Christmas collection. I don't usually create holiday layouts in August when the sun is shining and the temps are soaring (I'm more of an "in season" scrapper), but this collection was a breeze to work with and these pages came together so easily (even without snow on the ground or holiday music playing in the background to get me in the spirit of things).

First up is a page about my daughter's cat. He likes to take up residence under our tree. When he was a kitten, he actually liked to climb the tree, nestle among the branches, and just hang out.

The base of this page uses the 2x12 Border & 4x12 Title Strip Elements 12x12 Paper. I love how it looks like a number of different papers have been pieced together but without all of the choosing and all of the work. After all, that's what Simple Stories is about, right? Making it easy to scrap our memories.

Let's take a closer look at this page...

I added a number of embellishments to the bottom strip of the paper, not only to extend the one element already printed there (the word "believe"), but to give the page added dimension. One way to do this is to layer the die cut Bits & Pieces with Expressions and Fundamental Cardstock Stickers. Enamel dots give the Bits & Pieces even more depth.

Embellishments are also a great way to fill an empty space on a photo, like I did here in the bottom left corner of my photo. Again, I used a mix of Bits & Pieces, along with a snowflake sticker (cut in half since I didn't need the whole thing).

Chipboard pieces can also add dimension and another element to your pages. I decorated the tree with enamel dots and a mix of stickers.

This last shot shows how I decorated one of the Sn@p Pockets. There are times when I use the pockets to house a journaling tag or card, but other times I like to decorate them and use them as another element on my pages.

Now let's take a look at a page about my daughter's love of all things crafty. I wonder where she got that from? :)

Once again, I used a number of Bits & Pieces. In this case I layered a snowflake die cut over the mug, using foam adhesive to give the snowflake dimension.

Here's a look at the top right corner of the page. Enamel dots added to the "ho ho ho" die cut give it a bit of whimsy. The candy cane die cut piece gets dressed up a bit with a ribbon bow.

This last image shows the adorable snowman die cut peeking out from behind the photo, almost as if he's waving hello. Layering this piece over a tag helps to ground the die cut.

I hope you enjoyed this look at the Cozy Christmas collection and the different ways you can use the papers and embellishments. I hope you have a fun and crafty day!

Supplies

Hello there! Kim here sharing two cards that I recently created using the brand new Sweater Weather and Legacy Collections. Both lines share some of the same warm fall colors, but each line sure has its own personality.

My first card is just full of lovely layers and vintage touches from the Legacy collection. I think this card will go to a friend who just bought a new house, what a wonderful chance to fill that home with memories and love.

The Sweater Weather collection is the spunkier side of fall. Ha, ha! I love all the critters and fun icons included in this line. I let Mr. Fox take center stage on my card, what a cutie! This card had a modified matchbook fold: the bottom edge is folded up about ¾” and secured with a brad. Might be a fun way to add a little interest to your next card!

With so many amazing products just arriving from Simple Stories, I am feeling the urge to brew up some coffee and escape to my craft room! Won’t you join me?

Supplies

Hi Simple Stories fans Rebecca here! I LOVE Halloween. My kids LOVE Halloween. They are both still on the young side, so cutesy is the mainstay for their costumes. And that's ok with me! I featured two pictures of them in their costumes and went with a SIMPLE color block design.

When I am creating a color block layout, I pretend like I am dealing with a jigsaw puzzle and start with one piece that I know from the beginning where it is going to be. For this layout it was this un-matted photo.

I am not really big into measuring and rulers so I just do quick checks on the basics. The photo was 5" tall so I cut a piece of patterned paper to that height. Then I eye ball how much room I want inbetween the two pieces and how wide I want it to be (remembering to have a border around the whole page).

That block ended up housing a smaller matted photo. From there it is pretty easy to have two long blocks one for the top and one for the bottom.

Finally I used some Simple Stories Bits and Pieces, Brads, Cardstock Stickers and Chipboard stickers.

So if you are a Halloween fanatic like my family, you will definitely want to get every bit of Simple Stories Frankie and Friends and start having fun!

Supplies

Pages