Iris Fox's Blog Posts

Hello everyone!  Iris here with a layout about one of those common summer activities when you have little kids - swim lessons.  I had a series of photos of my daughter braving her very first dive into the deep end that I've been waiting for the perfect papers. I've found those in the Hello Summer collection.  

To start things off, I printed my photos as a collage of three columns and hand-outlined them for a whimsical, comic strip feel. I topped each column with word strips from the Combo Stickers. The wave pattern of Oh Happy Day makes a great background for pool pictures.

Large photo collages stand alone quite nicely without many layers, but I wanted to use a variety of the bright, cheery papers.  Inspired by the speech bubbles in the collection, I cut some large ones with encouraging words and hearts from the Silhouette store (Karla Dudley) and backed them with several of the papers. (Life is GoodCatching Rays, and 3x4 Journaling Card Elements)  I loved many of the sayings in this collection, so I added some from the word strips in the 4x6 Stickers pack onto the cut-outs.  Choosing the black and white ones to go on top of all those colorful papers kept it from looking too busy. 

I'm a big fan of the trend to pair "hello" with everything. It serves as an invitation for the good stuff that follows it. Like summer, right?! I used the large "hello" from the 6x12 chipboard set for my title, adding small tile alphas from my stash for "diving".  The left-hand side of this design is packed with die-cuts and colorful papers; the oversized black and white word catches the eye to bring it across the page.

This layout is about the fun, but the story of this summer milestone for my daughter was important to me.  I printed my journaling in bold black on white strips, darker and larger to distinguish them from the word strips on the left.  The journaling bridges the gap between the embellishments and the title. 

I layered smaller fussy-cut speech bubbles and circle stickers along the column of speech bubbles. Ink splatters (Heidi Swapp Color Shine in Ocean) and a sprinkling of black and blue enamel dots contrast from the other colors and serve to bring in the blue from the photo and black from the title up to the rest of the layout.  All the circular embellishments are reminiscent of spraying water droplets. 

Well, school is out, summer is officially here, and Simple Stories has a fabulous collection full of juicy color, fun icons, and great words for all our summer scrapping! 

Supplies

Hello friends, Iris here with the super, cutest baby layout I've ever made, thanks to the Oh, Baby! Collection.  All the papers are so adorable, it was difficult at first to pick which one to use for my background.  But I finally decided to go with one of the woodgrain patterns (Cuddly).  Those swirly frames are just so cute, and echo the theme of framing my photo.  

Speaking of the framing, when I picked a photo of my baby sleeping (she's 12 now by the way!), I was inspired to use the moon and star clear stickers directly on the photo, like a mobile hanging above her.  That lead to the idea of a circular cut-out over an enlarged photo, as if we are peeking into the crib through the cute mobile stars and critters swirling around her.

Framing the cut-out is a wreath I grabbed from the Simple Stories selection at the Silhouette online store.  (Design ID #214849) Originally released for an autumn line, I cut it out of the aqua dotty paper (Sweet Dreams), and it really is a sweet addition to my page.  One of my favorite techniques when I have circles and wreaths is to stitch multiple times around them to add texture. I did most of the stitching before adding the wreath, then took a pass over the it.

My daughter's lovey since she was a baby is an elephant and she still collects them, so naturally I gravitated to the adorable mama and baby elephant from the Bits & Pieces pack.  I tucked them under the cut-out.  Then I surrounded the photo with more die-cuts, chipboard, and stickers, and I used more stars, both die-cut and clear, scattered like I would normally use enamel dots. 

To fill in the blank spaces on the photo next to the top and bottom clusters, I picked a couple of sentiments and hearts from the Clear Stickers.  They, along with the little word strips from the regular 4x6 Stickers , serve in lieu of journaling.  Sometimes just those little sentiments are enough. And the chipboard banner serves as my title. 

The Oh, Baby! Collection is just so delightful!  My older daughter is now requesting some pages about her as a baby with this collection! I didn't get much scrapbooking done during those early baby years, so this collection will be perfect to document all those baby moments. Hope everyone enjoys scrapping their baby pictures with this collection too.

Supplies

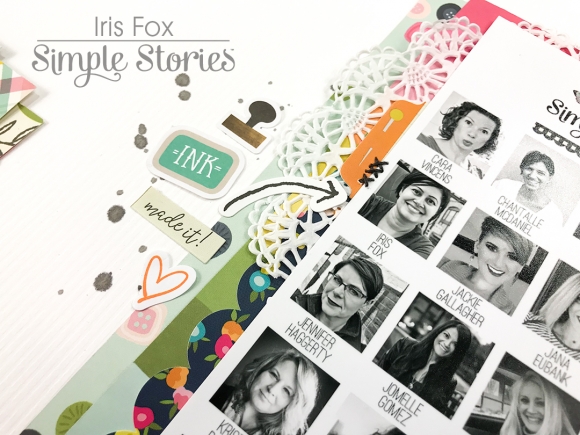
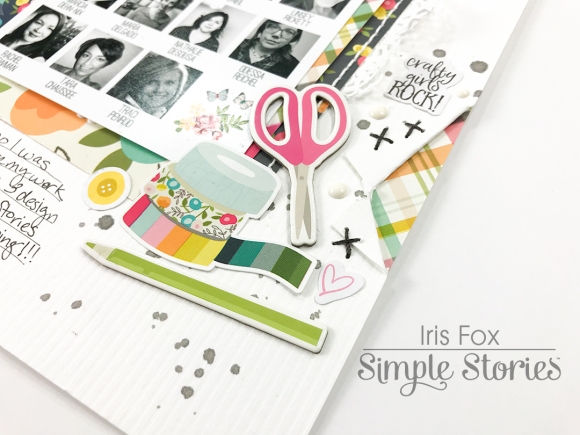
Hello hello, Iris Fox here with a layout that I've been wanting to create since joining the 2018 Creative Team. When I saw the Crafty Girl collection, I knew it was perfect to scrap the team announcement photo with all these amazing crafty girls that I would be joining.  Of course, I wanted to put ALL THE THINGS from this collection on a page because it's all so colorful and fun!

I started with white cardstock for my background, and cut strips of papers from the 6x8 Pad for layers.  (I probably say this every time, but I'm SO IN LOVE with the scale of the patterns in those 6x8 pads!) I also used one of The Cut Shoppe's cut files to make a heart that's hiding behind the girl chipboard.  I looks a bit like a fan, and I like that it adds another layer on interest.

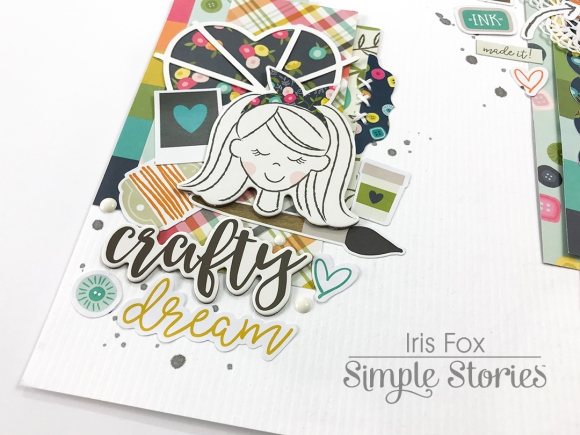
I had so much fun picking out cute icons that feel like "me" from the Chipboard and Sticker sheets. The size of the 4x6 Stickers are great to fill the nooks and crannies of the clusters, and to scatter around the page.

One of my favorite things to do is add what I call a peek-a-boo corner, which is when you fold over the paper and have another behind it.  So I did that in the top corner, and also tore and folded a piece on the right side.  That colorful plaid peeking out is my favorite paper in the collection. 

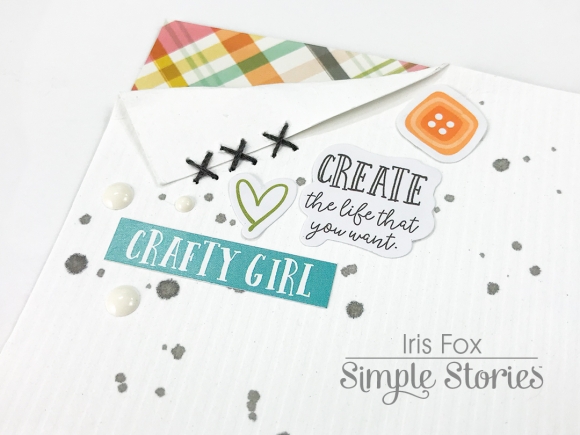
I can barely make a layout these days without adding some stitching.  In addition to some white stitches, I was inspired by the x's on the orange tab to stitch grey x's on the folds. (I also stitched over the printed x's on the that tab)  The finishing touches to round out my favorite types of embellishments are a doily, some white enamel dots, and soft grey ink splatters.

There is so much more I want to do with the Crafty Girl collection.  It's just perfect for documenting our passion for scrapbooking!

Supplies

Pages