August 2017 Blog Posts

Hi everyone! It’s Tara from Secretbees StudioHave I mentioned that I love decorating for Halloween?! Well I do and I have another fabulous project showcasing the beautiful and spooky 'Spellbound' Simple Set.


I just love it when a paper collection isn't all cute-sy and sweet and this one is perfect for Halloween with dark, rich colors and creepy images!  Plus, the stickers included are freaky too and I knew they would look awesome in a Halloween shadowbox!


This shadowbox is about 6 inches square and has great little cubbies just waiting to be filled up and decorated. The large cubby is the main attraction and I wanted to give it lots of depth and dimension. I used a piece of the 'Something Wicked' paper to create the background and then used the tree branch sticker to create depth and give the spooky spider something to hang from. I propped the frame  up and layered more sinister 'Spellbound' stickers with it. If you look closely, you can see that I added a tiny purple gem to the eyeball and some jewel drops to the potion in the bottle!


Each of the smaller squares features layered pieces of the other patterned papers and are all topped with small square stickers from the collection! I popped up different parts in each square for more dimension and added a couple of small gems to the spider and web.


I didn't want to pass up using the great 'Happy Halloween' sticker that is included on the sticker sheet! I applied the bottom half to a folded piece of patterned paper, leaving the top portion of the words free. I adhered the paper to the top of the shadowbox and added in one small word sticker as well! Such a perfect addition to my scary Halloween decor! Thanks for visiting the blog!
 

Supplies

Hi there!  Nathalie with you today  bringing you a few layouts created with the new and gorgeous "BEAUTIFUL" collection.  I am in love with this collection!  It is so easy to work with, and all the designs are perfect to document all those beautiful people in your lives.  I think the title says it all the collection is:  "Beautiful, indeed!"

Let me share with you a few layouts that I hope that inspire you, too:

BEYOUTIFUL


It seems like my kids are growing faster than I would like them to  ;( -sad emoji-,  and with each passing day, I see how rapidly they are letting go of my hand.  So I set out to create a page about my daughter, and her ever changing youth.

I was inspired by the small doodled flowers in the collection to create a  floral background for this layout.  Since I love cut files, I pulled the Behold Beauty file from Just Nick Studio to create the large cut out used behind the picture, as the flowers reminded me of the ones in this collection.  A little bit of mixed media using the blush color of the paper bring out the details of the flowers in this page.

To create the background of this page, i cut two strips of paper from the "BeAmazing" paper -i made sure to save the floral edge for a future project.  The b-sides of the papers in this collection are just as beautiful, so I glued the two strips so that both sides of the paper will show onto white cardstock.   Then trimmed the entire mat, and glued it to the b side of "Simply Wonderful Paper".  A bit of mixed media was then added to the page.

While the mixed media dried, I backed the cut file with pink and white vellum.   Using a punch, I created the butterflies for this layout.  I  used a combination of papers from the 6x8 paper pad to obtain the cut outs, and stitched them together.  

Then it came time to embellish the layout.   So I searched for all the doodle flowers available in the collection's coordinating embellishments, and used them to create 3 clusters on the page.   The clear gold stickers worked seamlessly in the background as they mixed nicely with the watercolor background.  

All the coordinating stickers, and sentiments in the sticker sheets are perfect to layer, and cluster around the pictures.   I had to restrain myself from adding more stickers to the clusters, instead, I found the black die cut "BeYouTiful" that serves as the title for this page.  Here is a look at the final page:

Aren't the colors and embellishments in this collection just Beautiful!  They are soft, and bold at the same time, but perfect for my teen daughter.

____________________________

HELLO AMAZING

This second project is all about my little cousin (she was named after me!), and she is also growing up so fast, and we only get to see her when we visit our family in Ecuador, so it is easy to see how much she has changed, and I wanted to document her as she enter into her tween years.

This page started with the large heart in  background.  I drew two parallel hearts in a piece of white cardstock, and cut the edges of both hearts so that they formed a hollowed out heart.  For the background of this layout, I used one of the papers in the High Style Paper pad -that matched the colors of the Beautiful collection-, so i searched on my stash for some thin crochet yarn that matched the paper's color, and used it to wrapped the entire heart cut out.

Once the heart was completely covered in yarn, I  cut a large heart out of the mint marbled paper from the 6x8 paper pad -using the wrapped cut out as a template-, and glued it to the back of the hear cut out.  I used hot glue to attached this piece to the mat ( as i wanted to completely secure it).  

There are so many floral motives in this collection, so I used a pair of fine scissors to fussy cut them from different papers, and also to trim the white edges from the stickers and die cut pieces -this allows for the flowers to mixed together without much space between them-.   I used a large number of them to layer behind the top of the heart and picture, along with some of the stickers and die cuts from this collection (there are so many to chose from)

The die cuts in this collection are just so beautiful, that i had to use them to create the title of this page.   I affixed the two die cuts at the bottom of the heart, and added a few of the floral motives behind the words.  The balloons sticker adds the little bit of whimsy to the page.

I love the end result of this page.  It has texture, softness, and lots of flowers...what is there not to love!!

I  hope these inspire you to create beautiful pages about all those special people in your life.  Trust me, once you receive the new Simple Stories BEAUTIFUL collection, you will also be looking at those special pictures to document.  AS always, let me know if you have any questions on how these came together.  

Have a BEAUTIFUL day!

SaveSave

Supplies

Hi there, it's Emma here to share with you the utterly beautiful new collection, Vintage Blessings. Well, where on earth do I start?? I know every time I say how fabulous the collection I'm showing you is, and that, let me tell you is what I adore about Simple Stories, but, this collection, oh my word, I have had so much fun!! You may have noticed that this blog is titled 'Part One', I have done so much using Vintage Blessings that I've had to make it into a two parter! 

As I always do, I cut out all the cut a parts from the 12 x 12 paper pack and placed them in a container along with the stickers, chipboard stickers, bits & pieces and a selection of co ordinating washi tapes, this is so I have everything at hand.

Decorating the pockets was so much fun, I picked out a few items from the Reset Girl collection too which I thought went well, love how the colours work so nicely together in the Ballerina CarpeDiem planner. 

Just look how cute these little birdies are, you'll find them popping up throughout the Vintage Blessings collection. I've used two of the chipboard birds to make into paperclips, I love how they sit proudly at the top of my pages! 

A super easy way to make dividers for your planner is to use the 6 x 8 paper pad, using the CarpeDiem punch you simply choose the picture you want, punch the holes and away you go! You can use paperclips at the side or top of each divider if you don't want to have to add tabs to them. 

Next month in the second part of my Vintage Blessings blog I'm going to take a much closer look at divider making, I can't wait to show you!

Here's a pocket divider I have made, I thought the houses were just so gorgeous that I had to use them everywhere! I fussy cut these out so they sit prettily at the top of the pocket. 

I used some journaling cards from the reset girl collection which I snipped the top corners off, punched a hole and attached some twine, to make a set of tags to fit in the pocket. These can be used for anything you fancy, journaling, list making or even to store some washi on.

Along with decorating my pages with the stickers I also enjoy cutting up bits from the papers and making little flags and banners, you can see here how I've done that and then used a black fine ink pen to draw around the edges for a faux stitching effect. I do this a lot, you've probably noticed! 

This is how I decorated my August monthly pages, I've used washi, stickers and again I've also cut up pieces from the 12 x 12 papers to fill some of the boxes. 

I hope you've enjoyed seeing the first look at how I've used the Vintage Blessings collection, I do hope you'll join me next month for a closer look. Until then, if you would like to see more of my projects then please pop over to my Instagram account https://www.instagram.com/heartsbyemma

SaveSave

Supplies

The vintage florals paired with gold foil accents, pretty pastels & marvelous marble patterns of our new Beautiful collection create a luxurious canvas for your most precious photos and memories.  Take an up close look at some of the gorgeous products from the collection & inspiring projects from our creative team!

When it comes to paper crafting, it’s all about the paper, right?!  Regardless of what crafty project you’re working on with the Beautiful collection – wedding, baby, planner dividers or just the everyday - paper is the perfect starting point.  These are some of the Beautiful favorites we’re mooning over, and judging by the speed at which they’re leaving our warehouse, it looks like they’re some of YOUR favorites too!

Washi tape, stickers and new planners – OH MY!  With the Beautiful scrapbook & Carpe Diem planner collections you’re sure to find just what you need to add a gorgeous touch to all of your projects.

From layouts, to cards to planners, you’ll see the beauty in everything you create with this stunning new collection.  Speaking of paper crafting & planning, here are a few projects to get you inspired to document your plans and memories with the ones you love. 

Be sure to check out & follow our Beautiful Pinterest board for more Beautiful inspiration now & in the future!

Hello Friends! It's Kristine Davidson here today ;) I am here to share 2 layouts using the NEW simple set OLD SCHOOL. It was perfect for a few recent photos of my niece and nephew. Getting back to school is such a big event. I remember those new school supplies. I loved them!  
 
This first layout is called Grow Learn Discover. 

I used the 4x6 journal element and cut it up to create my title. No hard decisions or doubts about a title. Nice and Easy! The one thing I really don't fuss over too much is a title. I usually find inspiration from a sticker or diecut from the kit. This was no exception. 

 
As you can see from the element sheet - I cut out the clock, Used a 3x4 card to add details to my page. This is a simple set collection and you get 2 sheets of 3 papers and a sticker sheet. So you make the kit last by using some elements from one single sheet! GENIUS! Not really, but it does help add details to your layout ;) 
 
 
___________________________________
My second layout is called Back 2 School
 
Time for my niece to head off to grade 9. I still can't believe she's 14 and will probably be driving a car in 2 years. OYE! 


This layout was created on a 12x12 piece of black cardstock and I wanted to had some white. Instead of using white as my base I layered it with a patterned paper and the black cardstock. I find it breaks it up as I used some neutral colors for my die cuts. I still added dimensional adhesive and created my layers. 

I still have a few pieces of scrap paper left from this collection - enough to create a card or two for those teachers ;) 
 
I hope you feel inspired to create today and perhaps we'll see your " Old School " layouts on social media! Tag us @SimpleStories_ and of course you can come follow me @KristineDavidson 
 
Thanks everyone!

Supplies

Hello Friends! It’s Dorymar back on the blog today to share a beautiful 4x6 Sn@p Album I designed with the stunning Hello Lovely Simple Set. I fell in love with this collection as soon as I saw it: flowers, hearts, different shades of pink, all working beautifully together! Our family is still enjoying the summer outdoors and had the opportunity to visit a beautiful flower park with my girls. This collection was perfect to document our memories there so here is my colorful project! 

¡Saludos a todos! Dorymar por aquí en el blog para compartirles un hermoso Sn@p Album 4 x 6 con la maravillosa colección, Hello Lovely. Quedé enamorada cuando vi la colección: flores, corazones, diferentes tonos de color rosado, todo trabaja perfectamente en conjunto. Nuestra familia sigue disfrutando del verano y las actividades al aire libre, entre estas actividades, mis chicas y yo tuvimos la oportunidad de visitar un hermoso parque de flores. ¡Esta colección era perfecta para documentar nuestros recuerdos allí! ¡Aquí les presento un proyecto muy colorido!

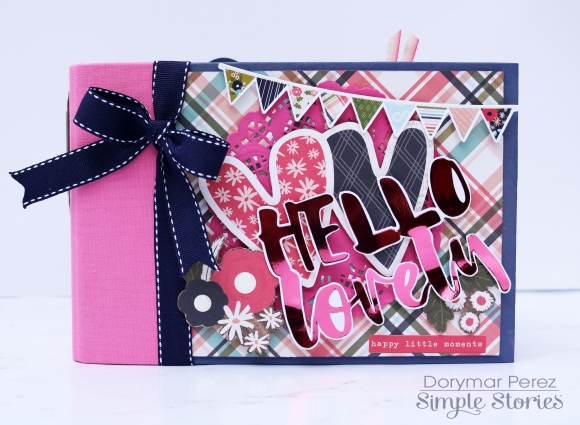
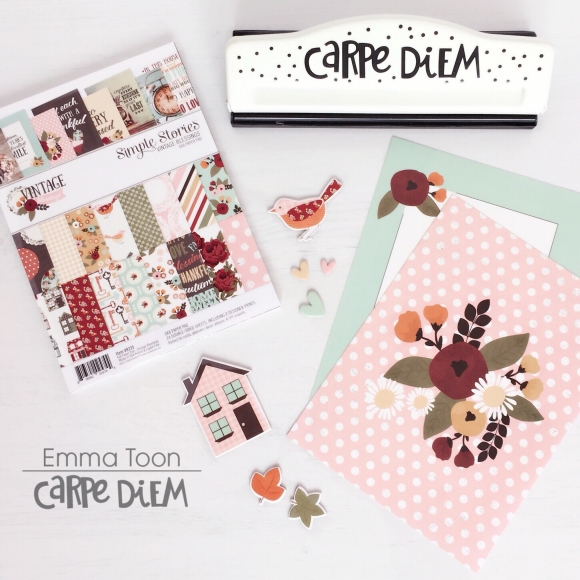
To design the cover, I used the Simple Stories "Hello Lovely" Silhouette cut file. I cut it into the Deco Foil Toner Sheets and then, with the laminator, I placed the Pink Melon transfer sheets and gave it that metallic, beautiful, and bright touch. 

Para diseñar la portada utilicé el archivo de Simple Stories para cortar de Silhouette “Hello Lovely”, lo corté en las Hojas de Tóner de Deco Foil y luego con la laminadora, coloqué la hoja de transferencia de color Melón Rosado y le dio ese toque metálico, brillante muy hermoso.

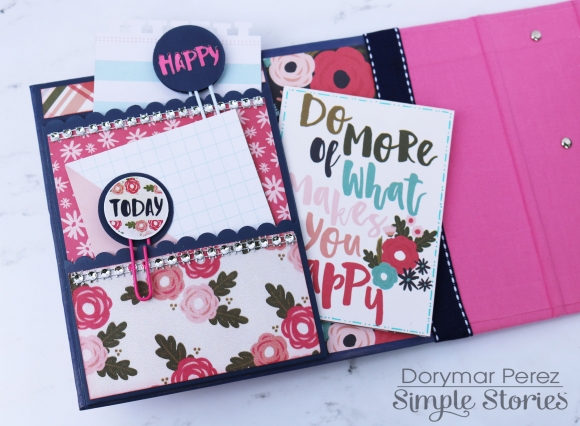
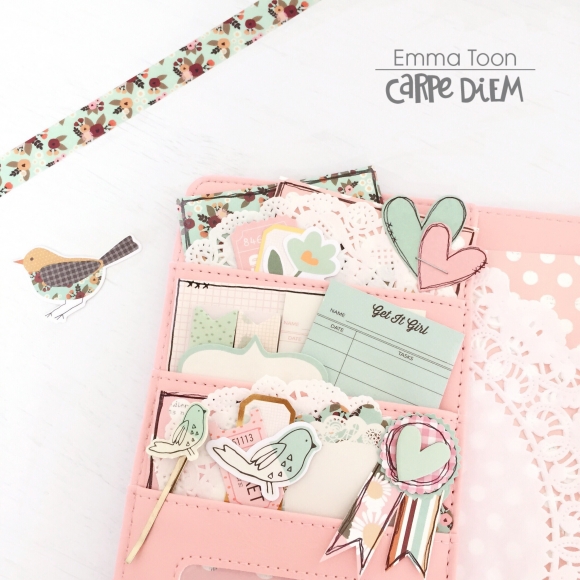
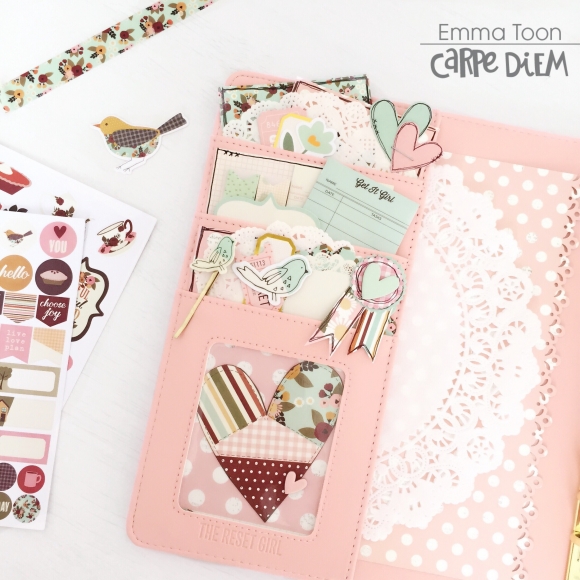
I love the pockets of Carpe Diem planners, so I decided to create some pockets like those using solid cardstock and I covered them with the beautiful "So Very Lovely” and “Fab-YOU-lous” papers. As an insert, I used 3 x 4 journaling cards from the collection. 

Me encantan los bolsillos de las agendas de Carpe Diem, por lo que decidí crear unos bolsillos similares a los que traen estas hermosas agendas. Para esto creé con cardstock sólido bolsillos los cuales forré con los hermosos papeles “So Very Lovely” y “Fab-YOU-lous”. Como insert utilicé las tarjetas para journal 3 x 4 de la colección.

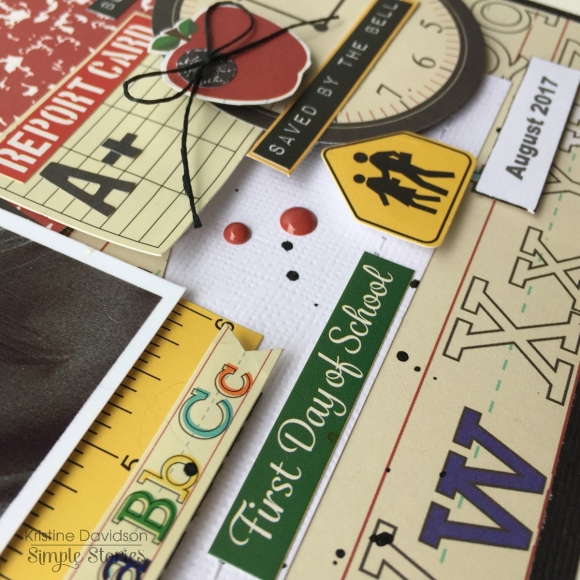
I used the SN@P! Album pages and papers from the collection to create pockets, tags, flaps make the album interactive and fun. I love finding pockets and items inside my projects, I think it’s super fun! 

Utilicé las páginas del Sn@p Album y con los papeles de la colección hice bolsillos, tags, flaps para darle ese toque interactivo y divertido. A mí me encanta encontrar bolsillos y elementos en mis proyectos. ¡Me parece super divertido!

To highlight the divisions, I used the "die cuts stickers" and flowers from the "So Very Lovely" paper sheet. They are super adorable! 

Para resaltar las divisiones utilicé los “die cuts stickers” y flores del papel “So Very Lovely”. ¡Son super adorables!

I love paper clips so I created several using a circle cutter to make the bases and then decorated them with the collection’s die cuts stickers. 

Me encantan las presillas de papel, así que he creado varias, utilicé un cortador de círculo para hacer las bases y luego los decoré con los hermosos “die cuts stickers” de la colección.

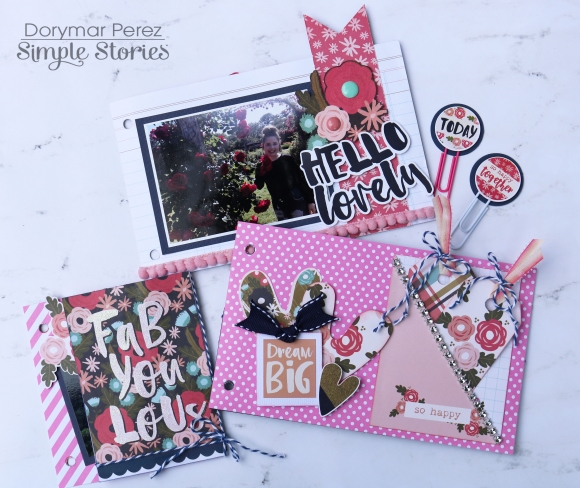
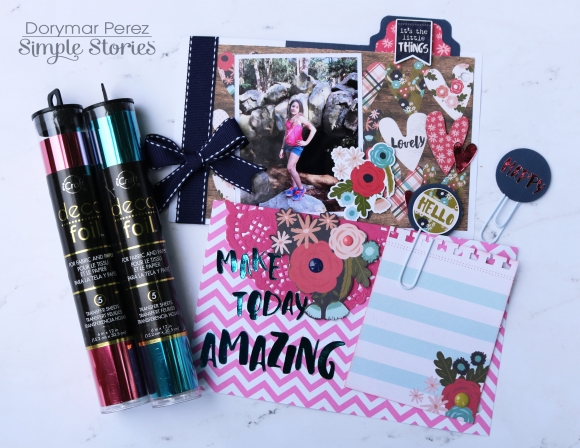
I like to give an interactive tone & feel to my projects, so between the divisions I inserted pages of different sizes. In addition, I continued playing with the Simple Stories Silhouette cut files, together with the Thermoweb Deco Foil toner sheets and foil transfer sheets, to give color & shine to my titles. I love it! Working with them is super fun! 

Me gusta darles ese tono interactivo a mis proyectos, por eso entre las divisiones inserté páginas de diferentes tamaños. En adición, seguí jugando con los archivos de corte de Simple Stories de la Silhoutte y en conjunto con las hojas de tóner y las hojas de transferencia de Deco Foil pude darles ese toque de color y brillo a las páginas. ¡Definitivamente me encantan! ¡Trabajar con ellos es super divertido!

Here you can observe in detail the beauty of these products. 

Aquí puedes observar en detalle, lo hermoso de estos productos.

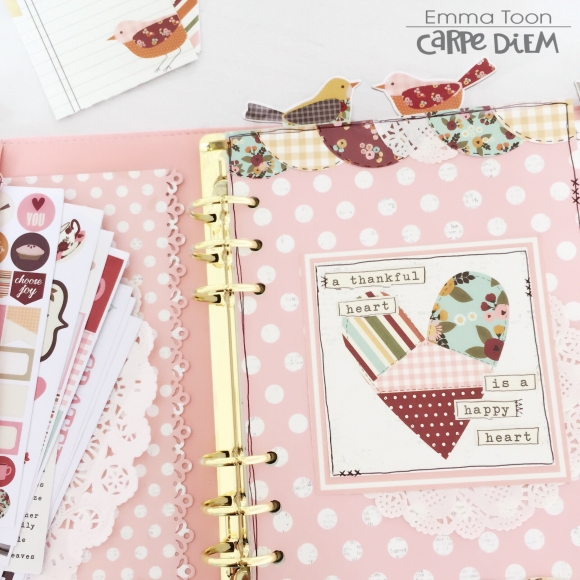
On these pages, I used the 3 x 4 and 4 x 6 journaling cards from the Journaling Card Elements Paper. I had fun layering the Sn@p pages with the die cuts stickers and the Simple Stories Silhouette's cut files. The combination of all these beautiful products is fantastic! 

En estas páginas utilicé las tarjetas para journal 3 x 4 y 4 x 6 del papel Journaling Card Elements. Resaltando los colores de las páginas del Sn@p con los die cuts stickers y los archivos de corte de Simple Stories de la Silhoutte. ¡La combinación de todos estos hermosos productos es fantástica!

So here it is! I hope you have enjoyed this project as much as I did and that it will inspire you to create with the new Hello Lovely collection and other Simple Stories products. Keep preserving your memories!   Have a great week! Blessings! 

¡Así que aquí esta! Espero que hayas disfrutado de este proyecto tanto como lo hice yo y que te inspirare a crear con la nueva colección Hello Lovely y otros productos de Simple Stories. ¡Continúen preservando sus recuerdos!   ¡Pasen una feliz semana! ¡Bendiciones! 

Don’t forget to visit the Deco Foil website to learn more about these fantastic products!

Supplies

Good morning! Nicole here today to share some inspiration using lots of florals! I am slightly obsessed with all floral patterns right now and it's a good thing that there are so many pretty floral patterns to be found in the Simple Stories collections. I hope to inspire you to dig into those floral patterned papers and get creative!
 
 
My first project is a literal interpretation of using floral patterns - I diecut some flowers on my digital die cut machine from some great floral patterns in the Faith collection.  I just love the pretty mix of pinks, teal and golden yellow and when trimmed down to floral shapes, they look pretty awesome!
 
 
I wanted to add some stems to my flowers, so I simply stapled on some natural twine and then added some loops and tucked them behind the flower shapes. I finished things off with a simple diecut title, some buttons and some great Simple Stories stickers on the flowers.
 
 
My next project uses lots of the floral patterns in a less obvious way. Using florals makes patterned paper mixing easy  as there is a collection of color choices already done for you! 
 
 
I diecut some pie chart shapes and used the floral paper in this case to fill in the design. I was able to add in variations of color and pattern by using the simple pie chart shape to hold it all together. Look  how lovely all those pretty floral patterns look mixed together, but it's not overwhelming either!
 
 
I couldn't resist a diecut title with more floral patterns and added in some neutral letters stickers to finish off my title and then added in some stickers and enamel dots to complete the page.
 

Supplies

Hey everyone! It’s Lori, marketing manager here at Simple Stories. It’s been a busy week for all of us in the office, because all of our kids are heading back to school this week. While it’s somewhat sad to have to say goodbye to summer fun, back-to-school is a great time to get organized, set some goals, and start new schedules.

My daughter is a busy 9th grader who plays volleyball and softball. Her life is pretty busy now, and she needs a way to keep her assignment due-dates and sports schedules in order. As a fun first day of school gift, I put together a planner for her using our Good Vibes 16 Month Spiral PlannerSeasons Sticker Tablet and some Modern Meadow washi tape from our Reset Girl collection.

A spiral planner is a great option for her, because it’s compact and can slide right in her backpack! Our spiral planners already come with 2 sticker sheets to highlight to-dos, appointments, etc. for her, so I decided to use our adorable Seasons Sticker Tablet to add seasonal fun to each of the monthly pages. Each page of this tablet has a different theme, and it’s filled with gorgeous designs!

Creating the gift was so easy and quick! I gathered all of her schedules from her sports, opened her school calendar online and sat at my desk and created for her. There are places in the planner for her to write down her goals, appointments, to-dos and add her own flair! The planner turned out perfectly!

Finally, as a nice surprise at the back of the spiral planner (and a great reminder to keep planning!), I added a Good Things Black Planner Decal on the back page and tucked the Seasons Sticker Tablet in the back pocket so she could use the extra stickers when she wanted.

The planner turned out so cute, now I want my very own! J

Good luck to everyone returning to school and starting a new year! If you would like a closer look at our spiral planners so you can see all of the beautiful designs inside, be sure to check out the spiral planner tour we did on the blog last week!

Supplies

Pages