Hello! Linsey here today and I'm so excited to share my first Simple Stories blog post and project with you! I love to alter almost anything and have been wanting to transform my ordinary cork board into something fabulous! I found the Domestic Bliss collection to be just right for my memo board makeover! The fresh, beautiful patterns mixed with the fun and perfectly quirky elements make for a most delightful experience in creating!


The main section is for memos, notes and messages and the smaller section is for my weekly dinner menu at a glance. A piece of 12x12 patterned paper was used for the background on the memo section.


For the meal list/menu, the daily chart is one of the 4x6 Vertical Elements and directly above that is one of the 4x4 Elements detailed with enamel dots and clear and regular stickers.


The Epoxy Metal Clips were securely adhered to regular push pins to create an area where notes can be easily slid onto the clips and displayed.


A variety of favorite Decorative Brads, Bits & Pieces and Combo Stickers were done in the same fashion as the clips, transforming them into adorable and fun decorative push pins!


Some blank tabs and bullet elements from the 4x6 Stickers were cut out individually and a small window pouch was created to hold them. Tip: layer a piece of clear plastic over and equal sized piece of patterned paper/cardstock and fold washi tape around the edges to create a visually pleasing window pouch.


The sides of the memo board were covered with Home Sweet Home Washi Tape. It was super easy to do and really adds to the customized look and feel of the memo board.


Finally, a couple of the large floral decorative brads were added to the frame as well as a few small chipboard flowers on the frame corners, topped with an enamel dot in each flower center.


Thanks so much for stopping by today and sticking with me throughout my post! I hope you enjoyed my altered memo board and might be inspired to create something with the wonderful Domestic Bliss collection too! Happy crafting!

Hello everyone! This is Lisa Dickinson and I'm so excited to be sharing my very first projects here on the Simple Stories blog! I've got two pages that feature one of my favorite design elements - circles - and some creative ideas for you to incorporate this dynamic shape into your layouts!

Today I'm working mostly with the Domestic Bliss collection because the spring palette worked well with both my page themes. I love how the colors are soft enough to work for Easter and spring layouts, with a bit of navy thrown in to make it super versatile. On my first page, I create a frame using punched circles - a circle of circles - that frames my grid of photos:

EasterEggs_1

Each circle is about 2" in diameter and I'm using 12 to complete my frame. ( But you could use smaller or larger circle punches and adjust the number of circles accordingly).  Once I had my circles cut, I treated each one like it's own little canvas and added embellishments, stitching and other elements that add texture and color. 

EasterEggs_4

On a few of the circles, I added a twine border for a fun dimensional twist. Just add liquid adhesive around the edge of the punched circle and adhere your twine!

EasterEggs_3

EasterEggs_5

To add stability to the design, I die-cut a large title (this Easter Simple Stories Silhouette Cut File) and placed it at the bottom of the frame. It acts much like a bow on a wreath and gives the frame a focal point.

EasterEggs_2

______________________________

For my second design, I used circular photos matted with more circles of cardstock and patterned paper:

BlueSkies_1

I love the fun and energetic feeling the layered circles give the page! I balanced out all the curves with a linear title (this Simple Stories SIlhouette Cut File) and a block of journaling that's right-justified.

BlueSkies_2

Continuing with the circle theme, I selected a few circular embellishments to scatter around the design. They add small pops of color and texture that help keep the eye moving through the whole layout.

BlueSkies_3

 So are you ready to try your hand at running in circles?! I hope you'll be inspired to try one of these ideas in your next Simple Stories creation! Thanks for stopping by today!

SaveSave

SaveSave

Supplies

Hi everyone!  This is Traci Penrod, from Artsy Albums, and I'm excited to be joining you for my first post as part of the 2017 creative team!  For those of you who follow my blog, you know I'm crazy about mini albums, so being part of the SN@P! Binder Team is a dream come true for me! Last summer, my husband and I built a new home.  Domestic Bliss was perfect for documenting the story.  I love the colors in this collection, and although pictures of building a home aren't very pretty, the papers and embellishments are so I love the way it turned out!

For my cover, I used the Bless This Mess paper from the new 6x8 paper pad.  I love that these sheets are sized for the 6x8 binder albums!  I also added chipboard stickers and some chunky twine to the cover for a little dimension and texture.  4x6 horizontal element cards are great for covers and titles and the one with the three houses was my inspiration for the entire album!
I used a 4x6 vertical pocket for the first page.  I love adding the different sized photo pockets throughout my album ... I think this, combined with various photo sizes, make for a more interesting album.  Our new address is on the front, and a photo of our floor plan was tucked into the back.  
 
Don't the cute papers and stickers make these ugly new construction photos look better?! 
I always add folding elements in my albums for extra space and interest.  For the page above, I used a 4x6 white card, layered lots of domestic bliss cuteness on the front, and added elevation photos of our home inside. I made a slit in the plastic page and slipped the bottom of the card under the plastic so that it can be opened without taking the page out.
"Get Stuff Done" summed up my summer -- always pushing the builder to get me into the house by the end of September. Our first grandchild was due in October so I needed the house finished :) The card is from the 4x4 element sheet.  
 
See the little banner sticker on the 4x6 green card?  These are from the Carpe Diem sticker tablet.  I used them throughout my album to mark the different rooms of the house.  This one says "Living".

'

2x2 photos are so much fun ... just little snippets when the entire picture isn't necessary.  

These photos show a bit of the progression my kitchen went through from framing to cabinets.  It was always so dusty and I couldn't wait for the day when I could clean it up!  The "Bless This Mess" sticker from the Combo sticker sheet was perfect for this page! 

Thanks for stopping by today!  I hope I've inspired you to have fun playing with Domestic Bliss to tell your home's story! 

SaveSave

SaveSave

Hello everyone! It's Jomelle today and it's my very first blog post here at Simple Stories as part of Carpe Diem Creative Team. I am excited to share with you what I've created in my planner.

When I saw the Say Cheese III collection at CHA in Phoenix, I fell in love with it right away. My family and I are fans of everything and anything Disney. We have Annual Passes at Disneyland, so this collection is perfect for my creative planning, memory planning and documenting our Disney adventures.

I decided to use the Ivory planner to document and plan all our Disney experiences.

 
It was so fun and so easy to stuff and decorate my planner pockets with this collection. I used mostly the bits and pieces. One of the pocket holds the page flags.


As you can see here, I love collecting Disney memorabilia. I keep all our parking tickets and passes. Sometimes I even save the Rider Switch pass and the Fast Pass. 
 

As many of you know, Tower of Terror Ride is being replaced. I saved anything that has to do with this ride.

I used the adhesive square label pockets I got from Target to hold my passes and other things I saved and collected. I just added stickers for decoration.

If you look closely, all the way in the back on the right side, my boys and hubby were "dabbing" in this picture during the Tower of Terror Ride.


Here is my weekly layout for the first week of April. My family and I went to Hawaii during my boys' Spring Break. We stayed at Aulani. I wanted to document our wonderful Disney experience while we were there in my planner. This was my daughter Juliet's first time in Hawaii.


I love using the sticker tablets to embellish my layout.
 

I looked forward to meeting the Disney characters and taking pictures with them.

Here I used 6x8 pad to make a dashboard. I added the picture of Mickey and Minnie kissing that I took while we were at Aulani. I love adding pictures in my planner.


I added the "Happy" tab on the bottom right of the picture so it can be lifted up.
 

 Just lift the tab to see another picture that I added behind the first one.
 

This is what it looks like when the tab is lifted. I added a little note that goes with the picture.
 

 I wanted to document the first time we went to Disneyland when we bought our Annual Passes. It was also my daughter Juliet's first time at Disneyland. My daughter is 15 months old.
 

I printed all my pictures using the HP Sprocket. The pictures are perfect size for my A5 planner.
 

I used the bookmark tablet to list our Favorites at Disneyland.
 

I decorated my Doc it Journal and I placed it at the very back of my A5 planner. I can use this to jot things down or if I want to write a journal. I can also add pictures there as well.
 

Here is my Monthly layout for the Month of May.
 

Planning Starts Now! I used the Bookmark Tablet to make my list to plan our Spring Break Next Year. I love making list to check off when they are completed.


Thank you for stopping by. I hope you enjoy reading my blog as much as I enjoyed creating this project. Have a nice day.

SaveSave

SaveSave

SaveSave

Hi friends! It’s Lori here on the blog again, and I’m excited to share even more of our behind-the-scenes from CHA/Creativation. Today, I’m sharing an up-close look at our Faith and Recipe Carpe Diem planner releases! 

Faith journaling has been popular for some time now. Our goal in creating our A5 Faith Planner Insert Set was to give faith journalers and planners the perfect place to record their thoughts and inspiration after a peaceful study session. Inside, there are places to record your favorite passages, names of those you’re praying for, and lots of pages for journaling and note-taking.

Take a moment to walk through a virtual tour of the A5 Faith Planner Insert Set and see all the beautiful and useful products that are included!  Inside you’ll find over 50 pieces of planning supplies; 12 inspired journal inserts, 12 decorative inserts, 2 dashboard pages, 6 die-cut dashboards, 6 tabbed dividers, 1 storage pocket and 3 A5 sticker sheets!

The second Carpe Diem planner product I’m thrilled to show you is our Recipe Planner Insert Set.

It’s said that the kitchen is the heart of the home. Passed-down recipes are cherished family favorites and evoke memories and nostalgia for young and old. Our A5 Recipe Planner Insert Set makes keeping these recipes and memories in one place simple and beautiful. Inside this insert set you’ll find plenty of pages for recording old and new recipes, creating shopping lists, and customizable tabs so your recipe organizing is tailored for you.

Take a moment to walk through a virtual tour of the A5 Recipe Planner Insert Set and take-in all of the tools and products that are included! Inside you’ll find over 50 pieces of planning supplies; 24 recipe inserts, 13 assorted inserts, 6 tabbed dividers, 1 dashboard page, 6 die-cut dashboards,1 storage pocket and 3 A5 sticker sheets!

Head to a participating retailer to check out both of these fantastic insert sets! To locate a retailer near you, check out our store locator. There you’ll find retailers in your area as well online stores towards the bottom of the page for ordering quickly.

Be sure to follow our Live Love Plan board on Pinterest for lots of pics, links, and tons of planner inspiration!

Good morning Simple Stories fans!  Nicole Nowosad with you today for my first projects as part of the Simple Stories team. I am super excited to be sharing my love of paper with you and today's projects hopefully reflect that love!


I just love the Domestic Bliss collection and drew a lot of inspiration from the different patterned papers in the collection to create this page. Quite often, the ones behind the camera are often missing in our scrapbooks, so I do try to make a point of turning that camera around and scrapping some photos of me from time to time. Plus, it gives me an excuse to use some of the more floral patterned papers that I adore right now.


I wanted to use a lot of patterned paper, but not in a “wow” that is a lot of paper way. I chose to cut thin strips of the paper and create a simple stitched frame around my photo, adding more patterned paper in the form of diecut flowere that anchor both sides of the page.


I also diecut some flowers on my digital die cut machine from different patterned paper and layered them together with Decorative Brads, Diecuts pieces and enamel dots.


Best part is, I only used one of the 6x8 paper pads for this page and although it appears I used a lot of paper, really, it is very little. The little strip border is fun and a great way to use those paper pads in a simple way.


I finished this page off with an easy title using stickers mixed with more Bits & Pieces.

__________________________________


This next layout was a little labor of love and was truly simple to make.  I used the concept of using simple strips of paper on this page again, but in a more quilted look.


I started with 4 square blocks of scrap paper and then cut several strips of paper in many patterns from the Faith collection 6x8 paper pad. I filled each scrap paper square with those papers, alternating the pattern and color until all four pieces were covered. I thought about stitching the papers on my sewing machine, but didn’t as I thought it would look too busy.


I added some mint green paint to the background of simple white cardstock and then layered my quilted squares to the background. I left a small gap around the edges to give the busy patterns a resting point on the page.


All that was left to do was add a few embellishments! I added a pretty floral diecut from white cardstock on my digital die cut machine and a simple title using some Chipboard and stickers. Really, the paper did most of the work on this page, time to keep those embellishments simple!


Thanks so much for joining me on the blog today! I hope you are inspired to make the most of your paper stash!

SaveSave

Say Cheese III!  One of newest collections that I'm absolutely obsessed with. I used the new Speckle Dot Carpe Diem planner (currently available at Hobby Lobby, available through independent retailers & online stores in June!) as my memory planner.  Memory planning is very important to me because it's a reminder of memories created. Simple Stories and the Carpe Diem planner made a perfect solution and match for what I wanted to achieve in my memory planning.

I've always been a fan of Disneyland and as I open up my planner, instantly it brings a smile to my face and memories start rolling through my mind. My pockets are stuffed with sticky notes, paperclips and ephemera.

As you turn the pages of my planner you will notice several pictures of my family and I. We went to Disneyland 2 times a year and created some of the best memories there. All the red and black with polka-a-dots, mouse ears, stars and yellow 12 month planner inserts (inlcuded in the Say Cheese Insert Set) are the perfect pairing!

The pocket included in the Insert Set is perfect for storing your stickers. 

The camera is such a cute extra addition to personalizing your planner and the Doc it journal fits perfectly in the back. Ready for me to take out anytime and add my pictures and journaling.

Adults are only kids grown up, anyway - Walt Disney.

Thank you Simple stories for designing and creating and making the Say Cheese collection. It made my memory planning magical and special. I can't wait to continue to create and play! 

Supplies

Hi everyone!!! Welcome to the blog today. It is Dorymar Perez and I am very happy and excited to be able to share my first project for the Simple Stories Design team. When I create my projects I always use some element of the collection as inspiration and this time I selected the pizza. Yes, the pizza, if you observe the collection is full of these!!! So, I decided to create a mini album in a pizza box with the beautiful collection EMOJI LOVE.

¡Saludos a todos!!! Bienvenidos al blog hoy. Es Dorymar Perez y estoy super contenta y emocionada de poder compartir mi primer proyecto para el equipo de Diseño de Simple Stories.  Cuando creo mis proyectos siempre utilizo algún elemento de la colección como inspiración y esta vez seleccioné la pizza. ¡Sí a la pizza, si observas la colección está llena de éstas!!! Pues decidí crear un mini álbum en una caja de pizza con la hermosa colección EMOJI LOVE.

I used black cardstock to create the box with a measure of 9 inches. You can see that its exterior is full of elements of the collection; 4 x4 cards, portions of 3 x4 and 4 x6 cards, stickers, epoxy metals, chipboard stickers,decorative clip, brads, etc.

Utilicé cardstock negro para crear la caja con una medida de 9 pulgadas. Puedes observar que su exterior esta lleno de elementos de la colección; tarjetas 4 x4, porciones de las tarjetas 3 x4 y 4 x6, stickers, hebillas, epoxy clips, chipboard stickers, brads, etc. 

The collection is so colorful and fun that I had to create a project worthy of the collection. Here you can see the exterior and part of what forms the mini album.

La colección es tan colorida y divertida que tenía que crear un proyecto digno de la colección.  Aquí puedes observar el exterior y parte de lo que forma el mini album. 

The inside of the box houses two 9 x 9 Layouts.  I used two design papers from the collection and adding elements from the collection like brads, epoxy metal clips, washi tape, chipboard stickers, etc. Since I saw the collection I knew I was going to use the photos that my girls take to upload  to their social networks!

El interior de la caja alberga dos Layouts de 9 x 9.  Utilicé dos papeles de diseño de la colección y añadiendo elementos de la colección como los brads, epoxy metal clips, washi tape, chipboard stickers, etc. ¡Desde que vi la colección sabía que iba a utilizar las fotos que mis niñas se toman para subir sus redes sociales!

The mini album is made for you to have fun discovering the photos on each of the layers as you spin the pieces!! I made the molds on chipboard and I was lining each piece with the decorative papers of the collection. After placing the photos, I accentuated around them with the sheets of stickers 4 x 6 and other elements of the collection.

¡El mini álbum está hecho para que te diviertas descubriendo las fotos en cada una de las capas según vas girando las piezas!! Hice los moldes en chipboard y fui forrando cada pieza con los papeles decorativos de la colección. Luego de colocar las fotos, acentuaba su alrededor con las hojas de stickers 4 x 6 y demás elementos de la colección

Here you can see as you turn each piece you still discover photos and elements!

 ¡Aquí puedes observar como al girar cada pieza sigues descubriendo fotos y elementos!

Do not forget to visit my Instagram page @dorymar_pl or Facebook find me like Carta di Papel by Dorymar! I hope you enjoyed the project and inspired you to create your own!

¡Espero que hayas disfrutado el proyecto y te sirva de inspiración para crear el tuyo!¡ No olvides visitar mi página de Instagram @dorymar_pl o en Facebook búscame como Carta di Papel by Dorymar!

¡Have a Great Week!! XOXO

Hello Friends!  Nathalie here with my first post as member of the 2017 Creative Team.  I am so blessed to be able to share with you some of my work using the beautiful Simple Stories products. I simply adore their collections!

Today, I am sharing with you two scrapbook layouts inspired on my everyday life.  It is the simplest of pictures, the ones that are the most memorable; and the newer Simple Stories collections are just perfect to document and cherish those moments.

Homework

The first layout is all about that dreaded word, "Homework".   The new Domestic Bliss collection, with its vibrant colors, playful papers, and cute embellishments was ideal to bring some cheeriness to the not so happy image homework conveys.

 
I wanted to bring in as many patterns and colors from the collection into this layout, so I set out to create a large background for this page.   The Open Alpha cut file from the Cut Shoppe -which forms the word 'Homework'- was welded to a simple house outline to create the background.


The new 6x8in paper pads are perfect to back cut-outs, as they contain all the patterns included in the collection, and it saves from cutting a small piece from a sheet of paper.   Don't you just love all the colors and patterns in this collection?

The outline of the house was cut from the  wood grain pattern of the "Bless This Mess" paper.   A bit of foam adhesive was used to secure the cut out to the outline thus creating some dimension on the page.  The background was then glued to the B side of the "Hickory Grid" paper from the Sn@p Basics collection,
 

A picture of my husband and daughter working on a school project was glued on a slant  to the "roof of the house".   I used  some of the cut-apart cards from the 4x6 Double Sided paper, and 6x8 paper pad as layers behind the picture.   Some of the stickers, die cut pieces, and  a paper clip from the collection were used to create clusters that frame the picture.  I love the small camera piece!!

To balance the page, one small cluster of paper die cuts, and stickers from both the 12x12  card stock sticker combo, and the 4x6 sticker sheets was added to the bottom right corner of the house.   Just a few enamel dots, and some journal lines complete this page.   I love how the colors and fun embellishments bring happiness to "Homework"


------------------------------------------------------
 

Believe

The second layout of this post is all about my daughter, and the gorgeous Faith collection.  This is by far my favorite Simple Stories collection!;  it is just so beautiful, and can be used in so many paper crafts, from Bible journals to every day pictures.
 
 
I  love cut files, and Simple Stories has a large catalog  of designs available in the Silhouette Store.   The large shattered heart design was the inspiration for this layout.  I used the Silhouette software to add an offset to the image -this helps to add hand stitching on  the cuts.
 
 
The paint strokes in the "Shine" paper were the starting point for this project.  By aligning the cut file to the paper, i was able to color block the cuts to match the paint strokes.  A bit hand stitching just around the cuts that contain a single color was then added,   Some  thread was spooled around the edges of  the cuts that  aligned at the junction of two colors.  I just turn on Netflix, and spend some time stitching this background
 

The 6x8 paper pad was used to back the cuts in the heart, and then glued to the "Shine" paper.   Before adding the picture, I used the 3x4 cards from the Cut-apart paper to layer the  picture, and added some of the 12x12 combo card stickers in between layers to form clusters around the picture.

 I love the Carpe Diem Sticker tablet, and the Clear Stickers, they have  a lot of small stickers than can be added used in scrapbook projects.  Just look at the small butterfly!

 
There is so many butterfly motives in the embellishments of this collection; so i  created a few larger  ones using a punch.  Two butterflies were punched from the papers - used to back the cut out - a bit of machine stitching holds two  butterflies together.  I love how these add a sense of movement to the page.   
 
 
I love how this page turned out.   I even used the Bible verse on the die cut pieces as inspiration for my journal lines.

The two new collection, Faith, and Domestic Bliss, are the perfect complement to your  memory keeping, especially for those especial every day moments.   So check them out!

Thanks for stopping by today!  See you all soon!

SaveSave

Hello there all you super creative, fantastic people! It's Andrea here and today I want to share with you a cool new project using the Simple Stories Faith collection! I made this one for all you who love planning and all you who love scrapping too! I enjoy doing both...which is one of the reasons why I love Simple Stories so much! It has such wonderful papercrafting supplies for both the planner addict and the scrapbook lover in you!

Recently, I came up with this idea to combine my planning and scrapping in a fun new way! I realized that after I finished playing in a planner with a certain theme or for a certain period of time, instead of just storing what I had put in the planner, I could instead take what I had done in my planner (the set up and decorations...all the planning, notes and writing) and incorporate that into a mini album!

It is so easy – you just take what you put in your Carpe Diem planner, transfer it over to a SN@P! album, add in some pocket pages and some photos, and voila!...you've completed a mini album!

I had so much fun creating this project! I decided that I wanted to document my faith in a special way. I chose to do something specifically for this time of year (for March and April because of Lent and Easter). I think this is a perfect time to reflect on one's faith and document it!

So this is what I decided to do – I thought I would plan out my March and April much like normal, but then add in all the cool stuff from the Carpe Diem Faith Insert Set. With the set, I documented things like my prayer list for the month, faith quotes that were inspiring me, etc. I used the cute notebook paper that comes in the set and used those to do some Bible journaling and to reflect on the mass readings from different days during Lent.

I love reading my Bible and it was cool to take notes on the different Gospel readings and things and really study them and explore what they meant to me!

I had fun with all the “nerdy” Bible studying that I did with my planner, but I also really had fun with the creative stuff like the decorating! I especially enjoyed making my cross dashboard! I used the SN@P! Pack  2x2 cards and the SN@P! pocket pages to make my cool dashboard.

This dashboard, and all my other goodies that I used to document my faith in March and April (for the Lent/Easter season), I then moved into my SN@P! 6x8 binder to create my cool “faith book” mini album.

I simply transferred things first, and then started adding in pictures and SN@P! pocket pages. I used the 6x8 paper pad and the SN@P! Pack and chipboard stickers and brads and other embellishments from the Faith collection to fill out my mini.

I love the look of the Carpe Diem planner dividers and notebook papers and things intermixed with all the large photo pages and photo pocket pages!

And I love the look of the calendar pages with the photo pocket pages!

I had fun putting my pocket pages together. I love that Sn@p gives you a range of different sized pockets to play with! I have a hard time sticking to just one or two sizes of pics...I want to use them all...I like a variety!

I also enjoyed adjusting some of the pocket pages to better fit my needs. It is so easy to do this...you just need some scissors and to do a bit of sewing with a strip of patterned paper along the edge (for the hole punching).

I love sewing little touches here and there inside my mini albums. I think it makes for a cuter more personal look.

I love my faith and I'm finding this such a fabulous idea for Lent – because I am not giving something up, but instead using my time to read my Bible more, reflect on what it means and the importance it holds in my life.

Alright well, I hope you enjoyed my cool Planner to Scrapbook Mini Album idea! Hopefully you now have some fun ideas on how to use your Faith collection.

And don't be afraid to mix in those planner goodies with those scrappy ones!

You can use this ideas for your faithbooking like I have (for a special project for Lent, Easter, or anytime of year really) or you could use it for other themed projects as well!

Hope I have inspired you today to put a little planning in your mini album...or a little mini album in your planning...see what I did there?   Anyways, have a great, happy scrappy day, a wonderful Easter and remember to, as I like to say, “live your life as a fairytale”...writing your own happily ever after one Simple Story at a time... Hey, see what I did there too? :-)

Hey everybody! It’s Lori, marketing manager at Simple Stories, and I’m here to share even more of our behind-the-scenes from the CHA/Creativation show.  Today, I’m sharing an up-close look at our Fitness and Home Carpe Diem planner release! That’s right; it’s a two-for-one!

Whether you’re a fitness freak or you struggle daily just to get your steps in, our A5 Fitness Carpe Diem Planner Insert Set is the perfect tool to motivate and track your workouts. Inside, you can set goals, document exercise times, celebrate achievements, and even record your measurements. It’s a great tool to motivate and applaud you & all of your hard work!

Take a moment to walk through a virtual tour of the A5 Fitness Planner Insert Set by clicking the arrows & see all the beautiful and useful products that are included!  Inside you’ll find over 50 pieces of planning supplies; 24 monthly tracking inserts, 12 weekly fitness tracking inserts, 6 tabbed dividers, 1 dashboard page, 1 storage pocket and 3 A5 sticker sheets!

The second Carpe Diem planner product I’m thrilled to show you is our Home Planner Insert Set.

Just like Dorothy discovered in The Wizard of Oz, there’s no place like home!  Home is filled with food, laughter and fun, but running a household also brings chores, budgets and to-do lists. With so many different items to tackle in your home, why not keep all of your honey-dos and documentations in one beautiful planner?  Our A5 Home Planner Insert Set is just the tool you need (and it doesn’t need to live in your toolbox).

Take a moment to walk through a virtual tour of the A5 Home Planner Insert Set by clicking the arrows and take-in all of the tools and products that are included!  Inside you’ll find over 50 pieces of planning supplies; 18 home planning inserts, 19 menu & financial inserts, 6 tabbed dividers, 1 dashboard page, 6 die-cut dashboards,1 storage pocket and 3 A5 sticker sheets!

Head to a participating retailer to check out both of these fantastic insert sets! To locate a retailer near you, check out our store locator. There you’ll find retailers in your area as well online stores towards the bottom of the page for ordering quickly.

Be sure to follow our Live Love Plan board on Pinterest for lots of pics, links, and tons of planner inspiration!

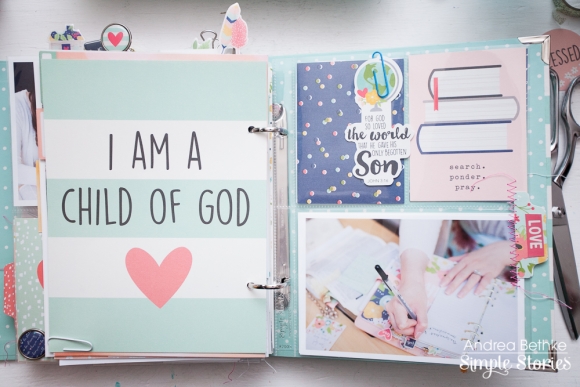
Hi everyone, Its Meredy and welcome to my first ever blog post!  I have a lot to share with you today as I walk through how I set up a Faith/Spiritual Planner using the Faith collection.  I want to start by saying that although I am Christian these same ideas could work for any spiritual practice. Even if you don’t think the Faith line applies to you I hope you will consider reading on—feel free to insert your own belief whenever I mention God and maybe this system can work for you too.  We all have wonderful things happening in our lives (or hopes for wonderful things) and I found this Carpe Diem line to be so helpful in focusing in on what matters.

I was thrilled when this line came out as I am a planner girl and bible journaler and I have been seeking a way to combine my two creative loves.  I wanted a way to document the things I am learning while Bible journaling as well as a place to record what God is doing in my life.  I love having my bible full of journal entries, but I wanted a way to see these lessons and A-ha moments grouped together by month so I could easily have an overview of what I had learned.  I had been dreaming about this for a while, but felt overwhelmed on how to create a system I would follow.  When this planner set came out, I knew it would be just the right tool to help me finally put something together.

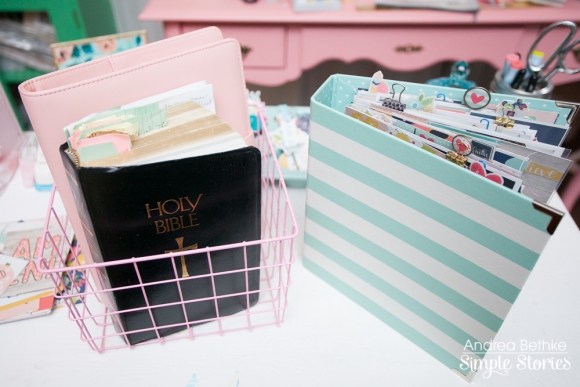
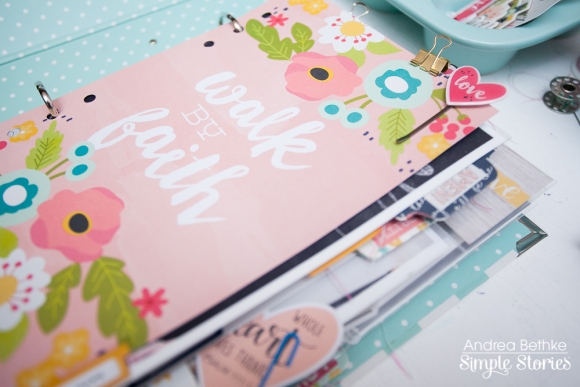
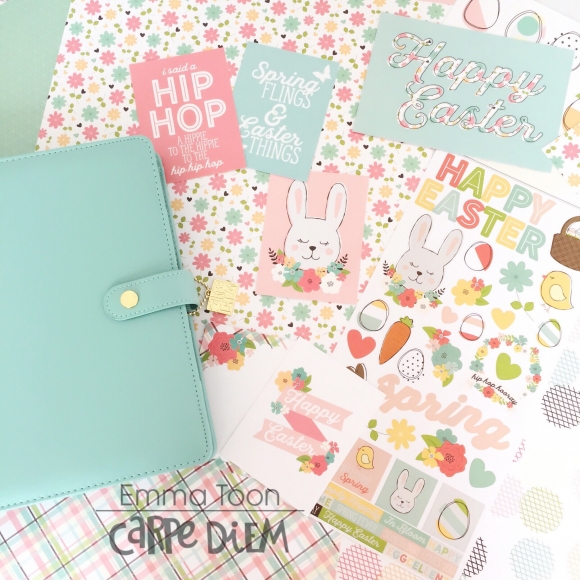
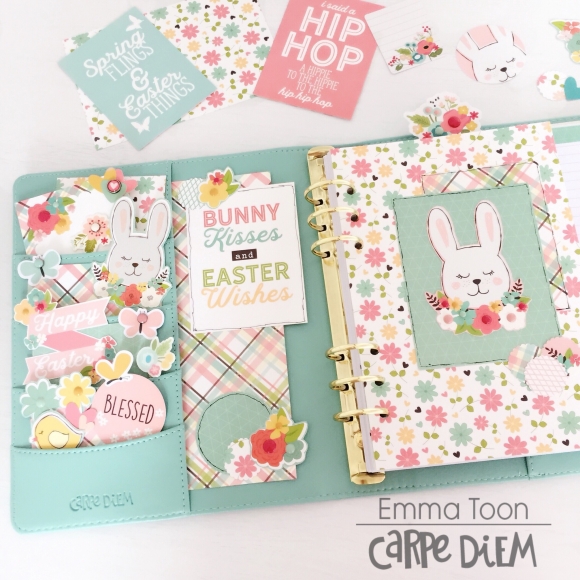
When I am setting up a new planner, I always start by making a dashboard and filling the front pockets.  While I work away on this, I usually start solidifying the way I will organize the planner-- I usually don’t have that planned out when I start. (gasp!)

My Dashboards are always simple and made from a paper that makes me happy with some other small elements.  I just want to feel happy every time I open my planner.  This feather paper shouts happiness to me!

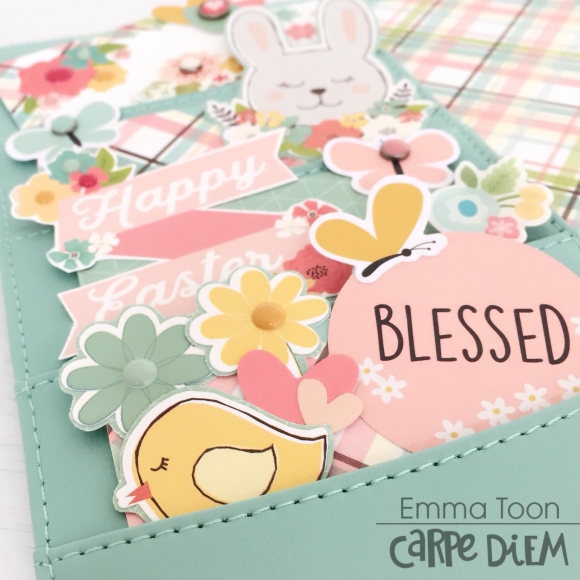
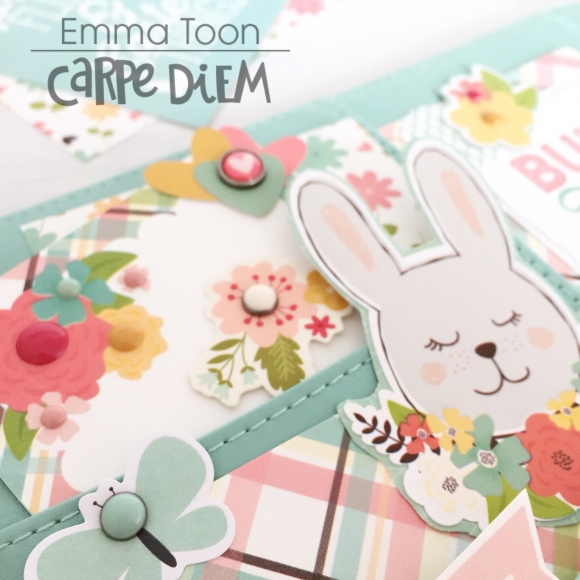
I love adding decorative elements into the front pockets, again these are usually items I know will bring a smile to my face—usually pretty journal cards, ephemera and planner clips. 

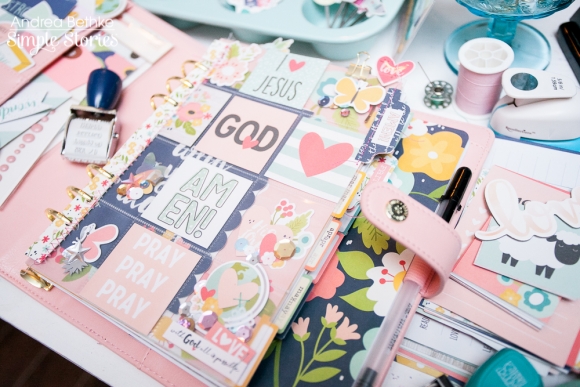
One thing I did differently with this planner is I devoted an entire section to supplies.  I don’t usually ‘plan on the go’ but this planner is really about documenting my time with God and I know having a section full of supplies will make it easy for me to keep up the system set up in my faith planner.  I love the pocket included in the Faith A5 Planner Insert Set - I am using this one to hold all my 4 x 6 stickers sheets.  As you will see further down in the post I use these stickers a bunch—they are perfect for brightening up a page.

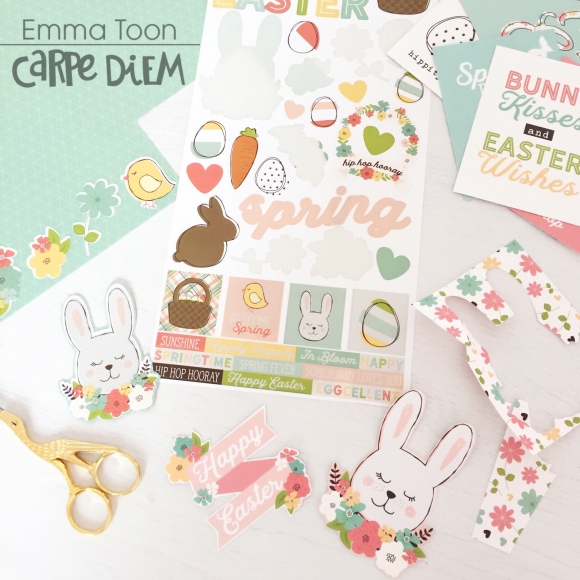
Another great part of the Faith Insert Set are the pages of sticker sheets that are pre-punched to fit your planner.  The three pages are full of functional stickers that make a planner girl happy!  Not to worry if you find you used them all up right away there is also a separate Faith Sticker Tablet that includes 12 sheets of similar stickers that are perfect for planning.  One of my favorite item on these sticker sheets are the divider labels.  The headings helped me figure out how to organize my planner and once I put these stickers on my dividers, my planner looked like it was starting to have real purpose.

The first section I made was for Prayer, because, let’s face it, it is not my strong suit.  I want to become more habitual with prayer like I’ve done with Bible Journaling so there is no better way than to involve some pretty paper and stickers to get this going.

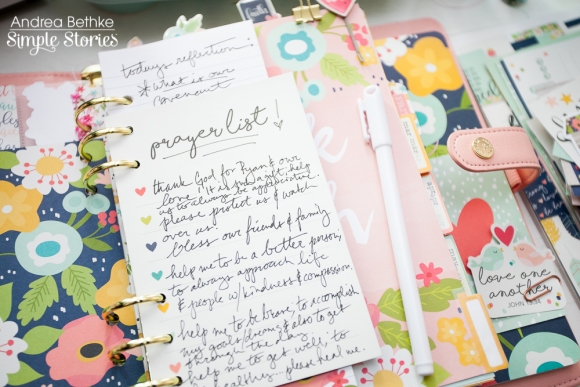
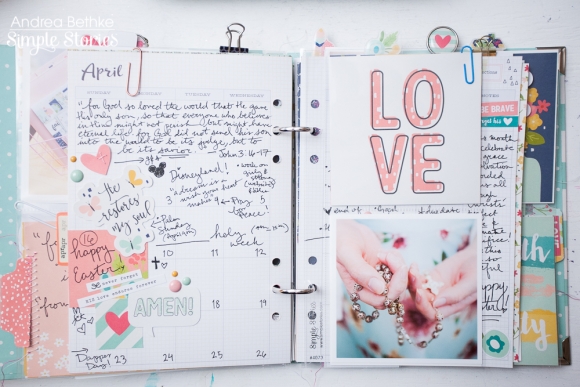
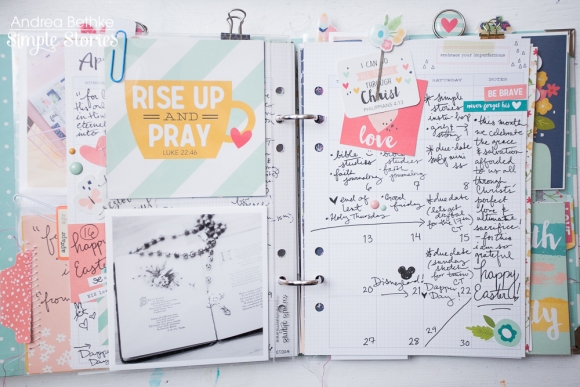
When I saw the Menu Planning Inserts (yes, the MENU Planning Inserts!), I knew instantly these would be perfect for documenting what I wanted to pray for each day.  I love that it is just a few lines for each day—not too much space to fill—and the bottom note section is a perfect place to summarize the week.

The whole page is decorated using the 4 x 6 sticker pack that is stored in my first section.  It was fun to use them each day.  Some days I just feel overwhelmed about what I should pray for (I can’t be the only one!) and I found the word and phrases stickers inspired me.

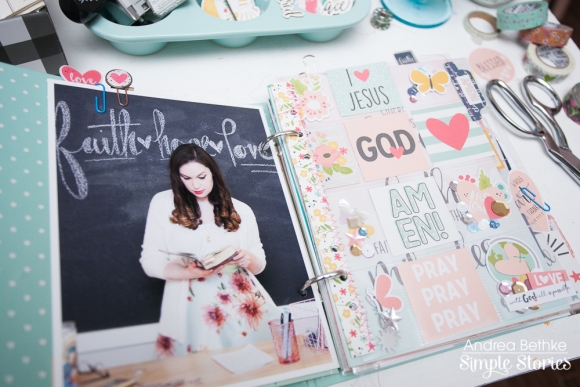
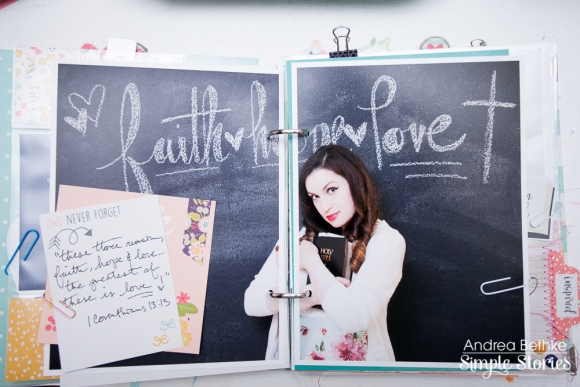
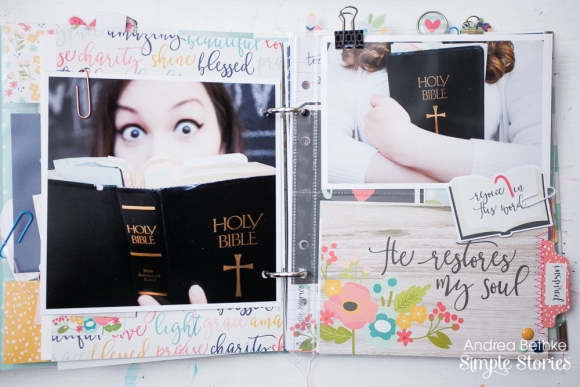
The next section is all about my bible journaling!  I used the Posh Monthly Inserts (the colors work perfectly with the Faith line) and printed out photos of my bible journaling to see an overview of my entries when I created them.  I wanted to do this because I don’t always post my entries on social media and I wanted a place to document them.

It was an eye-opening exercise as well, there was a good portion of the middle of the month I did not do any journaling—something I can work on next month. 

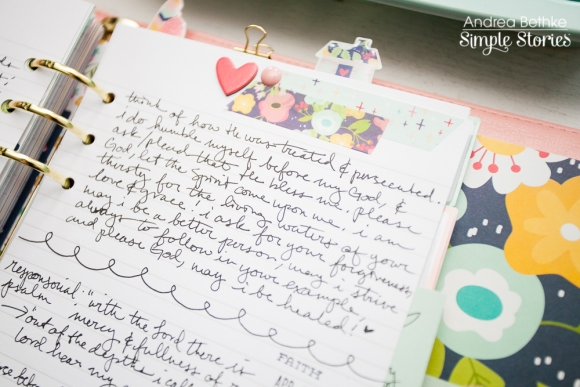
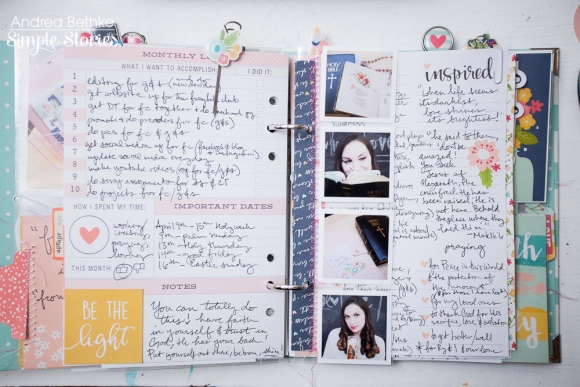
After the monthly layout, I created a Journaling Log using the decorated lined paper that comes in the Faith Insert Set.  I used the alpha letters from the 4 x 6 sticker pack to create a heading at the top, and the rest of the stickers are from the Faith Sticker Tablet.  In the heart stickers, I put the date of the entry and then I noted the portion of (if not the whole) the verse and the focus of that entry from the devotional.

On the back of this page I added a Journaling Card from the 4 x 6 Horizontal Elements 12 x 12  Paper and I wrote of summary of what I learned through the month.  I am so pleased with this process as I can really reflect of what God did in my life the past few weeks.  It was a wonderful way to remind myself that good things are happening!

The next section is all about Praise where I document events that I know God is at work in my life.  You know, those things that seem to work out just perfectly, or the comment your friend said that was just what you needed to hear, or that helpful hand that arrives just at the right moment.  To me these events are not a coincidence they are God at work.  I am working to become more adept at noticing these gifts so I am writing them down.

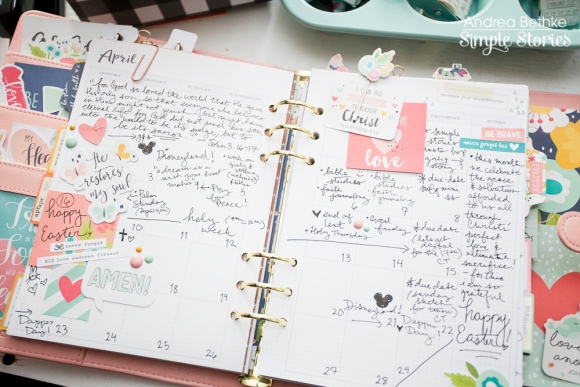
I used the 5th divider as a “Go and Do” section.  I wasn’t sure about how I would use the inspired inserts from the Faith Planner Pack at first, but I have to say they are a perfect way to wrap up a week!  So much of this planner for me is about documenting the little things at work in my life.  This one pager covers provides a great overall snapshot of what is happening in my week.   So much of what we do as planners is about what’s coming up in the future, but these are a great way to look BACK on the accomplishments of the week. 

My last section is for notes or study.  I put the unlined decorative sheets here that are perfect for scribbling quick notes or doodling when I am feeling creative.

Whew, we made it through the planner!  I am so happy with the way this planner came together.  The great thing about the Faith Planner Inserts is that you can really make it your own.  I have to be honest and say it took me a few days to get all my ideas clear enough to get this planner organized.  Sometimes a blank slate can be intimidating, but the Carpe Diem products really inspired me to create something I’ve been thinking about for over a year.  Give it a try and if you post your planner, please tag me on IG.

SaveSave

SaveSave

Hello. I'm Lisa. One of the new 2017 Creative Team members.
I'm really excited to be with you here today. I hope you will enjoy my scrapbooking creations.
 
I have two layouts for you today, both using the new 'Say Cheese III' collection.
 
The 'Say Cheese' collections are perfect for me as we are a Disney loving family. It's a special year for us as it celebrates 10 years since our first Disney World trip. We are so excited about going back again this Summer. As the excitement is building there's lots of family chat about our previous trips. I tend to just scrapbook each trip and it all goes away in separate scrapbooks, but I wouldn't usually mix the photos from the different trips, so this is what I've done today.     


I've taken one photo from each of the trips. It's so nice to see them all together like this, seeing how the children have changed and grown.
I printed each photo really small, just 1.8 inch square with a thick white border so I could piece them together like a photo strip.
 
I really enjoy using the 12x12 papers that are made up from the journaling cards. They are so fun to use. I have taken the piece with the 3x4 cards and cut two from this piece of paper. I left a small space between the two cards so that my photo strip could have center stage. 


I really enjoy using washi tape. I particularly like the tapes from this collection. The red with polka dots just screams Disney out to me, so I had to use this. Red, polka dots and bows, to me this just means Minnie Mouse. The bow is easy to make by sticking the tape down on thin card and trimming the edges. It can then be shaped in to a bow. I used the 'smile' which comes in the pack of 'bits and pieces'. This covers the joins nice and neatly.   
 
 
I used this same technique to make some journal strips. Sticking the tape down to card again and then trimming down in to  thin strips. It's a fun way to add a little journaling. 
 
 
I also used more of the 'Bits and Pieces' and the Rotary Stamp.
Lastly, I took one more of the 3x4 journal cards from that same piece of 12x12 paper and from this card I cut out the word 'LOVE'. The perfect final piece to my page.
 
*************************************************
 
For my second project, I decided I was going to frame a piece of art for our Disney inspired gallery wall.
Sometimes I feel it's a shame to file all these happy memories away in scrapbooks.
We take so much time creating these pages, I like to display them in my home too.
Our Disney memories are our happiest memories, so for me I like to create and display.
 
I picked up this 12x12 white photo frame and removed the glass.
I cut a piece of cardstock just slightly larger than the space.  
 
 
I used the Snap Pack this time and took two of the 6x4 cards and stuck them down over lapping one another. I measured the space on the upper journal card so that my photo would fit perfectly.
 
 
I used a mixture of the 'Bits and Pieces' pack and also some of the pieces that come in the Snap Pack.
Some of the pieces are stuck on to the layout and some partially on the layout and the mount and some just on the mount itself, really bringing the project together.


To finish, I took the same polka dot washi once again and stuck it to the edge of my 12x12 frame. I love that extra touch of Disney magic this adds. It really finishes this job off perfectly.  
 
 
This frame now has a home on our Disney gallery wall going up our stairs.


Thank you for stopping by today.
If you've enjoyed this post you can also watch me making these over on my YouTube channel here. And you can find me on Instagram - thefunkyfairy
 
Thank you so much.
Have a magical day xo

SaveSave

SaveSave

Hi there planner friends, it's Emma here. I'd like to show you how I've set up my Robins Egg A5 Carpe Diem planner with the Easter Simple Set.

The first thing I always do when setting up a planner is make the pockets pretty.  It's really important to me that when I open my planner it makes me smile.  I enjoy fussy cutting flowers and pretty things out to add to my pockets but also backing stickers with cardstock and cutting those out too. 

I like my pockets to be full and to have plenty of depth.

I've used decorative brads and enamel dots from the Faith collection to add texture.

A simple way to tie in the theme is to slide a piece of cardstock in the large side pocket.  This then gives an additional area to decorate.

Using a 3x4 element from the Easter set and a few cut out shapes I've been able to add even more interest to my planner set up. 

Another important aspect of the initial look to my planner theme is the dashboard.  I've layered with papers from the Easter Simple Set and placed more enamel dots on the super cute bunny which I cut out from one of the 3x4 element pieces.

To finish the look I placed the Floral bookmark Tablet in the back pocket and tucked in a floral element from the Faith Bits & Pieces pack to use as a page marker. 

I hope you've enjoyed looking at my Easter planner and reading how I put it together.  See you next month! 

Supplies

Hi everyone! It's Tara from Secretbees Studio! This is my first post for the Simple Stories Creative Team and since we are so close to Easter I could not resist making an adorable holiday banner! It was so easy too with this sweet paper collection- so many awesome papers and such cute stickers in the Easter Simple Set!
 
I used my Silhouette to cut an assortment of banner shapes from the beautiful paper collection. Each is approximately 3 inches wide and about the same in length but they do vary a bit. After deciding on the arrangement of the banner flags, I added in more pieces of the charming paper with smaller banner sizes, fishtail flags and scallops. Then came the fun part- adding in all of the super cute stickers!
 
 
I layered and positioned all of the Easter and Spring themed stickers in fun groupings, popping some off the paper for dimension! I tucked in some happy colored enamel dots from the Domestic Bliss and Faith collections because they match so well and really added a nice pop of color!
 
To add in more solid color variety, I cut portions of the 3x4 and 4x6 journaling card elements. The 'Hippity Hoppity' sentiment was also cut from the bottom of one of the journaling elements!


The cheery banner flags were strung on twine and I left extra at the ends so it can be tied or hung! I used some of my favorite papers from the collection to create two large rosettes and added those to the ends of the banner, hot gluing them right to the twine. Now to just display this super cute banner for the holiday so my whole family can enjoy it!
 

SaveSave

Supplies

Hello Friends! It’s Kristine Davidson with you today and I am excited to share a few layouts and cards with you today. It’s April already and that means it’s time to start scrapbooking those Spring photos and create those special mother’s day layouts.   

This month I decided to play with the NEW Simple Set called MOM.  I had a few layouts in mind but the photos of my mom and I are very few. I need to work on that this summer and get more pictures of her, even if she doesn’t like them! So I dug out some photos that were not necessarily MOM photos but they mean just as much to me. 

This first layout is called Beautiful – It is a picture of my niece who is really growing up way too fast – She took this picture as a selfie and I was in awe of how beautiful she is. 

I created a bit of a simple layout – using a white piece of cardstock and adding patterned paper for a ½ border around the cardstock. This just makes my layout feel like it’s framed.  I then added some strips of paper and did minimal sewing on this page. 

Adding a bit of embellishments to the top left was easy to do with this cute banner sticker and well since I love pop dots and twine that was a given to be included. 

I cut out the “ beautiful “ from a 4x6” journal card in the paper in the collection and added that as my title. Nothing fancy but it adds to my layout. 

It’s quite easy to replicate and of course you can add some journaling and your page is finished. Nothing too fancy and easy for you to create in less than 1 hour!

________________________________

My second layout is called Love You – It’s a silly and sweet picture of my kitty as she attempts to get comfortable in one of her kitty trees! My goodness she used to fit in that space so nicely but now she’s getting a bit too grown up for that little space ;) it’s funny to watch her try and get comfy!

I used a piece of cardstock that was cut with my silhouette. I created cut outs for a piece of paper measuring about 2.5” x 2.5” and fit nicely as a grid background. A great way to use scraps too! I then printed her photo in a 4x4” format to fit nicely on this grid layout.

I used minimal amounts of stickers or embellishments. I did add some enamel dots, twine, and did a few layers with the stickers using popdots. 

My title is found on the LOVE YOU sticker, and I added journaling at the bottom right.  

Well I had some left over papers and decided to create a few cards – these are themed for Mother’s Day and YOU can make these too!   I used left over stickers from the Simple Set pack and some twine – nothing else!

I hope you feel inspired to create with this beautiful collection and please share your layouts or cards with us on instagram @SimpleStories_ and you can tag me as well @KristineDavidson


Supplies

Hey everyone! It’s Lori, and I’m back on the blog sharing more behind-the-scenes from the CHA/Creativation show. Today it’s all about our magical Carpe Diem Say Cheese products!

The Say Cheese Carpe Diem collection brings a smile to everyone’s face! Filled with gorgeous, bright colors, these products are bold, fun and happy!

Take a moment to walk through a virtual tour of the Say Cheese A5 12 Month Planner Insert Set and see all the beautiful and useful products that are included! Inside you’ll find over 270 pieces of planning supplies; 12 monthly tabbed dividers, 72 weekly inserts, 1 main dashboard, 1 acetate dashboard, 6 die-cut dashboards, 1 storage pocket, and 3 A5 sticker sheets!

Inside the Say Cheese A5 12 Month Planner Insert Set, you can decorate your planner just as you want it.  On the countdown for a fabulous summer trip?  Or maybe you want to use the Say Cheese design in your everyday planning, because its just FUN!   Whatever the reason you pick up this design, you can decorate as much or as little as you like.

If you’re using the products from the Say Cheese Carpe Diem collection on your next trip to theme park heaven, grab a few of our Say Cheese Doc-It Journals to carry along on your daily adventures. Use them as autograph booklets or for recording cool things that happened throughout your day.

Are you super excited to start your magical planning off right? If you are, head to one of your local retailers and ask for this insert set today!

To locate an online store or retailer near you, check out our store locator. Be sure to call ahead to make sure they have this insert set in-stock, because they’re selling quickly!

Can’t wait to get inspired? Be sure to follow our Live Love Plan Pinterest board for more than 600! Carpe Diem Planner ideas and inspiration!  

SaveSave

Hello everyone ! Welcome to the blog today. It's Mindi here and I am so happy to be sharing some SN@P! pages with you today. This upcoming year I will be working in the 6x8 albums and telling smaller stories about my family/individual family members. Today though I am going to be sharing some pages made with the Soccer Simple Set
 
Here is a look at the first spread that I put together. My oldest daughter wanted to try out soccer last spring and so we signed her up in a non competitive league here in town. During the course of the year I took a few fun photo shoot type photos of her. I decided to make the first photo of this particular series a full 6x8 photo of her. I added some journaling up at the top and then added an arrow sticker on each side for some simple embellishments. I did strive throughout this pages to have a cohesive and simple look and design. The Simple Sets make it so easy to make that happen, they are perfect for these types of projects. 
 
 
It turned out that I had a lot photos from the season that I wanted to try and include. These 2x2 Insta Pocket pages were perfect. They allowed me to add in more photos and also to have a little bit of fun with some of the patterned papers. I really didn't want or need all those pockets so I trimmed off the top row for a fun look. 
 
I knew that I wanted to include that word sticker that says Soccer somewhere. I decided to add it onto the outside of the page protector and add it right in the middle of the page protector. That got me thinking that I could use it and the clear page protector as a see thru element to the next page. I positioned my journaling just right so that the word soccer was on top of my photos journaling on the next page. Once I had that figured out I filled in the extra pockets with photos and patterened papers plus stickers. 
 
 
The other side of the trimmed off page protector looks like this. I did more of the same, adding in photos and papers. I kept it pretty simple as to keep with a simple look throughout the album. The backside of the Soccer sticker I debated whether or not to add something to it but ended up leaving it and adding a few of the stickers on the backside. The rest of the pockets I took some of the stickers from the sticker sheet and simply embellished them. 
 
 
On this right side of the second page I focused on talking about practices and added some photos from the Monday night practices. I want to point out one thing on this page. There was a journaling card that I went ahead and cut up and used the parts of the card throughout these pages. I spread out these fun stat boxes and added number stickers inside the boxes. If you like a particular part of a card or even a word on a card go ahead and cut it up and use it in different ways. This is a simple way to customize your own pages that is simple and fun. Go ahead and get creative. 


Here is what the next set of pages looks like.
 
 
This set of photos and stories are all about the team photos and game days. Even though the team photos were poor quality I am so happy that they even did team photos and wanted to add them in to the album. I added in a journaling card that I created with some of the stickers from the sticker sheet. I just love those colored arrows and used them all up. 
 
 
This photo of my daughter was another one that they took and was small and poor quality. I took some patterened paper and cut it into a triangle shape and added it onto a 4x6 piece of white cardstock. Then I added my photo, a few strips of patterened paper and another one of those stat boxes to the left corner. I finished off with her name and a few more stickers on the other side. 
 
 
Here is a look at the last spread that I created. 
 
 
These pages were filled with some misc. photos and a few journaling cards. I made my own 4x6 journaling card using some of the stickers and strips of patterned paper. Those soccer ball stickers are so adorable and I was always saying " Go Katelyn" so it was perfect to use the soccer ball as a O in the word GO. 


Thanks so much for coming over to the blog today. I had so much fun putting these SN@P! pages together for my daughter's album. Have a great day ! 
 
 
6x8 Insta-Pocket Pages Variety Pack #4074 | 6 per unit | 10 per pack
6x8 Pocket Pages Variety Pack #2001 | 6 per unit | 10 per pack
6x8 SN@P! Faux Leather Album - Black #4037 
7917                   Say Cheese III                        Enamel Dots


Supplies

Pages