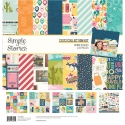
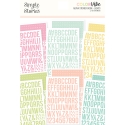
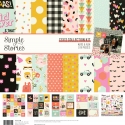
Hi! Odessa here with some spooky pages using Simple Stories Boo Crew. Full of all things creepy it was just what I needed to go with some Halloween-y photos

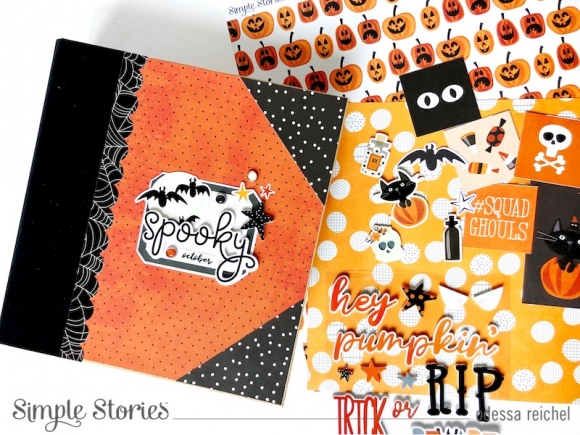
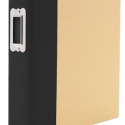
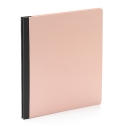
I used the SN@P! Binder with a black spine to coordinate with Boo Crew. I used the So Fantastic cardstock on the chipboard cover and then used the back side of the 2x2 Element cardstock to create faux book corners. I thought giving the album a spooky old album or book feel would be fun.

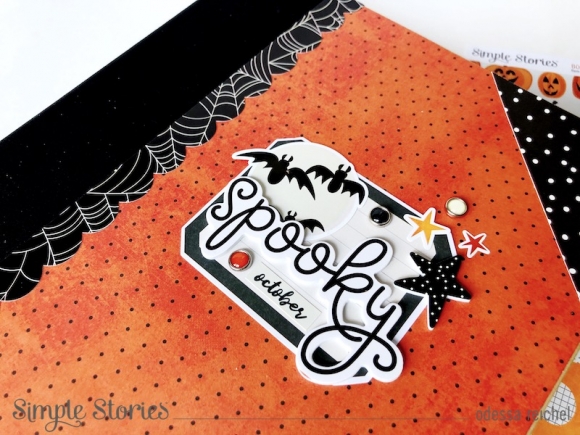
Keeping the spooky book feeling going, I made a little book plate for the middle. Using one of the Journal Bits as the base, I added a title using the Foam Stickers and sprinkled on some  Decorative Brads and Cardstock Stickers. It came together pretty quick but looks like the perfect album for Halloween memories!

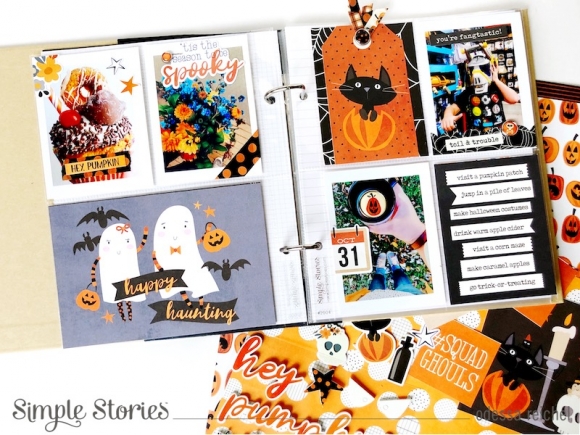
Inside is all things haunting. I filled my pockets with fun pictures from Halloween. This page has more general pictures and lots of fun touches. The Tag cardstock is packed with fun tags and I used a few in my pockets. I folded some of the Boo Crew Washi in half and threaded it through punched holes on top of the tag. It’s a great way to add a coordinating ribbon to a tag without having to find it in your stash. I finished the tags off with a brad over the hole. 

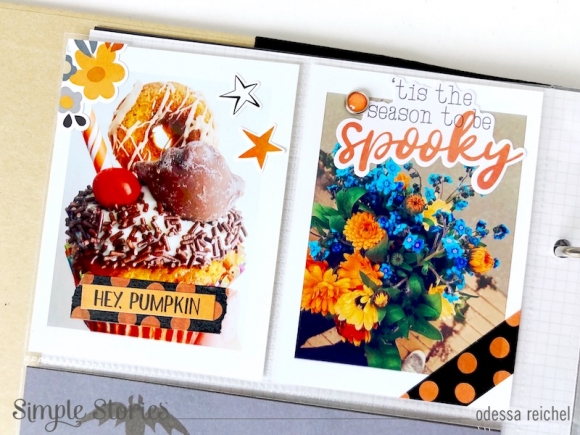
The embellishments in Boo Crew are great. Lots of spooky bits and simple embellishments that work with some less spooky photos like these. I layered on some stars and flowers with some phrase embellishments. After using the floral sticker from the Cardstock Stickers in the left corner I balanced it with a bit of washi in the bottom right. And those new stick on Decorative Brads are so great!

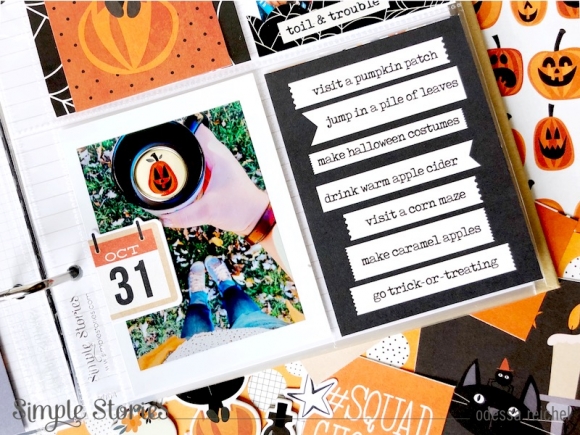
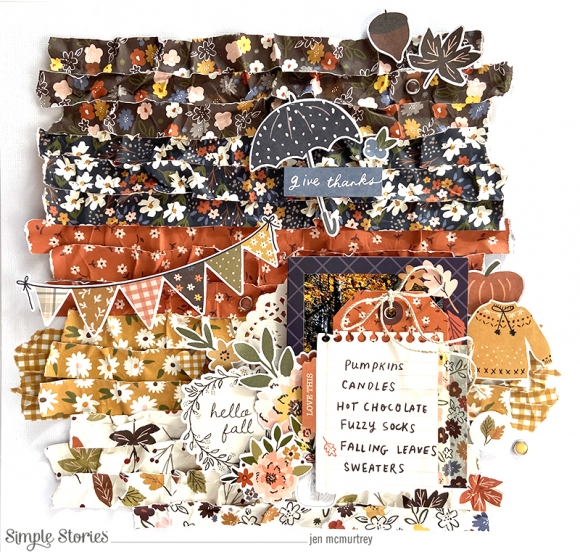
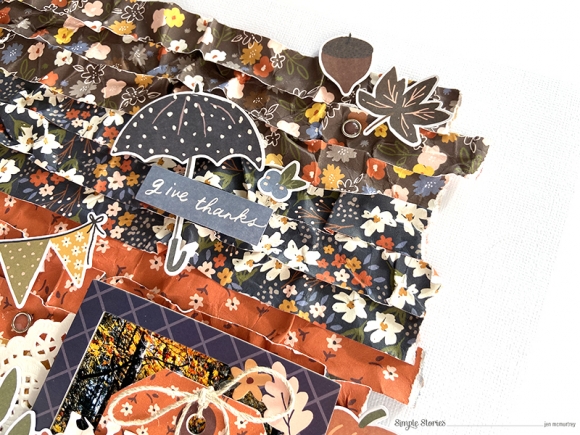
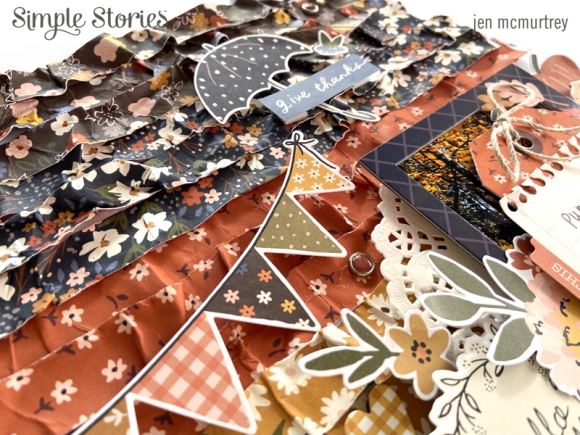
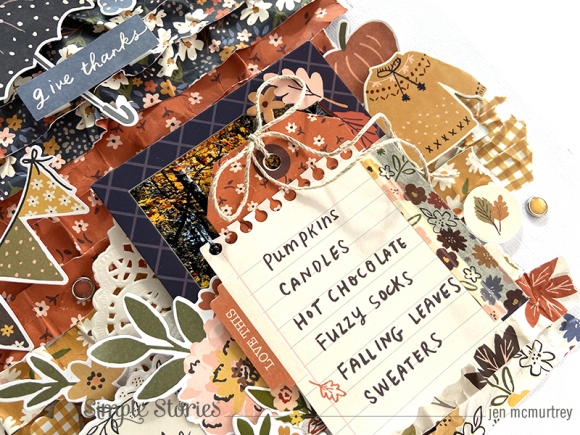
I just had to use this pumpkin Boo Crew Decorative Brad in my coffee cup over my pumpkin spice coffee. Such a perfect touch. And that list of fall fun on the card from the 3x4 Elements is just great.

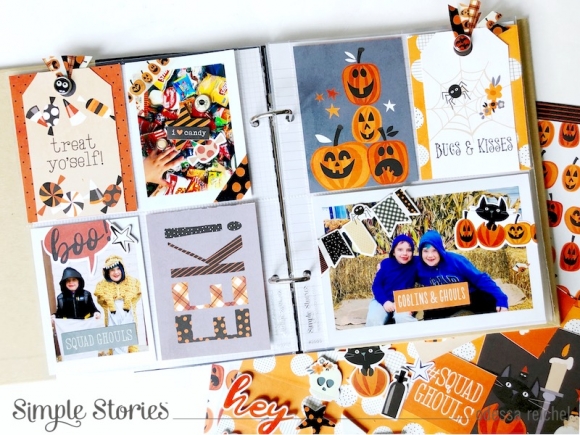
This page is a little more spooky. I used more tags put together like on the other page. They’re such a fun embellishment and alternative to fill up a pocket. I used some stickers on the picture on the bottom right to cover up some things in the background that didn’t work. The little pumpkins work great on the hay.

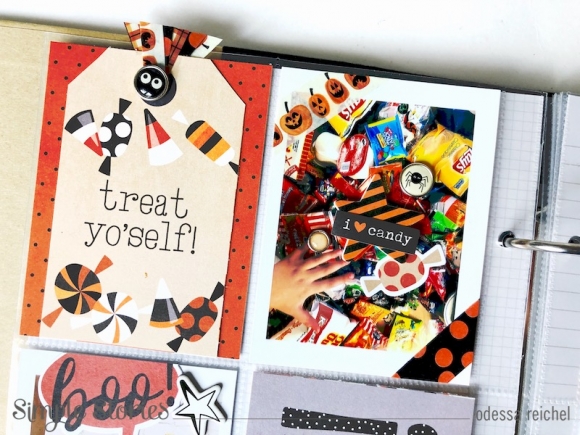
I used a big foam star sticker to help the candy phrase pop a bit with a few embellishments around it. That little spider brad is so cute!  And a close up of the tag. The brad and washi is the perfect touch to make the tag pop. Boo Crew is just the right mix of cute and spooky.

Supplies

Are you looking to host a bridal shower or need a house-warming gift for a recent graduate? Today I'm sharing a unique Recipe Keeper featuring the new "Apron Strings" Collection!

The keeper starts will two pieces of 4.25"X7.25" chipboard dressed in patterned paper for the covers.  To the front cover, I added layering of die-cuts and stickers.  

For the inner pages, I used an assemblage of die-cut apron shaped pages (see the PDF to create your own!) and sheets of 6X8 page protectors that were cut in half to accommodate the 4x6 recipe cards in the collection kit.

After assembling the apron pocket page, tags were cut from the Tags paper and tucked inside of the pockets.  I used left-over tags and attached them (by the top tab) to the top of the clear page protector.

I used various images and sentiments from the clear stamp set and added them to small premade tags.  These tags were attached to the clips that were used to hold the tags in place.

To the back of each apron page I added a small photo mat and tab stickers.  These pages can be used for photos of completed dishes or working in the kitchen!

In finishing, two holes were punched at the top of each page, page protector and cover page, and 1.25" rings were used to hold the pages together. If you're planning a bridal shower, have guests complete the recipe cards and add tips and tricks to the tags...such a meaningful keepsake!

NOTE: To use the PDF template simply print, trim out and trace.  You may also wish to scan and reduce the size to fit your project.

Thanks for joining!

Shellye

Supplies

Hello Simple Stories friends! It’s Jen today with a layout using the new Cozy Days collection. Fall is without a doubt my favorite season – the beautiful leaves, going to football games (usually), and of course pumpkin spice lattes. This year autumn activities may look a little different, but I know I will enjoy it just the same.

When it came to using Cozy Days, I literally could have used every single piece. There is not one thing in this collection that I do not love. With that being said, let’s take a look at my layout.

Adding texture to projects is one of my go-to methods, which is exactly what I did here. After choosing several of the floral-patterned papers, I cut three strips from each that were ¾” wide. Next, I took each strip and balled them up in my hands, rolled them around, and did my very best to make them look like they went through the laundry. LOL!

Once the strips of paper looked good and worn, I attached each with my ATG making sure to wrinkle and fold them as I went.

Embellishments followed, and I tried to keep like colors together . . . meaning I used orange embellishments on the orange patterned paper, etc. At this point, I did not yet adhere them to the background because I was still working with the placement of the photo.

For the photo, I selected a cardboard frame to use with it and adhered both to the layout with foam squares. This particular frame has an adorable raccoon on it, but I decided to layer flowers and a sentiment with it.

I fell in love with the cute tag die cut that looks like notebook paper that’s been torn out (must be the teacher in me). To give it a bit more color, I stamped the leaf onto it using orange ink. Next, I adhered it to the frame with washi tape and put my journaling behind it.

I hadn’t planned on covering the photo in the beginning but I like how it turned out.

After completing the embellishments on and around the photo, I adhered everything to the page.

The colors and patterns in the Cozy Days collection absolutely warm my heart, and I cannot wait to create more projects with it.

Thank you so much for stopping by today! I hope that you have been inspired to document your favorite fall memories with this lovely collection.

Supplies

Hey there! Tya here! I am up on the blog today sharing my latest batch of handmade cards! Sooo – is anyone else totally over summer and ready for fall already? It has been 100 degrees all week in my neck of the woods and working with the adorable Boo Crew Collections has me all sorts of excited for Halloween and all things fall!

So the Boo Crew collection- where can I start!! Um – first off – it’s SO MUCH FUN! I am more a lover of the cute, whimsical side of Halloween and this collection definitely fits the bill!  And the colors and patterns are adorable! Today, I am sharing 7 cards with you using this super cute collection- so here we go!

Card 1 features one of the cutest skeletons you will ever see! He is from the Bits and Pieces and I knew he needed to be front and center and I also loved the “Creepin’ it Real sentiment from the Journal Bits and Pieces. I also used a tag that is from one of the newest pattern paper types.  The “Boo Crew Tag” 12 x 12 paper is full of tags printed on both sides of the paper.  These tags make a great base for layering up all of my embellishments! I will for sure be using these over and over again!

Card 2 is a fun one. I made this card with some cream cardstock and used a metal scallop border die to cut a border in the front. The front flap will now lift up and reveal all the cute stars on the pattern paper showing underneath. How cute is that cute black kitty on a broom in the center of my card? Love it!

Next up we have Card 3…Lately I have been having fun making shaker cards – so I had to make one with some fun Halloween theme confetti inside it.   The cute ghost standing next to the haunted house makes a great decoration along the bottom edge and a fun “Happy Haunting” sentiment tie this card all together!

Card 4 is where I had some fun with the Starry Night 6x6 Stencil and some grey ink. I inked the back of some cream cardstock and then added my decorations on top of that paper. It’s fun to get inky sometimes! The candles and skulls were even super cute – so they had to be placed on this card! EEK!

Card 5 has another cute character on it. The mummy here trick or treating made for a fun “candy” themed card. And I forgot to add that I am completely in love with our Decorative Brads.  The now have an adhesive back instead of the prongs and I love them so much!! You can see them on the stars on my card.

Card 6 utilizes one of the 4x6 Cards from the 4x6 Elements paper.  These are great to use on cards and just need to be trimmed down a little bit on the sides to fit the card base. You can’t have Halloween without some Pumpkins! I also added a fun “Hey Pumpkin” sentiment from the Foam Stickers – they make great statement!

Card 7-our last card is a Slimline card. These are a new shape in the card making world and they are a lot of fun to decorate.  These cards measure 3 ½ x 8 ½ in size. I used a couple of metal dies from Mama Elephant to make the scallop edge and the window panel as well. I popped the window panel up with some foam tape and then stuck some cute ghosties and candies in the windows peeking out. I added some stars from the Foam stickers around the windows as well…  I love how this card turned out.

I had so much fun playing with the “Boo Crew” collection! I hope these cards have made you excited to get your Halloween crafts going! If you are a Halloween fan – you will definitely need this one in your collection! Thanks for stopping by today – Happy Crafting Friends!

Supplies

Hey everyone! It’s Kylie back with you today to share a very ‘girly’ themed layout with you all. I recently took some photos of my daughter which doesn’t happen too often these days. (**teenagers) I wanted to create something special to add to her album and decided to use the super pretty ‘I Am’ collection which would be perfect.

To begin, I trimmed a piece of the 4 x 4 ELEMENTS paper to 11”x 11” and adhered it on an angle over a piece of the AMAZING paper. Once in place I added a hand drawn border using a white marker pen as well as the border strip from the sticker sheet. It was adhered close to the top edge of my page.

I decided to create a decorative border to place on the lower half of my page. I did so by layering papers BLOOMING, (both sides were used) and the 4 x 6 ELEMENTS. A layered heart was created using multiple sized punches from my stash and I centred them with one of the decorative brads.

Using the super beautiful gold phrase stickers, I created a large page title and adhered it to my border.

My photos were printed 3”x 4” and I positioned them with one of the 3 x 4 element cut aparts, backed with the 2 X 2 ELEMENTS PAPER as a large banner throughout the middle of my layout. Using the floral elements from the sticker sheet and the chipboard stickers I created a few clusters of blooms to support and embellish my photos.

Once completed I was super happy with my page. There are so many gorgeous prints, colours and embellishments in the ‘I Am’ collection, making it super easy to bring your page together.

Thankyou so much for stopping by today. Until next time,

Kylie

Supplies

Hello friends! It's Mik here from Papermiks on the blog sharing a new flipbook inspiration. What can't be missing from your summer? For me it’s BBQs in the backyard, picnics, blue skies, pool and lemonade! And we can find all those and much more in Simple Stories' Summer Farmhouse collection. This is a beautiful and lovely collection and today I’ll show you a flipbook idea for a romantic and happy summer.

To make this beautiful and lovely cover I used a 6x8 pad paper, a 4x6 Sn@p! card and a 3x4 card. I wrote “Hello 2020” with the Foam alpha sticker and used ephemeras to give it a lovely touch. Finally, I pasted a yellow ribbon on the left side, and we have this adorable cover.

For the first page of my album I decided to make a flip page. As soon as you open the album, we have a card where I’ll write my romantic summer’s top ten.

When we turn the page, the fun begins. I made several flip pages. Interactive touch and many photos = Fun!

I love making frames using a washitape, and here you can see how beautiful it is a decorated page using a washi. I really love it!

Making cards, to my minialbum, is another passion. So here I used a 4x6 card and decorated it with 2x2 cards, washitape and stickers.

It’s look super fun, isn’t it? I hope you’ve got some inspiration from this idea and enjoyed it! Thanks for stopping by and have a creative day!

Supplies

Hi beautiful Simple Stories friends, Cristina here with you today to show you a new project I made with the fun and summery Summer Farmhouse collection. I made a mini album to make a gift to a lovely friend and this collection was perfect to make a ring album full of amazing designs.

I decided to make a mini album because I really like this collection and I wanted to be able to use it as much as possible. I chose a ring album that has a very versatile binding and that allows you to choose the structure of each page as you go ahead. Since most of the photos chose were made vertically I chose to make a vertical binding for 4 + 3/4 x 9 + 1/4 inches sizes.

This kind of binding is also very suitable to add page protectors and those chosen were obviously of a different size so I cut them out at the junction point of the pockets and sewed them to the photo inside to solve the issue of the side left open.

I also added some cut file with beautiful sentiment to sew them to the pockets, I really love how they turned out because that was the perfect mood I wanted to have.

This summer collection is really different than other because it is full of original designs suitable for creating summer pages but not necessarily sea-themed. Then all the papers have very high quality, It does not flake on the score or tear when you are wrong to attach
a sticker and you have to remove it. It has a high weight and has a wonderful smell, yeah I love to smell paper and the Simple Stories ones have a smell that I totally love.

I hope my project can inspire you in some way so thank you so much for joining me today and see you next time.
Bye.
Cristina xxx

Supplies

Hello my crafty friends and thanks so much for stopping by!  Did you know that birthday cards are the most popular cards to send?    That’s no surprise because birthdays are always a good excuse for celebrating and I mean…. Who doesn’t love cake?   LOL!

Today I’m sharing NINE cards made with the Simple Stories Birthday Blast Collection!   I guess I got a little carried away!   I couldn’t resist the bright colorful papers and all the adorable images perfect for the  little explorers in your life!

This collection is loaded with robots, space ships, aliens and did I mention cake?   YES!!! There’s yummy sweet treats too, along with all the traditional party goods you might expect like balloons, confetti, party hats and streamers!

All of my A2 size cards were made using the 6x8 paper pad.  If you cut the sheets in half they are perfect for covering two card bases, and the smaller print makes it easy to see all the printed images on the smaller size canvas.

You’ll find loads of embellishments including chipboard, washi, bits and pieces, decorative brads and enamel dots.  I used EACH of those items on ALL of my cards.  Can you spot all the bling?

And if that isn’t enough to make your heart happy how about silver metallic foil accents on the die cut bits and pieces, stickers and chipboard?  

I always arrange the elements on a clear piece of plastic the size of my card base.  This helps me figure out the placement before I commit and adhere them in place.    To select the background papers I pick up the sheets and lay them over the different colored papers.  Because the plastic is clear I can see how the elements will look on any particular pattern.

I’m a big fan of the thick chipboard pieces.  They add lots of dimension and give an expensive look to a design.  To make the die cut bits and pieces stand up, I make my own adhesive foam tape.  I adhere double sided adhesive tape sheets to inexpensive thin craft foam.  The large sheets make it easy to cut a piece to any size or shape embellishments without having to peel a bunch of squares.   It saves some money too so I can buy more pattern paper!!!

This collection really captures the fun and excitement of a birthday party.   You can’t help but smile when you see the rainbow colors and adorable images that will have you feeling like a kid again!

You’ll love the Birthday Blast collection for celebrating the little (or maybe a little older) rocket man in your life!

Supplies

Hey everyone, Michelle here today with a new layout to share using the Simple Vintage Great Escape collection.  We spend a lot of time outdoors in the summer so I was really happy to see this nature themed collection!   The colors can be used for any type of layout.

I cut some random strips of paper to create a starburst effect for the background of my layout.  I added a simple line of stitching in each of them and lifted the sides a bit to add some dimension.

I used a photo of my son from a camping trip a few years back.  I embellished the layout with some ephemera, stickers and brads.

The soft neutral colors of this collection make it very easy to use,  It matches with everything!

Thanks for stopping by!

Supplies

Hello again, today I’d love to share with you how I’ve used the Simple Stories Great Escape collection in my Green 6x8 Sn@p! Binder.

I’ve covered the front of the binder in the Wild and Free 12x12 paper from the collection kit, and then layered it up with a frame where I slide one of the cut a part images behind, and then plenty of chipboard pieces, bits and pieces, and I even threw in some brads for good measure!! You can never have too many embellishments...right?! Oh and if all that wasn’t enough, I chose some cute ribbons to tie around as a finishing touch!

You can also see on these close up photos how I used some gold twine and enamel dots to add some extra detail to it all! I have to say, I’m pretty pleased with the finished result! 

When you open up the binder you see the ‘front page’, I cut out a 6x8 sized page from the Adventure 12x12 paper and used three round stickers which I put foam sticky pads behind to lift them. 

I always enjoy making extra fun things for my binders, here’s a pocket folder and some cute little tags. You can make tags to journal on or even add photos too. 

I’ve used a lot of the ephemera from the foliage bits and pieces pkg to decorate the cards to fit into these 6x4 pockets, and also some tags from the.

One of my favourite pocket pages to fill are the 2x2 insta pocket pages which I like to mix up with the 2x2 element paper and areas to add my own photos.

Here’s a couple of full pages I’ve made, one to fit inside a 6x8 pocket page and one that I’ve punched holes in, so it can go directly into my binder. This collection is filled with so many fabulous elements, I’m pretty sure it will be a must for everyone!!

Hope I’ve given you a few ideas of different ways it can be used. If you’d like to see more of how I use simple stories products, pop over to my IG page

Supplies

Hi! I feel so happy to be back! I'm Celes from GuiadeManualidades.com and today we are going to have a party… a birthday party!  Birthday Blast Collection is an amazing and wonderful paper collection to create very special details for a birthday.
This project has two ideas: a cake made of sweet treat boxes and a very special cake topper.

Boxes:

For this project you can use a cutting file from your own cutting machine. In my case, I used a cutting file from my Scanncut Canvas. But, if you have an .SVG file or a .Studio3 file from your Silhouette machine you can use it too. Depending on which cutting file you use, you will need 10 boxes to make a cake. In that case, you will need 10 white cardstock of 12”x12”. Cut 10 boxes and choose one design paper from your paper pad.

Assemble all the boxes and glue them in the indicated paper tabs.

To decorate all boxes, you need to cut 5 or 6 paper strips (depending on the size of your box). I used Color Vibe Collection “Brights" and “Bolds” pads. Glue each strip and complete the “rainbow” in every box.

Then cut the cake decoration (Decor File) using the design paper that you chose before. Put all the boxes together and use a piece of ribbon to make de cake.

Cake Topper:

For making the cake topper you need one piece of stable cardboard of 5” of diameter. Cover that piece with one of the papers of the Color Vibe Collection. Besides, cut some strips of white crepe paper and glue them to the base. Next, you need to cut two pieces of white cardstock of: 4 1/2” w x 7/8” h. Score them in 3/8” at each end of the paper (wide) and 3/8” at the base (high). You are going to make small bases to prepare the different layers of the cake topper.

Use all you have to decorate… die cuts, stickers, chipboards, brads, washi tapes… Play with all of them! I used acetate to add some special details and I prepared a third layer with two sticks for brochette. I love to decorate and make such funny and happy layers!  See all the details in these photos.

You don't need to glue the cake topper to the cake. It’s possible to add another detail to the cake like a word or a phrase.

Isn't it a lovely idea? I hope you like it!

See you next time!

Supplies

Hi there! Nathalie with you today to share a new page that is all about boys and their magical bond.   It is always a treat when a masculine line is perfect to document those especial people in your life.  The new BRO & CO collection from Simple Stories is just perfection in a kit, which made this page come together easily...

I wanted to play with paper for this page, so i started by cutting the strips from the So Rad! paper and then cut strips of paper that matched the colors of the paper ( Total Legit!, Killin' It!, You Rock!, 2x2 Elements).  

I used the Birch/Grid Sn@P basics paper as the background for the page, and created the chevron pattern with the paper strips, making sure they formed that weaved pattern as they met in the center of the chevron.  Here is where i handstitched the strips in place.

The picture was backed and layered with the Level Up! and So Rad! papers, and then placed in between the chevron lines.  There are so many cute and fun embellishments, it was easy to create clusters around the page.

The foam stickers in the collection are a must have!!! I combined them with the Color Vibe Navy Foam Alphas to complete the title work. A few more stars, brads and stamped images complete this layout.

This layout was so fun and easy to put together, and i love how the design and colors bring the focus to the picture of my son and nephew.   Remember to check the BRO& CO collection, you are going to love it!

Supplies

Hello Simple Stories fans, It’s Dorymar with you today to share a new Snap Album with the colorful Going Places Collection.  This collection is very versatile because you can document all types of vacations they can be by airplanes, by cruise, by train even road trips. It has tons of beautiful patterns and bright colors. Check it out!

On the cover I wanted to recreate a city vacation scene, for that, I used the beautiful paper with aqua stripes and matched it with the passport stamp paper included in the 6x8 Coordinating Paper Pad as my background.  For the city view, I used one of the 4x6 cards included in the collection, and then I added fun icons from the chipboard stickers and sticker sheet. For finishing touches, I added a little touch of glitter glue to highlight the moon and blonde hair of the girl. I think the cover looks so fun and cute.

I love decorating the chipboard dividers that the Sn@p Albums includes, but this time I wanted to focus on creating the layouts for my 6x8 pages. For all the layouts that you will see below, I used the papers included in the 6x8 Paper Pad because they have the perfect size for the 6x8 pocket page.

For this layout I want to keep the concept on the cover, the City Vacation.  I am in love with the people and cars included in the collection.

A few close up!

One thing I love about this collection is the bright colors, because they blend easily with any type of travel photo. This collection is ideal for someone looking to simply collect multiple trips and keep a journal. With the grouped elements, the different layers of beautiful papers and the perfect photos, your project is sure to be the perfect one for any trip.

I could not stop incorporating the pockets and flaps that I love so much; they allow me to use all the beautiful elements that the collection has. I used a few of the page’s dividers included in the album to make them interactive and this show the adorable figures of the project. Below you can see each one in detail.

The journal bits and pieces pack has a lot of tags and postcards, they are perfect for add journaling of just to create a beautiful decoration in your layouts. In my case, I used them in strategic places to highlight various areas of my project.

Thank you so much for stopping by!

Happy Crafting!

Supplies

Hello everyone! Anya here today and I am happy to share a little travel project that might come handy to take along on your next trip or to record the memories of your recent adventure. I never get tired of little mini books, they are fun to create and are able to include all the photos you want!

For these arrow-shaped mini books I used the Going Places collection and a simple arrow cut file. With the help of a digital cutting machine it's easy to make a couple of books at once. How awesome it would be if we can write our stories in one of them and let our children fill the other one with the stories from their points of view. It's amazing how different we see things sometimes.

I like to use plain cardstock for the base of my pages and overlay each page with patterned paper. This way it make the pages a little sturdier and I always appreciate a thing white border. For me mini book don't require too much planning, which make it a rather simple project to create.

When I am making a mini book ahead of time, I don't decorate every single page, leaving myself more options in photo placement and story telling when time comes to fill the book, but a few photo flips are a must, since we always bring a lot of pictures back.

Hope this will inspire you to make a mini book if you haven't made one recently.

Supplies

As a mom to three boys, I feel like I am always scrapbooking boy birthdays! Because of that I am always happy to get my hands on a new boy birthday collection that has great patterned papers and embellishments.  Birthday blast has those and so much more!  Christine joining you today to share an Epic Boy Birthday Layout! 

This layout contains lots of layers with the patterned papers and various banners really being the highlight.  I made use of papers from both the 6 X 8 paper book and the 12 X 12 papers.

I was drawn to the wonky striped paper "Yay" and decided to use that as a unique base beneath my photos and patterned paper.  I cut them out and then distressed the edges so that they would add some neat texture. Because the stripes weren't perfectly straight, I was able to keep that from being a distraction by doing the distressing. I chose which color stripes to use based on the colors in my son's shirt.

I also made use of several of the birthday present shapes in chipboard, cardstock stickers, and bits & pieces.  I added a "9" to one of them from the 6 X 8 sticker pad to help personalize the story.

The title is probably my favorite part of this layout.  His shirt says "epic" on it, so I knew that I wanted to include that word.  By combining the Color Vibe Foam Letter Stickers with the script cardstock stickers, I was able to create a really eye catching and colorful title.

If you've got another boy birthday layout to capture, get your hands on Birthday Blast and have a blast ;) creating with it.  Be sure to swing by my YouTube Channel to see the full video on how this came together!

Supplies

Hi! Odessa here with a peek in my Flipbook today. Animal print is my favourite colour so when I saw Kate & Ash I was so excited. So many patterns, great colours and fun embellishments. I couldn’t wait to use it!

I am still loving using the SN@P! Flipbooks. Pocket scrapbooking is my favourite kind of memory keeping and it’s a nice way to focus on smaller life chapters rather than big volumes. I picked the Blush Flipbook to go with Kate & Ash and got to work decorating the cover. I used a few different cardstocks from the collection here. I used Super Like! to cover the front of the Flipbook and then cut instant photo style frames from Good Vibes, Awkward, 3x4 Elements and Whatever! I mix and matched frames and squares from inside them and stuck it all down on the cover. I added some Chipboard Stickers and a few phrase stickers from the Combo Sticker sheet on top. I finished the cover off with a few well placed brads to make it look like the instant photo frames were pinned up.

The pinks and gold hues were just what I needed to go with some spring photos so I got to work adding those in with some journal cards and all the embellishments. I’ve come to terms with the fact that I am a bit of a maximalist when it comes to stickers and enamel dots. I used a few photos with instant photos inside to carry the theme from the cover and just had a lot of fun with it. I really like how the 3x4 cut out from the 2x2 Elements cardstock looks in a pocket.

I really like how the 3x4 cut out from the 2x2 Elements cardstock looks in a pocket. Add in some of the sassy words and phrases and cute washi and this collection was so easy for me to use.

Here I used the back side of a 3x4 Element and layered lots on it to make a bold journalling spot. I used one of the Journal Bits & Pieces layered with lots of enamel dots, stickers and brads. The Colour Vibe Lights Alpha Sticker Book helped me add the finishing touch with some words in the middle.

This spread is so bright, I love it! More instant photos and just general life. I did a lot of sewing this spring and the pocket in the left lower corner is made by sewing a scraps from my project (which match Kate & Ash pretty perfectly) with FAB from the Cardstock Sticker sheet on top. I had fun adding in the 3x4 Elements, it was hard picking which ones to use because they were all so good.

Little clusters of tiny embellishments makes me so happy! I used lots of little enamel dots and hearts from the Cardstock Sticker sheet to liven up this photo with one of the cute phrase stickers. My nails in the photo even matches the golden colours in Kate & Ash. Love it!

I had a little to much fun embellishing our cat. I used Journal Bits & Pieces, chipboard stickers, brads, enamel dots and more to make the photo as sassy as she is. If you’re looking for a collection with on point colours, a little sass and all the animal print, Kate & Ash is perfection!

Supplies

Make your next unicorn-themed birthday party fun and functional with this tiered cake "Favor Tower". Not only does it make an adorable centerpiece, but kids will love picking out their treats and favors from the different sections!

You most certainly can make this in any heights and circumferences that you wish, but here are the measurements that I chose: 

Bottom-7.5D X 3.5"H

Middle-5.5"D X 5.5"H

Top-3.5"D X 8.5"H

For the side walls I cut strips of paper that were 1/2" more than the heights listed above. I made a 1/2" fold along one edge to create a flap.  I made small cuts all along the flap (up to the score line) so that the strips could easily be formed into a round shape.  The flap was then used as a footing and glued to a base circle that was also cut from patterned paper.  The process was repeated with the other two tiers.

Inside the bottom tiered I added pre-packaged brownies that were then wrapped in strips of paper!  You could also add stickers, or let the kids decorate the fronts with die-cuts and stickers.

To the middle section, I packaged glassine bags with candies and then topped it with a bag topper and a cute charm.

Did you know: (most) paper straws fit easily over a 3/16" wooden dowel!  After adding paper straws, I embellished the tops of the dowels with a layering of papers, stickers, die-cuts and ribbon bows!  Kids love these fun wands and will enjoy sliding the straw on and off for use.

In finishing the tiers I also used some of the foam stickers, washi tapes and chipboard stickers from the "Magical Birthday" Collection.  

Thank you for stopping by!

Supplies

Hello friends! It’s Jen today with a layout using the Summer Farmhouse collection, which is one of my favorite Simple Stories releases. The cute prints and bright colors make me so happy!

This summer has been different from those in the past in that we haven’t been able to take a vacation. Because of this, I have spent a lot of time looking through and printing some of our older family photos. This picture of my three kids is one that I just love - they are all sitting together and actually smiling! Bonus!

To begin this project, I used oxide inks to create a mixed media background. First, I mixed one color with water and used the smushing method to apply it to the white cardstock, followed by the next, etc. Next, I used the Summer Farmhouse stamps with the same inks and stamped flowers on top.

The next step was to cut several flowers and leaves using the Flowers cut file from the Silhouette Design Store.

After adhering my photo with foam squares, I began layering flowers across the page. Each of the flowers and leaves is adhered with foam as well to give them dimension.

The flowers and inks complement one another perfectly and bring so much depth to the layout.

The color and dimension from the inks and flowers looks amazing. To give them even more texture, I added enamel dots to the centers of each of the large flowers.

Because the flowers are so detailed, I kept the title and journaling to a minimum. To anchor the white space, I added strips of torn washi tape along the top and bottom of the layout.

I love the dimension on this layout and can’t wait to create with this gorgeous collection again. Thank you so much for stopping by today.

Supplies

Pages