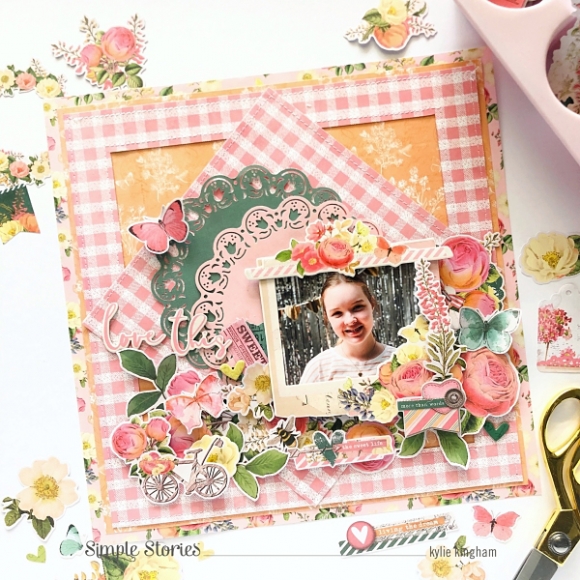
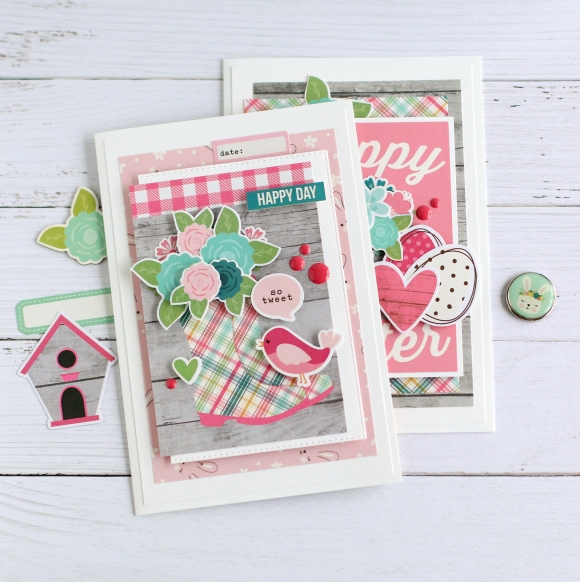
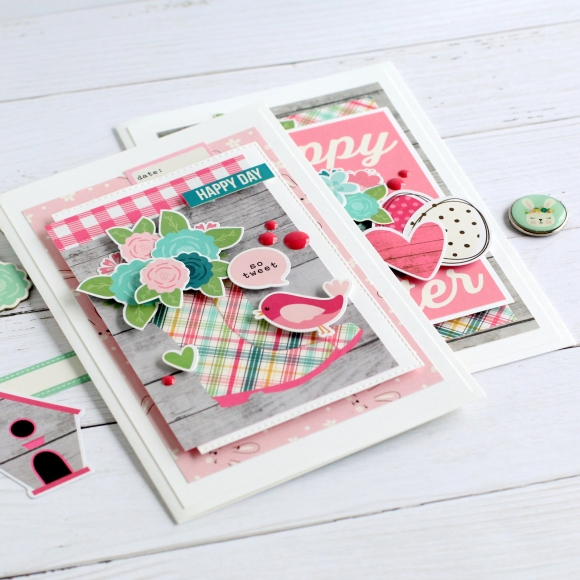
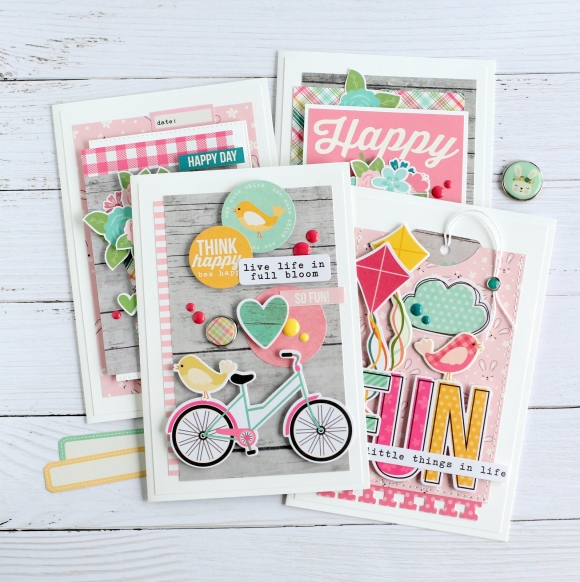
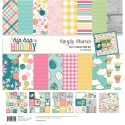
Hello there! It’s me, Tya Smith up on the blog today! I so excited to share my latest batch of handmade cards using the super adorable “Hip Hop Hooray” collection. This sweet collection is chock full of so many Spring and Easter themed elements and papers. I decided to create 4 cards focusing more on the Easter themed elements – I mean just how cute are those bunnies?

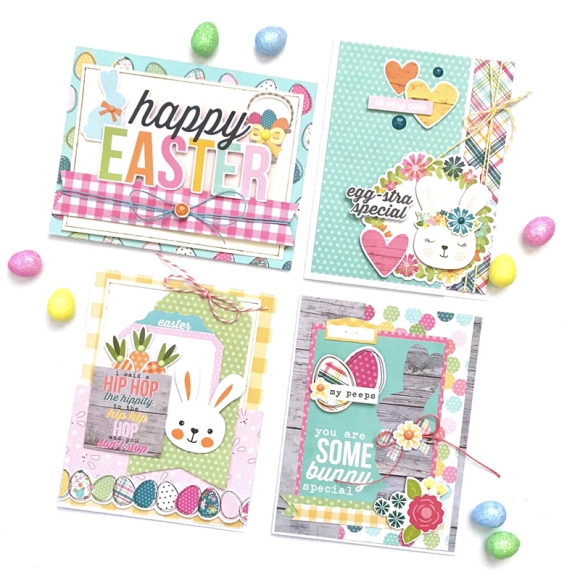
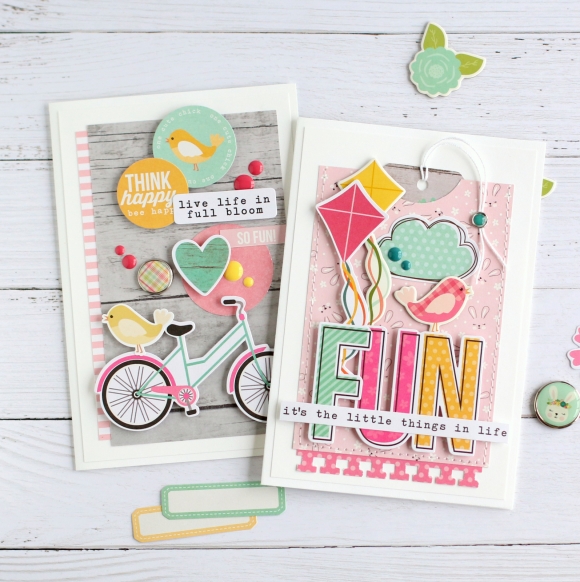
Let me show you each of the cards close up!

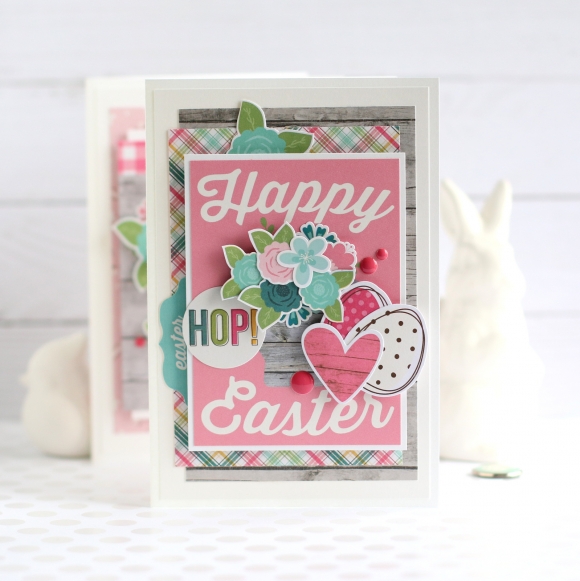
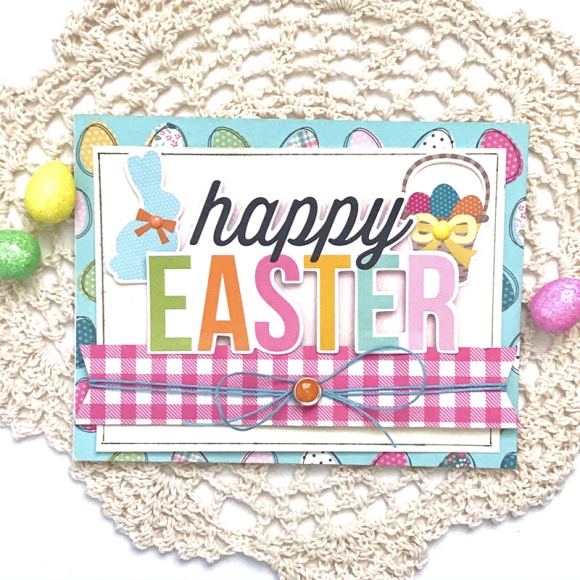
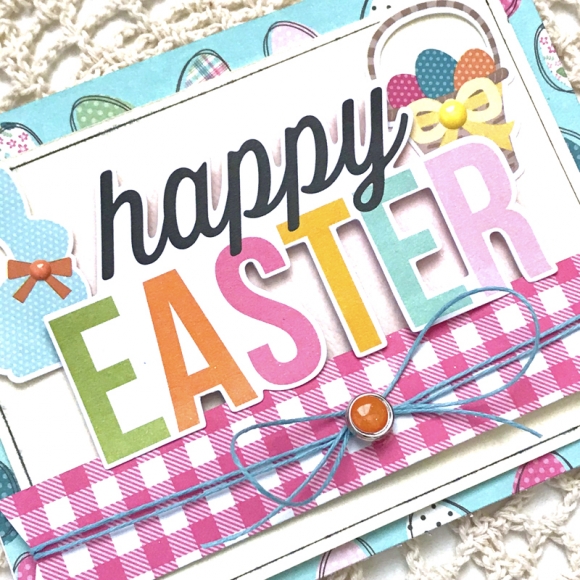
The first card uses the awesome Bits and Pieces ephemera as the “Happy Easter” sentiment.  I love that these are the perfect size for card making. I made a banner out of the pretty pink gingham paper from the 6x8 Paper Pad. I also used a couple of stickers from the Combo Cardstock Stickers up in the corners next to the title that I decorated with some of the Enamel Dots. I also added an orange brad in the center of my twine bow from the Decorative Brads. 

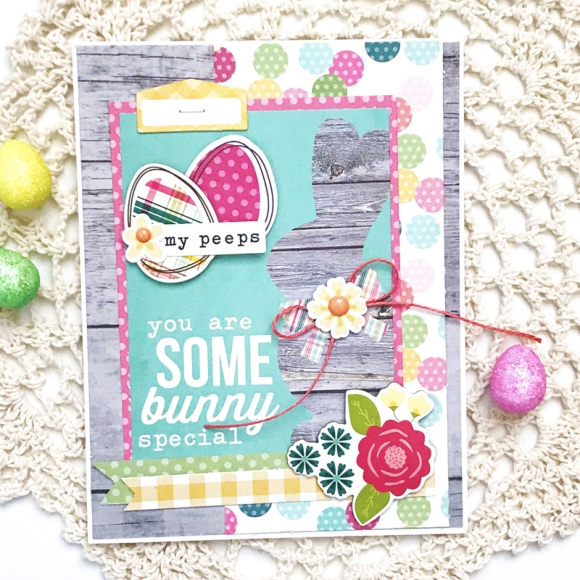
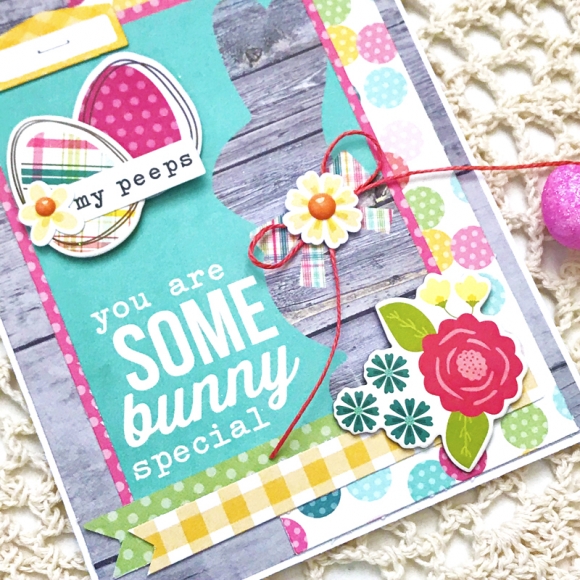
I loved the addition of the wood grain paper in this collection. I used it as the background of this card and then fell  in love with this adorable 3x4 card from the 6x8 Paper Pad. I decorated the card with some of the Journal Bits and Pieces, Chipboard, Stickers , Enamel Dots and various dot pattern papers from the 6x8 Paper Pad. I love the little bow on the bunny with the flower sticker center.  I like to look for fun little ways to add dimension to the 3x4 cards.

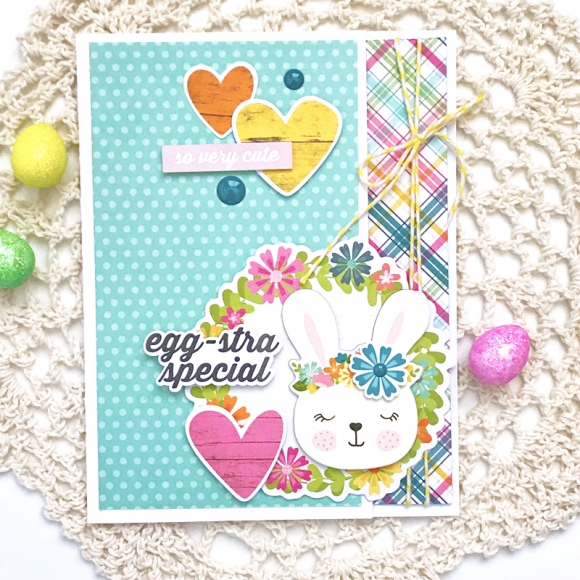
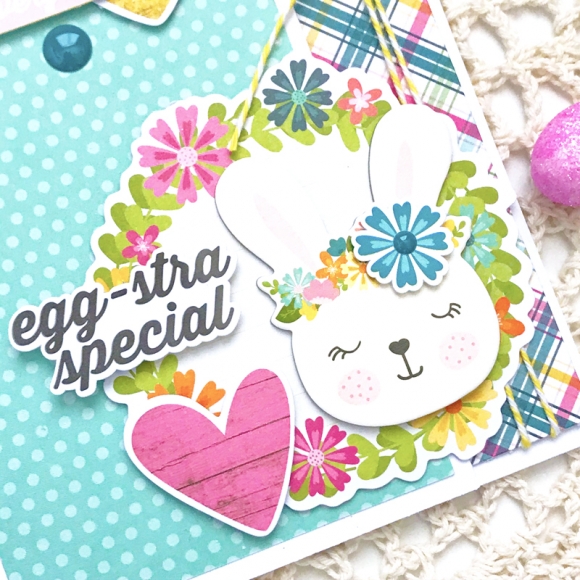
This card features the cutest little girl bunny ever! She is from the Chipboard stickers and I just loved her cute little face. I added a flower sticker to her with and enamel dot in the center. You can dress up the Chipboard stickers too! Those adorable wood grain hearts are from the Bits and Pieces and I staggered a few on the card with some word stickers from the Combo Cardstock Stickers. The cute bunny girl is placed on a floral wreath which is from the Bits and Pieces.

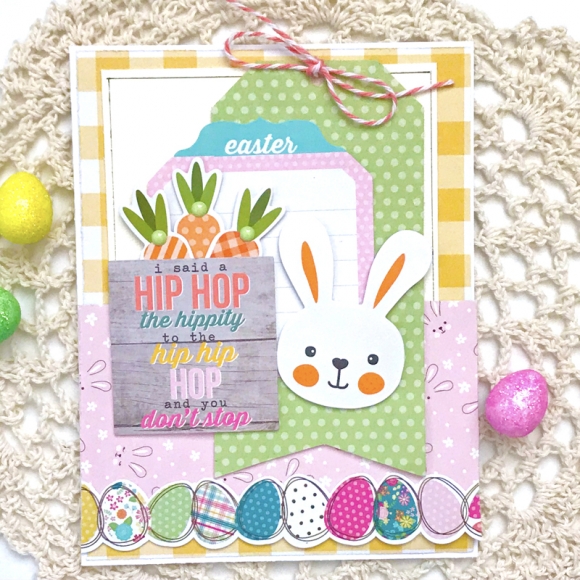
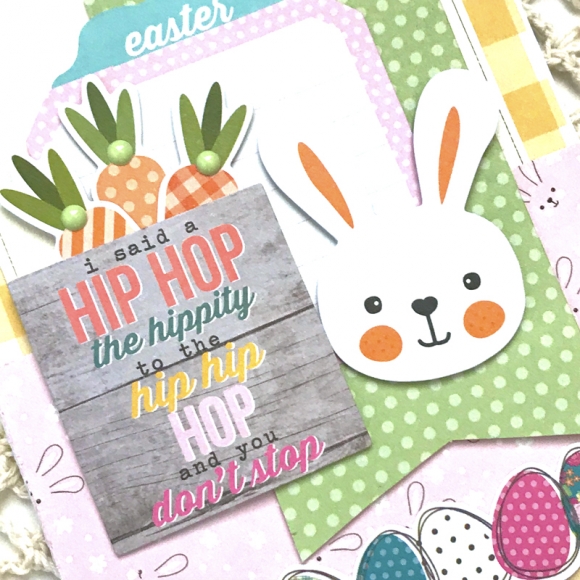
The last card to wrap up my project is just so fun! I loved the sentiment here since it matched the name of the collection and it’s a throwback to one of my favorite 90’s hip hop songs – so cute! It is found in the Journal Bits and Pieces. Little Bunny Boy makes his cute face show here – he is from the Bits and Pieces. I tucked 3 carrots behind the sentiment and they are also from the Bits and Pieces. This card is finished with some bakers twine, enamel dots and an Easter Egg border which is from the Combo Cardstock stickers.

Thank you for stopping by the blog today and getting a closer peek at my card creations. I am so excited for this new time of year and for the Easter holiday coming up. These cards would be great to put together and give to your “Egg-stra” special someone! I hope I have inspired you today to make a few of these cards! Thanks again and Happy Crafting!

Supplies

Hello friends, it’s Kylie back with you today with a brand new layout to share. I’ve been enjoying creating with the Simple Vintage Garden District collection and even though the days are getting cooler here for me in Australia I wanted to create a ‘Spring’ themed design. When I first saw this collection I immediately fell in love with the pink gingham side of the ‘Celebrate Today’ paper. I have created this layout based entirely around my love for this paper.

To begin with, I trimmed a 1cm (10mm) edge off each side of the ‘Love More’ paper before adhering it over the top of the ‘Choose Happy’ paper. Next, I trimmed a 1.5cm (15mm) edge off each side of the ‘Celebrate Today’ paper. Using a ruler and pencil I measured 1 inch from the edges all the way around and used a craft knife to cut out a ‘frame’. With the square off cut from the middle, I trimmed an extra 0.5cm (5mm) edge off each side. I machine stitched around both the frame on all edges as well as the square to give a nice texture. The frame piece of paper was adhered to the background and I adhered the square over the top, turned onto one corner, similar to a diamond shape.

Using a die from my craft stash I have cut two doilies from the Basics Paper Pack to be tucked in behind my photo.

I loved the layered frames and selected one to mount my photo to. I have also added one of the floral borders in the Chipboard Stickers to adhere to the top of the frame. I wanted to create as much dimension and as many layers as I could.

Using both the Bits and Pieces as well as the Floral Bits and Pieces, I layered many below my photo. I’ve used a ‘stacks on’ method, carefully building the layers so they had balance and dimension. I used foam tape on many which helps to add the necessary height.

This was a fun layout to create and I love all the different paper patterns and floral embellishments together.

Thanks so much for stopping by the blog today. I hope my layout has given you all some inspiration with your own creating.

Take care!

Supplies

Hello friends! It’s Mik here from Papermiks on the blog today! Today I’ll show you a Sn@p! inspiration using the beautiful Going Places Collection. I love traveling and making albums to eternalize each trip. It is a passion of mine.

To make the cover I used a paper from the 6x8 paper pad, SNAP Cards, Foam Stickers and Ephemeras. I stitched two pieces of happy travel paper to make a suitcase belt and then used some brads in the corners so we could have ourselves a “suitcase album”. I liked this.

As I still don't know which trip I’ll add to this album, I wrote “Destination: Happiness”. This way any destination will be perfect.

For the first page I decided to use a lined page so there I can write some notes about my destination: Happiness trip.

For the inside I chose pocket pages and some flip pockets. This allows me to have more space for photos and it also gives my album an interactive touch.

Here, as you can see, I decorated with an “Adventure” cut file. I love using cut files on my pages and I liked how it ended up looking.

I hope you got some inspiration from this idea and enjoyed it! And don’t forget this:

“On the way to happiness, there are no obstacles. There are only opportunities.” Paramahansa Yogananda

Thanks for stopping by and have a creative day!

Supplies

Hi beautiful Simple Stories friends, Cristina here with a new project I made with a brand new collection I love the most, I Am. I am totally in love with this collection and especially for this new edition full of my favorite colors but also with unusual combinations but so well matched that it is impossible not to fall in love with.

I decided to use this wonderful collection to make a mini album, 4x6" size, because I would be able to use as much as possible all the decorative elements and embellishments of which this collection is full. I chose to make a mini album to send a gift to a dear friend who asked me to use her photos of her recent trip to the States and so I did.

I chose a very easy way to make my project, without a front cover and with a ring binder to support the pages. 

I alternated the pages of patterned paper with page protectors of various sizes to adapt photos of different sizes.

To make my album more sturdy I made a back cover using a chipboard sheet that I covered with two patterned papers by the 6x8 “ pad which was perfectly suited for its vertical size.

I chose to sew some embellishments to give movement and added various elements as chipboard and brads wherever possible.

The designs are very original, versatile and perfectly chromatically balanced with each other.

I love to use so many layers and foam double tape to add 3d effects because I think this helps to focalize attention on the picture.

I’m a pink addicted and therefore if you are also you cannot fail to add this collection to your stash and we can’t wait to see how many beautiful projects you’re going to make with it.

So please don’t forget to leave us a comment below and tell us which is your own idea on how to use this collection, maybe so different than mine.

Thank you so much for joining me today and see you to the next post.

Bye.

Cristina xxx

Supplies

Have you checked out the Simples Stories Best Year Ever Collection?  It’s celebrates the things that make each month special - the holidays and changing of the seasons.   This collection is wonderful for embellishing planners, or documenting special occasions throughout the year.  I’m a card maker so I thought I’d make a card to celebrate holidays or seasonal birthdays.

January celebrates winter!  I made a fun scene cutting pattern paper from the 6x8” pad to create colorful snowdrifts for the cute snowman!  The snowflakes are a mix of chipboard, decorative brads, stickers and bits and pieces.

February is sugar sweet with hearts, a calendar page and yummy treats! The layout of each card is the same.  A foam sticker with the month is at the  top right of each card and coordinating foam stickers are along the left attached horizontally. 

Lucky me!  March is a fun mix of rainbows and shamrocks.   The washi tape in this collection features a rainbow stripe roll, a floral and a third printed with the months of the year. 

There are no clouds to chase away in April because we know that spring flowers will follow soon!  The 6x8 pattern papers are perfect for card making.  They feature a smaller pattern print and each sheet when cut in half will cover two A2 size cards.

This collection has many beautiful embellishments.  These May flowers are surrounded by little chipboard butterflies and enamel dots in coordinating colors.

June is a tropical paradise.  A flirty flamingo and juicy fruits are candy for the eyes.  Even the little decorative brad has a pineapple on it.   I adhered the printed and die cut bits and pieces with adhesive foam tape.  It’s easy to make your own with inexpensive craft foam and double sided tape.

July is all things summer – fireworks, barbeques, and of course the stars and stripes.   I added small sentiments from the 4x6 sticker book to each of the cards. 

In August we’re getting out of the house and heading out for a picnic!  The van is packed and we’ve got some yummy berries in the basket!

September is back to school.  A lined piece of patterned paper looks like a sheet from a notebook and is topped with a pencil and books, a sneaker and a decorative brad that reads “best year ever”.  Little foam sticker paper clips add some washi are fun embellishments.

October brings Jack O Lanterns, Bats and a Ghost.  I love a pop of teal with the orange so I added extra blue enamel dots.

November is sweater weather.  I arranged pumpkins and leaves as a focal point for this card.   I embellished the card with decorative brads and green enamel dots for a pop of color.

Simple Stories combines all the things you love about each month of the year so it really is the best year ever!


Supplies

Hey everyone, Michelle here today with a new layout to share using the Simple Vintage Garden District collection.  If you're like me and love to work with florals this collection is for you!  The pretty and soft floral patterns are perfect for any feminine project.

One of my favorite items in this collection is the big chipboard frames.  It's so easy to make a big impact on your layout just by adding one of these frames.

The final touches of this layout was just adding bits of ephemera and chipboard pieces.  It was hard to limit myself to just a few, they 're all so pretty!

This sweet black and white photo of my daughter was perfect for this collection.  Any photo can be made to look vintage just by printing it in black and white.

Thanks for stopping by!

Supplies

Hello, it’s Emma here today to show you how I’ve started using the fabulous I Am collection in my Pink Sn@p! Binder. Never before have I needed to hear all these positive quotes!! The I Am collection is the perfect kit to be using right now in these difficult times!!

I have decorated the front of the binder with (yes you guessed it!) one of the big blousy floral 12x12 papers from the Collection kit. I added more interest by using a layer of bold pink paper and embellished that with gold ribbon, doilies, chipboard pieces and the words ‘just me’ from the gold puffy stickers. 

As you know I’m still quite new to sn@p! binders, so I’m still finding my feet...but what I have found is that I’m really enjoying doing large 6x8 layouts to fit in the pocket pages. 

Like I said, the quotes are just lovely! This page I did with the gorgeous house images sums up everything right now! ‘Home is where the heart is’!

...and this one, ‘Positive Mind, Positive Vibes, Positive Lives’ Lets all stay positive, it’s all going to be ok!!

I’m going to fill this binder with positive quotes, you know when you stumble across one, remember to write it down! This is my place to fill with positivity! Stay safe! Stay healthy! ...and hold your loved ones tight!!

Supplies

Hi everybody! Do you remember me? I´m Maria Celeste from GuiadeManualidades.com I´m so happy to be back! I´ve been working on something special to share with you… Have you seen the new Going Places collection? This is one of the most beautiful collections for travelling I´ve ever seen. It has so many wonderful products to work with… I simply love it! I´ve choosen some of the products and I have prepared a very special mini album for you.

You will find all the cutting files at the end of this post. Yes! I made free cutting files to share with all of you. You are going to see them in .SVG (for cutting machines) and .PDF to print and cut by hand. For all your possibilities!  I hope you like them!

This mini album is a gift for my husband… We love to travel and he is always taking pictures of all of the details. When we came back to our home he usually has more than 5,000 photos of a small trip! It´s amazing how he can spend hours taking pictures and looking for a special spot or waiting for nature to surprise him. That´s why I designed a mini album with a camera shape! It´s the perfect gift for him! And the Going Places collection has everything I need to make it!

I will explain some details of the cutting files first. You will find 4 cutting files. The first one is “CAMERA BODY”: use it to cut 2 pieces of stable cardboard and 2 pieces of designer cardstock paper from the collection. The final size of it is approximately 8” w x 6” h. The second one is “CAMERA-DOBLE PAGES”: use it to cut 5 pieces of White cardstock. You will need A3 paper to cut them. The final size of it is approximately 5 3/4” w x 5” h. The third one is “CAMERA-INTERIOR PAGES”: use it to cut 20 pieces of designer cardstock paper and you will add them to your doble pages. The final size of it is approximately 7 1/4” w x 4 1/2” h. The fourth one is “CAMERA-FRONT PIECES”: you will find 6 pieces. You have to cut #1, #2, #3 (from left to right) in silver foil paper (two circles and a bar). You have to cut 2 pieces of #4 (first figure of the second line-left) in White foam.  You have to cut 1 piece of #5 (second figure of the second line-right) in acetate. And finally you have to cut 1 piece of #6 (figure of the third line) in design paper.

Let's get started! Cut the 2 pieces of stable cardboard of “Camera Body” file and cut another piece of 1 7/8” w x 3 3/4” h.

We have to cover the two pieces of “Camera Body” file with White cardstock and the other piece of stable cardboard with design paper of Going Places collection (these are for the interior) Choose another design paper and cut 2 pieces of 10” w x 3 7/8” h. Use them to cover the center of the camera body. Besides, add 10 white eyelets to the center pieces. Glue all the 3 pieces together… magic! Camera structure is ready!

Now, we are going to work in the camera lens… it's a beautiful shaker! Cut all pieces of “Camera-Front Pieces” file. You have to glue together the 2 pieces of foam and add them to the design paper piece. Use one of the die cut of the Bits & pieces pack and some chunky glitter and shape sequins to fill the shaker. Finally add the frontal piece with an acetate piece. Lovely shaker!

Let's start preparing pages of our mini album! You have to cut the 5 pieces of white cardstock of “Camera-Doble Pages” file and the 20 pieces of design paper of “Camera-Interior Pages” file.

Time to decorate the cover and all pages! I must confess I love it! I can spend hours doing it! Fort the cover: you need to have the shaker, the two pieces of foil paper we haven´t used yet, chipboards, some enamel dots, the stickers and thread for sewing in some colors you like.

Place the shaker in the center of the camera shape and then add the two decorate foil paper pieces. So wonderfull to see the camera finally complete! Now is time add chipboards, stickers and all you like to the cover. As this is a gift to my husband I decided to make a special composition of elements especially for him.  Play with all the elements you have. You are going to love it!

Once our mini album structure and cover is ready… time for the pages! I definitely wanted a lot of space for photographs so that is why I made this special design for the pages. Before I add all the design papers (“Camera-Interior Pages”) I recommend you to decorate all of them. You will see that I used a photo corner punch for some of them and left them without decoration. I want my husband to add the final details once he add the photos.

When you finish decorating all pages… it´s time to add them to our mini album. I choose white hemp cord because I love the quality and texture it have. It´s really simple to add all pages… and the final result for our mini album is simply amazing!

The Going Places collection has so many beautifull elements to decorate… Combine washi tape, chipboards, stickers, die cuts, cards and even some sewing details to make every page of this mini album special and lovely….

Hope you like it! See you soon!

FREE CUT FILES

FREE PDF FILES

Supplies

Hi there!  Nathalie with you today with a fun new project using SIMPLE STORIES new BEST YEAR EVER collection.  We are all living hard times at this moment, and it is hard to think of happy moments. Well, what better way to relive those lovely memories than to gather them all in one page.

Sometimes simplicity is the best way to go when working with multiple pictures.   I chose a picture of each month of 2018, transform them to black and white and used Lightroom to size them all to 2"x2.75" and print them all in one single sheet of photo paper.

I cut the rainbow paper from the 6x8 paper pad and glued it to the side of the picture.  This brings lots of color to the page.  A large piece of heavy cardstock was then glued to the back of the picture before matting the entire picture with the b side of the JANUARY Paper.  In order to bring texture to the page, i chose to hand stitch the corners of the paper to the background (Sn@p basics white dot grid paper).

There are so many cute embellishments in the Best Year Ever collection that it was hard not to over embellish the page, but i tried my best to place small clusters of stickers at the corners of the photo grid, and sprinkle some word stickers throughout the pictures.

The large "BEST YEAR EVER" from the sticker sheet was the perfect size to fit along the bottom edge of the picture collage.  A bit of foam adhesive help to add dimension and make it pop.  All that was left to do was type my lines of journal and add them below the title.  I finished the page with a chipboard sticker at the very bottom of the page.

It is in difficult times that we always look for silver linings, and the BEST YEAR EVER collection from SIMPLE STORIES will help you relive and document all those special moments.   

My thoughts and prayers are with you all!

Supplies

Hello dear friends! Are you enjoying Spring as much as we do? When I am not outside enjoying the weather, I love to surround myself with happy spring products and create with these happy colors! Anya here today and I would love to share a set of cards I made using the Hip Hop Hooray collection.

Don't you love to find more ways to use your product? I always look for ways to stretch my supplies or think outside the box. If you look closer at the Hip Hop Hooray collection, you will agree that besides Easter and Spring themed cards you could also create a card for a friend, Birthday cards, Baby Shower cards and more. I have a few samples for your inspiration.

I can't wait to create more cards and layouts with this beautiful and very versatile line! What will you be making with this collection? Thank you for visiting and hope you'll stop by soon for more inspiration.

Supplies

It's Dorymar here today and I'm sharing a Snap Album with you using Simple Vintage Garden District collection. I wanted to create something different for this album. I love using collections like this because they make my creativity fly. I am fascinated by working with bright and colorful collections, but this collection is different, it is full of pastel colors, butterflies, flowers and many vintage patterns. This is another style that I love working with, vintage, shabby chic style where I can incorporate different textures into my album.

For the cover, I incorporated many textures with the beautiful patterned paper from the collection. I mixed up lace, burlap, stencil paste, orange blossoms, and doilies. I added layers using some chipboard stickers and bits & pieces from the collection.

For the different spreads, I used only the snap dividers and make a beautiful vintage look with many layers, lace, and textures. I ripped the edges of some pieces of paper and added some different patterns behind the photo mats. I feel like the papers from this collection go together very well with all the things I added to create this project.

Below you can see in detail some close ups from the album. This collection has so many beautiful elements, that when you create a cluster around the photo mats to decorate, they create an exquisite and wonderful look.

I used an edge punch in combination with the solid papers in the collection to create another lace style. Layering different elements on my page created a wonderful dimension and gives it a beautiful texture when using different pieces.

I prepared these pieces you see below to insert them in my 6x8 pocket pages, what I do with them is reduce the pocket pages to their size and this gives a different touch to my project.

Here is another close-up, you can see the ripped edges. I added some pop dots underneath to create more shadows and dimension.

I love personalizing my pocket pages, below you can see how I incorporated the beautiful pieces of the collection with the journaling cards to create beautiful designs around my photo mats.

The Simple Vintage Garden District collection encapsulates everything we love about Spring with its color palette and beautiful, vintage look. It was so much fun creating this album!

Supplies

Where does your inspiration usually start for a layout?  Mine can come from a variety of places including products, pictures, and the stories themselves.  For today's layout showcasing Going Places my inspiration began with the Foam Stickers in this collection and evolved from there.
Let's take a look at the fun to be had with Going Places!


Basing my color choices on the colors in my pictures, blues and autumn colors, I opted to use puffy words to work with that.  I then chose patterned papers in those colors and cut 1/4" strips. I built concentric squares in the coordinating colors

I wanted to build the foam words into each border but with movement going down the layout. I did one for each color on the top of the layout and likewise on the bottom. The contrast of the script font against the straight borders worked nicely.

Once I had applied all the words and my pictures, I began embellishing.

I used pieces of embellishments from nearly every part of this collection, going one at a time and adding pieces as they fit well, considering both shape and texture throughout. I created a process video to go with the whole layout that you can check out here!  

Thanks so much for joining me today - I hope that you and yours are staying healthy and soon we will all be Going Places again!

Supplies

Hi! Odessa here with some SN@P! pages using the new Hip Hop Hooray Collection. When I think spring I think bright colours and Hip Hop Hooray did not disappoint. Not only is it packed with fun Easter papers and embellishments but it’s also great for documenting general spring stories too!

I knew that a bright playful binder was in order so I went with the Pink 6x8 binder. The chipboard cover is a blank canvas to have fun with!

I cut up strips of some of my favourite cardstock sheets from Hip Hop Hooray and layered them on the album cover. I used a couple of chipboard stickers and a phrase from the Bits & Pieces pack to embellish my album. Simple yet super cute!

Inside I had a lot of fun with Hip Hop Hooray. I really let the bold colours fly all over my page with a combination of journal cards from the 3x4 cut apart cardstock and a 4x6 pocket filled with a card made with some of my fav things from the collection along with some spring photos. 

In this pocket I layered 4 of my favourite papers. I cut a 4x6 inch rectangle out of the first piece of cardstock and then cut 3 more pieces, each one a half inch less length and width than the last. I glued them on top of each other a little askew and put a big phrase die cut from the Bits & Pieces pack on top. I layered a few more die cuts under it and added some stickers from the Combo Sticker Sheet as well as some of the adorable coordinating Enamel Dots to finish it off.

Hip Hop Hooray worked great with my photos, there was lots of little phrase stickers and die cuts and bright and cheery die cuts in the Bits & Pieces packs. Add in some more Enamel Dots for dimension and these pages came together in a snap! If you’re looking to document some springtime fun, pick up some Hip Hop Hooray!

Supplies

Planner-lovers, cardmakers and scrapbookers alike would love to receive a handy "Journal Card Portfolio" such as this!  Shellye McDaniel here with a fun spin on the traveler's notebook to create this unique gifting project.

To begin with the cover: I started with an 8.5"X11" piece of double-sided patterned paper and Scotch laminator with a laminating sheet.  After lamination, I scored the piece at 5" and 6" and folded along the lines.  Next, I used an 1/8" hole punch to make two holes at the top and bottom of the "spine". The holes were then threaded with a piece of 20mm white elastic cording and tied to create two loops for holding the inserts.  I also punched a hole in the middle of the spine and made a loop of elastic to make the closure band. 

For the two inserts: eight sheets of heavyweight cardstock (I used Neenah cardstock), were cut to 9.75"X8", scored in the middle and folded.  The sheets were then divided into two sections so that four sheets were in each.  

I crafted a cover for each section by covering a sheet of the heavyweight cardstock with patterned paper.  The two sections were divided into January through June and July through December, so I used the "Best Year Ever Stamps" to identify these months.  To color in the stampings, I used Sharpie markers!

Finally for the decorating and organizing of each of the pages! First, I cut apart ALL of the journal cards from the "Best Year Ever Essential Collection Kit" and corner rounded all of the edges (optional). To each of the "right-sided" pages, I added a pocket by using one of the 4X6 journal cards and scoring at 3/4" on the sides and bottom and then attaching with adhesive tape.  The front of the pockets were embellished with various stickers, die-cuts and pocket squares.  

On the left-hand side of the pages I actually used the leftover strip (from the top of each 12X12 paper) to create a vertical pop of color and then topped it with the month's sticker.  Finally, I tucked in all of the cards to the premade pockets and used the elastic closure to neatly hold the pages together!

Thank you for joining me today!

Supplies

Hello Simple Stories friends! It’s Jen today with a peek inside my 2020 Best Year Ever SN@P! Album. The Best Year Ever Collection is one that I quickly fell in love with – there are so many fun, bright elements that I could not wait to get my hands on. In keeping with the colorful theme of the collection, I decided to use the Yellow Stripe 6 x 8 Designer Binder with an eclectic cover that I created using the tear strips from each month’s patterned paper.

To make the cover, I sewed each of the tear strips to a piece of cardstock that I glued to the cover of the album. The title and stickers came from the Combo Stickers included with the collection and the 4 x 6 Sticker Book. I can honestly say that never have I ever used so many stickers!

One of my favorites from the collections is the stamps. Inside the cover, I created a title page using a piece of transparency paper cut to size. Rather than stamp one month at a time, I placed all of them on my Tim Holtz Stamp Platform and stamped in one simple step. Once the ink was dry, I machine stitched a border around them and placed the sticker sentiments above and below. I did place white cardstock behind the page so it is easier to see in the photo.

Next, I created a couple of inserts to add variety to the album. For the first insert, I used the packaging from the Collection Kit and cut a strip that includes each of the monthly patterns for January thought June. I embellished this with stickers that correspond with each of the months.

For the next insert, I used the January patterned paper with a SNAP Card. I kept the embellishments light on this one with a just a few stickers.

The first January page uses a bit of paint and ink with the stamps and Speckle Dot Stencil. First, I added the blue paint to white cardstock, went over that with green ink using the stencil, and finally stamped down the page.

For added texture, I machine stitched around the border of the page before adding the photo and embellishments.

The last spread for January continues the photos from the previous page and tells their story.

Using the Simple Stories Snowflakes Cut File (310106) available on the Silhouette Design Store website, I cut several and layered them behind the photo. This page is very simple with just the foam stick sentiment across the top of the picture.

Lastly, I used a pocket page to hold my photos and journaling, which I embellished with stickers, and enamel dot, and a remnant of a snowflake used on the previous page.

Thank you so much for visiting today. I hope you are inspired to record your memories using the Best Year Ever Collection – it really is the best.

Supplies

Hello everyone! Its Tya here on the blog today sharing my latest batch of cards and boy, were these fun to make! I am so drawn to all things girly and pretty and the lovely Simple Vintage Garden District collection fit the bill for sure! With oodles of florals, butterflies, not to mention the prettiest color palette, I was so happy to be able to create these eight cards for you! Here are the cards up close!

I love to add special little touches with the embellishments I use that match the collection I am working with. I used lots of pearls, doilies, lace ribbon, bakers twine, silver buttons and even a couple of paper clips that match the vintage vibe of the collection.

I added a little bit of Stickles Glitter Glue to the edges of the butterflies wings for some sparkle. Sometimes it’s the little touches like that add that extra little something to a card. I did this on the butterflies, the bee and also in the centers of some of the flowers.  I also used a notebook paper border punch on a few of the cards – also a fun way to add interest!

Isn’t the green in this collection gorgeous? I loved the monochromatic type of color scheme of this card.

Another fun embellishment that I added to a few of these cards is some paper flowers that I picked up at my local craft store. These add great dimension!

Its fun to add different die cut shapes to cards as well. Here I die cut 3 different sized circles and then layered them on the card with some of the edges trimmed off. It’s a fun way to lead the eyes on the card.

Aren’t the pattern papers so beautiful in this collection? I have a thing for script paper and dot papers, so this card is a good combination of both!

I can’t get enough of the all the butterflies and birds in this collection. And how fun is this frame? It is a sticker from the Combo Sticker Sheet – stickers are great for adding a sweet sentiment to your cards.

Finally, the Ephemera in this collection is phenomenal! There is such a great variety like this sweet Bingo card that acts as a good focal point of my card.

So there they are! I hope I have inspired you to pick up this collection! The Simple Vintage collections that Simple Stories put out are so fantastic and definitely a joy to work with. So if you are a lover of all things vintage, girly, or a little shabby chic – pick this one up today! Thank you so much for stopping by and Happy Crafting!

Supplies

Hello crafty friends! It’s Kylie (insert http://www.instagram.com/paper_sweetpea ) back with you all on the blog and today I have a brand new layout to share featuring the new ‘Going Places’ collection. A few years ago my husband had his very first trip overseas for business and was treated to a helicopter fly over of the Grand Canyon in the USA. This paper collection was the perfect choice to scrap some of his travel photos.

The papers Happy Travels, Pack Your Bags and On Our Way were used to create a framed background page. A one centimetre (10mm) strip was trimmed off each edge of ‘On Our Way’ before adhering it to ‘Pack Your Bags’. I then trimmed a 1.5 centimetre strip off each edge of ‘Happy Travels’ before adhering it over my other papers.

I immediately fell in love with the coloured strips of the ‘Detours’ paper and have used these across my page horizontally. A border punch from my craft stash was used to create a decorative edge to the top and bottom of the strips.

Several die cuts and journaling pieces were used to create a decorative cluster beside my photo. To one of the tags I have added a decorative brad which added a lovely dimension. My photo was backed and adhered to my background page with foam tape. That way it gave the appearance of ‘floating’ up off the page, creating more dimension and interest to my completed work. For my title I have used one of the Foam Stickers.

To complete my layout and add balance to my photo, I have added one of the cute chipboard stickers which was a perfect match for my page theme. Using a white marker I have also added a hand drawn border around the edges of my page.

Thanks for stopping by the blog today. I hope my layout gives you a little inspiration for your own travel themed scrapbooking.

Kylie

Supplies

Hello friends! It’s Mik here from Papermiks on the blog today! Today I’ll show you a Sn@p! inspiration using the gorgeous I Am 2020 Collection. This collection is so beautiful! It’s perfect to make an album to remind us all that: “I Am… enough, strong, beautiful, fabulous, perfect and blessed”. And you can also be!

Come with me and make yourself one, too! To make the cover I started by die cutting the butterflies from a cardstock. Then, I backed a vellum behind it and stitched some layered butterflies to add some dimension on my die cut. I love hand stitching and the dimensions that it brings. Don’t you? When my die cut was ready, I started to make the background. For this I used 2 pieces of paper and glued them on my cover. I also used a card from Sn@p! Cards, ephemeras, chipboard stickers and foam stickers. “Making big things happen” is the theme phrase that I chose to start my album with.

For the inside I chose pocket pages and some flip pockets. With this I can have more space for photos and it also gives my album some interactive touch.

On some of the pages, you can see that I made paper pockets and tags to add more photos.

Here, I decided to use the line paper and add a frame at the center of my page. This lets me write around my photo. It`s perfect for someone who loves journaling, such as myself.

I hope you’ve got some inspiration from this idea and enjoyed it! If you have any questions, would like to talk some more about Sn@p! or watch a video showing the inside of the album, come and check out my IG account.

Thanks for stopping by and have a creative day!

Supplies

Pages