Odessa Reichel's Blog Posts

Hi! Today I’m here with a spread using the Dad Life Simple Set. I don’t tend to do a lot of a layouts about what a great dad my husband is specifically, but I think it shows across my albums and layouts. The Dad Life set was perfect for putting together a couple of pages that celebrate how awesome he is! With lots of bold oranges and neutrals it was the perfect choice to highlight some photos of him in his element, having fun camping with our boys. I used the Black Stripe Binder which goes really well with the collection!

I mostly used just the Simple Set in my pockets, the only thing I added were some Simple Stories letter stickers I had on hand in a well matched orange and black. I like how Dad Life uses those colours heavily without looking like a halloween party. The playful plaids and stars are so fun. I picked out a couple of great photos: one of my husband and youngest son, one of my husband in his fav camping place, keeping the campfire going and one of his sweet coffee set up which went perfectly with the Dad’s Rocket Fuel card form the 3x4 and 4x6 Elements Cardstock. I love the plaid Papa Bear too, when they were younger I referred to the boys as the bears so it’s pretty perfect. I embellished with a combination of the sticker sheet as well as cutting up some of the cardstock in the collection. These Simple Sets are so great for working on a specific theme because everything works together so well.

This photo was one of my favs from my whole batch of way too many from our camping photos so I knew I had to feature it. I cut down a piece of the cardstock to 4x6 to fit in the pocket and got to work. It’s a mini layout within a layout. I added a very thin mat to the photo with the black and white dot cardstock and then added an asymmetric plaid cardstock with a wide, hand torn edge on the right side to add some depth. I then added some of the great hearts and phrases from the sticker sheet and some letter stickers to finish it off. I felt like the orange or black letter stickers would get lost on their own, so I stuck down the black ones first and then layered the orange ones on top offsetting them for some dimension.

The Papa Bear is just so cute I had to get it in my pockets! I embellished the adorable plaid bear with some star stickers and a couple more stars cut out from the star patterned cardstock paper from Dad Life. The sticker sheet had a fun square sticker with a Papa Bear hat which I fussy cut to give the bear a bit of attitude.

If you’re looking to celebrate a dad in your life, the Dad Life Simple Set is fun and ready to go with everything you need to fill your pockets with a dad-centric layout.

Supplies

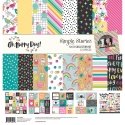
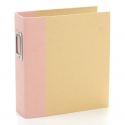
Hi! Odessa here with a couple of pages using the super fun Oh Happy Day collection. Both of these pages incorporate non-traditional photos with the fun colours and graphics of this collection. I love all the little cameras, coffees, hearts and cute phrases, they worked perfect with the pages I was working on. I picked the bright Pink Stripe Designer Binder to go with this collection to keep the fun vibes going.

I knew I wanted to incorporate some of the Instax photos my son took on our trip but in a way that kept them all together as a look into his viewpoint. A little collection of photos like this seems what the Simple Stories Photo Booklets are made for! Knowing that I wanted to incorporate them into my album as a whole I used one of the pocket pages that features 2x2 squares along with a big 4x6 pocket in the middle which I could slide the Photo Booklet into. 

The left side of the layout is pretty simple with some photos and a big graphic journal card. I used a lot of the camera icons from Oh Happy Day throughout this page since photos and taking them was the focus. I added in a little photo I had printed with my portable printer and then attached to the gorgeous photo cardstock from Oh, Happy Day. I sprinkled some cute stickers, chipboard and enamel dots (can I just say I am loving the coordinating enamel dots) to embellish my photos. 

I had a lot of fun embellishing the Photo Booklet with Oh Happy Day. I covered it in a cute dot pattern cardstock from the collection and added some stickers and washi to the front. Along the back of the booklet I used the scallop boarder from the combo sticker sheet to add some fun dimension along with one of the adorable Oh Happy Day bow clips! I also embellished a plain paper clip by adding in some strips of folded over washi from the collection just for more fun. I slid some 2x2 cards and Bits & Pieces to fill up the pockets to keep it less busy around the Photo Booklet.

Inside the photo booklet I cut down some of the coordinating solid cardstock from the Oh Happy Day Simple Basics Kit as a simple background to the photos. The coordinating cardstock was a great way to keep the fun colours throughout the booklet without overpowering the tiny photos. I added some simple phrase stickers to the photos to keep the embellishing simple. The big instant camera is cut down from one of the 4x4 cardstock elements.

On this spread I have some standard SN@P! pockets with a cute insert in the middle to hold a photo strip. The photos on this page are from a fun trip to the mall which is a perfect thematic match for Oh Happy Day! The left side is some cute photos of my boys and 3x4 Element cards to go with them (and a ton of embellishments, of course!)

I cut down one of the Insta Photo Pockets for this page. There’s one with a long vertical pocket and two 4x4 pockets that is perfect for making these little inserts. I slid in a photo strip that I wanted to include with the layout as a stand out element and attached some tab stickers from the Combo Sticker sheet along with some phrase stickers.

On the back of the photo strip I added my journaling and some stickers to tie it into the rest of the layout. On the page facing that I finally got to use ALL THE COFFEE STICKERS on a photo of a coffee cup and a bit of sass with a “normal is boring sticker” on a funny photo of my guys. I hope you’re inspired with some new ways to add non-traditional photos into your pages!

Supplies

Odessa here today with some SN@P! layouts using the Sunshine and Blue Skies collection. The summery Simple Stories collections are often my favourite - they’re always so fresh, bright, fun and a little sassy. The colours in Sunshine and Blue skies are so good. The greens and corals missed with the blushes and blues and even black just feel so summery. 

When I first saw Sunshine and Blue Skies I knew it go perfectly with the new Blush SN@P! binder. It’s such a pretty yet sophisticated colour. I kept the front of my album simple with one of the Bits & Pieces and some word stickers that went well with the binder. That little van is adorable and perfect for documenting some summer fun.

This page has some 4x6 cards and a full page 6x8 photo on the right. The umbrellas on the journal card show off all the colours I am loving in Sunshine and Blue skies. I mounted the photo below on a piece of cardstock cut down to 4x6 with the same umbrellas to tie it together with a cute camera sticker and some word stickers. I kept it simple on my 6x8 photo as it had a strong graphic feel. I used the “summer” word stickers from the Combo Sticker sheet and added a cute lemon slice and a word sticker below to balance it on the page well.

I had a lot of fun with the next spread. I had some smaller photos on the left, a full page 6x8 layout on the left and a cute insert of some things I really liked from Sunshine and Blue Skies in the middle. I made it by cutting off one of the columns on the 6x8 page protectors full of 2x2 squares. I like to do these in my albums to add a visual break from photos and words and to just have fun!

The journal cards in Sunshine and Blue Skies are just so fun they don’t need a lot of extra embellishment. I love these floral words and added a cute camera icon in the middle. I embellished the photo with some chipboard and stickers to frame it - I kept them mostly on the left side so they’d be at the edge of the page and not in the middle which adds to that framed feel.

To fill the 2x2 pockets I started pulling out all my favourite bits from Sunshine and Blue Skies and started moving them around to figure out the feel I was going for. I knew I wanted a mix of 2x2 journal cards and more transparent pockets with floating elements. When I saw the FUN chipboard stickers I knew those had to be in there. I added a snow cone next to them to fill up the pocket. I added in other fun summery things like the rainbow and swimming tubes and really like how it turned out.

I wanted the 2x2 pockets to be reversible and had my work cut out for me. The pockets with the journal cards were easy because I slid some fun cards related to the layout next to them. With the swimming tube I glued down another swimming tube from the Bits & Pieces to the other side. I did the same with the snow cone. With the rainbow and the chipboard FUN stickers I attached some on theme paper on the other side so that it wasn’t plain for a truly reversible layout without using the transparency of those pockets.

For the full page 6x8 layout I kept it simple by mounting one of my fav photos on some coordinating cardstock from the Simple Basics Paper Kit (I love that the newer collections have these!) to give it some depth and then on the cuuuuuute ombre paper from the 6x8 paper pad. I embellished with the floral washi tape and some coordinating flowery bits to keep that summer feel going and to go with the florals on the page next to it. I added some word stickers (always a fav) and a nice journalling spot from the Bits & Pieces to finish it off. I can’t wait to make more pages with Sunshine and Blue Skies, it’s making me wish summer was here already!

Supplies

Pages