Odessa Reichel's Blog Posts

The Simple Vintage Traveler collection was just the inspiration to get some pictures of a family trip printed and in an album! As soon as I saw the colours I knew they’d go perfect with the majestic mountains and dreamy blue-green lakes we saw camping in Jasper National Park a bit over a year ago. I started with a Robins Egg Stripe Designer binder because it went with the collection so well and got to work adding in photos, paper and more.

This first spread have a couple of my favourite photos of our trip. I went with a large 6x8 photo on the left and a 4x6 and a journal card on the right. I really like the layered chipboard frames found in the Vintage Traveler collection. They don’t fit in the pockets because they’re more geared towards larger layouts but I found that attaching one to the outside of the page protector to be just what I needed to frame my photo. I kept the rest of the page simple with a cute journal card with a chipboard geotag.

Embellishment clusters make me happy and were just what my big 6x8 photo needed! I just started pulling stickers, chipboard pieces and die cut Bits & Pieces and stuck them down to give the story some words.

This spread has a combination of photos and journal cards in pockets as well as an accent pocket. I used a postcard style SN@P! card to add some journalling to my spread. The card is really cute and keeps the whole travel theme up great.  I added some faux tickets stickers and die cut pieces to give it a bit more dimension. Underneath is a photo of my husband and boys I just added some simple phrase stickers. The super cute vintage cluster style stickers in Vintage Traveler are a great layer under phrase stickers. On the right I have some smaller photos and cards. I collected a bunch of various bits and pieces throughout our trip like the soda label on this page. Along with the cute bingo-y card and (of course) a coffee shot I added in a bit of our between adventure life.

In one of the pockets I simply placed one of the large geotags from the Bits & Pieces. It gives the page a bit of a breather and adds in some fun layering between pages. I love the amount and variety of geotags in Vintage Traveler!

On the next page I documented life around the campsite in the evening on the left and a map to start off documenting the next days’ adventure. I used some simple stickers and die cuts with my photos on the left and a photo flip (seriously, one of my favourite Simple Stories things!) to add some journalling space. I left the back of the geotag from the other side plain because I liked the way it looked there. On the right I used one of the square pocketed page protectors that Simple Stories makes. I cut down a map to fit in the 2 larger 4x4 pockets and filled the smaller 2x2 pockets on the side with some of the 2x2 cards from the collection.

I love including maps in travel albums. I save pretty much every tiny piece of paper that I can so I have a few of them in my Alberta trip scrapbook. This map was perfect because we had spent the day following it and checking stuff out. I marked some of the main spots we stopped with chipboard geotags and then used some of the Simple Stories alphabet stickers to add a title. I embellished the title with some phrase stickers from the sticker pack and combo sticker sheet, added a cute car die cut from the Bits & Pieces and it was a done page.

Finally, I added some journalling and one more picture of the boys enjoying campsite fun in a Photo Flip on the other side. There are some really great journal cards in Simple Traveler that gave me space to get our story down in a way that looked like more travel ephemera. I had been putting off documenting this trip because it was hard finding a collection that did all the gorgeous landscape shots I took justice but I can’t wait to finish up my album with Vintage Traveler now.

Supplies

Hi, Odessa here with some SN@P! inspiration using the Spring Farmhouse collection. It is still super winter here but I am craving spring so much. I decided to bring the spring anyways by pairing Spring Farmhouse with some wintery photos. The bright pastels and upbeat vibes is just what I need right now.

I love all the pinks and yellows in Spring Farmhouse and I wanted to make them the focus of this page. I cut down the Love this Life cardstock to add to one of the pockets because that pink floral is gorgeous and a journal card to the other. The colours in them really set the tone for the rest of the layout. 

Spring Farmhouse had some fun new things in it and I had to include them! The bow clips are just darling. I used one to attach a bus transfer from the day to the page which acts as a title card with the date for my story.

Here I mix up a regular pocket page next to a page full of 2x2 squares. I used all of my 2x2 pictures on the other side of the page so I cut down a 4x6 photo to stick in the squares along with a 4x4 journal card from Spring Farmhouse and some ephemera from the day. 

The yellow in Spring Farmhouse is so good! It’s the perfect spring-y touch I needed in my layout and I made sure to add pops of it throughout.

Spring Farmhouse has the Live Simply coordinating stamps that are just so perfect. I used one of the phrases from the stamp set beside one of the die cuts from the bits & pieces pack to add some more words to the page.

I have all the 2x2 pockets going on here. I had a lot of pictures of similar things so instead of pages and pages of photos I printed them at 2x2 to get it all together. Each side of the layout is a different story made up of a bunch of photos. I added in some journal cards, stickers and more to finish off the layout and pull it all together.

Another new thing I was excited about was the enamel dots. The sheet has the main colours of the kit in a few different sizes perfect for adding an extra touch to my page. I used them to balance the circle on this page.

Supplies

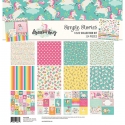
Hi, Odessa here with a SN@P! layout using one of my favourite collections, Dream Big. I love the saturated playful rainbow of colours and fun imagery. 

I was looking through my supplies for the perfect collection to go with some winter fun photos. I just love the contrast of the white snow against all that colour! I made a two page spread with some fun extras - a shaker divider and a photo booklet. I had so many photos that I picked my favourites to go in the pockets and featured the rest in the booklet.

The left side is the simple part of the layout. a couple of photos and a cute journal card from the collection. Dream Big has some great embellishments and I used stickers, puffy stickers, bits and pieces and chipboard stickers on this page.

In the middle of my spread I made a cute shaker just because I really wanted to make one. I used one of the Insta-Pocket Pages cut down to a long single pocket. I slid a strip of the Be Younique cardstock down the side of the page protector to make it stand out a bit more. I used the Believe stickers from the combo sticker sheet and then added a few chipboard pieces and a bunch of confetti made with a hole punch and some of the Dream Big Cardstock. I added a tab sticker from the combo sticker sheet and sewed it up with my sewing machine. Now I want to make all the shaker pockets!

On the right side it looks like a couple of pocket cards and a 4x6 photo but one of the pockets is actually a photo booklet! I had a bunch of photos from that day and didn’t feel like they’d be great as a bunch of layouts. The photo booklet pulls together all of those extra photos into one layout with an added surprise.

I used the backside of Dream Big 3x4 cardstock to make a cute pocket card with some of the chipboard stickers. They’re supposed to spell out Dream, but Rad fit better in a 3x4 pocket. I embellished with a few more stickers to make a personalized journal card. Next to it is my photo booklet. I covered it with the Be Younique paper to make it match the rest of my layout a bit better and added some stickers for extra cute. Finally I added a tab to make it a little more obvious.

I lined the inside cover with the backside of the Dream Big 4x4 element paper and filled the pockets with my extra photos.

I kept the embellishment in my photo booklet simple with mostly just phrase stickers. I love how phrase stickers look on instant photos!

I just love that sideways adorable sticker. Dream Big might be thought of as a more “girly” collection but I didn’t let that stop me from using it with photos of my boys!

Finally, I used one of the 3x4 journalling cards to add some words to my layout. If you have a ton of photos I recommend giving these little photo booklets a try! They slide nicely into the pocket pages and are great for collecting images together. I put it all in the Robins Egg Striped Designer Binder which might be my favourite Simple Stories binder ever.

Supplies

Pages