July 2015 Blog Posts

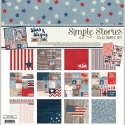
Howdy!  Layle here with you for Day 2 of the Simple Stories & A Flair for Buttons Product Swap! 

Both design teams have swapped products and will be sharing on our blogs all week long.  Join us for some great inspiration as well as a chance to win a prize package from both A Flair for Buttons & Simple Stories! 

Even better, A Flair for Buttons has created these custom flair to coordinate with our Summer Vibes collection for both teams to use this week!

You can pick up your own FUN custom Summer Vibes Flair here!

Today design team member Marie Lottermoser joins us with a sunny, summery SN@P! Binder - 
____________________

Hi Everyone!  Marie here today to share the beginning of my summer album. As the weather warms up I can't wait to include all my favorite summer things from popsicles to beach trips in my album.

I started off by using a die cut from the SN@P! Journal Pages to create a divider page to separate out the season and year from the rest of my album.  I punched out a 2" circle of striped paper and layered a flair button right on top.  I love these flair buttons, and am using several of them throughout my pages.

I followed that up with a 2x2 grid page of my favorite summer things. I added in several small chipboard frames which fit perfectly in the pocket pages and make great accents for stickers and another flair badge.

Summer just isn't summer without a trip to the fair.  On this page I layered a transparency (which is included in the Summer Vibes collectionover my photo.  It's a simple way to add a pop of color to a photograph.

Next I used a foldover Journal Page and punched a 2 inch circle on one side.

Now when the Journal Page is folded over, a flair badge peeks through the opening.  One tip, punch out your circle before you glue down your flair badge to make sure you have proper placement.

So that's a look at how my summer album is coming together.  I hope you'll join me this summer in documenting all of your favorite memories!
_________________

Now for even more fun!!  Enter via the Rafflecopter widget below and we'll draw one lucky winner on Sunday to win a Summer Vibes prize pack!  

a Rafflecopter giveaway

After you enter, head on over to the A Flair for Buttons blog to see what their team has created.  Make sure to enter there as well - they're giving away $50 worth of flair both here & on their blog!

Want to follow A Flair for Buttons and keep up with all of their great projects & products?  Here you go!

Join us again here tomorrow for more inspiring projects!

Supplies

Howdy!  Layle here with you today.  We've got a fun week planned for you - a Simple Stories & A Flair for Buttons Product Swap! 

Both design teams have swapped products and will be sharing on our blogs all week long.  Join us for some great inspiration as well as a chance to win a prize package from both A Flair for Buttons & Simple Stories! 

Even better, A Flair for Buttons has created these custom flair to coordinate with our Summer Vibes collection for both teams to use this week!

You can pick up your own FUN custom Summer Vibes Flair here!

Today design team member Allison Davis joins us with this super, summery layout -
________________

Happy Summer! Finally! I don’t know about you but I have been counting down the days until Summer time. We always try to find a beach to visit during our family summer vacations and I can’t wait for this year. I had never been to a beach until I was in my thirties (crazy, right!?) and let me tell you, I’m hooked. So is my 10-year-old, Drew. He’s like a natural born beach bum. We can’t get him out of the water whenever we go. He’ll spend hours running into the crashing waves and laughing when they knock him over. It’s always fun to watch!
 
Just like I look forward to our beach time every year, I always find myself looking forward to seeing what summer collection Simple Stories puts together. Summer Vibes will go down as one of my favorites and paired with A Flair For Buttons, it’s a recipe for fun! 
 
Here’s a look at my layout using both of these fun products:
 
 
I used A Flair For Buttons in combination with the Simple Stories Bradz, enamel dots, and small circle stickers to create a spray of circles across the whole layout.


For the title of my layout I couldn’t resist using the die cut “beach” arrow.
 
 
Here’s a closer look at some of the details:


Now for even more fun!!  Enter via the Rafflecopter widget below and we'll draw one lucky winner on Sunday to win a Summer Vibes prize pack!  

a Rafflecopter giveaway

After you enter, head on over to the A Flair for Buttons blog to see what their team has created.  Make sure to enter there as well - they're giving away $50 worth of flair both here & on their blog!

Want to follow A Flair for Buttons  and keep up with all of their great projects & products?  Here you go!

Join us again here tomorrow for more inspiring projects!


Hi everyone! Happy 4th of July!  Allison here with a layout using the new Stars & Stripes Simple Set.  I’ve also got a new sketch to share with you that combines traditional scrapbooking design with the SN@P! Pocket Pages. 
 
 
You can download the full sketch with measurements and placements here.
 
The left side of the sketch features a more traditional style of layout design while the right side uses the SN@P! Pocket Page, Design 4.
 
Here is my layout based on the sketch:
 
 
My mom started the tradition of flag photos on the 4th of July with my oldest son. We all snapped away while Drew ran around the room with a mini American flag. The pictures turned out so great that we did it the next year, and the next year, and the next year. Fast forward a few more years and we’ve gotten Jackson doing the same tradition. Drew has hit the point of too cool for flag photos and has passed the torch flag onto his younger brother. Jackson did not disappoint in taking over the flag tradition. 
 
 
I instantly knew that I had to use the “Land that I Love” paper from the Stars & Stripes collection.   The large USA with the flag print was the perfect backdrop for my flag fun photos!
 
 
I added two grouping of smaller photos on the big USA and arranged them so that I wasn’t covering up too much of the design on the paper. I cut out the “Fourth of July” star from a 3 x 4” card and accented it with smaller hearts and a word sticker.
 
 
I arranged the title and journaling in the center, between the two groups of photos.
 
 
At the top of the page I used two 2 x 2” photos accented with more stars and another word sticker. Word stickers are one of my favorite go-to embellishments! 
 
 
For the right page I used a combination of photos and cards with Pocket Page, Design 4. I love the 2 x 12” pocket with this Pocket Page! 


To embellish the 2x12” strip, I used a small striped strip, stars, a small photo, and a 2x2” square. 


I always like adding pieces to decorate the empty space in some of my photos. On this photo I added the washi tape sticker and accented it with the USA and Land That I Love sticker.
 
 
On the Stars & Stripes Forever card I added two 2 x 2” photos and some more word stickers.
 
 
To accent another photo I used the Yankee Doodle sticker and some more stars.
 
 
I hope you enjoy using the sketch! And, for those of you in the US, have a happy (and safe!) 4th of July! 

Hi!  It's Chantalle back with you again today, sharing one last layout -  Summertime Selfie using the Summer Vibes collection. This is a way to demonstrate how one can use embellishments to help tell a story.

The photo was taken in the early summer weeks. My son rode his first roller coaster with me and I took a quick snap to mark the occasion. I loved the lens flair in the shot. I couldn’t believe my eyes when it matched up perfectly with the flair in the gorgeous bokeh print on the sheet of ‘Shine On’. I’ve made the text on the chipboard frame part of my title by setting it close to the ’Summertime’ die cut shape from the Summer Vibes ‘Bits & Pieces’ pack.

The camera print photo overlay sparked the use of lots of camera shapes. I cut them out of a 12x12 sheet of ’Selfie’ as well as the smaller version from the 6x6 Pad.

When using lots of similar shaped embellishments, vary the size if possible and raise individuals at different heights to keep interest.

Thank you so much for stopping by the last 2 days! If you would like to see more of what I get up to, feel free to pop in to my blog (copasetique.blogspot.com) or you can find me on FB and Instagram @chantallemcdaniel.

Hi!  It's Chantalle, back again today with another layout, this time featuring the So Rad collection.  I have been itching to use this picture of my DS against a painted mural, which was taken on a recent trip to Bondi Beach in Sydney. I just love how these two hot dogs coordinate with their cool sunglasses! ‘So Rad' could not be a more perfect fit for capturing this moment on paper.

I was inspired by the artistic print on this So Rad ‘Chillin’. I wanted to build on the theme by adding a Gesso base. Simply applied with an old loyalty card, it adds to the painted elements and also provides a more focused area on which to build up my photo layers.

Once the gesso was dry, I added an ‘extreme awesome’ 12 inch sticker from the So Rad  Fundamentals sticker sheet. I really love that these stickers are a full 12 inches in length. It can be annoying when one goes to use a sticker like this and it doesn’t fit all the way across the page. By placing it diagonally. I am creating continuation with this awesome ‘extreme awesome’ photo overlay, which comes as a bonus in the So Rad collection kit!

Add a touch of grunge by distressing chipboard stickers with a sanding block. Under my photo I have adhered a pocket horizontally. You will find a couple of these handy guys, as well as some super cute die cut shapes in the So Rad Sn@p Cards pack. I’ve journalled on a 3x4 card from the pack and ever so slightly trimmed it and tucked it into the pocket.

 
The circular elements in the pack of So Rad photo stickers tie in the nicely with the small circular finishing touches.
 

Supplies

Hello everyone! Chantalle here and how fabulous to be back sharing with you again today! I have been creating up a storm with the new lines, So Fancy, So Rad and Summer Vibes and absolutely love them. It’s a thrill to see these collections shipping to retailers and seeing amazing creations on social media already!
 
I have three layouts to share with you over the next 2 days, one from each collection. My first uses So Fancy.  Not only is it beautiful and inspiring, but also very luxurious with it’s gold finishes. One can add a sense of fun with the sweet sentiments and carefree elements or add a dash of metallics for a touch more drama.
 
Girl, why fit it?
 
 
The 4x6 SN@P! card and its statement was a perfect match for this image of my little girl, working her usual sass! I often find myself amazed by her outgoing personality and sense of humour. She’s definitely a force to be reckoned with! I need to remember that she has her own path to follow and I must encourage her to be the beautiful rainbow that she is.
 
 
The feather shapes were also a big drawcard for me. I’ve taken the various sizes from the chipboard stickers and the die cut elements and added a couple more in the form of some stamping as well as some die cut shapes which I created with a metal die and gold foil paper in my Cuttlebug.
 

I then had some fun layering all these elements and adding a few details like machine stitching, enamel dots and tiny pops of inky splatters.

Check back later today for the layout I created using to the So Rad collection!

Supplies

Hi everyone, it's Audrey, with a couple of patriotic projects to share with you today. So, the Fourth of July is almost here, and that means it's time for long lazy days, summer barbeques, and the good ol' red, white, and blue. Perfect time for Simple Stories' new 12x12 Simple Set - Stars & Stripes. AudreyPettit-Stars&Stripes-USASet Now I am absolutely crazy over patriotic colors and theme, so this new collection is right up my alley. Of course they are perfect for the Fourth of July, but I think they work really well all summer long, or all year long, for that matter. I think my favorite thing from this collection has got to be that adorable VW Buggy, so that's right what I've went for in my projects today. First up, a quick and easy home decor frame. AudreyPettit-Stars&Stripes-USAFrame This frame uses one of the larger 4x6 journaling cards, which is absolutely perfect for slipping into a standard 5x7 frame. I had just enough room for a couple of layers of papers underneath, and because I removed the glass, I could build up layers on top, too. AudreyPettit-Stars&Stripes-USASet2 I simply added a twine tie, and a few Stars & Stripes stickers. Thought the scalloped border made an awesome "road" for my buggy to cruise on. Super simple, and fun. AudreyPettit-Stars&Stripes-IndependenceDayCard And because I love that little Buggy so much, I made a matching card using the smaller VW cardstock sticker. AudreyPettit-Stars&Stripes-IndependenceDayCard2 A 3x4 journaling card is the perfect size for my little arrangement, and I love that the cards do half of the design work for me with all the fun printed details. I simply added stickers for the image, as well as a pair for the greeting. I popped some of them up with foam dots for definition and depth. AudreyPettit-Stars&Stripes-IndependenceDayCard3 Have a problem adhering stickers with foam tape without catching every stray fuzzy floating around? Place your foam adhesive onto the back of the sticker, and then try patting the remaining sticky spots with an embossing powder tool, baby powder, or even cornstarch. The powder will stick to the sticker, so the fuzzies can't. Happy Summer! 

Supplies

Pages