November 2015 Blog Posts

Happy Cyber Monday!

Today only, your entire purchase from our digital store is 50% off!

WIth more than 45 of your favorite Simple Stories collections in digital format, you're sure to find just what you need for all of your digital crafting needs!  Visit our digital store here and enter code CM2015 during checkout!!  


Hey Simple Stories fans! Rebecca here! You may remember THIS POST where I showed how I was setting up my 30 Days of Thankful Album. 

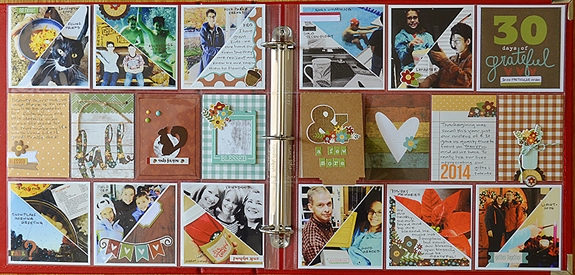
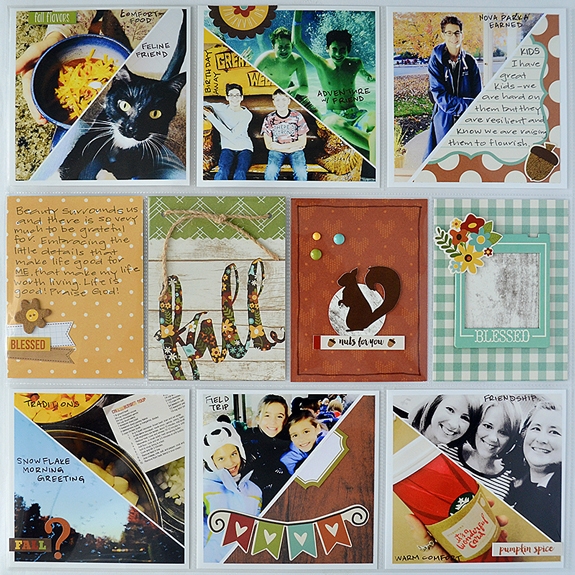
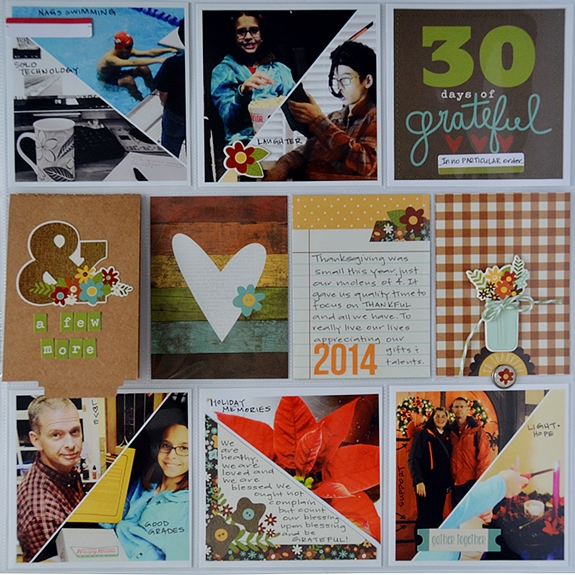
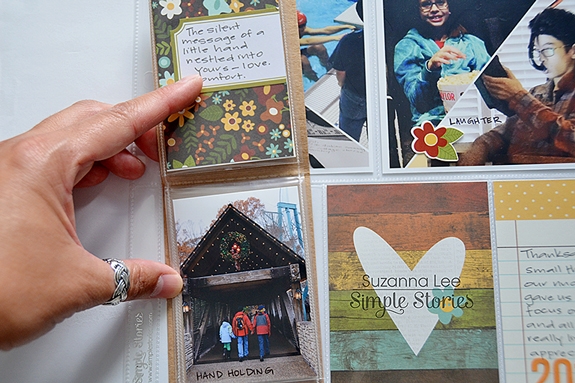
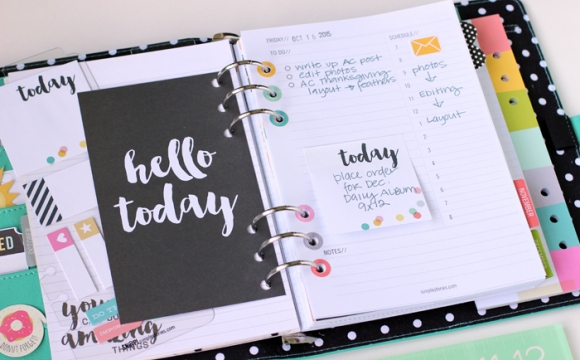
Well, I am back with a nearly completed album! Every year this is one of my absolute favorite albums to work on. I love thinking about the things in my life I am grateful for and I really enjoy taking a photo a day. This year the album came together very quickly because I used a Simple Stories 4x6 album. If you are overwhelmed by the idea of a month long album project, this is the album for you. It comes with a variety of page protectors and inserts. Combine it with your favorite Simple Stories collection and you very quickly have an album you will cherish. 

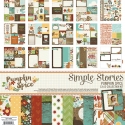
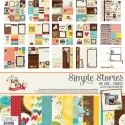
I mentioned in my first post that I used the Pumpkin Spice collection and that it all came together so easily. Since I had so much pre-done I had extra time to add some special touches and I came up with 10 tips or tricks to share about this album.

#1: Mix It Up!

Use a variety of page protector sizes so you can see parts of pages peeking out. Round corners or punch bordered edges.

#2: Take a Photo a Day on Your Phone

It makes it easy to compile your photos if you are taking one a day with your phone. You can simply start with the first photo taken on November 1st.  Bonus Tip: I decided NOT to label each day in my album so as not to stress myself out in case I missed a day!

#3:  Add Hand Stitching 

There is something about hand stitching that adds such a homespun feel to your album. It adds dimension and texture too. I simply drew a heart, pierced holes around the shape, erased the pencils lines and stitched it up.

#4: Use Older Photos

On November 2nd I posted about being thankful for my "girl on fire."  I used my favorite photo from Halloween instead of one from November. Although the photo wasn't technically taken during November I figured it was close enough!

#5: Journal, Journal, Journal!

Journal as much as you can! I documented most of my days in Instagram and had little snippets there that I could copy for my journaling. Bonus Tip: Mix handwritten and typewritten journaling. This way you don't have to stress about your handwriting for the WHOLE album, but you are remembering and passing down some of it!

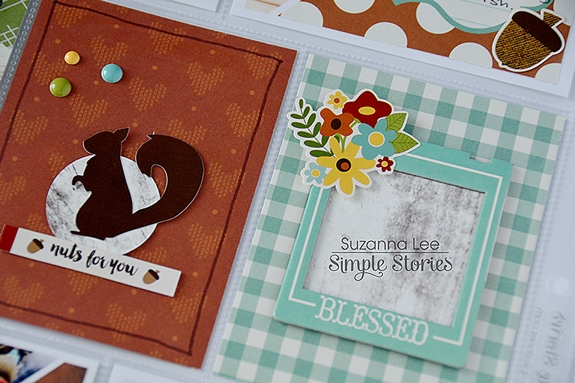
#6:  Mix Embellishments 

Combine stickers, die cuts, chipboard and more. Simple Stories makes this easy by offering so many adorable coordinating embellishments. The combination of them all creates visual interest and helps tell your story.

#7 Stamping

Stamping is a great way to connect journaling cards and photos without adding bulk to your album.

#8: Journal on Your Photos

This sunset photo had a ton of open space that was silhouetted and made it a perfect place to journal with a white gel pen!

#9 Fillers

Not all pockets have to be filled with photos or journaling. On the right hand side I stuck enamel dots right to the page protector inside a small chipbaord frame. On the bottom right square I placed a sticker on stop of the page protector. I mimicked both designs on the back so no white showed through.

#10: The Small Details

Don't forget the binding, back cover and book plate! I am not about to lie and tell you I've covered ever back cover of every mini album I've ever made, but I will say that when I do it makes for a much more completed look! I always love using some mini stickers to add the date to the book plate. The scalloped round sticker just seemed to fit perfectly on the binding. Bonus Tip: The Simple Stories border stickers wrap perfectly around this album. If you run out, just use a thin strip of patterned paper like I did on the back cover!

If you are documenting your 30 Days of Thankful, I hope you find these tips helpful! 


Supplies

Hello, again!   This is Amber, founder and creative director of Simple Stories.  I'm here for another installment of my monthly Document IT blog feature.  Today is Thanksgiving in the US - happy Thanksgiving from Simple Stories!

This month I've decorated my Carpe Diem planner for the holidays -

I used a mix of products from our Claus & Co. collection - I love the way they look against the black Carpe Diem planner, especially with the polka dot interior :)  The vertical & secretarial pockets are a great place to store the smaller cards & embellishments I plan to use throughout the month.  And those clips - super easy to make, I just adhered the Bits & Pieces die cuts to a paper clip with a glue dot, backed with a piece of washi and called them good!

I mixed in a few pages from the SN@P! Journal Pages, including this pocket insert.  Although they're sized for our 6x8 binders and albums, I just trimmed a bit off of the left edge of each of the pages and repunched the holes & voila! -  perfect Christmas themed inserts for my A5 planner.  The pocket insert is at the front of my planner and is a great spot to store the stickers and other bits I'll use throughout the month.

I've also incorporated the Holiday Planning Inserts in my planner.  They're also sized for our 6x8 binders and albums, I just trimmed and repunched again and they fit perfectly :)

The Holiday Planning Inserts include so many fun, different things - from tabbed dividers and calendar spreads to lists, dashboards and stickers, it's everything I need to customize my planner for the holidays, in one convenient little package!

I'm so excited for next month to start!  I'm looking forward to using my planner to help me stay organized and on top of things during such a fun & busy time of year.

FREE PRINTABLES!


Now we get to the really fun part!  We've designed these FREE printables for the holidays; the month in review insert will fit in your 6x8 Life Documented Planner and this month there's an A5 version as well!  In addition you'll find lots more fun printables that can be used for your in cardmaking, gift giving, home decor & more!  

Click here to download November's Free Life Documented Printables.

You guys!  There are a whopping 12 page of free printables we've included this month.  We wanted to share them with you as a thank you for being such loyal Simple Stories fans :)

The printables include - 

A5 & 6x8 November Month in Review
A5 & 6x8 December Month in Review
Printable Stickers & Gift Tag Stickers
Gift Tags
6 8x10 printables for framing


TIP: The November free printables are on a single PDF document with 13 pages - it's a larger file, so it may take a bit to download depending on your internet connection.  Print off what you want and the quantity you need.  We've added cut marks to each printable, so you can easily trim your pages to size.  

Thank you again so much for being such loyal Simple Stories fans - Happy Thanksgiving!

Supplies

Hi y'all! Suzanna here today to share with you my quick version of 30 Days of Grateful. Everyday there are things that we ought to be grateful for. Some days there are more things than others. Rather than force gratitude, I want to really focus on the gratitudes that mattered most to me. Hence, the no particular order part of this process. No numbers, days or rankings, just plain gratitude!
 
 
In order to be able to include a lot of pictures on my pocket page spread, I had to get a little creative. I liked the symmetry and movement of the triangle bisected squares that move around the top and bottom of the pocket pages. There is the occasion trimmed down 4x4 elements card for additional journaling and to the eye a break.
 
 
I also used a Simple Storied Photo Booklet on the right hand page to be able to include even more gratitudes and corresponding pictures. The back page fit perfectly into the 4x3 pocket of my Pocket Pages.


The SN@P! cards that coordinate with the Pumpkin Spice collection made easy work of this project for me! The hardest part was the lesson of gratitude; slowing down each day and acknowledging that things or things or person/people for which I was grateful. Gratitude's abound, there is so very much we have that fill our lives which we take for granted.
 
 
Thank YOU Simple Stories readers for stopping into the blog and reading our posts! I hope you, your friends and your family have a safe and blessed Thanksgiving!

Supplies

Hello Friends!

It's Kristine here today and I'm sharing a pocket page spread for November with a " thankful " theme. I used the Pumpkin Spice collection, it was perfect for my fall themed layout.  

These are photos of my family taken last season and a picture of my parents with grandkids that was taken this past July. The orange shirt my dad was wearing worked great for this Pumpkin Spice collection! Yes, I love it when a shirt matches the paper I'm using ;-)

I kept the same theme throughout my spread using yellow, pumpkins, a few flowers to decorate my filler pages.

Here's the left side of my spread

I did't have a lot of pictures that are " fall " themed. I always love to include my cats in the mix cause they are family too right?!  A Thanksgiving dinner, and my dad walking in the woods with my niece.

What is something I did differently on this page, can you tell?  Well, I actually added some embellishments ON TOP of my page protectors! Something different for me and I actually enjoyed it. I was able to overlap from one pocket to the next and also add dimensions to my page. It is a great way to add texture as well.

Here's the right side of my spread

I added a bit more journaling on this right side, nothing planned it just happened that way. I cut the pumpkin from a larger 4x6 journal card and added it to a 4x4 piece of paper to create my own journal card. 

This next photo shows the diecuts on top of my page protector.  I added foam dots to make it more dimensional.

As you can see, adding some extra stickers and embellishments adds a bit of interest to a page. Hope you can give this a try !

Enjoy creating with Simple Stories this month and please tag us on Instagram so we can see your work ;-) ( #simplestories ) You can also follow my work on Instagram @KristineDavidson

Supplies

I love this time of year!  November means Fall weather, Thanksgiving, spending time with family and a lot of delicious food!  It's a time to be THANKFUL.  But it doesn't mean it's the only time for us to be thankful.  We can be thankful everyday and in everything.  I wanted to document an everyday kind of thankful on the layouts I'm sharing today.  These are just everyday photos, but they can easily be used with the We Are Family collection to create a thankful themed layout.
 

I started my first layout, We Are Blessed, by cutting a large arrow background from White card stock.  Then I backed the open space with the Our Story patterned paper and machine stitched around the arrows.  I wanted to use the open spaces between the arrows to place my photos, embellishments and title.


I added my two photos first, to give me a starting point for the rest of my design.  Once the photos were in place, I added my title to the top section of the arrows, using the We Are Family wood veneers mixed with a die cut word.  Then I moved on to embellishing the bottom section of the arrows, with a mix of Stickers, Bits, Enamel Dots, Wood Veneers and Bradz from the We Are Family collection.


After I have 95% of my layout design finished, I like to go back and add a few other touches.  I wanted to bring some embellishments to the title, so I added a small arrow Sticker, Brad and Bits & Pieces heart with an Enamel Dot in the center.  I also wanted to add a few things to the photos, to help draw your eye.  I kept it simple with a couple of Stickers and Bits & Pieces from the We Are Family collection.


On my second layout, XOXO YOU, I created a large typography graphic by welding several words together in Silhouette Studio.  I wanted to have a thankful themed text in the background of the layout.  I decided to cut the words from the Making Memories patterned paper in the We Are Family collection.  This pattern allowed me to bring in a lot of color, without using a lot of different papers.


Before I added the die cut words to the White card stock background, I created an offset design in Silhouette Studio and drew the outline of the words with a Brown Sketch Pen.  Once the words were finished drawing, I added the die cut words to the drawn image.  And before I added my photo or any embellishments to the layout, I added a few splatters with Brown spray mist.


I didn't want to cover a lot of the background words, so I placed my photo to the right hand side of the page, and added my title above it and some embellishments below it.  And I added a few of the Bits & Pieces, Wood Veneers and Enamel Dots from the We Are Family collection to the left hand side of the page to balance out the layout.


I hope these two layouts have given you inspiration for creating thankful themes, to go with your photos all year long.  The right collection, embellishments and title can bring a thankful look to any of your layouts!


Supplies

Hi there, Simple Stories fans!   Teri here, and I am excited to give you a peek inside my Carpe Diem Planner
 
I'm so geeked about this planner for a couple reasons. First, I love the planner's large A5 size because it gives you lots of room to write and embellish. And I love the ring binding system because you can take pages out and add pages in. You can really customize your planner to your heart's content. I love that!
 
The first thing I did with my pink planner was to rearrange the months. Since I started using it in November, I moved the November and December sections to the front of the planner. (Hello, friends! How could I possibly wait until January to start using it?! Kid in a candy store, but I digress.) I also moved the piece of pencil paper to the front of my planner. It had previously been in the back of the planner. It's just so cute! 
 
 
I immediately delved into planning November. I removed some of the "day" planning pages that the planner came with and replaced them with some "Who What Where When" pages from the Carpe Diem Basic Inserts pack.
 
 
I added a number date to each day with the Carpe Diem Number Stickers. Rather than being uniform about that, I randomly put the date circles into the three columns. I just kinda love that random, tossed together look. 


My handwriting is extra messy on these pages, but I think addition of colorful stickers made the pages fun and cheerful and distracted from that messy writing! I mean, how cute is that coffee cup? Yes, I know! 
 
I also created a cute little dog clip for November! It was easy to make! I adhered the dog (from the Carpe Diem Bits & Pieces) to a large paperclip with some glue dots.
 
 
Flip it over, and you'll see I added a little bit of paper washi tape to cover up the adhesive. Easy peasy! 
 
 
Speaking of paper washi tape, I used it to add a little color to the top of those Who What Where When pages, as well as the November month calendar pages. 
 
 
Finally, I included a "This Month" page (also from the Basic Inserts pack) to my November section.
 
 
It's great because I was able to add some important dates for the month that I definitely don't want to forget. I also was able to document some of my goals for November. Always good to have something to strive for... wink! 
 
 
I made the page a little more interesting visually by adding some stickers and die-cuts to it.
 
Thanks for letting me give a peek at my planner. I'll see you again soon!

Hey there planner friends, Nancy here with walkthrough video on how I've set up my Carpe Diem planner and organize my planner supplies. I was looking for a place to store all of my creative project deadlines, ideas and plans. I think I found the perfect spot!

​This monthly view is my favorite part of the planner. I love that the pages are perfectly plain so that I can add as much color and decor as I want every month. The quote stickers fit perfectly into the boxes and let you customize the design.

The weekly view here is dressed up with number stickers, dashboard insert and plastic divider. I use this space for my weekly social media plans. For a closer look at the entire planner, watch the video here:

The daily planner pages are where I list things that must get accomplished today, notes and an hourly schedule. I love the sticky dashboard notes and use them for pops of color and to add the things I want to remember.

This planner is the perfect example of form follows function. It's beautiful and practical all rolled into one!

Pages