January 2018 Blog Posts

Howdy friends, Layle back with you again today for Day 2 of our Winter 2018 Reveal Week!  If you missed us yesterday, you can catch the reveal of our new I AM... collection here.   Be sure to check back with us each day this week for more new goodies as well as a chance to win our new products before you can buy them!  

You can also follow us on Instagram at simplestories_  and carpediemplanners for additional chances to win! 
____________________________
 
First comes love, then comes Always & Forever - a gorgeous collection to document memories of that special day!  Classic black, vibrant white and soft cream paired with gold foil accents present the perfect palette to complement any wedding.   Say I DO to Always & Forever when it comes to scrapping your love story!
 

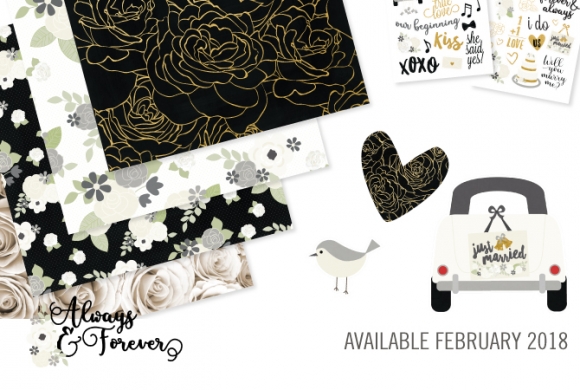
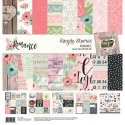
So there you have it, Always & Forever - shipping to retailers in early February!  

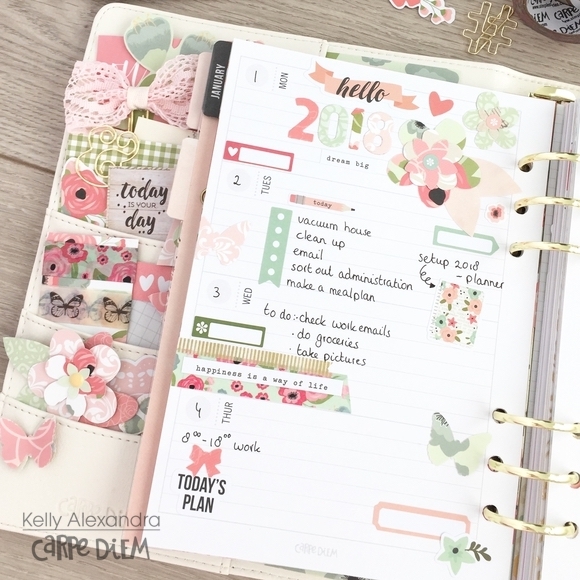
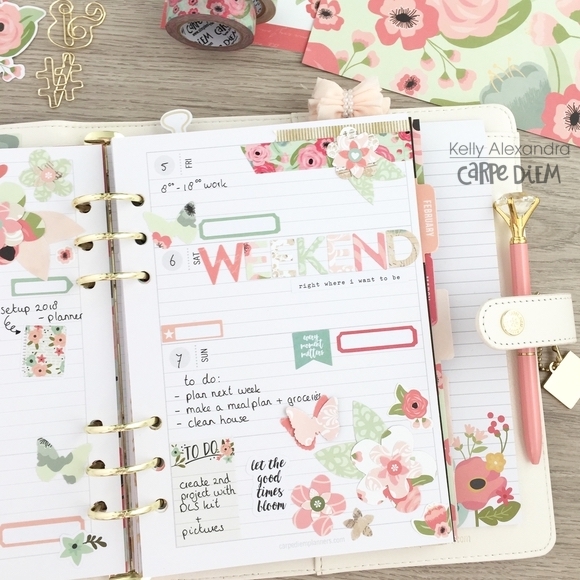
Now for some fun!  How about a chance to win an Always & Forever prize pack before you can buy it?!!  You have 3 chances to win - 

First, simply enter via the Rafflecopter widget below -

a Rafflecopter giveaway

Second - PIN TO WIN!  Just pin your favorite(s) of the Always & Forever images in this post, tag your pin with #simplestories and #alwaysandforever, then leave us a comment on this blog post telling us that we've been pinned and include your Pinterest user name.

Third - follow us on Instagram at simplestories_  and watch for Always & Forever posts for a 3rd chance to win! 

I'll announce all of the winners throughout the week in one giant celebratory post here on Thursday the 25th, so make sure to check back then to see if you're one of the lucky winners!

Good luck - we can't wait to hear what you think about Always & Forever!

And remember, today is only Day 2 of SEVEN fun filled days, so meet me back here tomorrow morning for Day 3!

Hello there! Linsey here today sharing a brand new altered project and I'm super duper excited about this one! A lot of time and patience went into the making of it and I couldn't be happier with the outcome! If you are winter lover of any kind, I think you'll like it as well! So kick back, chill and enjoy a personal tour of my 3D winter wonderland creation, otherwise known as the Sub Zero Ski Lodge & Snow Park!

I had the most fun designing this festive winter escape and it was done using the new Sub Zero collection--a super cool addition to your Simple Stories stash! Mr. Merry Moose is at the front window to greet all guests upon arrival, answer questions and set you up with whatever your outdoor pleasure is for the day!

The 3-story lodge offers lovely rooms with spectacular mountain views and meals in the charming lodge dining room. For more privacy, choose one of the cozy cabins, each with its own fireplace.

Join in a snowman building contest or take an old fashioned sleigh ride through a winter wonderland!

Rent a pair of skates and go ice skating on Boone's frozen pond or feel the exhilaration of downhill tubing and sledding from the top of Wolf Peak. From the Bunny Hill to Grizzly Drop, the choice is yours! Whether it be skiing, snowboarding or one of the many other outdoor activities, this place is snow much fun for the whole family! All runs are open! 

Afterward, be sure to warm up with a cup of hot cocoa at Frosty's Snowflake Café and sit around the bonfire toasting your toes and recapping on the days activities and fun. 

And that's all for me! Thanks so much for visiting and touring my winter lodge! I hope you've been inspired and are ready to create some winter magic of your own with the Sub Zero collection! Happy crafting!

Supplies

Good morning Simple Stories fans! I am excited to share a fun project using the new Life is Ruff simple set! We got a new puppy this past year, so this simple set is perfect to document a few photos of our new addition Chase!

I was inspired by the Ruff Ruff paper in the collection - all those fun word bubbles were just meant to be fussy cut out! I decided to cut a title for my page from a design from the Silhouette store and then added in a lot of fussy cut word bubbles to finish off the page!

I tried to mix up all the different colors and direction of the word bubbles as I went along the page, popping some up with foam adhesive and adhering some just as is!

I couldn't resist adding in some of the dog icons from the cardstock sticker sheet in the simple set - they mixed so well in with the fussy cut word bubbles! I popped up some of those too along the way.

Supplies

Hi everyone, a new year means the setup of a new planner! This year I decided to use the Ivory A5 planner and the Bloom planner inserts. For this setup I’m using the new Romance collection, and I created some diy layered flowers and butterflies to use as decoration.

I stuffed the pockets with some bits and pieces, paperclips, cards and a little washi sampler from the Romance collection.

I used scrapbook papers to make my own dividers; I chose five different patterns that coordinate well together.

I love to decorate the ‘This month’ page, I use it to write down my goals for the month and important things I need to do. I decorated the first week of the year using planner stickers from the Bloom sticker tablet, some washitape and my own layered flowers and butterflies.

I hope you enjoyed reading this blog and looking at the pictures of my planner! You can find more spreads in my Carpe Diem planner on Instagram createplannernl https://www.instagram.com/createplannernl/

Supplies

Hello! I hope you are having a great week! Jana Eubank here with a snowy scrapbook page using the Sub Zero collection.

I am in love with the colors of this collection! They have been perfect for scrapbooking my son's love of snowboarding. His jacket just happens to be a lime green ... one of the amazing accent colors that makes working with this collection so much fun!

I created a title for my page by using a circular metal die to cut out the "Chills & Thrills" wording from one of the cards of the 4x6 Vertical Elements paper. Next, I matted it with red cardstock and then built a scene around it using snowflakes, pine trees, and a car from the Bits & Pieces pack, Combo Sticker sheet, and 6x12 Chipboard sheet.

My main photo had a lot of white space around my subject. I took advantage of that space by overlapping the left side of the picture with another scene using the adorable A-frame cabin and pine tree die cuts. The "Up to Snow Good" arrow phrase is so punny ... I just couldn't resist using it here! Ha ha! (Especially, since my son usually ditches school to go snowboarding ... shhh!)

This snowboarding polar bear looks like he has a fun personality! He is cool as can be and somebody I'd love to hang out with on the slopes!

Supplies

Hello Everyone! Jomelle here today and I cannot tell you how excited I am to share with you my Winter planner set up and layout using the Sub Zero Collection. I am from Chicago but I currently live in Southern California and this time of the year is when I miss seeing the snow the most. Even though I do not like driving in the snow, I must admit that the first snowfall is quite beautiful. Everything is so white and so beautiful.


"Pocket Love" I get so excited decorating and stuffing my pockets every time especially if I'm starting a new theme. It always makes me happy when I look at my stuffed planner pockets. 

I love incorporating scrapbooking in my planner by making a dashboard. I cut up the 12x12 Elements and I added one to the bottom page. You will see in the next picture that I didn't glue this piece so that it can be flip over and I can add pictures or write a journal later.

I flipped the bottom part over as you can see on the left side of this page. This page has the space when I'm ready to add picture and to write my journal that goes with that picture.

 I've always love creating a new dashboard for each new set up to match. I used the pop up adhesive for the tram to add dimension and make it look 3D.

We may not get a Winter Season in Southern California, but this monthly layout gives me that "Winter Feel" 

 You may know by now that I love using the number stickers to add the dates. I like that it's undated so that when I add the dates, the color will match the collection I am using.

I used my envelope punch board to make this 6x8 envelope. I added the holes on the side so I can put it in my A5 planner. I will use this to store my stickers, ephemeras and other planner goodies I want to carry with me.

Thank you for stopping by. I hope you enjoy my Winter Set Up. Come and visit me on my Instagram at https://www.instagram.com/j4fashion/

Supplies

Living in the tropics, seeing snow is a rare treat! I’ve only had the pleasure of a winter wonderland a handful of times and it was amazing. Creating this page with Sub Zero has me looking forward to a day when my kids and I can frolick in the snow together!

I’ve journalled directly on my background paper using my typewriter. The coloured lines alternating with white on this ‘Below Zero’ paper made for a fun alternative to printing my journaling out and adhering it to the page. 

The little snowman elements were a great match for the snowman building pics. It was the first snowman I had ever built! I’ve used a combination of a larger, hand cut snowman from the 4x4 Elements sheet as well as some smaller sized ones from the Combo Cardstock Stickers, 4x6 Stickers and Bits & Pieces.

Expression stickers are just the right size to fit in between the lines of journaling.

Thanks for joining me.

If you are lucky enough to play in the snow - roll around in it for me!

Supplies

Hi everyone! Tara here with Secretbees Studio  Hope you all are having a wonderful New Year! I know we just finished a busy holiday season but I am here to remind you that it's not too early to start creating for Valentine's Day! What's not to love about this holiday?! It's all about the love and happiness we have for the most special people in our lives. I so enjoy making fun and adorable gifts for this holiday! The 'Romance' paper collection from Simple Stories is super charming and lovely with its pastel colors, floral bouquets, hearts and butterflies! The sentiments in this collection are sweet and endearing- perfect for a loved one! Even better when they come attached to a cute gift!

I used my Silhouette Cameo and an SVGcuts file to make this super sweet flower candy holder and little mailbox! The base for the flowers was cut out of the beautiful 'Romance' papers and wrapped around some floral foam. How perfect that there was a wood print in the collection! I used three different patterns for the flowers and topped them all with a yummy truffle! A chocolate kiss or even conversation hearts would be great too! Layered stickers and ephemera embellish the front and sides of the tiny flower garden.

The mailbox stands 7.5" tall and actually opens! The front is decorated with one of the 3x4 journal cards in the collection as well as some of the adorable stickers and 'bits & pieces'!. The hanging key is one of the lovely stickers and is attached to the lid with a chain. More stickers and 'bits & pieces' adorn the top and inside of the mailbox as well. I also added in lots of pretty sequins for shine! You could stuff this mailbox with more sweet treats but I thought it was perfect to tuck in some love notes also made from the collection. There is plenty of room for lots of sweet notes for that special person in your life and the sentiments in this collection say all you want in the sweetest way!

Handcrafted gifts are a great way to show your love and a sure bet to get some in return! Wishing you all a love filled Valentine’s Day!

Supplies

Pages