I AM... Thank You Cards
Hi everyone, it's Audrey, and today I have a couple of thank you cards to share with you, made with the beautiful I AM... collection.
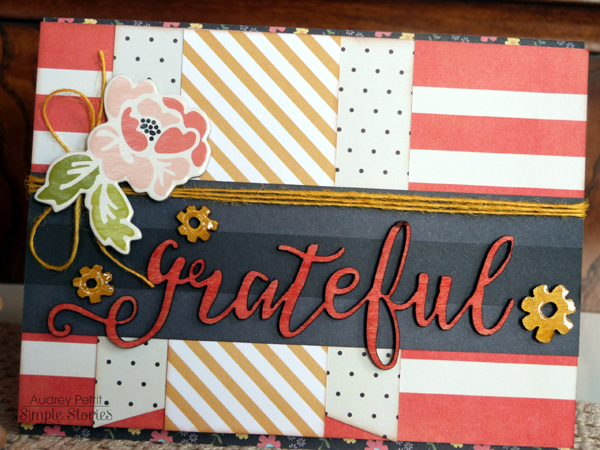
I absolutely adore the script font of this beautiful wood veneer sentiment, and wanted to make it the focal point of my first card. Love the large size and how it takes center stage in this simple card design. I decided to alter the wood veneer a bit, to make it stand out even more. And once I did, I got me thinking of other ways to highlight the wood veneer embellishments. So for both my cards today, I decided to really focus on these fun accent pieces, and show you some different things you can do with them.
The Wood Veneers are beautiful in their natural state, but are also super easy to alter and embellish to create your own unique embellishments. The "grateful" sentiment piece used here was colored with a Worn Lipstick Distress Marker, which was a perfect match for one of the striped 4x6 SN@P cards from the collection. It only took a minute to color, and I love how the sentiment really pops off the card now, especially layered against a bit of black paper from the 6x6 Paper Pad.
A smaller 3x4 SN@P Card and papers from the 6x6 pad make up the base of the card. I wrapped the card with yellow twine and added a chipboard flower to the bow. Then to help frame the focal sentiment, I added a few small flowers from the Wood Veneers, this time colored with markers and given a coat of Glossy Accents. Love how the wood finish looks with all that shine.
My second card also features lots of the Wood Veneer accents, along with layers of pretty papers from the 6x6 Paper Pad.
This time I used both markers and ink pads to apply color to the arrow, bird, and hearts, and you can see a bit of the difference if you look closely. The arrow, hearts, and the legs of the bird were colored directly with a marker, and you may notice the color is deeper and richer on those areas. I used an ink blending tool to apply Distress Inks to the bird's body. It's definitely a softer look by applying color this way, but it's a great way to blend different colors without harsh lines.
Once my wood pieces were colored, they were all coated with embossing ink and heat set with clear embossing powder. It's not quite as glassy as the glossy accents, but a wonderful shiny finish and visual texture, still. Hope I've given you some fun ideas for using the adorable I Am Wood Veneers on your next card projects! Enjoy!


