Meredy Vranich's Blog Posts

Hi everyone, its Meredy aka @myplanningadventure.  I’ve been using my Carpe Diem Daily Inserts and it is a great way to organize your day.  It doesn’t take long to pretty up the page with decorative elements and I love that each day can have a different look, or even work together.  I am going to take you through a recent week of daily planning, and I hope you feel inspired to plan a bit every day.

I use my Black Speckle planner for daily planning, It’s a perfect mix of professional and playful—just like my day.  The new Carpe Diem A5 punch is my new best friend!  I always hand punched my holes after I added washi because I could never line up the page correctly in a multi hole punch.  The carpe Diem punch has a ridge that keeps the page in place and it punches perfectly to the Carpe Diem Inserts.

This planner stays at home and is primarily my tool to help organize my day.  Whether I am at the kitchen table, or at my desk, these daily inserts really help me to get my day organized.

One of my favorite aspects of decorating a daily page is you can really have fun with it!  When I am decorating a weekly layout, I feel extra pressure to make it just the way I want it as I will be looking at those pages many times throughout the week.  With a daily insert, I can just have fun—it doesn’t have to be perfect.  

Fourth of July was on a Tuesday, so I did a quick layout using the All American Simple Set from Simple Stories.  I used the stickers that came in the set to decorate the page and just made a couple of reminder lists—the day was for celebrating our freedom with friends (and maybe the freedom to take a nap as well).

In the morning, we went to a parade with friends so I made a quick Memory Page with some of the elements I loved from the All American Set.

This add in page turns this daily into a quick two page spread

Wednesday, it was back to work, and I had a lot to accomplish.  I break my To-do lists into Work and Home and I always try to add in an item or two that I am wanting to accomplish for myself. 

I used this decorative paper from the Domestic Bliss Collection on the back of the memory page I made on Tuesday.  I added an inspirational card, and a small piece of paper that I could jot down the items I need to pick up at the store.  I also used the Brads from Domestic Bliss to make a quick paper clip.

One of my favorite parts of decorative planning is layering stickers on the page.  I like to add in fun sayings or ephemera and add in smaller stickers like stars, hearts and arrows. 

Now it was on to Thursday and Friday.  I used similar colors on these two pages, but are different but work together.

Thursday was a mix of home, work and socializing.  I used ephemera pieces instead of alphas for Home and Work.  I didn’t have long lists this day so I dressed up the page by layering stickers and other decorative elements.

Friday was back to my standard Alpha Headers and Todo lists.  I love the Summer Days collection, such a fun way to celebrate the end of the week!

I hope you enjoyed seeing a week of my daily layouts!  Daily planning is a fun way to get some creative time in each day.  The pages are quick to decorate and a great way for me to practice some hand lettering.  Give it a try!

SaveSave

Supplies

Howdy friends!  Layle here with you today for day 2 of our week long Simple Stories & Maya Road Product Swap! 

Both design teams have swapped products & teamed up for some great inspiration all week long!

Today creative team member Meredy Vranich joins us with her Carpe Diem planner & our Cabin Fever collection -

__________________________________

Hi Everyone, Its Meredy (aka @myplanningadventure) and I am here to show you my June set up for my Carpe Diem Planner using the Cabin Fever collection.  I know the theme of this is for outside adventures, but I actually found it perfect to keep me motivated on my current adventure, a home renovation!  We are managing the project ourselves and I have loved the elements and inspirational sayings as they have really helped me stay energized over the last few weeks.

One of my favorite things to do in my planner is make dashboards.  It is a quick and easy way to give your planner a fresh new look.  I also love patterned paper but I don’t scrapbook so this is a perfect way for me to utilize those papers I collect!  

Next, I move on to the pockets.  I like using journaling cards and Bits & Pieces in the pockets and I always tuck in some of my favorite larger size journaling cards into the back pocket.  I also like to put in clips that I can use throughout the month.  I love these number paper clips from Maya Road.

Here is a close up of my dashboard.  It’s fun to layer a bunch of different elements.  For the dashboard I used Under the Stars paper, then added items from the Bits & Pieces pack and a journaling card from 4x4 elements paper.  Alpha stickers are my new obsession and I used some to spell out June!

The back of this paper was too pretty to leave blank, so I added another journaling card from the 3x4 Journaling Card elements paper.

I also made some charms to remind me that the key to the success of this project is to keep moving forward.  The Maya Road pieces were perfect for making the charms!

Another way to use pretty paper is to make a pocket insert--It is really easy to do!  Find a 12 x 12 paper you love (this one is Nature Hike) and fold up the bottom portion of the pocket until the paper is the same height as an A5, then fold in half with the contrasting bottom portion facing out, glue the inside together, trim a bit, punch and you have a pocket!  Put on some stickers, ephemera and embellishments, like the Maya Road metal arrow that I used, and you have the perfect companion to a new dashboard.  I have been loving the 4x6 sticker packs Carpe Diem releases for each collection--they easily make your planner look gorgeous!  I put them right into my pocket pages and I am ready to decorate on the go.

The back of the pocket page is stuffed with Alphas from Simple Stories SN@P! line (did I mention I was obsessed with alphas!?)  I also decorated the pocket with stickers from the 12 x 12 Combo sheet.

Next up is my monthly layout.  This month is all about the work happening at my house and home life.  I used washi folded in half to mark out my construction schedule and brightened up the rest with decorative elements.

Last up is my daily planning—one of my favorite things to do!  I break up my To Dos into three categories using Alpha letters and then just have fun with the rest.

I used this Maya Road number paperclip for the date, so fun!

Thanks for stopping by and viewing my project.  I hope you are inspired to use this collection to motivate you on your own adventure whether it is outdoors or just on a project you have going on at work or at home!

__________________________________

Now for even more fun!!  Enter via the Rafflecopter widget below and we'll draw one lucky winner next Monday to win both a Summer Days & Cabin Fever collection kit!   

a Rafflecopter giveaway

After you enter, head on over to the Maya Road blog to see what their team has created.  

Want to follow Maya Road and keep up with all of their great projects & products?  Here you go!

Join us again here tomorrow for more inspiring projects!

Supplies

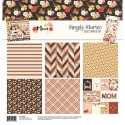
Hi everyone, its Meredy and I don’t know about you, but I have been LOVING the Simple Sets that Simple Stories has released.  If you aren’t familiar with these sets they are a small, mini collection that includes (2) sheets each of three double sided cardstock paper, including one sheet of 3x4/4x6 element pieces and (1) 6 x 12 sheet of cardstock stickers.  I wanted to make up a new planner for May and I loved colors and florals in the Mom Simple Set so I thought I would see how I could pretty up my Ivory Carpe Diem planner with this Simple Set.

The first thing I always do is make a Dashboard and fill up the pockets of my planner. I cut apart the page of 3x4/4x6 elements and filled up the pockets!

I used “I Love You Mom” floral paper for the dashboard with a 4x6 card cut out from the “Journaling Card Elements” paper.  I added the LIFE using Black alpha stickers from the Simple Stories Sn@p Line and a Coffee Cup Sticker from the 6 x 12 Cardstock Sticker Sheet included in the set.

The Journaling Cards really brightened up my planner pockets quite easily.  I don’t always like my pockets super stuffed and these cards did the trick.

There are enough papers in the pack to create dividers.  I usually feel overwhelmed by cutting all the papers and gluing them together and adding the tabs. But I used a quick way to make dividers and I am so happy with the end result!

To make quick dividers take a 12 x 12 paper and fold it in half.  Trim down the side opposite the fold and the bottom to the correct size for your planner.  Use a tab punch to punch a tab from the cut away paper.  Use a glue stick on the inside of the paper, stick on the tab at the correct location and fold the paper closed.  Press down until the glue keeps the paper together, punch the holes and you are ready to make the next divider.

The double layer of cardstock makes a perfect divider.  Folding the paper and using the same pattern on the front and back of the divider really cut down on the time it took to make the dividers.  This will probably be my go-to way to make these from now on.  I added 3x4 journaling cards to the front of the dividers for a finishing touch.

Now on to my favorite part, my weekly layout using the 6x12 sheet of Cardstock Stickers! One of my favorite aspects of the pages are the center washi strips I made from the papers in the collection.  I started with the banner sticker on Thursday for my Birthday and I built the pages from there.  I used practically all of the stickers on the sheet to layer up the page.  I also used the Sn@p Line Alphas and some of the 4x6 Black stickers from a few Carpe Diem collections.

Another way to use the 3x4 journaling cards is to cut them down to fit into your layout.  I loved this yellow floral pattern with a small white space—it was perfect for this very important reminder.

Last, I just wanted to show how I used some of the remaining elements to do a bible journaling entry.  Since I have an interleaved bible, the oversized MOM sticker was perfect place to start for this entry.  I cut out the banner from a 3x4 Journaling card, drew in a little extra string and added some heart stickers.

I used a tab punch to make a tab from the “Best Mom Ever” Paper and used a phrase sticker from the Sticker Sheet.

Last I added in a photo of my mother and me (41+  years ago!) wrote the verse and a short journaling entry.  Last I layered up the floral stickers to create a bouquet in the corner and finished it up with a Happy Mother’s Day sticker.

I hope you all enjoyed seeing how many things you can make with these 12x12 Simple Sets—I am in love!  Also, wishing you all out there a happy May and Happy Mother’s Day!

SaveSave

Supplies

Pages