March 2015 Blog Posts

Hi everyone, it's Audrey, and today I'm here to share a couple of cards with you that I made with the super adorable Say Cheese II collection.

AudreyPettit-SayCheeseII-BestDayEverCard

have fallen so hard and fast for this collection! Of course, who doesn't love a paper line dedicated to the happiest place on earth, right? But what I love even more is how well this Disney-inspired collection works for any occasion, way beyond just a visit to the theme park. Today I'm going to show you several ways to use this sweet themed line to create a pair of general purpose, all-occasion cards.  On my first card, I've swapped out Mickey for another current hot trend in the paper crafting world these days, coffee and tea.

AudreyPettit-SayCheeseII-BestDayEverCard2

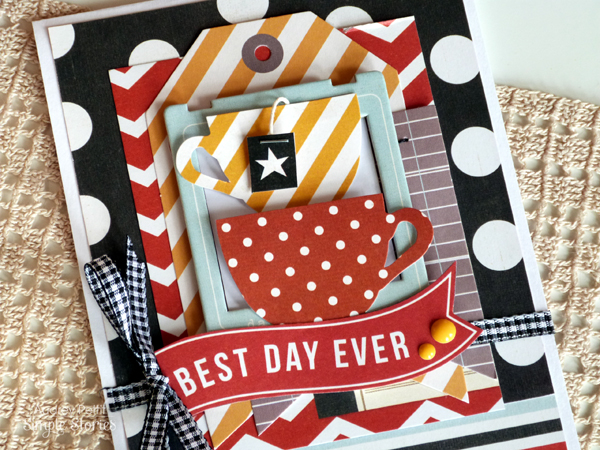
Here I've nestled two cups from the Bits & Pieces die cuts pack inside a chipboard frame, and accented with a sentiment banner to create a fun celebratory look that would work perfectly for a birthday, or any other special day, for that matter.  I had fun making my own "tea tag" from a bit of twine and a portion of a die cut Bits & Pieces label. I simply stapled the twine to the back, then tucked the loose end of the twine behind the cup. It was so quick and easy and really makes me smile.

A couple of other details here? A Layered\Stitched Tag and a pair of bright enamel dots. The background layers are journaling SN@P Cards, in both 3x4 and 4x6.

AudreyPettit-SayCheeseII-BestDayEverCard3

My second card takes on a bit of a love theme, with lots of hearts and a lovey dovey sentiment. I love the clean look to this one, mixed with small accents of gold.

AudreyPettit-SayCheeseII-HappyTogetherCard

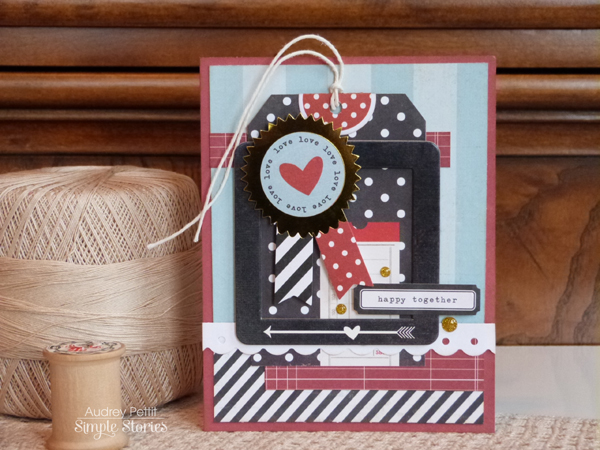
I used lots of papers from the 6x6 Paper Pad to create my pieced background, but I also threw in one bolder striped print from the 12x12 papers. I always think mixing the different sizes and scales of the prints is an easy way to add a lot of interest to  the finished design.

AudreyPettit-SayCheeseII-HappyTogetherCard4

 I made my own tag from one of the 6x6 papers, too. Love how the little ticket on the paper becomes highlighted with the addition of a chipboard frame on top.

AudreyPettit-SayCheeseII-HappyTogetherCard3

And the hole reinforcer on the tag? That's actually a Bits & Pieces balloon die cut... but folded over the top you would never know. 

AudreyPettit-SayCheeseII-HappyTogetherCard2

Hope I've given you some fun ideas! And thanks for stopping by! 

Hi everyone!  It's Ashley, and I'm here today to share two new layouts with you.  I love using my Silhouette Cameo and die cuts to create fun, unique looks on my layouts.  And every once in a while, I like to do something a little different and use popular shapes to create shaped photos on my layouts!  For my first layout, I used one of the Simple Stories talk bubble shapes.  Did you know, that Simple Stories has lots of fun shapes in the Silhouette store?  Well they do, so make sure you stop by and check them out here!!


I used the Wood Grain paper from the Life Documented collection as the background for this layout.  Then I ran it through my Cameo and cut three large talk bubble shapes.  After they were cut, I backed each talk bubble shape with my photos.

Since the large talk bubbles were a negative cut, I also wanted to add some smaller positive talk bubbles.  I cut these from four different patterned papers from the Life Documented collection and added pop dots under each one to add some dimension to my layout.


And I also played around with mixing product on this layout.  Most of it is from the Life Documented collection, but I also mixed in wood veneers from the Say Cheese II Collection and some items from the Epic SN@P Pack.
 
On my second layout, I wanted to use a Triangle design.  I used a basic Triangle shape and created several different sizes, and randomly arranged them in Silhouette Studio.  Once the Triangles were cut, I backed them with different patterned papers from the I Am 6x6 paper pad.

Because I was using a square Instagram photo, my printed photo didn't fill in the large Triangle where I wanted to place it.  So I added the photo first behind the Triangle shape, and then used the Yellow diagonal striped paper from the 6x6 paper pad behind the photo to cover the rest of the Triangle.


I wanted to embellish my layout, but not cover all of the patterned papers behind the Triangles, so I chose a few of them to embellish with Stickers, Bits & Pieces, Bradz, and Enamel Dots.


So if you're looking for a fun way to use some of your Simple Stories products, make sure you check out the coordinating cut files in the Silhouette store.  There are a lot of great shapes to use for your next project!

Hey everyone! Rebecca Larson here! It seems like every March I get the itch. The travel itch. You know the one where you dream of far off places and exotic foods and smells! This is when I pull out photos from trips past, and relive the memories. While it doesn’t completely rid the itch, it does make it tolerable - lol!

For this month's blog post, I chose to find life once again in some memories of a trip that my husband and I took to Washington DC for the Cherry Blossom Festival (Bucket List: Check). I'm using one of the first digital kits that was added to the digital store - Urban Traveler. I love the retro feel of this collection. The elements and cards remind me of travel posters of the 50’s and 60’s. The bright primary colors are the perfect blend of masculine and feminine.

I wanted my layout to resemble a vintage suitcase that you would see with lots of tags and stickers on it, and boy did the Fundamentals deliver!  The Expressions give this layout the final touches, as I enlarged the DC letters to draw the eye to the title.

Urban Traveler is a beautiful digital collection to help you document your upcoming - or past - travels!

Thanks for stopping by!

Hey everyone, Amy here to share a project I created using the fabulous Enchanted collection.  Obviously the Enchanted line is a "princess" themed line, but it's also versatile enough to use for everyday pages.  My sweet teenage daughter is obviously way past princesses, but this line still works for pictures of her and her friends. That's what I love about all the Simple Stories lines, they always have enough versatility that you can use them for so many types and styles of pages! 
 
Here's the page I created - 
 
 
I know I've said it before, but the frames in each collection are just my favorite!! The make it so easy to create a grid-style page.  Here are some closeups. I love the silver foil in this collection!
 
 
I used my Silhouette Cameo sketch pens for the title.
 
 
Thanks so much for stopping by the blog today, have a great day!


Tell us who are for a chance to win one of 2 $100 I AM prizes!  Here's how to play -

1.  Download and print one of the 7 colorful I AM signs here.

2.  Add your own I AM statement & have someone take a photo of you holding your I AM sign.

3.  Post your photo to Facebook and/or Instagram with the hashtag ‪#‎SimpleStoriesIAM‬

We'll draw two random lucky winners who posted their I AM photo to receive an I AM prize pack valued at $100! 

We'll also gather all of the I AM photos and put them into a Flipagram video like this one we put together of retailers and friends from CHA telling us who they are - 

We can't wait to hear who YOU are!!

Hello everybody. It's Mindi here with you today. I'm super excited to be sharing some pocket pages with you using the new Say Cheese II collection. The whole Say Cheese II line is awesome ! I used it to document our family's Disney trip from 2012.


Here's  my title card.  These photos are random memories from our Disney trip back in 2012. I started with one of the 4x6 journaling cards and then added the black castle and wish circle from the Bits and Pieces pack. 
 
 
I just love to embellish here and there on the journaling cards. I used one of the photo overlays and added it to the corner of the journaling card for a fun star effect. 
 
 
Here is another example of using the photo overlays. I used the believe overlay and added a gold foiled heart underneath the overlay. 
 
 
If you have ever been to Disneyland you know that meeting Mickey is a BIG deal. I added in an insert with Mickey and Minnie Mouse memories + photos. I added some personalized journaling cards in the middle of the insert.
 
 
These gold photo overlays are so fun. I loved this one of the Mickey ears. I used some of the new washi tape along with the wood veneers to embellish this journaling card. These wood veneers are among my favorites !! 
 
 
Here is a look at the other side of the insert and then one more pocket page.
 
 
This side of the insert is about Minnie Mouse. Here are some journaling cards. 
 
 
Here are a few close ups from the right side page. Both of these cards I had fun using the chipboard frames as photo frames. 


I knew I wanted to do something with this wood word "magic". I used it as the center of my journaling, all about the word magic !! 
 
 
That is a wrap on my Disney pages. I loved working with the new Say Cheese II collection!


Hey there it’s Vicki!  Happy to be here sharing a project I created with one of my all time favorite Simple Stories collections - I AM....  I love this color palette so much and couldn’t wait to dig in and make something.  As I was shuffling through the papers one immediately caught my eye and the design idea started to take shape.

This is the paper…

I AM... 2x2 & 6x8 Elements.  All of those little squares really appealed to me and I thought it would be fun to try to maximize the use of one sheet of paper to create a layout.  Here is what I came up with…

I used two other sheets of paper, some cardstock and a few embellishments to finish off the page.  I love how this one turned out!!!

Take a closer look at the 2x2 squares.  They make perfect pennants!  And the word paper cut into strips creates a little fun.

Don’t you just love the Chipboard frames?!  That little pop of yellow tied the whole page together.

Here is another perspective of the page.

I used my craft knife to cut around the rose so I could slide my photo under it.  This allowed me some freedom with the positioning of the photo.  This picture also shows off the gold foil that is found throughout the I AM... collection.  That gold is another thing I LOVE!!!

Thanks a million for stopping by and letting me share my project with you today!  I hope “I AM...” encourages you to step out from behind the camera lens and get in some of those photos!!!

Hi everyone!
 
Teri here, and I'm excited to share with you some cards I created with the  Say Cheese II collection. I just love the fun feel of this collection. You just can't go wrong with references to fun times, happy places and "magical memories!"   And I think the collection's chipboard frames are SO fun so I threw a creative challenge to myself to use them on each of the cards I'm sharing with you today.
 
 
I have to admit that I'm a big mix and matcher when it comes to paper crafting. And one of the reasons I really dig Simple Stories' products is you can easily mix and match things together. You can just pick a collection and pull different things from it together. The colors and designs all go together. Everything has been thought out so it just works. I like that a lot! 
 
 
I adhered the chipboard frame over a little bit of patterned paper for this card. Notice how the patterns just go together? LOVE that. I get a kick out of how the mouse's ear just peeks out from behind the frame. So fun.
 
 
To give the frame a unique feel, I decorated it with a Bradz and a couple enamel dots.
 
 
I used three chipboard frames on this card. Instead of using all three in their entirety, I used my scissors to just cut off a portion of two of the frames to use.
 
 
You might say I played things straight with this card. 
 
 
I didn't alter or decorate the frame at all. I used it instead to "frame" the sentiment and a couple stars.
 
 
I went crazy with chipboard frames on this card, using (... wait for it...) four of them! 
 
 
I used just a piece of two of them. And I altered one of the frames by adding the ampersand die-cut to it. 
 
 
I used multiple chipboard frames on this final card as well. Look real close and you'll see there are actually three of them on my card.
 
 
I stacked two frames together on the left to frame the balloons! 
 
 
I envision using this card as a birthday card so I decorated the inside as well. I made a pocket by applying adhesive to just three sides to a strip of patterned paper. And then I added a few stickers. The cool thing about the pocket is I can slide a gift card into (as you see here) or some cash for the recipient.
 
 
I think it will make fun gift! 
 
Thanks for stopping by today! I'll see you again real soon!


Supplies

Pages