October 2015 Blog Posts

Hi there!  It's Chantalle with you here today.  Here's the first of 3 projects I'll be sharing with you; check back later this afternoon for me 2nd post and then again at the end of the day for my 3rd post!

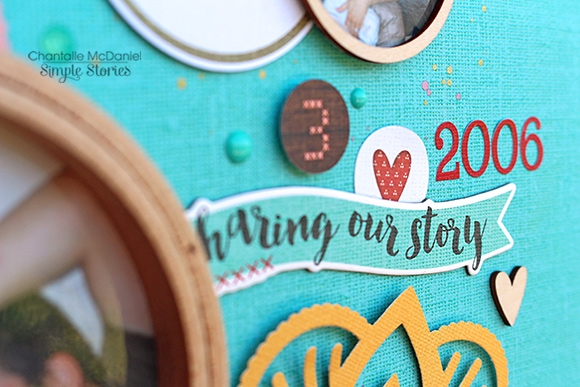
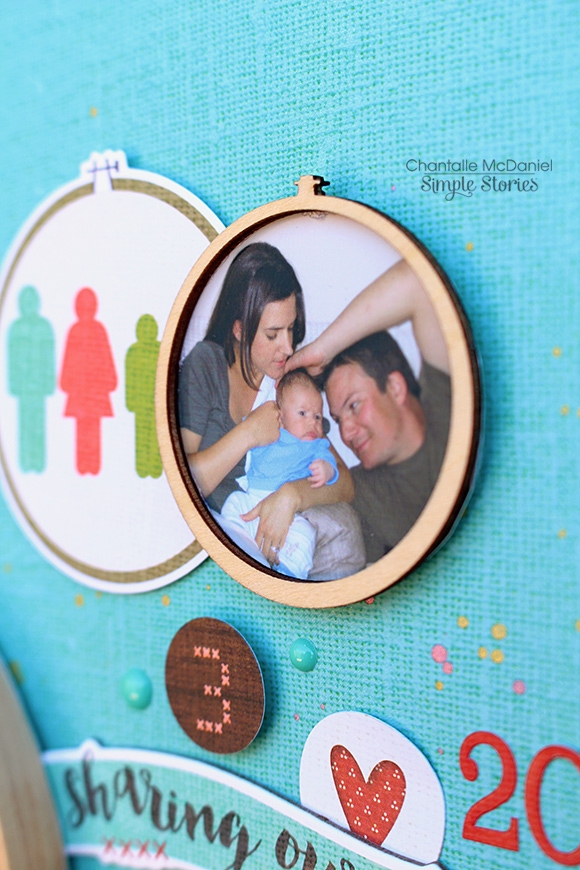
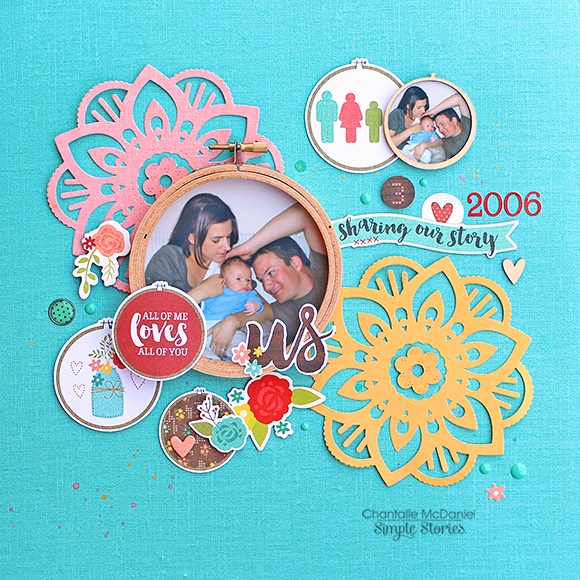
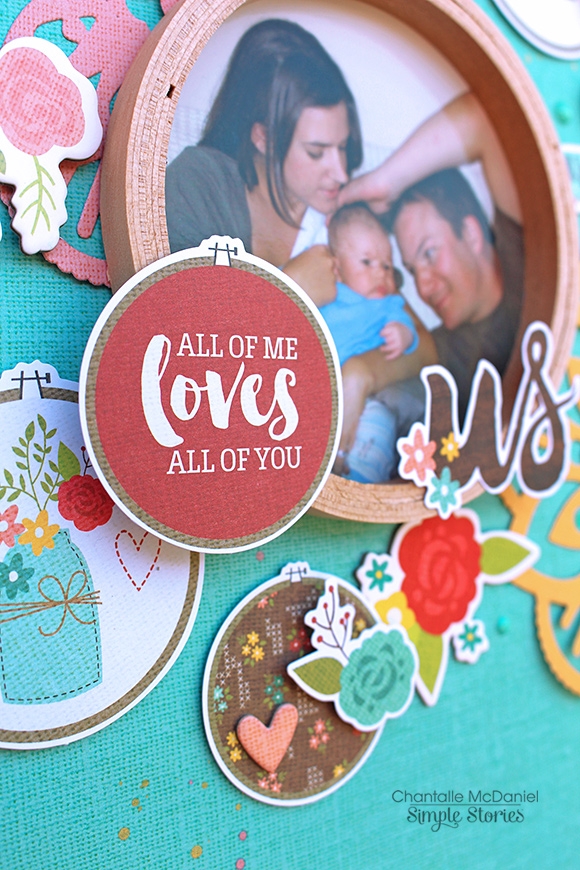
I’ve taken inspiration from the adorable embroidery hoop prints in this collection. (I may or may not be hoarding a certain 12x12 sheet of ‘Perfect Together’!) Adding an actual mini hoop to my page was a great way to tie in the theme and frame a very special photo taken of us as a family, when my little man was only a few weeks old.

I’ve gathered as many of the hoop bits and pieces that I could find. The different sizes and textures add great dimension to the page and the floral die cuts fit in nicely with the circular shapes.

I just love the sweet stitched details and the texture of this Teal Calico/Linen 12x12. You will definitely want to invest in the 'We are Family’ Simple basics kit and grab yourself a sheet of every colour!

Utterly adorable, this teensy wood veneer hoop was the perfect finishing touch for this page!

Remember to check back later this afternoon for me 2nd post and then again at the end of the day for my 3rd post!

Together with We are Family

Hi all, Wendy here today with a few pages created with the We Are... Family collection.  I have just about exhausted my supply of this collection as it is just so wonderful for documenting life in general.  I love how bright the colors are, they just make me happy!
 
Today I created some fun pages working with the SN@P! Pages, a product normally used in the 6x8 SN@P! Binders. I simply trim the holes off of the Pages; I love incorporating these in my scrapbook layouts!  
 
 
My first layout, Best of Friends, used the frames to nestle little scenes and items to transform my page.
 
 
I contrasted the light playful pieces with the dark woodgrain paper which I used to mat my picture and draw your eyes to my focus.  I also used this area to place my title where it wouldn't get lost.
 
 
I even used a chipboard frame to make one of the areas pop out more, I chose a tone-on-tone look to keep the area from standing out too much.
 
 
A strip at the top and bottom of the layout held all of my pieces in and added a little more interest.
 
 
My next layout, Together Forever, again started with a SN@P! Page and my photo.  
 
 
I love looking for SN@P! cards that work for a title or sentiment to explain my thoughts on my layout, it takes the work out of it which allows me time just to create.
 
 
I dressed up the one side with a dark woodgrain to balance the SN@P! Page colors.  I created a visual triangle with the wood veneers and the black pops.
 
 
A chipboard banner added some fun to the page.  I carried the heart theme on a vertical to further bring cohesiveness to the layout.
 
 
A splattering of photo stickers and enamel dots were the finishing touches of playfulness.
 
Thanks for joining me today, you can see another layout I created with the We Are Family collection here on my blog. 
 
Hello all!!! Yesterday was Thanksgiving here in Canada so I'm feeling rather stuffed from all that yummy turkey & pumpkin pie!!  Plus it's always so wonderful to get together with family.
 
Family and fall are what my layouts have in common today and I'm excited to share them with you.
 
In this first layout, "Give Thanks with a Grateful Heart" I used the Pumpkin Spice collection. This collection offers so many possibilities for creating layouts and any type of project. I love it!!


I incorporated some of the Bits & Pieces (diecuts) into my handwritten journaling.  It's a good idea to pencil in your journaling first when doing something like this. That way you can space your lettering and sentences accordingly. Make sure to use a pen/marker that will not smudge when you erase too.
 
 
I then added a bunch of stickers, diecuts pieces and enamel dots across the lower section to give a whimsical feel.
 
 
I love the rich & warm colours in this collection and in this second layout I chose to use the colourful wood patterned paper  on the front of my layout.


I wrote some of the things I'm thankful for on the 3x4 journaling card and added the most adorable chipboard coffee cup on top. 
 
 
I added a few chipboard leaves here and there on my page as well as a few word strip stickers.


I kept the layout simple with 2 photos and journal/title blocks that balanced it out on either side of the photos.  
 
Thanks for stopping by.  We'd love to see what you create with this fabulous fall collection called Pumpkin Spice.
 

Howdy!  Layle here with you today.  Welcome to day 5 of the Simple Stories & Tombow Product Swap! 

Both design teams have swapped products and will be sharing on our blogs all week long.  Join us for some great inspiration as well as a chance to win a prize package from both Tombow & Simple Stories! 

Today design team member Nancy Damiano joins us with a super clever idea for creating your own cusom letters!
______________________________

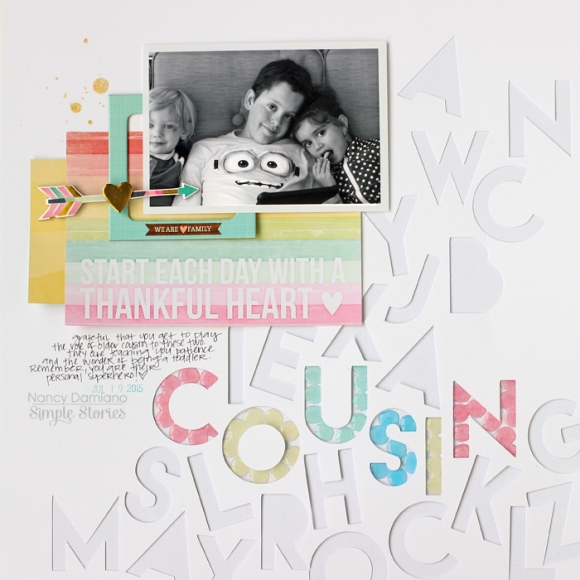
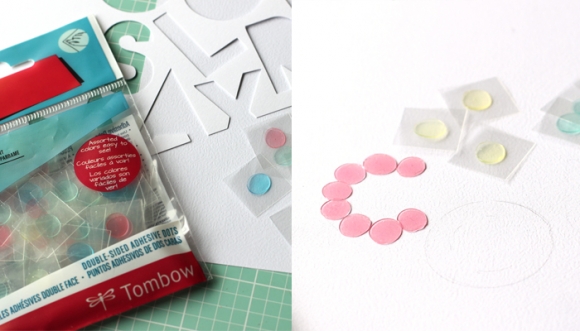
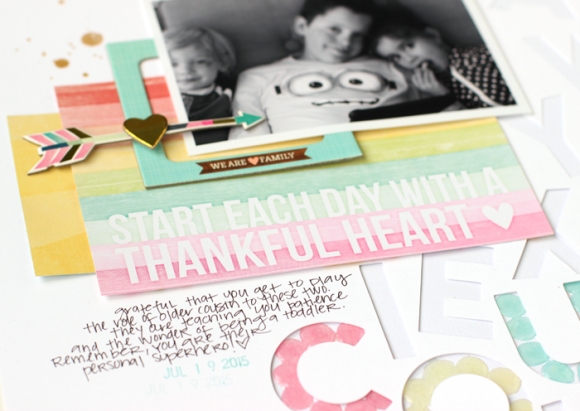
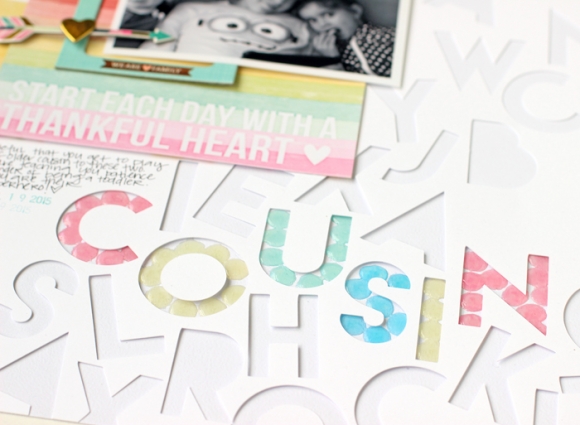
Hi there Simple fans! Today I'm combining some of my favorite pieces from Simple Stories' Happy SN@P Pack and some cool products from Tombow. I created this tumbling title page with my die cut machine and added a pop of color and texture using the Tombow Colorful Adhesive Dots.


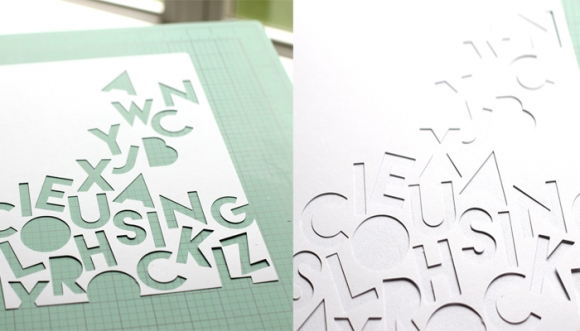
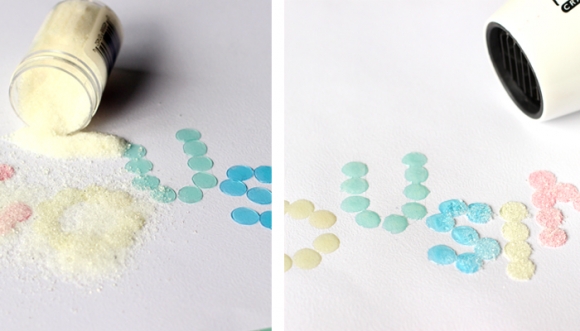
Here's a step by step look at how to create this glass enamel look:
 
 
​Create a cut file of tumbling words using your die cutting machine. Among the letters, choose a title and fit it in a prominent spot. Here I chose the word "cousin". Layer the die cut paper onto another sheet of white card stock. Then using a pencil, very lightly trace the title word onto the background.
 
 
Using the pencil guidelines, place the adhesive dots so that they form the letters in your title.
 
 
​Cover the glue dots with clear embossing powder and set with a heat gun. You'll get a beautiful clear glass look as the embossing powder melts. Then place the alphabet die cut sheet over lining up the dots and glue down.
 
 
I love how the color really pops off the page. It's a word find within a scrapbook layout!
 
 
Here's a peek at this month in my Simple Stories Planner. I started by creating a dashboard using a transparency from the Enchanted line. I like to add post-its to these which I use throughout the month. A simple Bradz gives it a pop of color.
 

I kept the color scheme for October traditional with black, orange, gray and a pop of aqua. I used simple graphic label and alphabet stickers to keep the theme clean.
 
 
My daily pages are dressed up for Halloween. This one is my fairytale page with pops of color from the Enchanted line. This is as close to a princess costume I'm going to get!
 
 
______________________________

Now for even more fun!!  Enter via the Rafflecopter widget below and we'll draw one lucky winner on Sunday to win a Claus & Co. collection pack!  

a Rafflecopter giveaway

After you enter, head on over to the Tombow blog to see what their team has created.  Make sure to enter there as well - they're giving away an adhesives package!   

Want to follow Tombow and keep up with all of their great projects & products?  Here you go!

Website: http://tombowusa.com

Facebook: https://www.facebook.com/tombowusa

Instagram: tombowusa

Blog: http://blog.tombowusa.com

Join us again here tomorrow for the final day of our swap with Tombow!

Howdy!  Layle here with you today.  Welcome to day 4 of the Simple Stories & Tombow Product Swap! 

Both design teams have swapped products and will be sharing on our blogs all week long.  Join us for some great inspiration as well as a chance to win a prize package from both Tombow & Simple Stories! 

Today design team member Marie Lottermoser joins us with a super useful altered notebook and a layout -
______________________________

Hi Everyone, Marie here today to share how I used my new Pumpkin Spice collection kit.  I have to be honest, when a new collection comes along there is so much in the pack I usually end up using only a small portion of it.  This month I decided to go all out and try to use as much of the new Pumpkin Spice collection as possible.
 
 
I started by making my 6x8" Pocket Page spreads to go into my Sn@p! Binder.  I love fall, and it's nice to be documenting football games, falling leaves, and pumpkin everything right now. 
 
 
Next, I decided to make some greeting cards.  I cut and folded patterned paper to make the cards, and then used foam tabs by Tombow, to pop up some die cuts to give my cards extra dimension.
 
 
I made envelopes to match my cards using some extra sheets of patterned paper.  I simply traced an envelope pattern straight on to the paper, and then cut them out and folded them.
 
 
The last thing I would want is for my envelopes to come apart when they are in the mail, so to keep them held together I chose Tombow's extreme adhesive to create a strong, permanent bond.
 
 
I finished by making a gift card holder, with more foam tabs to pop up the coffee cup on the front.  I can't think of a more fitting gift for this time of  year, than a gift card to a coffee shop.
 
 
It feels great to use up so many of my supplies, and know that some friends have a little surprise heading for their mailbox.
 
 
Thanks so much for joining me today.  Happy Fall!
 
______________________________

Now for even more fun!!  Enter via the Rafflecopter widget below and we'll draw one lucky winner on Sunday to win a Claus & Co. collection pack!  

a Rafflecopter giveaway

After you enter, head on over to the Tombow blog to see what their team has created.  Make sure to enter there as well - they're giving away an adhesives package!   

Want to follow Tombow and keep up with all of their great projects & products?  Here you go!

Website: http://tombowusa.com

Facebook: https://www.facebook.com/tombowusa

Instagram: tombowusa

Blog: http://blog.tombowusa.com

Join us again here tomorrow for more inspiring projects!

Supplies

Howdy!  Layle here with you today.  Welcome to day 3 of the Simple Stories & Tombow Product Swap! 

Both design teams have swapped products and will be sharing on our blogs all week long.  Join us for some great inspiration as well as a chance to win a prize package from both Tombow & Simple Stories! 

Today design team member Rebecca Keppel joins us with a super useful altered notebook and a layout -
______________________________

Hi All! Rebecca here! The Simple Stories team had the pleasure of swapping goodies with the Tombow adhesives team this month.  I received an assortment of Tombow adhesives and a set of Dual Tip Markers. For my first project I created an altered notebook. I bought a composition book from the Dollar Store, pulled out my Simple Stories We Are...Family collection and the several Tombow adhesives. I got to work changing it from a plain old black and white notebook into this...
 
 
I used the Tombow Mono Liquid Glue to cover the front and back with patterned paper.
 
 
I used Tombow Xtreme to apply cards and smaller pieces of paper.
 
 
I added layers to the front, back...
 
 
and inside.
 
 
I love how quick and easy it is to turn a plain composition book into a personalized gift with some pretty Simple Stories paper and stickers and some good adhesive.
 
 
I also created a layout this time using both the Tombow adhesives and markers.
 
 
I stamped the hot air balloons and colored them in with the Dual Tip Markers.
 
 
I used the Tombow Stamp Runner to adhere elements to my page. I used it as a roller on the larger pieces like the one on the right and as the Stamper to stamp out a square adhesive on the smaller elements like the small cloud.
 
 
For some extra dimension I used Tombow 3D Foam Tabs.
 
 
I like how they come in two sizes for different size embellishments or die cuts.
 
 
______________________________

Now for even more fun!!  Enter via the Rafflecopter widget below and we'll draw one lucky winner on Sunday to win a Claus & Co. collection pack!  

a Rafflecopter giveaway

After you enter, head on over to the Tombow blog to see what their team has created.  Make sure to enter there as well - they're giving away an adhesives package!   

Want to follow Tombow and keep up with all of their great projects & products?  Here you go!

Website: http://tombowusa.com

Facebook: https://www.facebook.com/tombowusa

Instagram: tombowusa

Blog: http://blog.tombowusa.com

Join us again here tomorrow for more inspiring projects!

Supplies

Howdy!  Layle here with you today.  We've got a fun week planned for you - a Simple Stories & Tombow Product Swap! 

Both design teams have swapped products and will be sharing on our blogs all week long.  Join us for some great inspiration as well as a chance to win a prize package from both Tombow & Simple Stories! 

Today design team member Vicki Boutin joins us with two fun cards -

______________________________

Hey there friends!  So happy to be apart of the Tombow/Simple Stories Swap!  I am a girl who likes to find time to be creative even if there isn’t much time available!  One of the ways I have mastered crafting on the fly is creating simple cards!  So today I made two super cute, super quick cards and focused on the Tombow Dual Brush Pens.  The cards were quick to make and the addition of the pens also helped feed my technique-y soul!!!

Here are the pens.  They are Water-based, blend with ease and the colors are bright and fun.

These are the Tombow items I gathered to create two cards using the We Are Family Collection!

I used the pens to add a little color to the We Are Family Bit & Pieces on this card.  It’s a fun way to highlight and customize premade embellishments.

Here is the completed card.  

For this card, I used a little Pointillism and created a pattern with two shades of green and a series of dots!

Take a look at the completed card.

Some We Are Family paper, Bits & Pieces and embellishments and Tombow products and lickety split 2 cards in 20 mins or less!!  LOVE it!!

 
Thanks for stopping by!!!  Hope you can grab 20 minutes in your day and feed that creative soul!!!
 
______________________________

Now for even more fun!!  Enter via the Rafflecopter widget below and we'll draw one lucky winner on Sunday to win a Claus & Co. collection pack!  

a Rafflecopter giveaway

After you enter, head on over to the Tombow blog to see what their team has created.  Make sure to enter there as well - they're giving away an adhesives package!   

Want to follow Tombow and keep up with all of their great projects & products?  Here you go!

Website: http://tombowusa.com

Facebook: https://www.facebook.com/tombowusa

Instagram: tombowusa

Blog: http://blog.tombowusa.com

Join us again here tomorrow for more inspiring projects!
Howdy!  Layle here with you today.  We've got a fun week planned for you - a Simple Stories & Tombow Product Swap! 

Both design teams have swapped products and will be sharing on our blogs all week long.  Join us for some great inspiration as well as a chance to win a prize package from both Tombow & Simple Stories! 

Today design team member Shellye McDaniel joins us with this awesome holiday planner -


Hello!  Shellye here to share my version of the "Claus & Co." Planner featuring many of the goodies from the collection, as well as several of the great adhesive products from Tombow!  Because the Holiday SN@P! Album is nice and large, it will work double-duty as a holiday planner and as a December-daily-style album...I cannot wait to fill it up!  To get a jump-start, I decided to have all of the cute pre-planned pages in place and then added a few embellishments that I'll share today.

To begin, I cut the "Oh Joy" (side B) paper down so that it covered the chipboard portion of the album front.  I used the Tombow Xtreme for attachment.  When you want something to really stay PUT, the Xtreme adhesive is what to reach for!
 

I wanted to create a fun 'bridge' between the fabric binding of the album and the patterned paper, so I used various sized circle dies to cut the motifs from the "I Believe" paper.  The circle sizes ranged from 1.5" to 2". 
 

After deciding placement for the circles and other embellishments, I used the 3D Foam Tabs, Multi and Aqua Mono Liquid Glue and Stamp Runner to adhere the different pieces.  The Mono Glue was perfect for adding the Wood Veneer pieces and small sequins (from my stash).

Here is a look at the completed album front:

As I said earlier, I did go ahead and add all of the inner workings to the album: the Claus & Co. SN@P! Journal Pages, Holiday Planning Inserts and the clear pocket pages that come with the album.  I mixed in some fun embellishments to some of the pages:
 

The introductory page to the album is the "Holiday Planner" tabbed page from the "Holiday Planning Inserts" packet.  I decorated it with some of the leftover circles that I didn't use on the cover.  Notice the two half-circles at the top and bottom...I just cut one of the 2" circles in half and glued it in place with the Stamp Runner!  The holly berry die-cuts were attached with 3D Foam Tabs.
 

Here I dressed up the banner insert page with one of the 4X4 Elements.  Again, I used the Mono Liquid Glue for attaching the sequins.
 

3D Foam Tabs were used when adding stickers and die-cut pieces.  I found the the Multi or Aqua Mono Liquid Glues worked best for the veneers.

The decorative insert pages are great places to add a splash of personality!  I tried to leave the pages, where a lot of writing would be done, without too much bulk so writing would be easier when the time came.
 

One last peek at the album cover.  I'm so in love with how this turned out...what fun! 
Thanks for letting me share it with you today!
______________________________

Now for even more fun!!  Enter via the Rafflecopter widget below and we'll draw one lucky winner on Sunday to win a Claus & Co. collection pack!  

a Rafflecopter giveaway

After you enter, head on over to the Tombow blog to see what their team has created.  Make sure to enter there as well - they're giving away an adhesives package!   

Want to follow Tombow and keep up with all of their great projects & products?  Here you go!

Website: http://tombowusa.com

Facebook: https://www.facebook.com/tombowusa

Instagram: tombowusa

Blog: http://blog.tombowusa.com

Join us again here tomorrow for more inspiring projects!
Pages