September 2016 Blog Posts

Hi crafters! I'm on the Simple Stories blog today with 2 layouts using Posh collection. This collection simply took my breath away! The colors and theme rhymes with my new hairstyle!

I have had long hair for at least 10 years now. Through the years, I've changed some styles in between, but my hair was always below my shoulders. Before I made the dive to cut my hair really short, my hair length was at my waist.

Here's how much I really cut off -14 inches (possibly more since the hair stylist had to do some trimming). Yes. That is quite a move!

Therefore, I decided to document this journey with the Posh collection! It's the best collection to go with the new look!

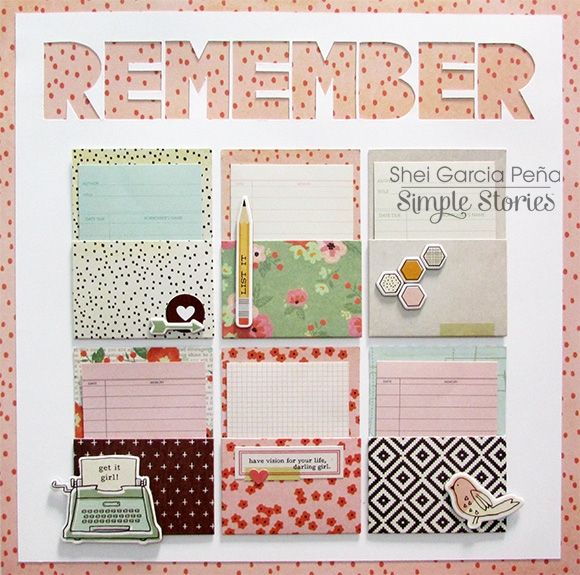
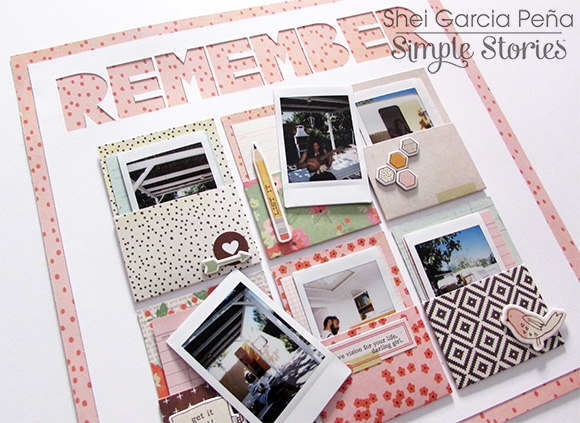
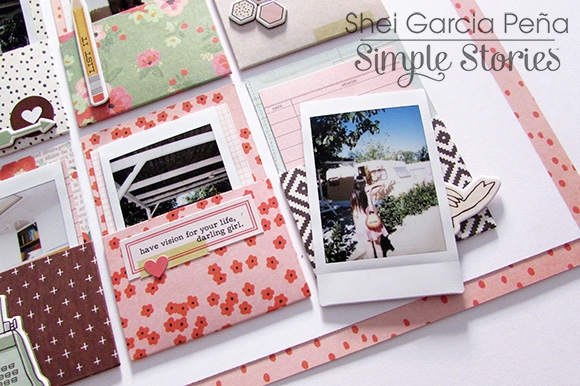
For my first layout "Sparkle", I added some stitches to the background of this layout. I found that it added another layer to the entire layout, and helps to enhance the pattern papers on top of them. 

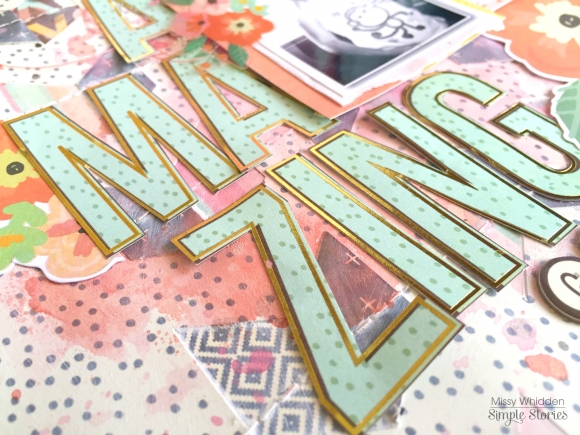
I also like to use basic shapes on layouts to highlight the beautiful pattern papers in the collection! Basic shapes are ever lasting details which you can add to layouts but not overbearing them. Here, I have selected pieces from the 6x6 pad and cut them into triangular shapes.

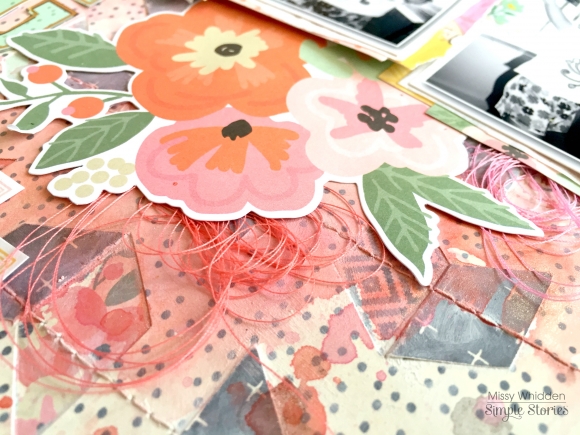
To add some fun details, I added some simple machine stitch on each triangle to outline it. Not only does it further define the triangle shape, it also helps to create focus for the embellishments on top of it! Here I have used elements from the bits and pieces pack. I must say, this pack packs a POW! Totally in love with every single piece!

Don't forget to add some journaling to your layout! I realised that I have already forgotten much details on earlier layouts which I had not done any journaling. It is always good to document and highlight it with pretty embellishments!

There are so many useful and pretty elements in this bits and pieces pack! It was a breeze working on this layout!

A little more detail on the stitching and my favorite element in this layout - the chipboard "sparkle". Well, as the word says so indeed! I love that shine of foil! It gives a subdued shine, good enough not to steal the limelight of my photo! It is the perfect piece!

_________________________

For the next layout, I had to document the start of my new look and the support from my husband. While creating this layout, I started thinking about the support from my husband and the fact that he was my pillar in times of good or bad. Then I decided to create a vertical background where the vertical strip denotes pillar and timeline. It might sound wierd, but i get ideas like that to start my layout!

 I had a lot of fun with the decorating, you can say I was spoilt for choices! 

I did not have to look too hard to find the title, the 4x4 & 4x6 Vertical Journaling elements was sitting right in front of me with the exact title I needed! Some fussy cutting, and then sewing it onto the layout. Then, just because I am in love with the foiled elements, i decided to add another just below my title! The foil "today" is from the Posh - Bits & Pieces pack too!

Seriously, I am having too much fun with the foiled embellishments. Here are some more from the bits and pieces pack! The chipboard stickers have also foiled bits, like the heart I have used below.

Throughout the layout, I have also added some stitching to the "pillar" to create some added interest.

Using the chipboard frame from Life in Color collection for my main photo together with the pretty POSH elements!

This bird element is perfect! I wanted to give it a glow so I went ahead to do some fussy cutting on the 3x4 Journaling Card elements. It is the one with the word shine. I decided to save the word for future use, but just using the lines to create a glow for a beautiful element!

Similarly, i added the glow to Winston! Did you participate in the earlier naming contest in Simple Stories instagram? Winston is such an apt name for it, and I am so fond of it!

I have also layered another 3x4 Journaling Card element here. It is so simple to add layers with the journaling cards! 

So there! I hope you have enjoyed the walk through of these 2 layouts and hope they inspire you to do something creative!

Supplies

Hey Friends!  It’s Vicki here with a project near and dear to my heart!  When The Reset Girl collection was revealed it quickly became a favorite!!!  I knew immediately that I would want to make a minibook using this line.  So that is what I have done!
 
Take a look this fun 4x6 SN@P! album I created with The Reset Girl SN@P! Pack, Chipboard, Combo Stickers, a few papers and some inks and paints!
 
 
Here is how I created the inked and painted base…
 
 
The tools I used.
 
 
Add the paint to a stamping block, mist with a little water and swirl around.  Stamp the paint on to the cover. Allow to dry.
 
 
Ink the cover with Mustard Seed Distress Ink and then stencil with Mowed Lawn Distress Ink.  The Distress Paint will resist the ink!
 
 
The finished cover.
 
 
A peek at the inside cover.


I made a few top flaps with the 3x4 cards from the SN@P! Set.
 
 
And a pocket!
 
 
This set has great “month” cards.
 
 
Here is a peek at the awesome vintage fashion girls in The Reset girl line.
 
I have lots of work ahead of me to finish this project up.  It will be a great album to share my story, thoughts and favorite things.  I might even turn it into a class, I love it so much!!!  It is amazing what you can create from Simple Stories SN@P! Packs and a 4x6 SN@P! album.
 
Thanks for joining me here on the Simple Stories blog!  If you haven’t tried creating a little magic with a SN@P! Pack yet, give it a try!


SaveSave

Good morning friends! Brenda Smith here with you today to share with you how I've set up my marigold Carpe Diem planner for fall.  

I broke out my Hello Fall and started filling my pockets with 3x4 cards from the Sn@p Pack and die cut ephemera from the Bits and Pieces pack. I cut down the Warm & Cozy 12x12 paper to put behind the "Choose to Shine."

I keep my stickers stored in the large pocket because they are primarily what I'll use to decorate for this month in this planner.

I fussy cut a strip of the hexagons from the paper called Warm & Cozy to go along the top of my calendar. Because I covered up the days of the week, I made a label border using label stickers from the 4x6 sticker pack. 

 
For this week, I decided to go all out with the fall theme even though it's still over 100 degrees here. I can dream, right? The "Fall" on the right side is from 6x12 chipboard pack. The chipboard pieces are perfect for planner pages because they add a little dimension without making things too bulky. 
 
 
I used my Silhouette Cameo and its sketch pen feature to get all the "typed" words on my pages. 
 
 
I used a little foam dimensional adhesive to pop up some of the embellishments, just to give the page a little depth. I like to use the thinnest foam adhesive I can find on planner pages. 
 
 
I made a pocket page insert to go in between the pages of this spread. I used the 6x8 page protectors and punched extra holes with a single-hole punch to make it fit in the 6-ring binder. 
 
 
I've been doing my full scale pocket pages a lot less consistently so I like including pictures and stories in my planner whenever possible. Adding a page protector gives me enough space to have a full week planned AND have my stories documented as well. 
 
 
I printed up my photos at smaller sizes using Photoshop and picked out patterned backgrounds to place them on top of. The Bits and Pieces pack provides plenty of options for layering and embellishing. 
 
 
I used foam dimensional adhesive in some spots on these cards. I find that when struggling to layer embellishments, it helps to add depth and dimension to give each embellishment a little bit more definition. 

Supplies

Hi there!  It’s Shei here today. I’m so happy to be back on the blog sharing two layouts.  Let’s get started!

For my first layout I decided to work with the amazing “Reset Girl” collection.

First of all I cut the word “remember” (the title) with my Silhouette Cameo in a white cardstock and then I glued it in the Lookin’ good (b-side) paper.

I love the Library Pockets of this collection, so I decide to use them as the real protagonist. I glued six of them in the white cardstock

But you may say… “where are the pics?”

Well, this is the point. This layout is interactive, so you can put into the pockets your photos.

I really enjoy playing with all the product trying to do different and original projects. I think this is the most original project I’ve ever done.

Furthermore, you can use the pockets to put your journaling inside them.

I use this project to keep a few Instax pics. They’re taken during our last summer trip with a vintage van. It was very funny and I love keep this memories in the better way I know. 

To finish the layout, I added different elements to decorate the pockets. I used embellishments from the Combo Stickers and the 6x12 Chipboard: the arrow, the cutest bird in the world, the pencil, the sentence or this wonderful typewriter. 

___________________________

For my second layout I chose the cute “Posh” collection. I’m totally in love with this line!!

I started with “Live simple” b-side paper as a background. As you can see I used 4 black and white photos for this project, so I want a colorful paper that contrasts with them. So I used “Choose happy” b-side paper as a big frame for these 4 pics.

I have titled my project “Dream dig” combining the blue abc from Combo Sticker and the word “dream” from the 6x12 Chipboard.

Then comes the funniest part: add embellishments!  I used some elements from Combo Sticker and 6x12 Chipboard: a very cute heart, some sentences, arrows, the balloons, etc.

At the bottom of the page I added a tag (from de Bits&Pieces) that I cut in two parts. Then I glued an arrow from the 6x12 Chipboard. I like all Simple Stories’s embellishments but I love the chipboard stickers ‘cause they add more dimension to the projects.

Finally, I used one of the new metal clips. It’s so cute that I couldn’t avoid and I look for a place to add it! Hahaha!

Thank you so much for taking the time to read my post! I hope you enjoyed my layouts! See you next month!

Never stop smiling! Kisses!!

SaveSave

Supplies

Hey Everyone! This is Jennie with today’s extra crafty pocket pages. The Reset Girl Collection is a mix of everything I love, specially crafting, reading and stationery! My daughters enjoy crafting too and this week they got crafty so it was the perfect opportunity to use this collection.

My go to product is always the Sn@p Pack but this collection also has a pack of 3x4 cards3x4 Journaling Cards and the Library Pockets.

For the weekly card I used a 4x4 card from the Sn@p PackCombo Stickersthe Icon StickersWord Label Stickers and the List It Roller Stamp.

 
Sometimes I print 3x3 photos to put them in 3x4 pockets, that way I can embellish it a little bit more. I like to put washi and the top and bottom like they are holding the photo. 
 
 
The card on the right is from the 4x4 & 4x6 Vertical Elements Paper. The strip on the bottom is not really part of the card is the strip with the brand name but I liked how it looked so I cut ½ from the top.
 
 
Next to a few of my photos in these pages I put a number and in the journaling card I wrote the number and journaling about the photo.
 
 
I always pick “sprinkles” in a collection that I spread all around the layout. Word Label Stickers are a must but I’m also loving these cute cameras from the Icon Stickers. These stickers are a favorite for planner peeps but I feel like pocket pages and planners are neighbors in the cute documenting village.
 
 
This is my favorite part in these pages! There are 8 different Library Pockets in a pack and they are all gorgeous! They come with a library card inside where I wrote a quick review of the book and why I wanted to read it. I also trimmed a bit of a 3x4 Journaling Card and wrote my favorite quotes from the book.
 
 
I hope you enjoyed these pages! If you want to see how I made them check out this process video.

https://www.youtube.com/watch?v=NCj9EwgEySg&feature=youtu.be

Supplies

Hey there, friends!  Missy back with you, and I’m so excited to share my first two layouts using the gorgeous The Reset Girl scrapbook collection!  The colors are just delicious, and there are so many fun embellishments to choose from.  I had a blast creating these two pages using photos of my oldest daughter.  They are both everyday moment photos, which are my favorite to scrap. 

For my first layout, I decided to create a fun background using a cut file and go big with my title and floral embellishment.  I used the new Cheeky Chevron cut file from The Cut Shoppe which cuts just one side of the shape and you fold the other side back.  I used this fun Speckle patterned paper with a black backside, so when the chevrons were folded back, you see the black.  I backed the open spots with papers from the 6x6 Paper Pad and then stitched through all the rows of chevrons.  I used a lot of white gesso to fade out some of the colors & patterns as well as prime the paper from some watercolors.  I used lots of Shimmerz watercolors to create all those pretty pink tones behind everything.  I love creating a messy look behind my photos & embellishments.

Here you can see how the gesso faded out some of the color, and doing that helps strengthen the paper as well as allow the paint to be true to color.  The white base of the gesso helps the color not to just fade into the color of the paper.  For my title, I fussy cut AMAZING from the 24/Seven paper.  I love the gold outlining!  I decided to stack the letters around my photo strip.

I am in love with these floral elements!  I pulled this gorgeous die cut from the Big Pieces pack and tucked it under the photos along with some coordinating tangled thread from my stash.  I love how the thread blends in, yet it stands out as a fun textural element against the background.

Here’s a good look at how neat this cut file is.  You could do this same thing and not do the stitching.  The chevrons pop off the page and created some really cool dimension.  I opted to stitch them down so I could do the mixed media.  I completed my title with some of the adorable chipboard pieces and then added some of the Word Label Stickers.  Those worked great for my journaling since they said pretty much what I wanted to say.

Here’s one more close-up.  I layered in more thread and added a floral clear sticker on top of the photo.  Those Clear Stickers make fabulous accents!

_______________________________

For my second layout, I was immediately drawn to this gorgeous geometric patterned paper.  I have seen lots of fun geometric designs on layouts recently, so I decided to cut these squares up and create a big heart out of them.  I usually don’t use dark brown as a main color in my pages, but the brown in these squares just jumped out at me.  I pulled the dark brown patterned paper as my background, and I just love how those bright colors pop right off of it.  I was also excited to use this photo because of the coordinating colors.  It matches so well, I think.  I arranged all the squares how I wanted them and then glued them all down.  I machine stitched around it a few times and did a little bit of gesso & watercolor work behind the photo and behind the small photo cluster on the upper left.  I didn’t want to cover up those beautiful squares too much!

Again, I cut my title from patterned paper.  This collection has several large words that are great for fussy cut titles.  I layered in a fun floral sticker and some of the Clear Stickers.  There were SO many pieces in this collection to choose from.  It was so difficult to pick and choose which cute pieces to use!

I fussy cut another big floral cluster to layer under the photo along with some thread.  I used four patterned papers behind my photo.  I love how the gesso & watercolor is just peeking from behind the photo and die cut. 

I think my favorite part of this whole page is the flipped up edges of some of these squares.  I love that dimension!  I added a cute circle sticker here and a small fussy cut flower.  There is a whole sheet of brown Clear Stickers in this line, and they look so good.  I used a few of them and the black ones around the layout.

To create a cluster in the upper left area of the big heart, I punched a few more hearts.  I stitched around the edges with gold thread and layered some thread under them.  I added a punch circle and more of the Clear Stickers. 

I hope these layouts give you some ideas on what you can do with this collection.  It truly is gorgeous and so colorful  & fun!  Thanks for stopping by today!

SaveSave

Supplies

Hey, planner friends! Meka here today. I’m easing my Carpe Diem planner into the fall season!  The Posh collection of scrapbooking ad planner goodies mixes well with Simple Stories’ Hello Fall scrapbooking yummies.

My front pockets are stuffed with the good stuff – pocket card inserts, page flags, and a special note-to-self decorated with Bits and Pieces. The yellows and oranges in Posh are perfect for autumn.

This Pocket Insert makes a great dashboard. You can clip notes onto the front, and place important documents or essential planning supplies inside.

Sturdy chipboard stickers are the perfect embellishment for DIY paperclips.  Don’t you just adore this Hello Fall fox? And did you catch Winston above? He’s Simple Stories’ pretty pooch mascot. Too cute!

I love these metal clips. The Reset Girl clips have gold hardware that matches my robin’s egg planner. To disassemble them, I carefully inserted a craft knife under the epoxy images to lift them up, and then combined the images I wanted to use with the coordinating gold hardware. They’ll be easy to swap out again when I’m ready for a change.

As an overview for the month, I’ve decorated a “this month” planner insert. This “September”  pocket card from the Posh Sn@p pack combines with a monthly calendar sticker to make the perfect heading.

This week I used the horizontal weekly layout included in the Carpe Diem Posh boxed set. A light wash of watercolor in the background, Posh washi tape, stickers from Posh and Hello Fall, and stamping with the Make It Happen roller stamp add fun elements to my week.

Thanks for taking a look at my almost-autumn planner décor. I hope you grab your Hello Fall scrapbooking supplies and deck out your planner in the weeks ahead!

Supplies

Hello friends!  Laura here with you and I am super excited to share today's projects with you!  I am playing with a new Simple Stories collection called The Reset Girl, and boy am I smitten!

I am not a planner girl, technically, but I am a long time list maker and pretty office supply lover!  So I thought it would be super fun to document my love of lists with this collection!  But first I decided to doll up my mini binder that I use to keep track of my design team and scrappy lists with some of the goodies from this collection!  I mean how could I resist, really!
 

My little binder has a clear pocket to insert a cover page into and I used the Aztec/Typeset patterned paper to create one.
 

I used a few die cuts to decorate the front of my book.
 

As well as some alpha stickers to add my initials.
 

And then I added an extra strip of paper to the spine.

Once I was finished decorating my binder, I stacked up all of my list books and snapped a few pictures.
 

I even added some of the Washi tape from The Reset Girl collection to the spines of a few of my more basic list books.
 

I love how pretty they look now!

But I am seriously digressing, so back to my layout shares today...
 

List Obsessed
 
Oh I had so much fun with this page! How awesome is it that my photo and layout totally coordinate!
 

I began with a die cut heart and stitched it to my patterned paper background using three colours of floss pulled from the colours in the patterned paper.
 

And then I set to work creating two focal areas, one for my photo and the second for my title.  I fussy cut flowers from the "Like a Boss" patterned paper to tuck in behind both focal areas.  To the right of my photo I also added in some die cuts and stickers, plus a few enamel dots (from the Life in Color collection). How adorable is that little pink coffee mug with gold foil spots!  We all know the best lists are created over a good coffee!
 

The left side of my photo received a similar but more minimal treatment.
 

The top of my photo also got a special treatment of Sticky Notes, Epoxy Metal Clips, Chipboard Stickers and clear stickers.   Because I used two focal areas on my layout I wanted to be sure to create a visual triangle around my photo.  And let's face it, it meant I could play with more goodies! ha!
 

My second focal area, my title, was layered above and below this sweet library pocket - boy am I in love with these! I die cut the word "list" and misted it with gold Heidi Swapp color shine to mimic the gold foil in this collection.  I used chipboard, cardstock and clear stickers as well as die cuts to adorn this section of my layout.

After creating this page and decorating my list book, I am seriously thinking I need to become a planner girl; Simple Stories has THE best goodies for planners!
 

---
 

My youngest son is heading back to school in a few days, so that inspired me to create a layout using the photos that I took this time last year.
 

7th Grade

Library pockets and graph paper, oh my!  Did I mention that I also have a thing for school supplies.  I may hoard them, for no apparent reason! So as you can imagine, this collection spoke to me for so many reasons!
 

I had fun, decorating another library pocket on this page, with a slightly more masculine look.
 

To create my title, I modified an "L" sticker from the word "GIRL" to be a 7, and then fussy cut a "GR" from the 24/Seven patterned paper.
 

I used Washi tape, clear stickers, die cuts and enamel dots (from the Sunshine & Happiness collection) to adorn the bottom of my page.


I also added a couple of stickers to the upper right side of my layout and then added a few splotches of Mr. Huey's mist.  I hope you are as inspired by this amazing collection as I am!

Thanks so much for visiting today! xo

Supplies

Pages