April 2017 Blog Posts

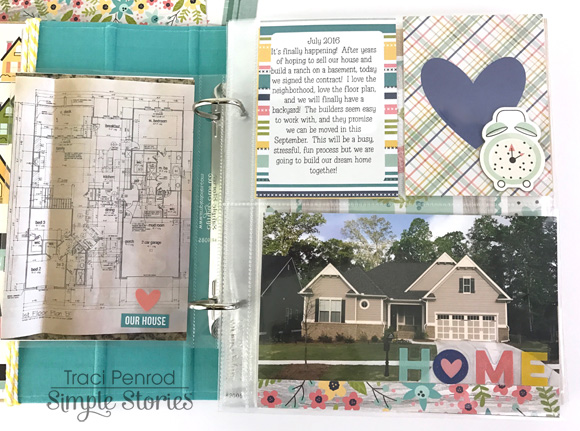
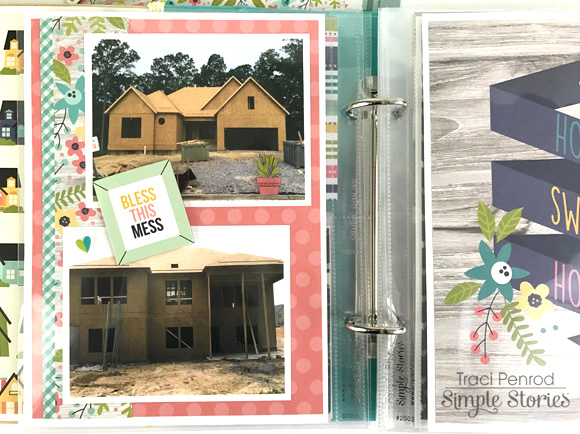
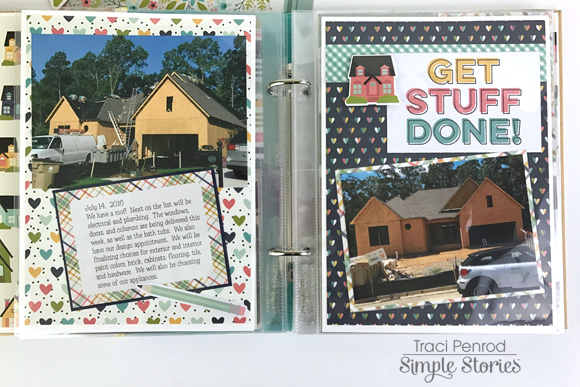
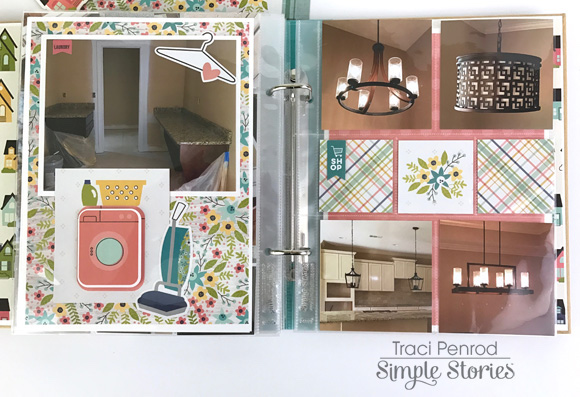
Hello! Linsey here today and I'm so excited to share my first Simple Stories blog post and project with you! I love to alter almost anything and have been wanting to transform my ordinary cork board into something fabulous! I found the Domestic Bliss collection to be just right for my memo board makeover! The fresh, beautiful patterns mixed with the fun and perfectly quirky elements make for a most delightful experience in creating!


The main section is for memos, notes and messages and the smaller section is for my weekly dinner menu at a glance. A piece of 12x12 patterned paper was used for the background on the memo section.


For the meal list/menu, the daily chart is one of the 4x6 Vertical Elements and directly above that is one of the 4x4 Elements detailed with enamel dots and clear and regular stickers.


The Epoxy Metal Clips were securely adhered to regular push pins to create an area where notes can be easily slid onto the clips and displayed.


A variety of favorite Decorative Brads, Bits & Pieces and Combo Stickers were done in the same fashion as the clips, transforming them into adorable and fun decorative push pins!


Some blank tabs and bullet elements from the 4x6 Stickers were cut out individually and a small window pouch was created to hold them. Tip: layer a piece of clear plastic over and equal sized piece of patterned paper/cardstock and fold washi tape around the edges to create a visually pleasing window pouch.


The sides of the memo board were covered with Home Sweet Home Washi Tape. It was super easy to do and really adds to the customized look and feel of the memo board.


Finally, a couple of the large floral decorative brads were added to the frame as well as a few small chipboard flowers on the frame corners, topped with an enamel dot in each flower center.


Thanks so much for stopping by today and sticking with me throughout my post! I hope you enjoyed my altered memo board and might be inspired to create something with the wonderful Domestic Bliss collection too! Happy crafting!

Supplies

Hello everyone! This is Lisa Dickinson and I'm so excited to be sharing my very first projects here on the Simple Stories blog! I've got two pages that feature one of my favorite design elements - circles - and some creative ideas for you to incorporate this dynamic shape into your layouts!

Today I'm working mostly with the Domestic Bliss collection because the spring palette worked well with both my page themes. I love how the colors are soft enough to work for Easter and spring layouts, with a bit of navy thrown in to make it super versatile. On my first page, I create a frame using punched circles - a circle of circles - that frames my grid of photos:

EasterEggs_1

Each circle is about 2" in diameter and I'm using 12 to complete my frame. ( But you could use smaller or larger circle punches and adjust the number of circles accordingly).  Once I had my circles cut, I treated each one like it's own little canvas and added embellishments, stitching and other elements that add texture and color. 

EasterEggs_4

On a few of the circles, I added a twine border for a fun dimensional twist. Just add liquid adhesive around the edge of the punched circle and adhere your twine!

EasterEggs_3

EasterEggs_5

To add stability to the design, I die-cut a large title (this Easter Simple Stories Silhouette Cut File) and placed it at the bottom of the frame. It acts much like a bow on a wreath and gives the frame a focal point.

EasterEggs_2

______________________________

For my second design, I used circular photos matted with more circles of cardstock and patterned paper:

BlueSkies_1

I love the fun and energetic feeling the layered circles give the page! I balanced out all the curves with a linear title (this Simple Stories SIlhouette Cut File) and a block of journaling that's right-justified.

BlueSkies_2

Continuing with the circle theme, I selected a few circular embellishments to scatter around the design. They add small pops of color and texture that help keep the eye moving through the whole layout.

BlueSkies_3

 So are you ready to try your hand at running in circles?! I hope you'll be inspired to try one of these ideas in your next Simple Stories creation! Thanks for stopping by today!

SaveSave

SaveSave

Supplies

Hi everyone!  This is Traci Penrod, from Artsy Albums, and I'm excited to be joining you for my first post as part of the 2017 creative team!  For those of you who follow my blog, you know I'm crazy about mini albums, so being part of the SN@P! Binder Team is a dream come true for me! Last summer, my husband and I built a new home.  Domestic Bliss was perfect for documenting the story.  I love the colors in this collection, and although pictures of building a home aren't very pretty, the papers and embellishments are so I love the way it turned out!

For my cover, I used the Bless This Mess paper from the new 6x8 paper pad.  I love that these sheets are sized for the 6x8 binder albums!  I also added chipboard stickers and some chunky twine to the cover for a little dimension and texture.  4x6 horizontal element cards are great for covers and titles and the one with the three houses was my inspiration for the entire album!
I used a 4x6 vertical pocket for the first page.  I love adding the different sized photo pockets throughout my album ... I think this, combined with various photo sizes, make for a more interesting album.  Our new address is on the front, and a photo of our floor plan was tucked into the back.  
 
Don't the cute papers and stickers make these ugly new construction photos look better?! 
I always add folding elements in my albums for extra space and interest.  For the page above, I used a 4x6 white card, layered lots of domestic bliss cuteness on the front, and added elevation photos of our home inside. I made a slit in the plastic page and slipped the bottom of the card under the plastic so that it can be opened without taking the page out.
"Get Stuff Done" summed up my summer -- always pushing the builder to get me into the house by the end of September. Our first grandchild was due in October so I needed the house finished :) The card is from the 4x4 element sheet.  
 
See the little banner sticker on the 4x6 green card?  These are from the Carpe Diem sticker tablet.  I used them throughout my album to mark the different rooms of the house.  This one says "Living".

'

2x2 photos are so much fun ... just little snippets when the entire picture isn't necessary.  

These photos show a bit of the progression my kitchen went through from framing to cabinets.  It was always so dusty and I couldn't wait for the day when I could clean it up!  The "Bless This Mess" sticker from the Combo sticker sheet was perfect for this page! 

Thanks for stopping by today!  I hope I've inspired you to have fun playing with Domestic Bliss to tell your home's story! 

SaveSave

SaveSave

Supplies

Hello everyone! It's Jomelle today and it's my very first blog post here at Simple Stories as part of Carpe Diem Creative Team. I am excited to share with you what I've created in my planner.

When I saw the Say Cheese III collection at CHA in Phoenix, I fell in love with it right away. My family and I are fans of everything and anything Disney. We have Annual Passes at Disneyland, so this collection is perfect for my creative planning, memory planning and documenting our Disney adventures.

I decided to use the Ivory planner to document and plan all our Disney experiences.

 
It was so fun and so easy to stuff and decorate my planner pockets with this collection. I used mostly the bits and pieces. One of the pocket holds the page flags.


As you can see here, I love collecting Disney memorabilia. I keep all our parking tickets and passes. Sometimes I even save the Rider Switch pass and the Fast Pass. 
 

As many of you know, Tower of Terror Ride is being replaced. I saved anything that has to do with this ride.

I used the adhesive square label pockets I got from Target to hold my passes and other things I saved and collected. I just added stickers for decoration.

If you look closely, all the way in the back on the right side, my boys and hubby were "dabbing" in this picture during the Tower of Terror Ride.


Here is my weekly layout for the first week of April. My family and I went to Hawaii during my boys' Spring Break. We stayed at Aulani. I wanted to document our wonderful Disney experience while we were there in my planner. This was my daughter Juliet's first time in Hawaii.


I love using the sticker tablets to embellish my layout.
 

I looked forward to meeting the Disney characters and taking pictures with them.

Here I used 6x8 pad to make a dashboard. I added the picture of Mickey and Minnie kissing that I took while we were at Aulani. I love adding pictures in my planner.


I added the "Happy" tab on the bottom right of the picture so it can be lifted up.
 

 Just lift the tab to see another picture that I added behind the first one.
 

This is what it looks like when the tab is lifted. I added a little note that goes with the picture.
 

 I wanted to document the first time we went to Disneyland when we bought our Annual Passes. It was also my daughter Juliet's first time at Disneyland. My daughter is 15 months old.
 

I printed all my pictures using the HP Sprocket. The pictures are perfect size for my A5 planner.
 

I used the bookmark tablet to list our Favorites at Disneyland.
 

I decorated my Doc it Journal and I placed it at the very back of my A5 planner. I can use this to jot things down or if I want to write a journal. I can also add pictures there as well.
 

Here is my Monthly layout for the Month of May.
 

Planning Starts Now! I used the Bookmark Tablet to make my list to plan our Spring Break Next Year. I love making list to check off when they are completed.


Thank you for stopping by. I hope you enjoy reading my blog as much as I enjoyed creating this project. Have a nice day.

SaveSave

SaveSave

SaveSave

Hi friends! It’s Lori here on the blog again, and I’m excited to share even more of our behind-the-scenes from CHA/Creativation. Today, I’m sharing an up-close look at our Faith and Recipe Carpe Diem planner releases! 

Faith journaling has been popular for some time now. Our goal in creating our A5 Faith Planner Insert Set was to give faith journalers and planners the perfect place to record their thoughts and inspiration after a peaceful study session. Inside, there are places to record your favorite passages, names of those you’re praying for, and lots of pages for journaling and note-taking.

Take a moment to walk through a virtual tour of the A5 Faith Planner Insert Set and see all the beautiful and useful products that are included!  Inside you’ll find over 50 pieces of planning supplies; 12 inspired journal inserts, 12 decorative inserts, 2 dashboard pages, 6 die-cut dashboards, 6 tabbed dividers, 1 storage pocket and 3 A5 sticker sheets!

The second Carpe Diem planner product I’m thrilled to show you is our Recipe Planner Insert Set.

It’s said that the kitchen is the heart of the home. Passed-down recipes are cherished family favorites and evoke memories and nostalgia for young and old. Our A5 Recipe Planner Insert Set makes keeping these recipes and memories in one place simple and beautiful. Inside this insert set you’ll find plenty of pages for recording old and new recipes, creating shopping lists, and customizable tabs so your recipe organizing is tailored for you.

Take a moment to walk through a virtual tour of the A5 Recipe Planner Insert Set and take-in all of the tools and products that are included! Inside you’ll find over 50 pieces of planning supplies; 24 recipe inserts, 13 assorted inserts, 6 tabbed dividers, 1 dashboard page, 6 die-cut dashboards,1 storage pocket and 3 A5 sticker sheets!

Head to a participating retailer to check out both of these fantastic insert sets! To locate a retailer near you, check out our store locator. There you’ll find retailers in your area as well online stores towards the bottom of the page for ordering quickly.

Be sure to follow our Live Love Plan board on Pinterest for lots of pics, links, and tons of planner inspiration!

Good morning Simple Stories fans!  Nicole Nowosad with you today for my first projects as part of the Simple Stories team. I am super excited to be sharing my love of paper with you and today's projects hopefully reflect that love!


I just love the Domestic Bliss collection and drew a lot of inspiration from the different patterned papers in the collection to create this page. Quite often, the ones behind the camera are often missing in our scrapbooks, so I do try to make a point of turning that camera around and scrapping some photos of me from time to time. Plus, it gives me an excuse to use some of the more floral patterned papers that I adore right now.


I wanted to use a lot of patterned paper, but not in a “wow” that is a lot of paper way. I chose to cut thin strips of the paper and create a simple stitched frame around my photo, adding more patterned paper in the form of diecut flowere that anchor both sides of the page.


I also diecut some flowers on my digital die cut machine from different patterned paper and layered them together with Decorative Brads, Diecuts pieces and enamel dots.


Best part is, I only used one of the 6x8 paper pads for this page and although it appears I used a lot of paper, really, it is very little. The little strip border is fun and a great way to use those paper pads in a simple way.


I finished this page off with an easy title using stickers mixed with more Bits & Pieces.

__________________________________


This next layout was a little labor of love and was truly simple to make.  I used the concept of using simple strips of paper on this page again, but in a more quilted look.


I started with 4 square blocks of scrap paper and then cut several strips of paper in many patterns from the Faith collection 6x8 paper pad. I filled each scrap paper square with those papers, alternating the pattern and color until all four pieces were covered. I thought about stitching the papers on my sewing machine, but didn’t as I thought it would look too busy.


I added some mint green paint to the background of simple white cardstock and then layered my quilted squares to the background. I left a small gap around the edges to give the busy patterns a resting point on the page.


All that was left to do was add a few embellishments! I added a pretty floral diecut from white cardstock on my digital die cut machine and a simple title using some Chipboard and stickers. Really, the paper did most of the work on this page, time to keep those embellishments simple!


Thanks so much for joining me on the blog today! I hope you are inspired to make the most of your paper stash!

SaveSave

Supplies

Say Cheese III!  One of newest collections that I'm absolutely obsessed with. I used the new Speckle Dot Carpe Diem planner (currently available at Hobby Lobby, available through independent retailers & online stores in June!) as my memory planner.  Memory planning is very important to me because it's a reminder of memories created. Simple Stories and the Carpe Diem planner made a perfect solution and match for what I wanted to achieve in my memory planning.

I've always been a fan of Disneyland and as I open up my planner, instantly it brings a smile to my face and memories start rolling through my mind. My pockets are stuffed with sticky notes, paperclips and ephemera.

As you turn the pages of my planner you will notice several pictures of my family and I. We went to Disneyland 2 times a year and created some of the best memories there. All the red and black with polka-a-dots, mouse ears, stars and yellow 12 month planner inserts (inlcuded in the Say Cheese Insert Set) are the perfect pairing!

The pocket included in the Insert Set is perfect for storing your stickers. 

The camera is such a cute extra addition to personalizing your planner and the Doc it journal fits perfectly in the back. Ready for me to take out anytime and add my pictures and journaling.

Adults are only kids grown up, anyway - Walt Disney.

Thank you Simple stories for designing and creating and making the Say Cheese collection. It made my memory planning magical and special. I can't wait to continue to create and play! 

Supplies

Hi everyone!!! Welcome to the blog today. It is Dorymar Perez and I am very happy and excited to be able to share my first project for the Simple Stories Design team. When I create my projects I always use some element of the collection as inspiration and this time I selected the pizza. Yes, the pizza, if you observe the collection is full of these!!! So, I decided to create a mini album in a pizza box with the beautiful collection EMOJI LOVE.

¡Saludos a todos!!! Bienvenidos al blog hoy. Es Dorymar Perez y estoy super contenta y emocionada de poder compartir mi primer proyecto para el equipo de Diseño de Simple Stories.  Cuando creo mis proyectos siempre utilizo algún elemento de la colección como inspiración y esta vez seleccioné la pizza. ¡Sí a la pizza, si observas la colección está llena de éstas!!! Pues decidí crear un mini álbum en una caja de pizza con la hermosa colección EMOJI LOVE.

I used black cardstock to create the box with a measure of 9 inches. You can see that its exterior is full of elements of the collection; 4 x4 cards, portions of 3 x4 and 4 x6 cards, stickers, epoxy metals, chipboard stickers,decorative clip, brads, etc.

Utilicé cardstock negro para crear la caja con una medida de 9 pulgadas. Puedes observar que su exterior esta lleno de elementos de la colección; tarjetas 4 x4, porciones de las tarjetas 3 x4 y 4 x6, stickers, hebillas, epoxy clips, chipboard stickers, brads, etc. 

The collection is so colorful and fun that I had to create a project worthy of the collection. Here you can see the exterior and part of what forms the mini album.

La colección es tan colorida y divertida que tenía que crear un proyecto digno de la colección.  Aquí puedes observar el exterior y parte de lo que forma el mini album. 

The inside of the box houses two 9 x 9 Layouts.  I used two design papers from the collection and adding elements from the collection like brads, epoxy metal clips, washi tape, chipboard stickers, etc. Since I saw the collection I knew I was going to use the photos that my girls take to upload  to their social networks!

El interior de la caja alberga dos Layouts de 9 x 9.  Utilicé dos papeles de diseño de la colección y añadiendo elementos de la colección como los brads, epoxy metal clips, washi tape, chipboard stickers, etc. ¡Desde que vi la colección sabía que iba a utilizar las fotos que mis niñas se toman para subir sus redes sociales!

The mini album is made for you to have fun discovering the photos on each of the layers as you spin the pieces!! I made the molds on chipboard and I was lining each piece with the decorative papers of the collection. After placing the photos, I accentuated around them with the sheets of stickers 4 x 6 and other elements of the collection.

¡El mini álbum está hecho para que te diviertas descubriendo las fotos en cada una de las capas según vas girando las piezas!! Hice los moldes en chipboard y fui forrando cada pieza con los papeles decorativos de la colección. Luego de colocar las fotos, acentuaba su alrededor con las hojas de stickers 4 x 6 y demás elementos de la colección

Here you can see as you turn each piece you still discover photos and elements!

 ¡Aquí puedes observar como al girar cada pieza sigues descubriendo fotos y elementos!

Do not forget to visit my Instagram page @dorymar_pl or Facebook find me like Carta di Papel by Dorymar! I hope you enjoyed the project and inspired you to create your own!

¡Espero que hayas disfrutado el proyecto y te sirva de inspiración para crear el tuyo!¡ No olvides visitar mi página de Instagram @dorymar_pl o en Facebook búscame como Carta di Papel by Dorymar!

¡Have a Great Week!! XOXO

Pages