March 2020 Blog Posts

Oh the joys of gifting!  Shellye McDaniel here today with a project that I fell in LOVE with making: "Milk Containers & Caddy" featuring the I Am Collection!

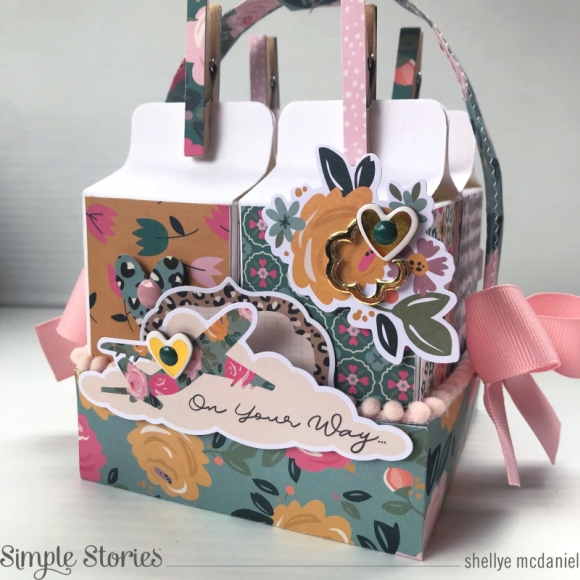
I love crafting gift sets and happy mail and spotted this pretty-popular project while perusing Instagram recently.  When I set out to grab ideas, I look at the main photo and then go to my own drawing board to recreate in my own way :)  So, let's get started with how I constructed the "milk containers":

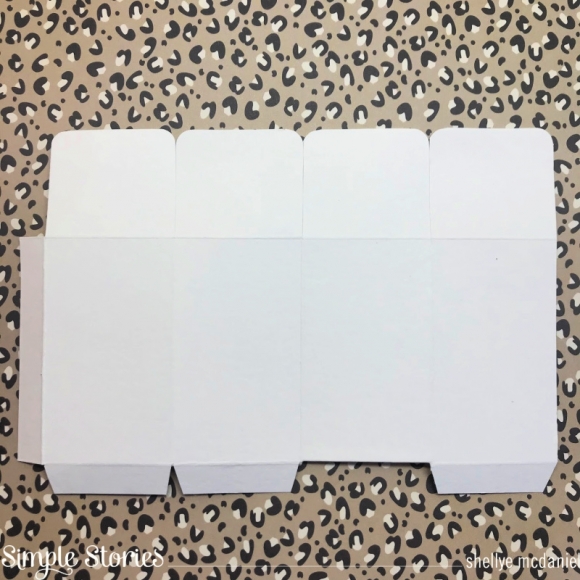
First I used a very heavy cardstock paper that measured 5.75" X 8.5".  I scored lengthwise at 2", 4", 6" and 8", which leaves a 1/2" tab.  Next, I turned and scored at 1/2" and 4".  Placing the paper in front of me, I have the 1/2" tab to the right (as shown above).  I used a 1/4" corner rounding punch to punch all of the corners on the top flaps. Apply adhesive tape to the side tab and fold the box along the score marks; adhere tab to the inside of the opposite side. To the bottom flaps I made small angle cuts so that it would fold up easier.  You will notice that the second from the end flap is missing; I glued the flap to the inside for a cleaner look when assembled.

Next, cut a small piece of white cardstock to 2"X2.5"; score at 2" and then corner round the edges of the 1/2" tab.  Attach to the last bottom flap; this will be your closure (refer to the photo above).

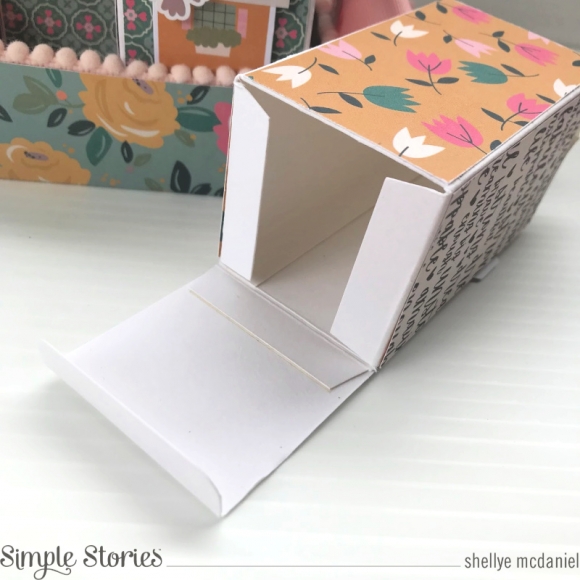
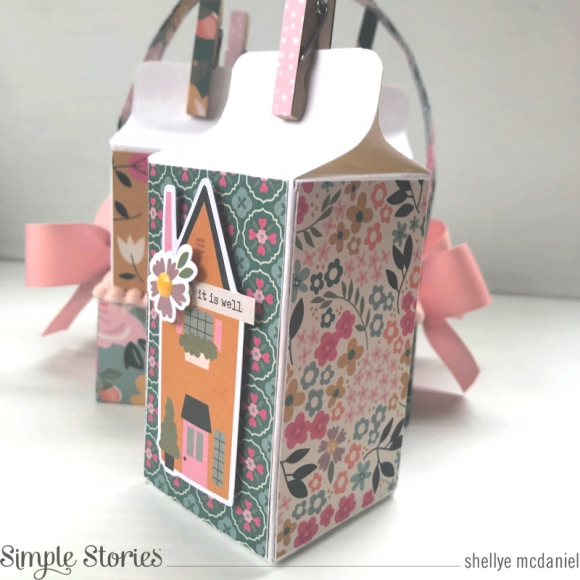
To join the top tabs together and form the "milk carton" look, I simply folded the two side tabs in and then joined the front and back tabs with a small piece of adhesive tape.  

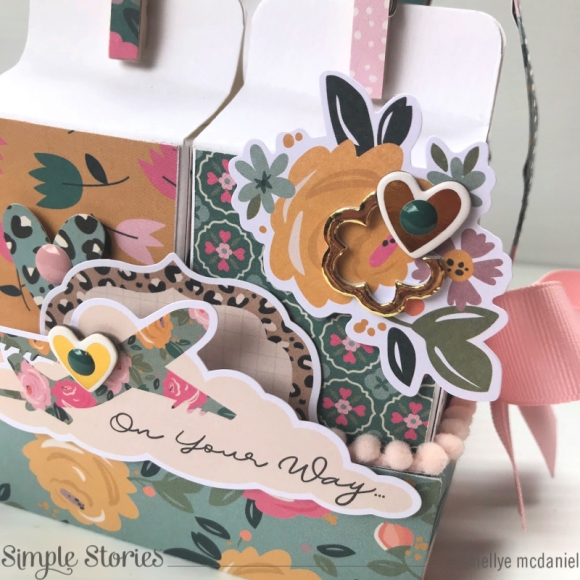
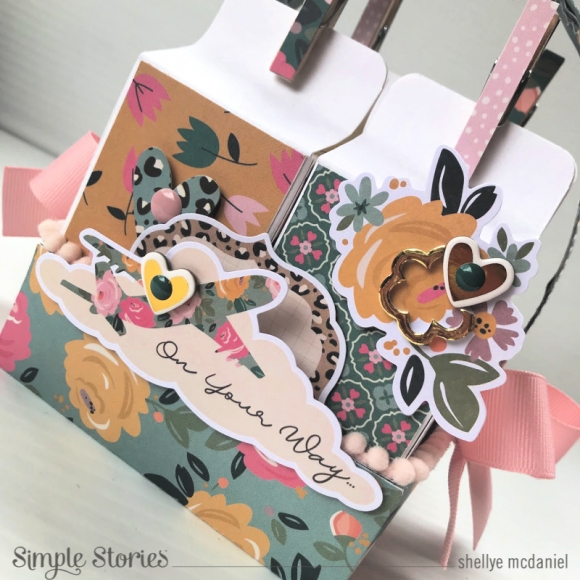
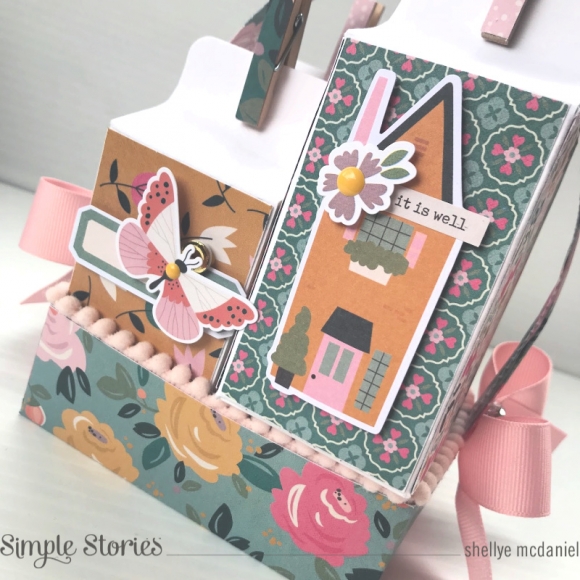
Onto the decorating!  I used various patterns from the "I Am Collection" and cut them into slightly smaller-than-the-carton- strips.  The tops were adorned with mini clothes pins that were dressed in bits of paper.  I layered on cute die-cuts, chipboard stickers, enamel dots and stickers to each of the containers.  

For the caddy: I created the box using a 7.25" X 7.25" sheet of patterned paper.  I scored around all four edges at 1.5" and then cut along one score mark at each side before folding and adhering the sides together.  I also placed a small square of lightweight chipboard inside before adding the containers. 

For the handle I cut two strips of 1.5"X12" pieces of paper and folded into thirds.  Next, I machine stitched each of the strips and then joined them together at one end with adhesive tape.  Before adhering to the inside of the box, I determined the height of the handle and then trimmed away the excess.  To hide where the two strips were joined, I wrapped a piece of the discarded strip around it and secured with tape.

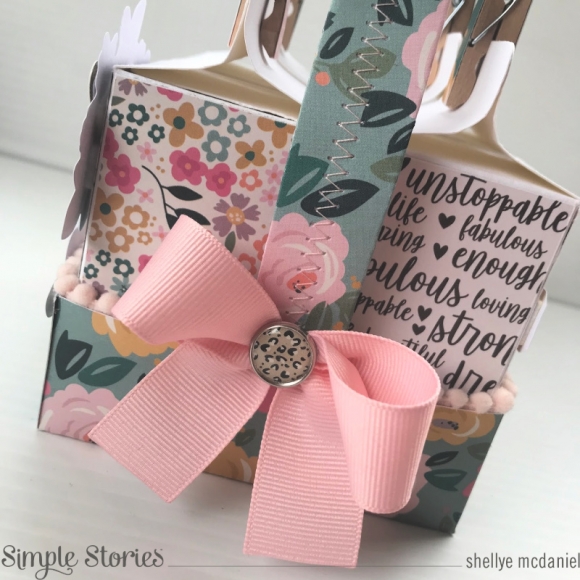
Finally, I tied on a couple of bows and glued them to the sides.  I attached one of the decorative brads to the center of each bow using fabric glue! Whether you need a couple or a trio of these containers, just make your little caddy accordingly.  Tuck small gifts or treats inside and it's ready for gift-giving!

Supplies

Hello Simple Stories friends! It’s Jen today with a special project about a very special day. Each year in my small town a pageant is held for what are considered “differently abled” girls, and I am lucky enough to be able to participate behind the scenes. This year my youngest daughter was a buddy, which means she is paired with a contestant who she stays with during the pageant. It is so fun watching all of the girls and their buddies play, talk, take pictures, and get ready for the different portions of the pageant. It is truly heartwarming!

When going through my photos last weekend, I came across this endearing picture of Abby with her buddy. Just look at the happiness on both of their faces – it is pure joy! I could not think of a better collection to document this special photo than Simple Vintage Garden District. The beautiful florals and sentiments are perfect.

To create a unique background for my project I used the Simple Stories Scalloped Heart (#187129) cut file from the Silhouette Design Store with paper from the Simple Vintage Garden District Simple Basics Kit. I resized and duplicated the file so there are three hearts on the page. After cutting the hearts, I backed each one with patterned papers from the Collection Kit and Simple Basics Kit and machined stitched each one to add texture.

Next, I placed a Layered Frame over my 4” x 6” photo and adhered it to the page with foam squares.

Embellishing the layout used several Simple Vintage Garden District products including the Banner Stickers, Bits & Pieces, and Chipboard. There are so many beautiful elements to choose from that I used a little bit of everything.

To give the project more uniformity, I layered the Scalloped Hearts with embellishments that are in the same color scheme. I love the butterflies the appear throughout the page.

Last was journaling to capture the story and a date stamp.

Here’s one last look at the finished project. I totally love this layout and the story it tells.

Thank you so much for stopping by today. I hope you are inspired to record your special moments just as I have using the beautiful Simple Vintage Garden District Collection.

Supplies

Hi there! It’s Tya up on the blog today! I am so excited to share with you all my latest batch of handmade cards using the awesome new “Going Places” collection. As someone with a serious case of wanderlust – this collection was right up my alley and I loved working with it!

I created 4 cards today using many parts of the collection. These cards would be great to give a fellow travel lover or to anyone who is headed to or from a vacation - so many great sentiments, embellishments and papers to celebrate all things travel. Let me show you each of the cards!

This first card was a lot of fun to make. I love adding dimension and layers to my cards for some interest. On this card, I used a circle die cut to cut a hole in the red pattern paper. I added some foam tape on the red paper and then placed it on top of a lined 3x4 SNAP card. I then decorated the card with a chipboard girl on a scooter, some palm tree and cactus die cuts from the Bits and Pieces. I placed the cute “travel” banner, which is from the Combo Sticker along the bottom part of the card and decorated the ends with a couple of enamel dots.

This card is one of my favorites! I feel like the happy traveling lady in the corner could be me planning my next trip LOL! The fun “Go, See, Do” 3x 4 SNAP cards makes a great base layer to decorate this card. I used the inside of the red pattern paper that I used in my previous card on the card base and then layered my other papers on top. I like  to create little  scenes with my embellishments and loved the adorable  “I Love Travel” bag ,which is from the Bits and Pieces and those fun heart sunglasses are from the 4x6 Sticker Book.

This next card was inspired by my desire for a cross country road trip with my hubby! I’d love to cruise across the states in a cool convertible like the die cut I used in the bottom corner. The states paper is actually one of the 4x6 SNAP cards that I trimmed down to fit my 4 ¼ x 5 ½ inch card base.  I added a navy brad from the Decorative Brads in the center of the front wheel.  Lady Liberty peeks out from behind the car and she is from the Bits and Pieces. I loved the “Let’s Get Lost Together” sticker and used it as my sentiment. I also added a geo tag die cut with an orange brad in the center just to the left of the sticker sentiment.  I added the “I Love Travel” die cut from the Bits and Pieces with some foam tape right under the car.

The final card was made by layering a few papers from the 6x8 Paper Pad and some more SNAP cards. Whenever I travel I like to get postcards from my trip and save them so I had to use one of the SNAP cards that looked like a postcard. . I used a tag from the Journal Bits and Pieces and tied some red twine to the top. And those cute suitcases are from the chipboard and they add great dimension to the card! The card sentiment is made from the adorable foam stickers – I love the green in this collection. I finished this card off with some orange enamel dots in the corners.

Wow! It was a blast making these cards and I am seriously hopping on the computer to book my next trip after working with the “Going Places” collection. I hope I have inspired you to grab this collection and make a batch of cards of your own- you won’t regret it! Thanks for stopping by today and Happy Crafting!

Supplies

Hello friends! It’s Kylie back with you on the blog and today I have a new layout to share created with the super adorable ‘Hip Hop Hooray’ collection. The colour palette and gorgeous icons featured in this range will have you doing happy bunny hops…….I sure did. I wanted to create a layout with lots of layers of colour which was really easy to achieve!

For my background, I have layered the ‘BUNNY TAILS’, ‘HELLO PEEPS’ & ‘4 x 6 ELEMENTS’ paper together. Because I have a thing for pink gingham, I also added strips of the ‘3 x 4 ELEMENTS’ paper. I also added a hand drawn border with a black fine tip marker.

The ‘Hello Spring’ chipboard stickers were added as my main title. This was supported by some of the pretty floral die cuts. I added some with foam tape so that it gave some dimension to my layout.

The ‘Bits and Pieces’ die cut pack also had the perfect little sub-title for my photo- ‘Hoppin’ down the bunny trail…’, which was added alongside more die cuts and chipboard stickers.

To complete my layout, I couldn’t resist making a sweet tag. I have added to of the decorative brads to the front and the string came from my craft stash.

Thanks so much for taking a little peep at my layout today. I hope it has given you a little inspiration for your own creating.

Until next time,

Kylie.

Supplies

Hello friends! It’s Mik here from Papermiks on the blog today! Today I’ll show you some Sn@p! inspiration using the gorgeous Best Year Ever Collection. To make the cover I started cutting out the monthly Sn@p cards and sewed them on a white cardstock. Then I glued those on the cover and added some words from Combo cardstock stickers. Super easy and fun to make!

I decided to make 4 dividers to my album. Each one decorated with one of the 4 seasons: Winter, Spring, Summer and Fall, using 12x12 paper. Now we have 3 months in each divider. I used monthly washitape to make my tabs. It looks beautiful and fun, doesn’t it?

I’ve also decorated a couple of 6x4 and 3x4 cards to fill the pockets page, leaving some space to add photos or journaling.

Important to say that this binder has so much space and you can add as many pocket pages as you want. I love the sense of opening my album in the end of the year and remembering every moment of my year. Do you also? There are so many elements to the “Best Year Ever”! I can’t wait to see my album full of photos by the end of the year! I hope you’ve got some inspiration from this idea and enjoyed it! If you have any questions or want to talk more about Sn@p!, leave a comment below the post or check out my IG account. Thanks for stopping by and have a creative day!

Supplies

Hi beautiful Simple Stories community, Cristina here to show you my very first project made as a new creative member of the Simple Stories design team. I’m so excited to be here working with all those amazing brand new collections and I can’t wait to show you what I made. I worked on this project starting with a focused idea on what I wanted to achieve by taking advantage of one of the collections that I love the most among the new releases, that is Simple Vintage Garden District. It's a collection with a light vintage touch that literally stole my heart. I really love matching colors and amazing designs I chose, really cool!

To better harmonize my composition I decided to use a black textured color vibe basics cardstock and create a very strong contrast using the stencil by the same collection with delightful butterflies, on which I spread gesso using a blending tool. I really love how it turned out. I let it dry and then I started work on my composition. This is really my favorite part because I spend so much time choosing the right elements that perfectly fit each other.

In this collection you can really can find many different embellishments, chipboard and cardstock stickers, bit and pieces die-cuts and obviously a rich choice of papers with amazing patterns and It’s been very difficult to choose only some of them for this project.

All my pages must be symmetrical and all the elements used must be in a cluster, I always use the double foam tape to glue papers and embellishments because I really love the 3D effect you get. For this page I decided to place my decoration in the center of the page focusing on the mixed media background. The thing I like the most on this page is the flight of butterflies, both those drawn on the black cardstock and those in chipboard and cardstock added here and there to give movement to the overall view.

The pieces of distressed paper were stitched using my sewing machine and the threads at the ends were stopped with a stapler and embellished with two butterflies. When I was satisfied by the page I spread all over the opposite corner some drops of gesso mixed with water.

Thanks for joining me today.

See you lovelies.

Supplies

Hi friends!  I hope you’re having a great day!  Today I am excited to share the new Simple Stories I Am 2020 Collection!   This collection is full of empowerment and inspiration – a way to affirm that we are all beautiful, blessed and capable of more than we know!

Before I read the wonderful words of empowerment I was smitten with the beautiful colors!  I’m attracted to brights and this collection does my heart happy!

 The images are a walk in the garden.. flowers and butterflies!  You’ll also find images to refresh (Coffee anybody?) and set your soul free.  Check out the little motor scooter with the basket of flowers!

This set has all the embellishments you love including journaling cards, bits and pieces, washi and enamel dots.  But guess what?  There’s also decorative brads, GOLD foiled foam stickers, stamps and a stencil too!

One of my favorite things in this collection is the washi.  Why?  Because one roll has gold foil words, another is floral print, and the third?  LEOPARD PRINT!

Because I’m primarily a card maker I used the 6x8” pad to create my cards.  The prints are smaller and the sheets cut in half are the perfect size for the front of an A2 size card.   The pad even includes some journaling 3x4” cards great for embellishing or SN@P! journaling.

And what’s better than the printed, die cut bits & pieces?  Having Journal Bits & Pieces too!   They’re great for making focal points to embellish, and of course everything is color matched to coordinate.

TIP:  If you decide to add a decorative brad after you have all your paper layers adhered in place simply snip off the metal prongs and adhere the brad with adhesive to secure it in place.

Wishing you a beautiful day!

Supplies

Hey everyone, Michelle here today with my first post as a design team member of this amazing team!  Yay!  I'm so very happy to be here!  I was given the Going Places collection to work with this week.  Although I don't travel much, I have a soft spot for travel collection. They are always so fun to work with.  

I had a plan for this layout but then my Silhouette Cameo died so I had to improvise.  lol  It just goes to show how easy this collection was to work with.  I still managed to create my layout in about 45 minutes. 

I love to layer embellishments on my layouts.  Especially ephemera, you can never have too much right?  The touches of red in this collection were perfect for my photo.

I often pop up embellishments or stickers on my layouts.  I like the dimension it adds and it makes layering easier.

Thanks for stopping by!

Supplies

Pages