Hey y’all! It’s Courtney again sharing the absolute perfect fall collection! Fall Farmhouse is the perfect collection to scrapbook my fall family portraits. Fall Farmhouse has everything I love in one collection, floral, Buffalo plaid, polka dots, and pumpkins.

For this layout, I decided to go with the Lil’ Pumpkin paper and I used the beautiful buffalo plaid that is on the B side. Next, I layered three papers, Simply Thankful,  the b side of  the 4x6 element’s, and the peach dot Paper.

After I layered those papers then came the fun part of adding all of the fun elements. I used themini   sticker tablet, the journal bits and pieces, the bits and pieces, the  6x12 chipboard,  the enamel dots, and the combo sticker sheet

I matted two 4x6 photos and then began with embellishments. I alternated my pumpkins with foam tape or just regular adhesive. I loved mixing all of the different types of embellishments to give my layout a layered look.

I tied everything together with a few enamel dots from the collection and a little bit of gold mist.

I hope you love this collection as much as I do!

Supplies

Good crispy morning, everyone! I am really enjoying this lower temperatures weather and absolutely enjoy creating projects in the colors of my favorite season! Anya here today and I would like to share with you a set of card I made with the Autumn Splendor collection.

There were a few of my absolute favorite papers in this collection that I wish I had a hundred of each. One of them was the Autumn Leaves patterned paper. I used pieces from that paper on all of these cards.

To create these cards I started with a 4.25x6” card base. To each of them I added a 4x5.75” piece of white cardstock as a little frame. For two of these cards I used a 3x4 cards that were fussy cut from the 3x4 Elements patterned paper. Along with die cut pieces and chipboard stickers I used fussy cut leaves from the same Autumn Leaves paper. Also, for a more finished look and stability of the card I added a 4x5.75” piece of dark wood grain paper to the back panels of cards. I finished these cards by adding a few little stickers and Enamel Dots.

Supplies

It's Dorymar here today and I'm sharing a beautiful Fall Sn@p Album I created using the new Autumn Splendor Collection. As the name says, this collection is splendid it’s full of fall goodness with beautiful warm colors mixed with vintage elements and gorgeous designs with a touch of watercolors mixed between plaids, polka dots and autumn leaves. This collection it’s totally AMAZING!

On the cover I wanted to focus on highlighting the vintage of the collection and for that I used the top left side of the Fall Blessings Paper as a base, then I match some elements from the Bits and Pieces and add a touch of texture with jute and buttons.

This album has a lot of space to document all your fall memories, if you see with the Mini Sticker Tablet I identified the kraft dividers with some tabs, they are very helpful when you organize and documenting your photos, and best of all, you have several to choose from!

I really enjoy filling all the pocket pages offered by the Sn@p Binders, in this case I want to highlight how practical and curious it’s to create a pocket within the spaces offered by these pocket pages. In this project I created several pockets inside of the pocket pages in many different sizes.  This pockets are really interesting because when you go back to look at this Sn@p album you have so much fun finding and looking back at them !

I love to add different elements inside my album, in this case I created a large fun pocket with a big tag that includes space for photos and journaling. On the other side I used a 4x6 journaling card as a divider, to give a personal touch I added some leaves from the Foliage Bits and Pieces and the results were fantastic!

Another touch that I love to include in my projects are the photo flips, in this case I used one to insert a shaker that I created using 3x4 journaling cards and some elements of the bits and pieces. They are really fun!

On this page I incorporated one of the magnificent Layered Frames included in the collection and mixed up with some die cuts and a few strips from the papers. This collection has so many precious elements that I wanted to incorporate all into this one beautiful and amazing project, I am really in love with the collection!

This layout is one of my favorites because I fussy cut the beautiful fall wreath from one of the 6x8 paper pad and I also used it as part of the base of the photo mat. Closer to the photo mat I used several elements of the collection to highlight this layout.

Totally loving the Autumn Splendor Collection, I hope this serves as inspiration to work with this AMAZING Collection.

Thanks for stopping by!

Supplies

Ahhh! There is now a bite in the morning and evening air and that means that fall is just around the corner! Squeal! It's my FAVORITE time of year! Hello, everyone! It's Jana Eubank. Whenever fall comes around, I want to cozy up inside and BAKE! You do, too?! There's just something about coming home to the scent of pumpkin muffins or chocolate chip cookies baking in the oven on a crisp fall day, am I right?

Today's layout features the warm colors of the Fall Farmhouse collection and photos of my daughter and her friend doing a little fall baking themselves!

I wanted to create a patchwork effect on this layout. I chose the Harvest/Dots paper for the background and then cut several of the papers from the 6x8 Paper Pad into 2"x4" and 2"x2" blocks. 

My photos are also 2"x4" and are matted with the SN@P! Basics Aspen/White Notebook paper.

I used the 6x12 Chipboard Stickers and the Combo Stickers to accent the title and create an embellishment cluster next to the middle photo. I am in LOVE with the wheat and berries tucked in with the florals. They look so cute with those plump and cheerful pumpkins!

I cut the label shape from the 4x4 Elements paper and then used a label and pumpkin sticker from the Mini Sticker Tablet to accent it. I also added green enamel dots and the chipboard banner and tiered plate stickers. CUTE!

Of course I had to pull in some washi tape, too! You can see that I layered the gingham and striped washi tapes together across the top and bottom blocks. I also added a bit of the gingham washi to the right of the title.

Happy Fall to one and all! Have a great day!

Supplies

Hi there and welcome to the Simple Stories blog ! Nicole here today to share a collection of cards made using just a few sheets of patterned paper from the Happy Trails collection. I am pretty much in love with any floral paper that is easy to fussy cut. I know that makes some people cringe, but for me, a little effort and fancy scissor work you can create some amazing results. My inspiration for my project came from the Back to Nature paper in the Happy Trails collection.

I created two cards using the same supplies - the woodgrain paper from the Happy Trails collection, along with a lot of fussy cut florals from the floral paper and a stamped sentiment using stamps from the Heart collection.

I diecut a simple geometric frame from white cardstock and used that as a base to enclose my fussy cut flowers, adding in the stamped sentiment to finish off the circular design.

The second card I made using the same fussy cut flowers and stamped sentiment, this time creating clusters in each corner of the card using those pretty flowers.

It is really easy to make some simple cards with a little imagination and a few supplies!

Supplies

Hello!  It's Jennifer on the blog today to share with you another awesome collection by Simple Stories! The new Happy Trails line is perfect for documenting your favorite outdoor activities or a fun vacation!  I used photos from a hike our family did while in northern Michigan!  

I  love anything with woodgrain print so I  wanted the B side of Happy Camper to be a majority of my background. I  also added the bright yellow print of The Great Outdoors as well as the fun floral print of Back to Nature.  When creating my layouts, I  feel that you can add complimentary prints even if its a strip of paper here and there. 

I  am loving that Simple Stories is offering both a Journal and Icon Bits and Pieces in some of the collections.  This means more selection for your projects!  I  usually go through each one to pick out what I  think I  would like to use on my page. The floral clusters  from the Icon Bits and Pieces caught my eye. I  knew I  wanted to incorporated them especially since they compliment the floral print of Back to Nature. I  adhered them around the cute tag from the Journal Bits and Pieces using pop dots on a couple for dimension. My title is the adorable hiking boot and can be found on the 6x12 Chipboard.

At the bottom corner of my photo, you can see I  utilized another floral cluster as well as added two of the typed sentiments found on the 

Combo Sticker sheet.  You can also see this is where I  snuck in additional prints; using a border punch is a great way to add a small break in the focal line. I  also adhered a very small strip of the beautiful plaid of Lakeside, using my sewing machine to stitch through.  

I  added a small strip of the B side of Back to Nature at the right edge of my page again stitching through with my sewing machine. 

The Combo Sticker sheet offers many diverse accents such as sticker tabs or different sentiments to add to your photos or underneath journaling. 

Thank you for stopping by the blog today! I  hope this inspires you to document about a favorite outdoor memory using Happy Trails or another great Simple Stories collection! Have a great day!

Supplies

Hi everyone! Tara here with Secretbees Studio! You can't really have Halloween without a treat bag and this one holds one of my favorite things- a mini album!  This one is loaded with lots of spaces for your holiday photos and mementos!

The new Simple Stories Happy Haunting paper collection is so cute it's scary! The patterns are a playful mix of stripes, plaids, chevrons and polka dots with some pretty flowers thrown in and the images are charming and quirky. I adored it all so much I made a seriously multi-paged album to show it all off!

I wanted to highlight the journaling cards of the collection so I began by cutting page bases from heavy black card stock a quarter inch larger than the cards, That way I could layer the 2x2, 3x4, 4x4 and 4x6 journal cards right on top. I also cut the same sizes from the patterned papers to use as backgrounds as well.

There are also interactive pages, pockets and flaps too so I would have even more spaces to decorate with all of the adorable embellishments of the collection. There are bats, stars, spiders, ghosts and more in chipboard, stickers and bits & pieces. 

All in all there are 20 plus pages ready for all of those Halloween memories! Once all of the pages were colorfully and copiously embellished, I punched a hole in one corner of each and secured them all together with a metal ring that is also decorated with ribbons in the colors of the collection!

Not wanting to stop using this super fun collection, I decided to give it it's own treat bag as a holder! Using the same heavy black card stock as a base, I made the bag 5.5" square and 2.5" wide. The front is spookily decorated with haunted houses, tombstones, bats and even a cute little spider! I topped off the bag with ribbon wrapped wire handle so it could take the weight of this extra large mini.

I have a walk-through video of this adorable mini album at my YouTube channel so you can see all of its wonderful details, pockets and flaps! Be sure to check it out to get some of your own Halloween crafting inspiration! 

Supplies

Hi there! Nathalie with you today with a new layout all about the loves of my life, my family.  The Heart collection is probably one of my favorite Simple Stories collections ever.   The colors and sentiments are just beautiful and perfect to document a memory for my son's album.

I started by cutting the floral frame from white cardstock using a cut file from Handipaper -who says florals are just for girls!-.   Each of the images was then backed used papers from the 6x8 paper padsn@p cards, and Simple Basics kit.

The cut out was attached to the b-side of the My Heart paper using some foam adhesive - this creates dimension on the page-.   All the colors in the frame  are just soft and masculine, perfect for a memory for my son.

The picture of  my family was backed with papers from the collection, and then nestled at the bottom corner of the frame.   To frame the picture, i used a combination of stickers and bits and pieces to create embellishment clusters.

The title of this page was placed at the top corner area of the floral frame - this balances the page-.   All the embellishments in the Heart collection are just gorgeous that it makes it so easy to embellish a page.

To finish this page, i used one of the tags in the Bits and Pieces pack to write my lines of journal, and then slid it behind the picture.   A few drops of gold ink complete this page.

I hope this inspire you to create a new project of your own.   The HEART collection is versatile, gorgeous and perfect for all those special memories.  Make sure to check it out!

XO

Supplies

Fall is in the air and as the air turns crisp and the leaves begin to fall my mind turns to camping.  There is a long tradition of camping in my family.  My husband has always been an avid outdoorsman, always ready for a hike or a fishing trip.

When our son was old enough he became a Boy Scout.  Of course that means lots of volunteer time for us and eventually my husband became Scoutmaster.  I loved setting up merit badge clinics on whatever the boys had an interest in.  I’d find local professionals to share their skills and knowledge with the group.

Scouting depends heavily on volunteers and it’s important to let them know how much they are appreciated.  I always sent our special guests and park rangers a thank you from the group on a hand made card made with an outdoors theme.

I’d always send my son a card to let him know how much I missed him when he went off to camp.  Usually my husband would tag along and take lots of photos of the boys and their adventures. 

We’d pour over the photos when they would get back from summer camp or a high adventure trip and eventually those photos would morph into personalized scrapbooks for the boys.

I can’t tell you how honored I’ve been to see books I’ve made proudly on display at Eagle Scout Ceremonies

The Simple Stories Happy Trails collection is perfect for all your outdoor adventures.  The wonderful images and coordinated colors make creating a SN@P!

You’ll love all the camping, fishing, and hiking images.  There are trail signs, animals flora and fauna.  Who knew that Simple Stories could even make the pesky mosquitos adorable?

I know you’ll be delighted looking back at captured memories documented with this collection!    Happy Trails to you and yours – now go get your FALL on!

Supplies

Hi! Odessa here with a cute SN@P! layout using Say Cheese Halloween. I paired my layout with the Yellow Designer binder because I love the polka dot pattern on the inside and the yellow goes great with the spooky colours in Say Cheese Halloween.

The colours and icons Say Cheese Halloween are so fun and playful, so I had so much fun putting this layout together! I’m really into adding interactive elements to my pages lately so there is a photo flip as well as a little protector strip that’s kind of like a bookmark. Around it are lots of cute photos and journal cards from Say Cheese Halloween.

On this page I used a couple of the journal cards from Say Cheese Halloween and a photo from the adventure I was documenting with my kids. I embellished simply with word stickers, stickers, embellishments and alpha stickers to tell my story in a bold graphic way that matches the collection.

In the middle of the layout is one of my current fav elements. I use the Page protector with a long 2x8 strip with two 4x4 pockets. I cut off the 4x4 pockets to make a long strip that’s kind of like a bookmark in the middle of the page and fill it with fun! I put a photo I really liked in it on the black and white stripe of the Frankly Frightful cardstock and added some stickers to finish it off along with a tab sticker on the top.

On the other side of the 2x8 sticker I layered some of the adorable kids from the Say Cheese Happy Halloween Kids Bits & Pieces that reminded me of my boys. Adorable!

I really really like the Photo Flips. They might be one of my favourite Simple Stories accessories and I use them a ton! They’re great for adding that one extra photo to a layout that you couldn’t fit in the pockets or adding more dimension to a story. Under our doughnut photo I squeezed in some journalling and a photo of my son in full donut bliss.

I filled the little 2x2 pockets on the page with some cute embellishments and journal cards. Say Cheese Halloween is such a fun collection! I didn’t have any great recent Halloween photos to use so I used the collection with some everyday photos and love how they worked together. Everyday can be Halloween!

Supplies

Hello Friends!

It's Kristine here today and I'm sharing a Halloween Layout I created using the Happy Haunting Collection. This collection contains some great Halloween colors such as black and orange but throw in a little pink and you have a collection that can be used for summer, fall or Halloween layouts. I chose to create a Halloween page. I used a photo of my cousin's painted face for her last Halloween party. 

I wanted to add some color on this page and kept it to the orange, black and white colors. I tried not to add pink because I'll keep those elements for another page. 

 I started created my layout using a piece of black cardstock. White was also a good option but I wanted more black on my page. I cut a piece of paper 10x10" to fit and then added some orange for color on the top and bottom.  I created some star shapes and added those on my layout using a multitude of colored papers. 

I wanted to used multi photos on this page but I only had 1 picture to work with. I printed a 4x6 and then decided why not use the same picture but smaller. I added some dimensional adhesive on the back to add dimension to those photos. 

Adding lots of chipboard pieces as well as Bits & Pieces just completes my page. I really can't go without decorating or adding clusters to my page. The little scary cat, the RIP tombstone and some bats in the mix just add lots of texture and dimension as well to my page.

I finished off my page by adding Happy Halloween with the chipboard pieces from this collection. It fits perfectly on the top right of my layout. 

To add more details I added some enamel dots and voila! EEK!! Grab this Spooky collection from your local scrapbook store and enjoy! Visit us on Social Media @SimpleStories_ and @KristineDavidson

Supplies

Hey y’all! It’s Courtney here sharing the layout that I created using the awesome Happy Trails collection. This collection was calling my name with all of the amazing colors and icons it has to offer. I’m really into the mustard yellows, aquas, and oranges right now. Here’s a look at the layout that I created.

For this layout I knew I wanted to use a cut file and I knew I wanted something like mountains or triangles to give me that mountain look. I went with a cut file that I have actually used before, but I went a different direction with it, literally. This cut file is a free file from Paper Issues and it’s called It’s Geometric. I turned it sideways and backed it with a few of my favorite pattern papers. I cut this one out in white so the colors would really pop against it. I added some dimension to the cut file with foam tape to help separate it from the background.

I printed three photos out for this layout and I was originally only going to use one, but I loved how the 2x2 photos looked with the 4x4. These pictures of my oldest are some of my favorites   and I thought the colors were perfect for this collection.  They were all matted in white as well to help them pop.

I created three clusters around my photos using a combination of the sticker sheet, the icon bits and pieces, the journal bits and pieces, and the chipboard. I added a few enamel dots from the Oh Happy Day collection along with the cute little mosquito’s to create my three. Then I finished my layout off with some black paint splatters.

I hope that you get inspired by this layout and I can’t wait to see what you create!

Supplies

Hello Simple Stories friends! The finishing line of summer is getting closer every day, but I am sure there were so many great memories to be thankful for! Anya here today and I have another mini book I like to share with you. If you've been to Disney recently, or may still have photos sitting in the box for years, this one is for you!

I've been wanting to create a mini book in the Mickey Mouse shape for quite some time and Say Cheese 4 collection seemed like a perfect fit for it! I created the shape of the mini book in the Silhouette Studio and cut all of the pages from black cardstock first.

Then, I covered each page with a piece of patterned paper that was a bit smaller in size, which I created by using the Internal Offset feature and decorated each page spread with journaling spots, photo mats, ephemera and stickers. For the cover I used a lot of chipboard pieces and some stickers. It was a lot of fun to create this one!

Supplies

Hey there Simple Stories fans! Nicole here today to share a non-traditional project using the new Happy Haunting collection! I know that this is a Halloween themed collection, but I love the pretty mix of colors and couldn't resist creating a non-Halloween themed project using this collection.

I punched several flowers from various papers in the collection, using a lot of the b-sides of the papers. To add some neutrality to the flowers, I punched smaller flowers using some simple white cardstock. I decided to adhere my photo first, overlapping the fun bold striped paper in the collection.

To finish off each flower, I stitched on a simple button in co-ordinating colors and then popped the flowers with some foam adhesive. I love how you can stretch a themed collection into an everyday one, with a simple paper punch and a little creativity!

I hope you are inspired to try a non-traditional page using a traditionally themed collection!

Supplies

Hello! It's Jennifer on the blog today to share a layout I  created with the very fun Happy Haunting! I  am a huge Halloween fan so I  always look forward to the new collections from Simple Stories!  Happy Haunting definitely doesn't disappoint with its bold prints as well as the greys and pinks mixed in with the traditional colors! And the ephemera is adorable without being too cute-sy! 

I  began with the black dot print of the B side of Utterly Spooky as my base. I  then adhered a 6x12 portion of Hocus Pocus to the top. At the "seam" of the two patterns, I  added in additional prints to layer under my photos (which I  matted onto white cardstock).  

For my title, I  used the cute "BOO" die cut from the Happy Haunting Journal Bits and Pieces as well as the floral tag you see hanging down. I  had some Halloween colored bakers twine in my stash and thought it would look cute tied onto the end of the tag. 

 I also  utilized much of the die cut flowers from the Happy Haunting Icon Bits and Pieces pack adhering them in clusters at the corners of my photos.  A few of them are affixed with pop dots to add dimension. 

Here is a close up of my second cluster of flowers. This time I  added the cute girl ghost with pop dots, as well as a pink pumpkin. This layout is for my daughter so I  decided to "go girly". However, Happy Haunting has elements that will work for feminine or masculine projects.  You can also see I  added a journaling spot as well as little sentiment stickers from the Combo Sticker sheet. 

After I  thought I  was finished with my layout, I  felt like it needed something more. I  adhered a small strip of patterned paper at the top and bottom of my page, stitched through with my sewing machine, and then tore the edges as shown. I  felt like this helped to break up the smaller patterns.  I  also added some of the smaller die cut flowers around my title accenting with enamel dots from my stash. 

Thanks for stopping by the blog!  You can see Happy Haunting in its entirety by clicking HERE!  Have a great day!

Supplies

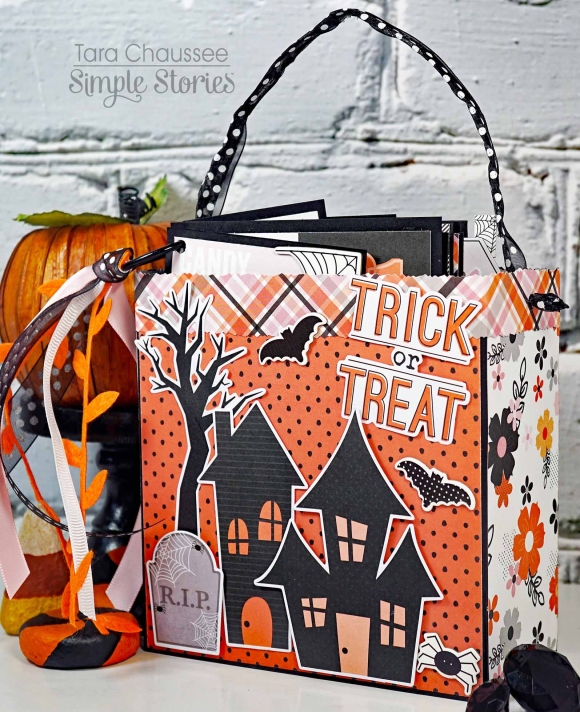
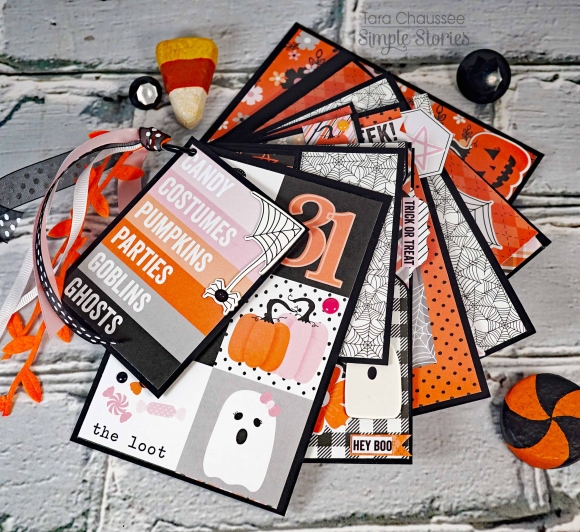
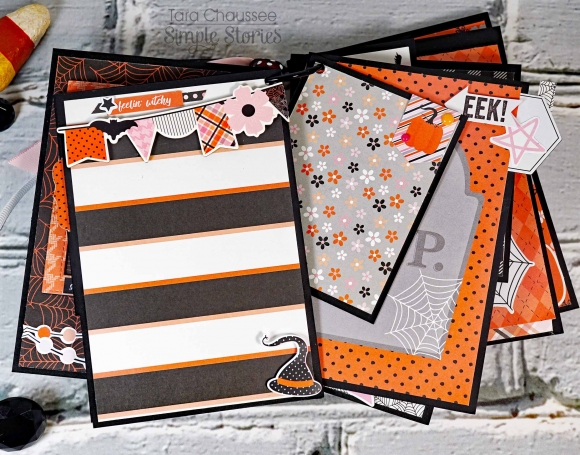
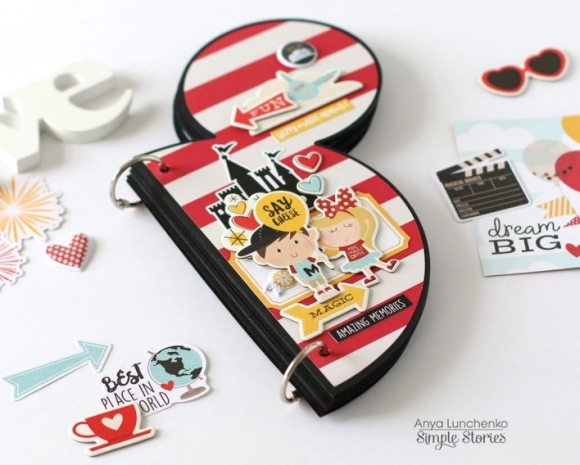
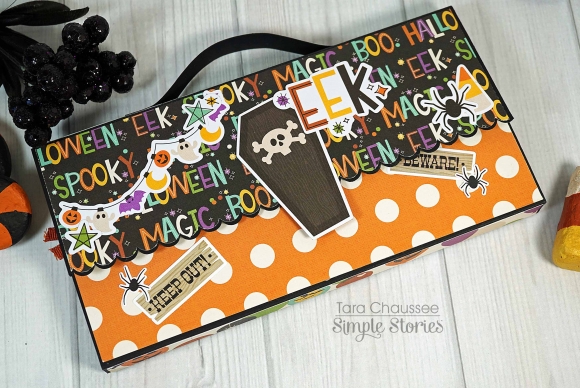
Hi friends! It’s Dorymar with a scary cute 4x6 SN@P Album using the new Happy Haunting Collection! One of the things I loved about this collection is the mix between cute and mysterious. I adore how pink makes a triumphant entrance among the typical dark colors of Halloween.

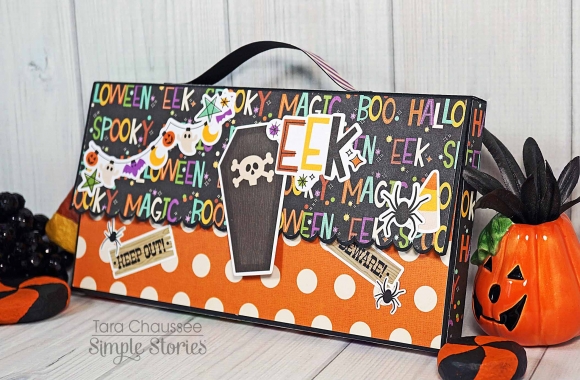
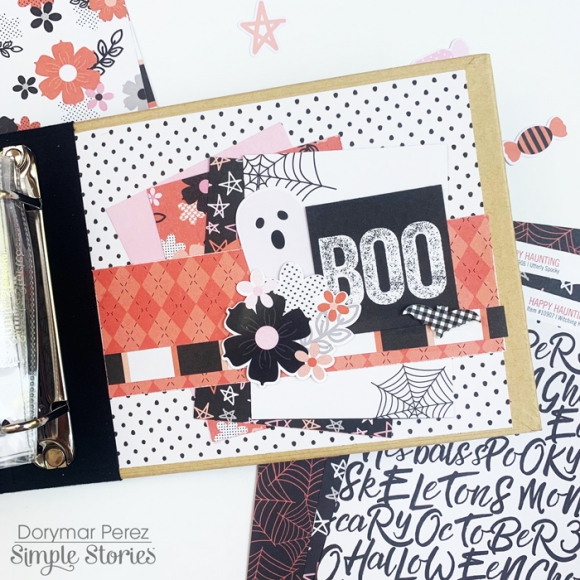
I love the plain chipboard cover of the 4x6 SN@P because it allows me to use the collection papers to make the perfect complement between the cover and what I’ll create and document in the inside of the album.  I selected the black spine album and I  decorate it with some pieces of the collection.

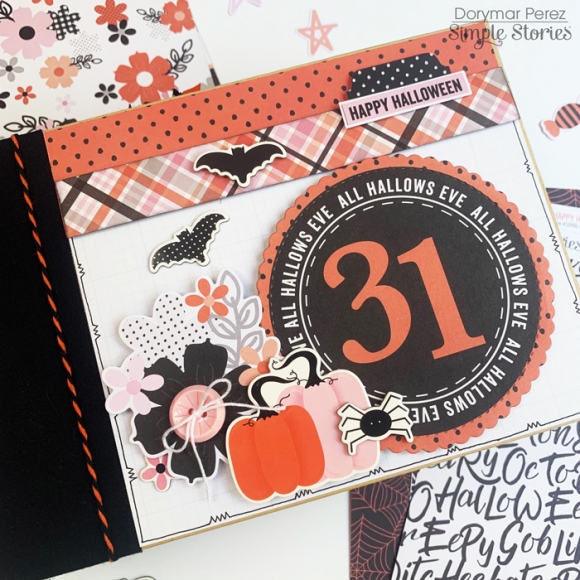
I selected one of the Snap album pages as a base and match it with two stripes that I cut from the papers. Then, I extracted with a scallop die the big 31 circle from the 4x4 journaling cards.  The collection has a lot of super usable icons that were easy to decorate the cover.

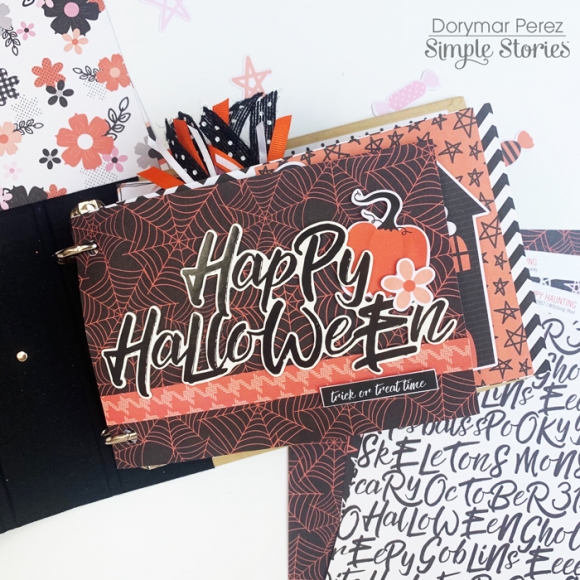
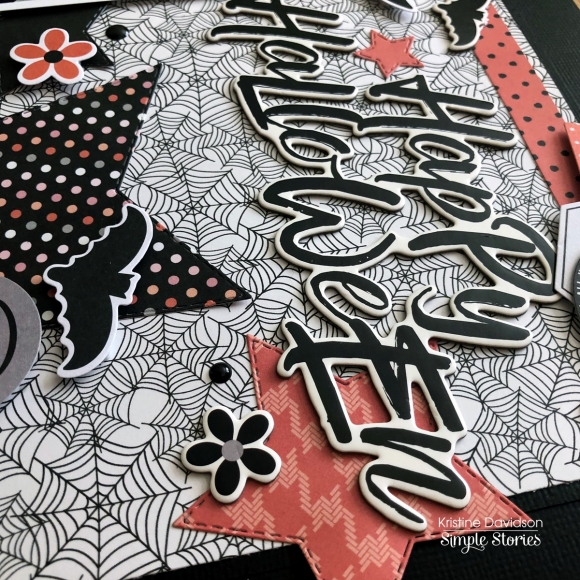
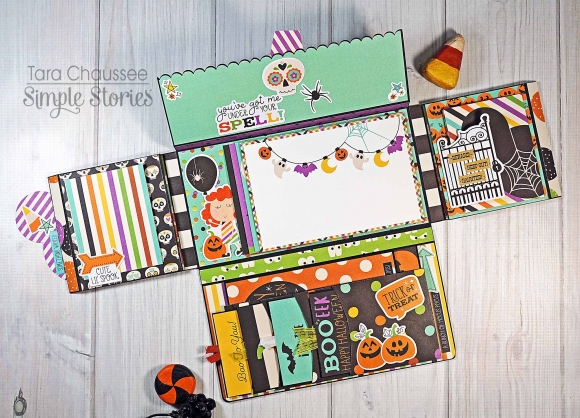
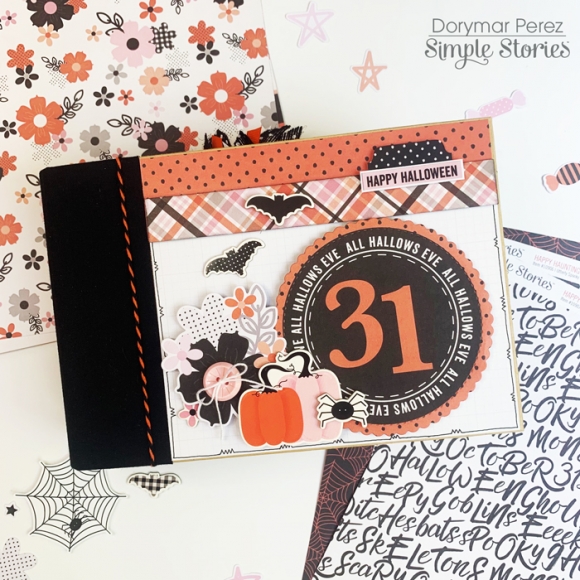
I did a title page with a combination of chipboard, die cuts and phrase sticker.  As a base I cut a 4.25 x 6 piece from "To Die For" paper. All together are the perfect match!


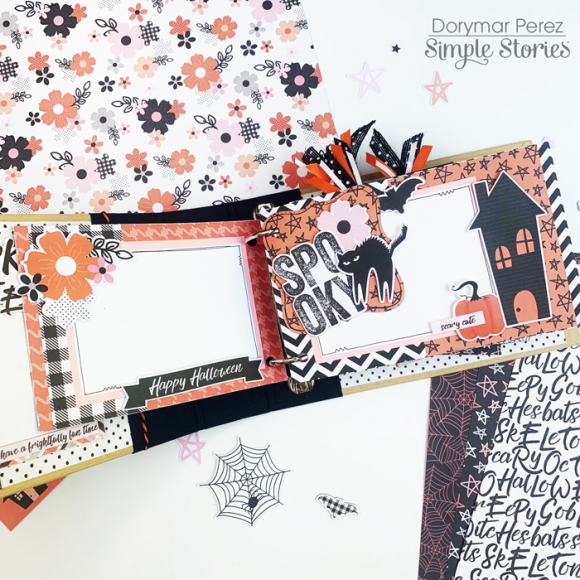
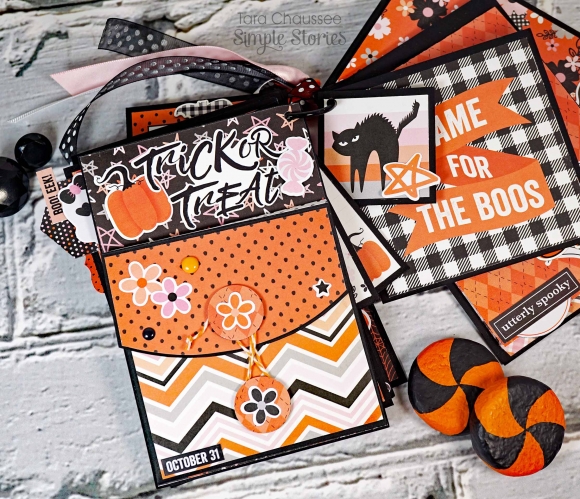
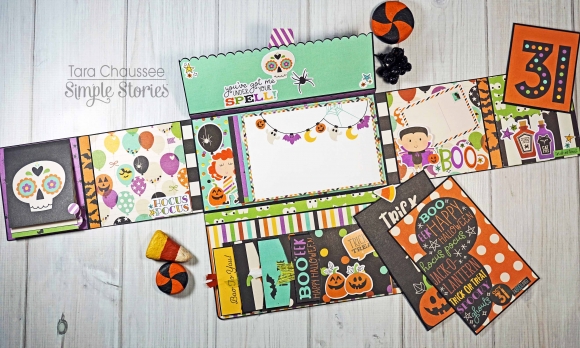
Between pages I made some brackets and decorate it with a mix of pieces from the collection, back of these pieces you can put photos or journal and you can use it anywhere else you would like in the album.

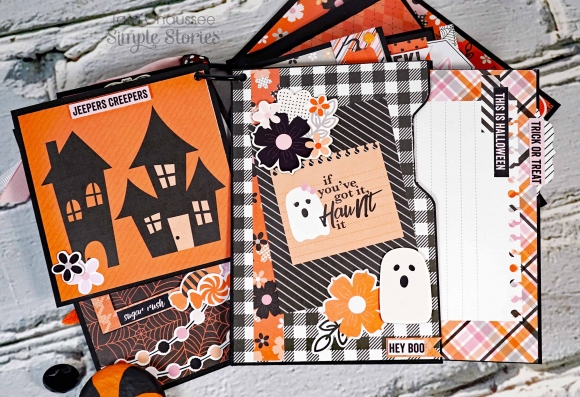
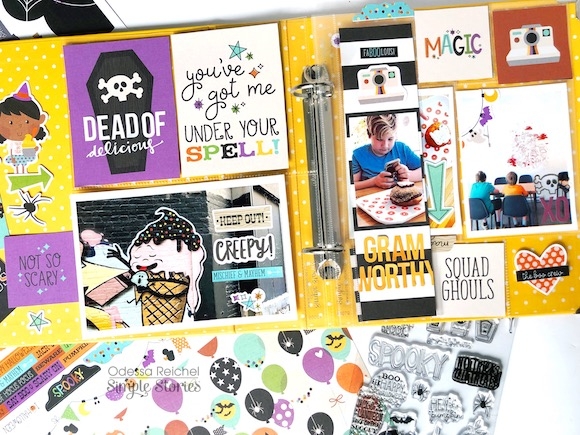
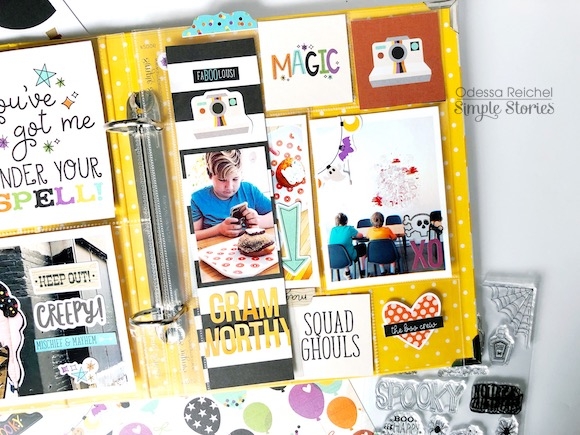
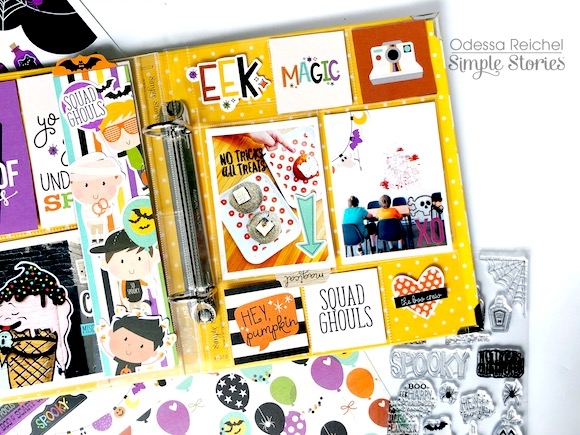
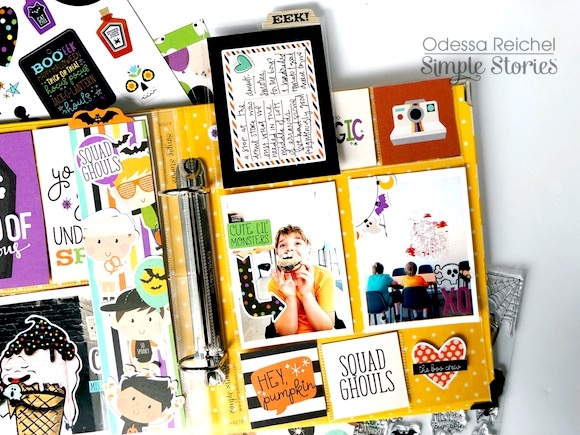
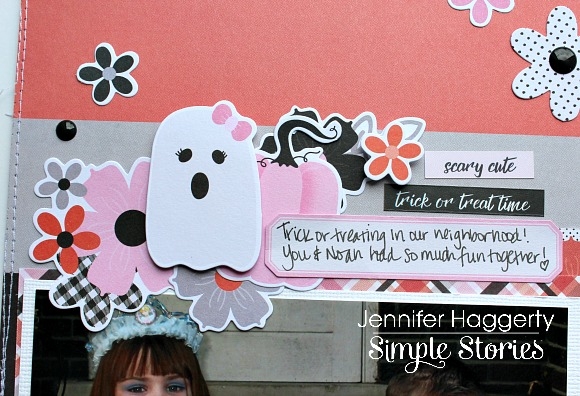
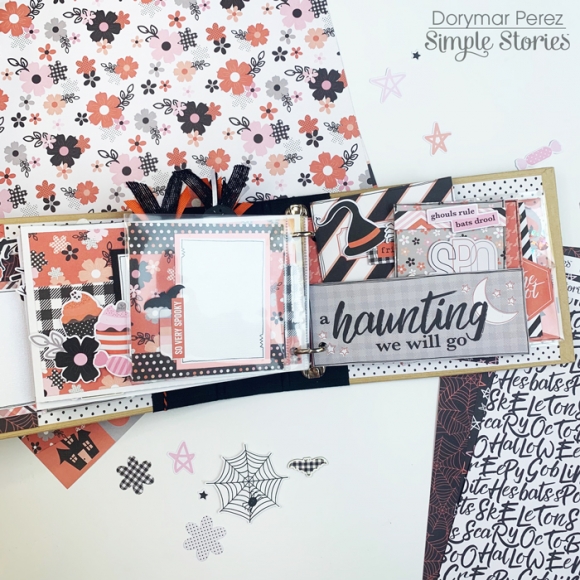
I love to create pockets, flip and flap to give an interactive touch to the album.  In this case I love the super cute ghost of this collection, you can see the big eyelashes of the ghost girl, looks Spooktacular!  I selected one of the 4x4 cards and scored on the top to create a fun flap inside the 4x4 pocket page from the Horizontal Pocket Pages Variety Pack.

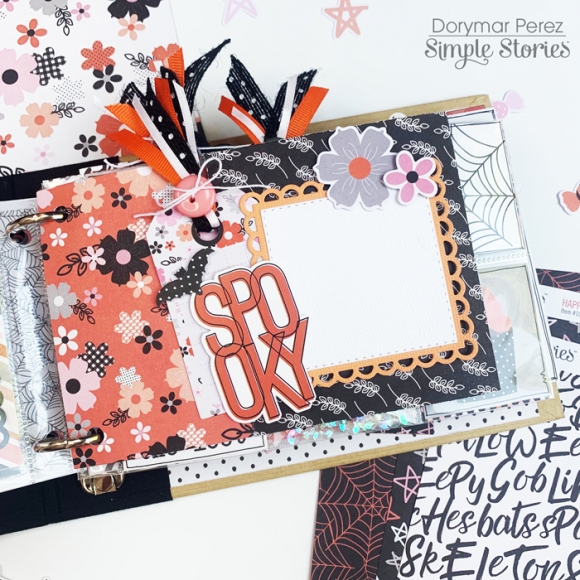
In this flap I used one of the tags from the Happy Journaling bits and pieces and match with the Spooky phrase and some pieces from the bits and pieces to decorate cluster to the photo mat, I added some ribbons and bottoms to give the cute touch that match perfectly with this cute Halloween collection. 

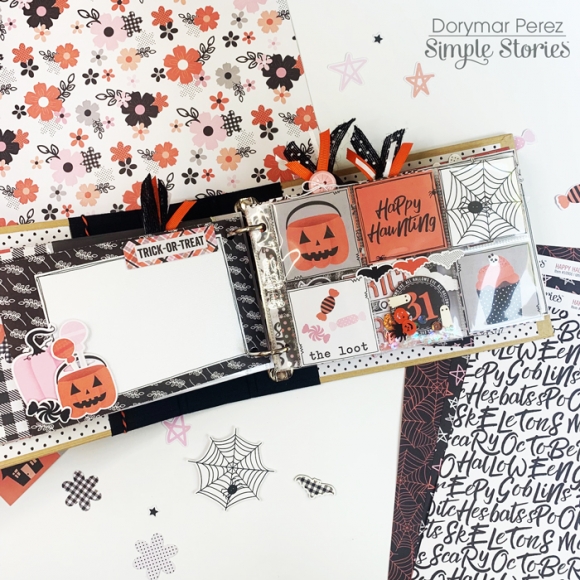
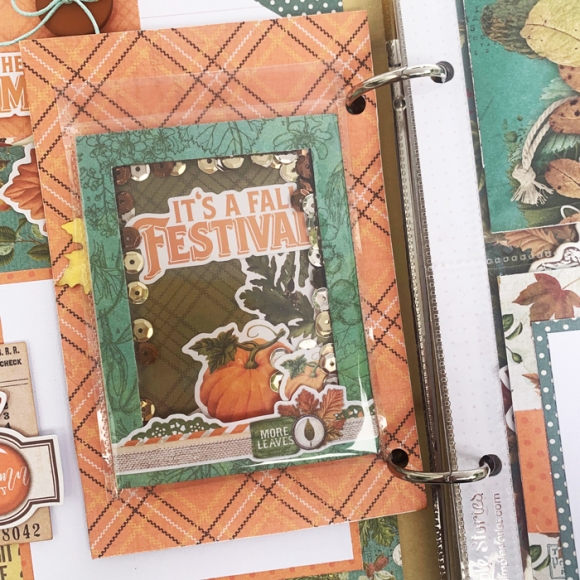
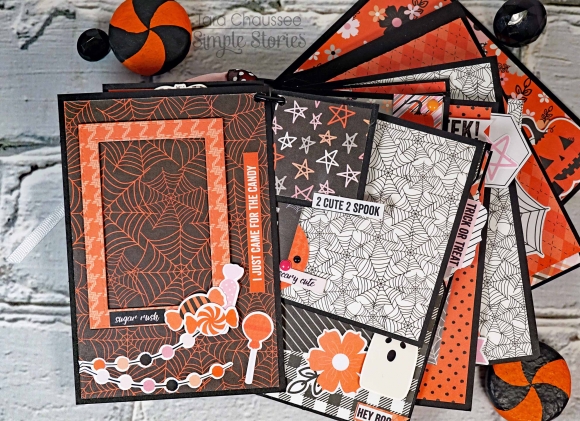
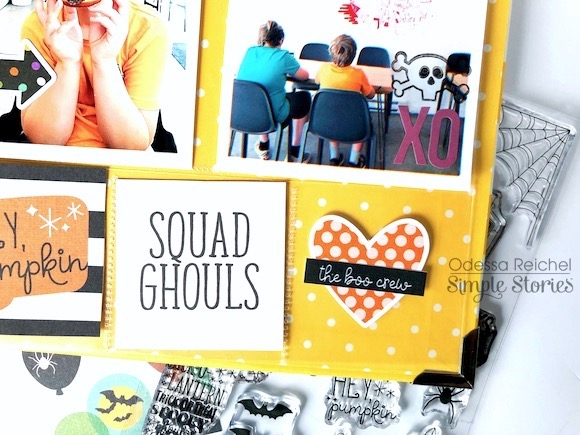
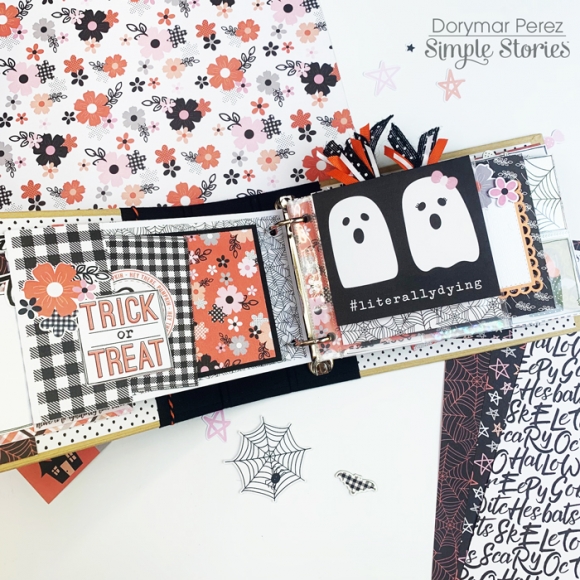
I really love the 2x2 pocket pages because it allows me to selected my favorites 2x2 cards and combine them with elements of the collection.   I can add messages, photos and make small shakers.

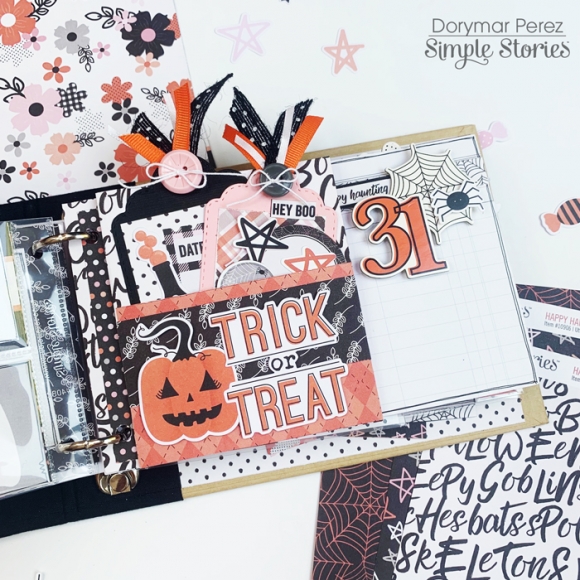
Here I did folded 4”x12” flip page, I created a small pocket with fun tags in the inside.  When you flip the page, you can find space to add photos and fun phrases from the stickers sheet.

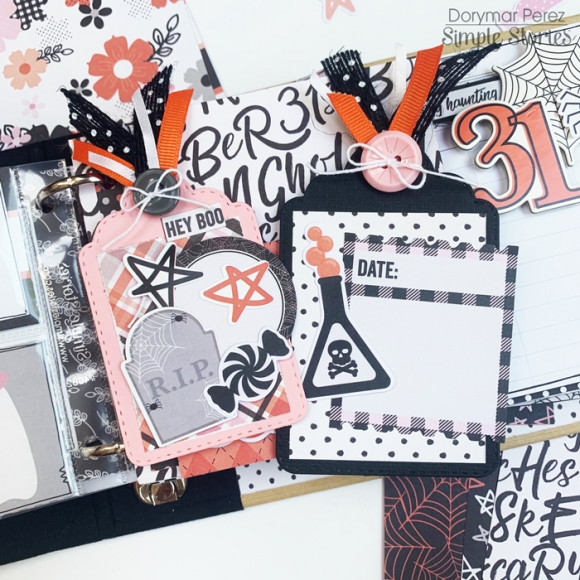
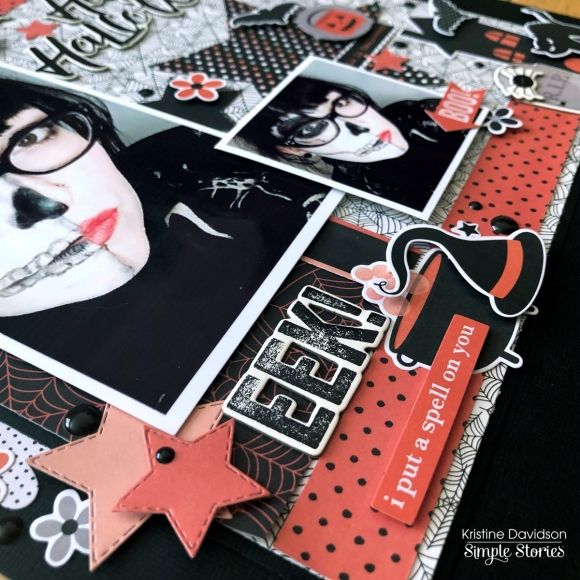
Customize tags are one of my favorites, I really love to create my own fun embellishments using a combination of the die cuts, sticker and phrases of the collection. This is the result; they look really nice!

In these pages I used a couple of the 3x4 and 4x4 elements along with some of the stickers to create and decorate inserts to add space for journal and more photos.  It’s fantastic!

I really love to create this project with this different Halloween Collection.  Simple Stories collections make it so easy to put together in every project. I hope this project inspired you to create a fun one using this super cute Halloween collection. 

Happy Scrapping!

Supplies

It's been so much fun to see everyone's creations with the Say Cheese Halloween collection this week on the blog. Hi, Everyone! It's Jana Eubank. I'm here to finish out the week with a scrapbook page!

The colors in the Say Cheese Halloween collection are so vibrant and fun! I especially love the addition of teal and green because they go so well with my daughter's gypsy costume in the photos I'm using today.

I fussy-cut the "B-O-O" letters from th2 2x2 Elements paper to use as my title. I placed the letters across the top of the chipboard banner piece and then added a die cut web (Bits & Pieces) and the chipboard spider and bats.

I am loving the purple in this collection. I cut my photos in circles using the Circle Photo Crops and then matted them with the purple, spider-patterned So Creepy paper. I then accented the photos with the chipboard stars and "Not So Scary" phrase, as well as some die cut bats  (Bits & Pieces).

At the bottom of the page, I fussy-cut several icons from the Elements papers. The potion bottle ingredients are cooking up something interesting in the neighboring cauldron (both from the 4x4 Elements paper) while the jack-o-lanterns look on with their silly and friendly grins (4x6 Elements paper). Good thing they have some chipboard candy corns to snack on while they wait for the concoction to finish brewing! *wink*

I added journaling to the postcard die cut from the Bits & Pieces pack in the bottom right corner of the page. I then added a few phrase stickers from the Combo Sticker Sheet, as well as a chipboard spider.

This not-so-scary, colorful Halloween page was so much fun to put together! Have you thought about what costume you want to wear for Halloween this year?

Supplies

Hi everyone! It’s Tara with Secretbees Studio  We might be in the thick of Summer but it is not too early to start getting those paper crafted Halloween albums and decorations started. Especially since Simple Stories has some of the cutest holiday paper collections ready for you! The Say Cheese Halloween collection is full of bright magical colors and so many bewitching patterns. Plus this collection has the happy kids dressed up in their most adorable costumes along with not so scary pumpkins, ghosts and spiders. All in all, this collection will add so much fun to any holiday project!

This sweet wallet mini album is perfect for holding lots of Halloween memories and it has lots of pockets and interactive elements! When closed, it measures 8.5" x 4.25" but it opens up to reveal lots of openings and pockets like any great wallet.

The bottom section has its own 'credit card' slots that holds four of the 3x4 journal cards and a gusseted pocket that holds 4x6 journal cards. All have been decorated and embellished with the charming stickers and bits & pieces.

The center section folds out on both sides to reveal several photo spots including a couple of small flip out sections and a pocket! The large center holds another photo flip that showcases the super cute 4x6 journal cards with photo holders on the backs. Check out the walk through with instructions on making your own photo wallet like this one on my YouTube channel!

Supplies

Pages