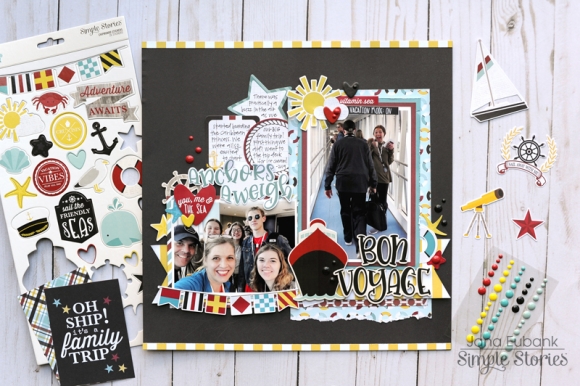
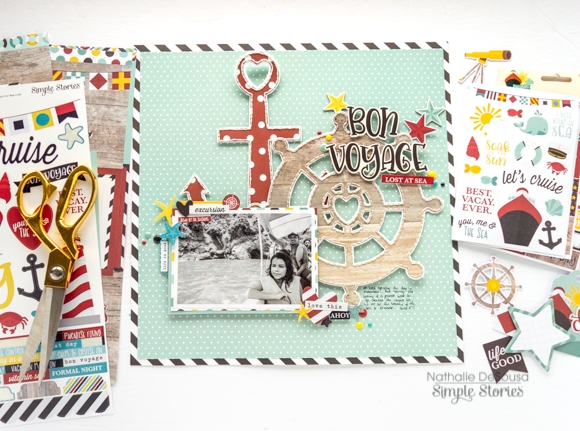
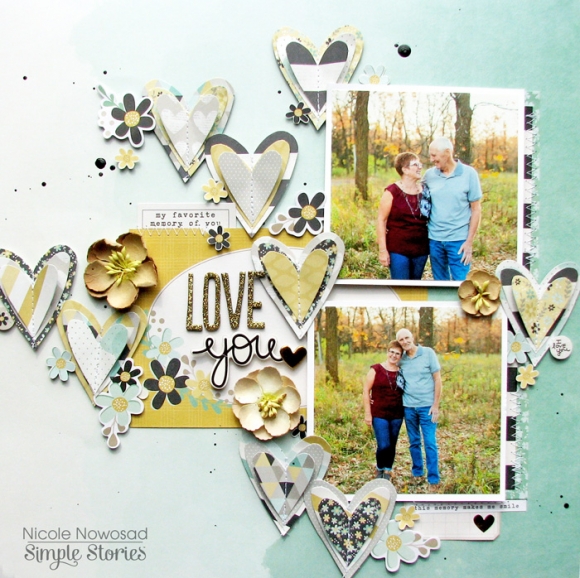
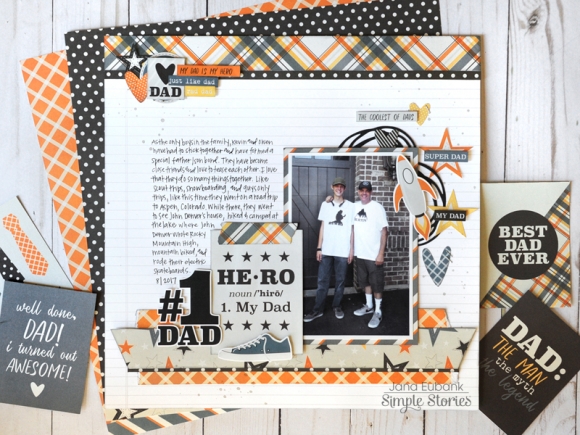
Hello, Simple Stories Fans! Jana Eubank here with a brand new layout featuring the Cruisin' Collection. 

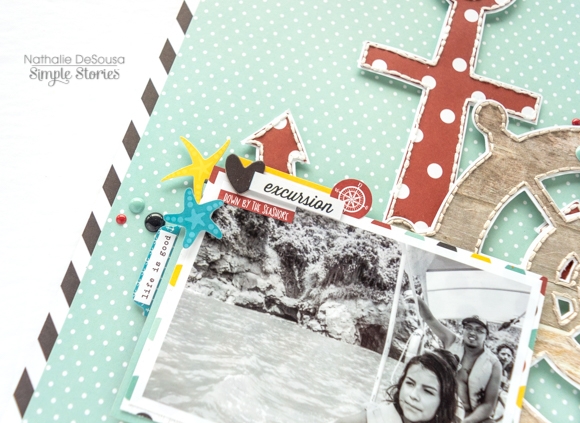
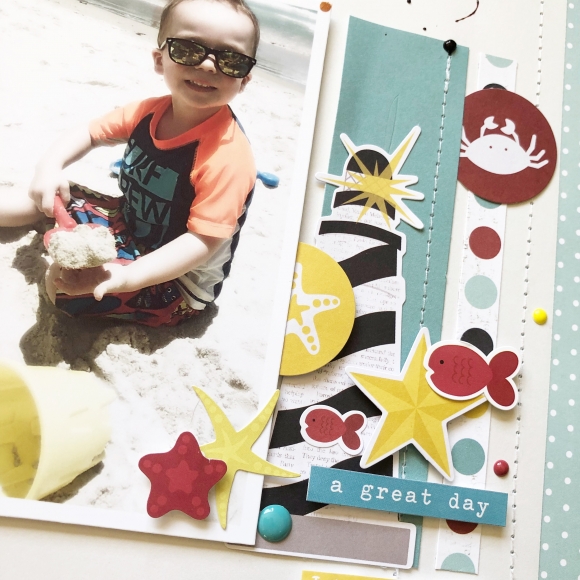
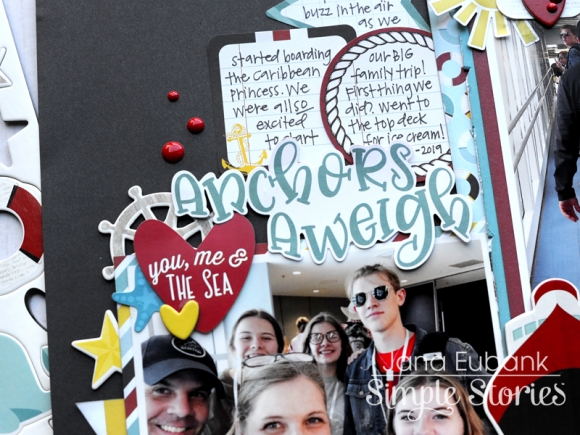
Each time one of my children graduate from high school, we plan a big family trip to celebrate! My son graduated from high school this year, so we planned a Caribbean cruise. The photos on this layout today feature the excitement we all felt as we boarded the cruise ship.

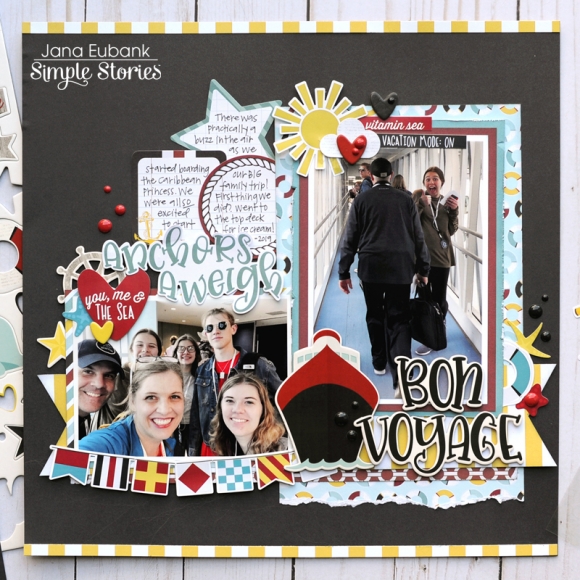
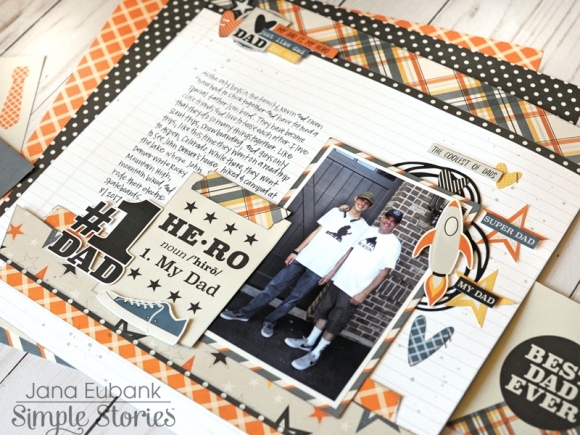
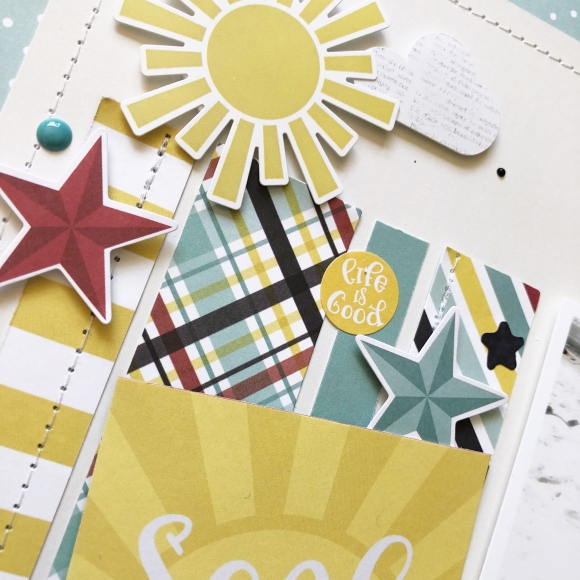
I LOVE using lots of patterned paper in my scrapbook designs, but to make those patterns really SHINE, you need to give the eye a rest by incorporating solid colors as well. This is why I love the Simple Basics Kit so much! I used all three papers in the Simple Basics Kit on this page. I used the Navy/Yellow paper for the background, and then layered up the Red/Blue paper and the Teal/Cream paper as photo mats behind my main photo.

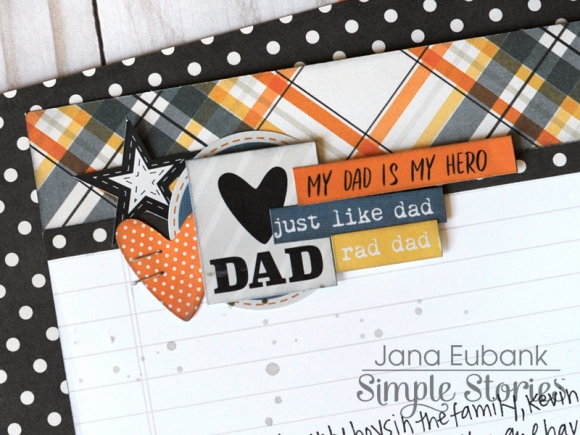
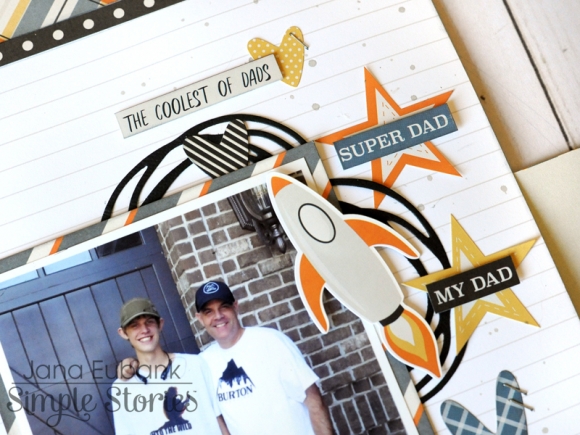
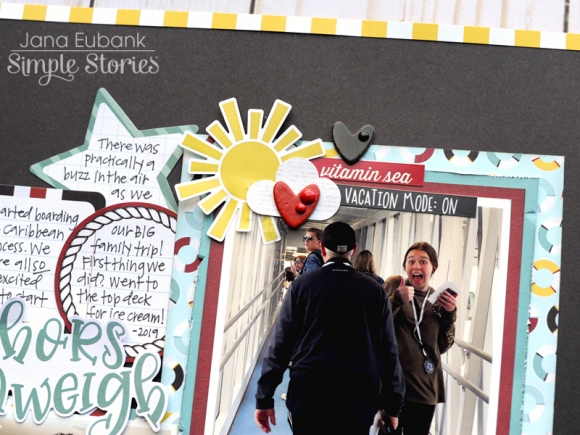
I then created an embellishment cluster across the top of my photo with the sun, cloud, and phrase stickers from the Combo Sticker Sheet, as well as a few chipboard hearts and enamel dots.

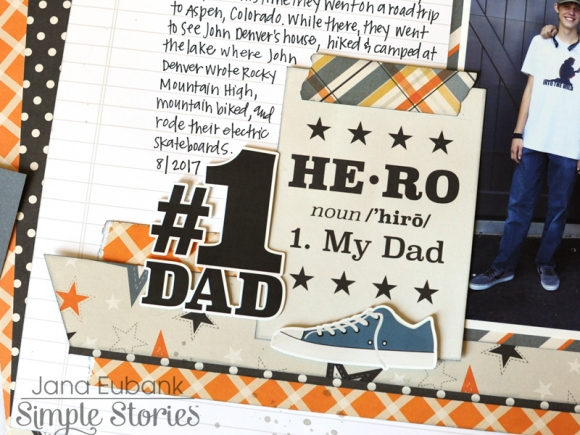
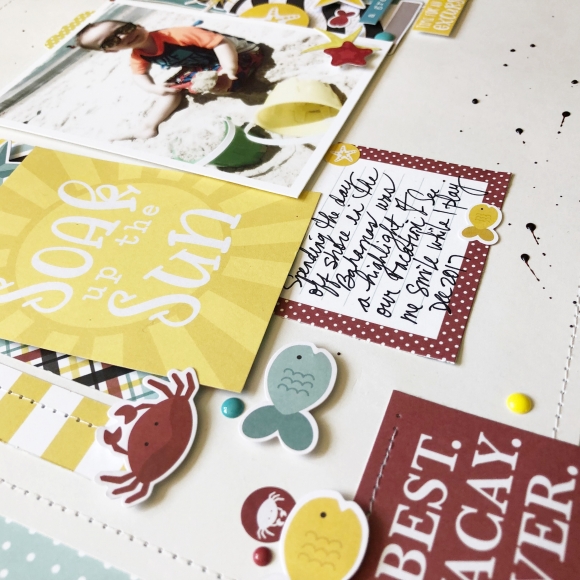
I decided to do something a bit different for my journaling on this layout. Instead of using one large journaling block, I layered together three different journaling shapes from the Bits & Pieces. I LOVE the way this turned out! The different shapes stacked together are so CUTE!

I then accented the top of the horizontal photo with the "Anchors Aweigh" phrase (Bits & Pieces), a heart sticker (Combo Stickers), chipboard pieces, and a sprinkling of enamel dots.

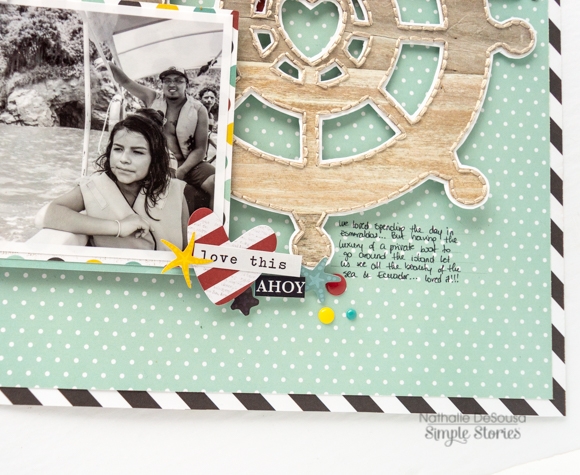
I placed the chipboard phrase "Bon Voyage" along with the chipboard cruise ship at the bottom of the vertical photo for my page title. Next, I tucked in a few stickers behind the photo mat layers to the right of the title and then added tone-on-tone navy enamel dots to the ship and page background. (It's amazing the fun texture and shine you can add with just a few enamel dots! I love those things SO MUCH!!!)

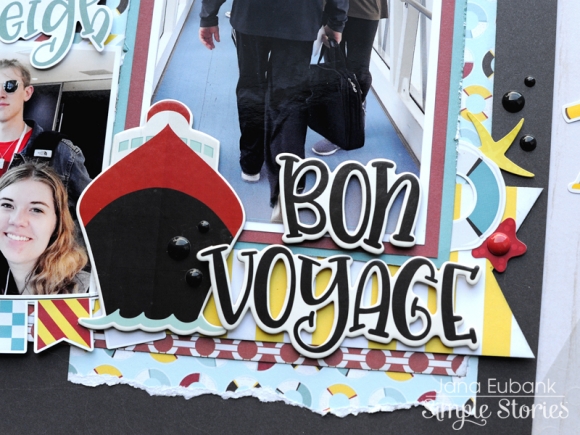
To cap off my design, I added strips of the yellow/white striped AHOY paper across the top and bottom of the page. 

Simple Stories makes scrapbooking so much FUN! What memories will YOU capture today?!

Supplies

Hi Friends, It’s Dorymar here!  Today I want to share with you some layouts and the cover of my latest Snap Album.  On this occasion I used the lovely Heart Collection, this is a very sentimental collection, but in this case, I used it with a different meaning than for what it is designed for. My album is designed for Family Memories.

I select the 4x6 Navy Snap Binder because it is a perfect match with the collection. To design the cover, I used the Never Forget paper as a background.  I selected the forever and love words from the Chipboard Stickers as a title.  This time I want to make the cover simple, that’s why I only use a few elements of the collection to decorate it.   

I love the colors and patterns in the Heart Collection.  Fun plaids, stripes, and hearts paired with lots of cute flowers and a beautiful touch of metallic gold made this album come together very quickly.

The die cuts, chipboard stickers, and element cards helped make the album fun, and added space for journaling that I wanted to record.

I love to add folding elements in my albums for extra space and interest.  For the page above, I used a piece from the Never Forget paper, a 4x6 element card and I combined it with the washi tape, die cuts and scallop border from the combo stickers.   

The 4x4 and 3x4 element cards allow you to have more space for journaling and photos.  I always incorporate buttons and ribbons to give a personal touch. 

Thanks for stopping by today!  I hope I've inspired you to create beautiful things with the Heart Collection!

Supplies

Hello, its Jennifer here on the blog!  Today I'm happy to share a layout I created with the Heart collection!  If this line looks familiar, you aren't imagining things!  Heart was originally released as a Simple Set a few years ago and is now back with the same beautiful prints plus some as well as additional embellishments! I  cannot tell you how excited I was to see this collection again because of its wonderful meaning.  My page is about my dear angel mother who passed away 10 years ago this month. A lot of tears were shed creating my layout but I  feel that its therapeutic and healing to scrap about the people we've lost. 

I  started by cutting the My Heart print in half and adhering each side to a white cardstock background. I  loved the contrasting light blue ledger print against the grey/white heart.  I  then adhered and stitched a strip of my favorite plaid of So Loved down the middle. Using the navy from the Heart Simple Basics Kit, I  cut my heart frame cut file on the Silhouette. I   then adhered different prints inside the negative spaces of the heart to add extra color! 

For my title, I  used the script words "miss you" off the 6x12 Chipboard as well as added flowers to accent from both the Chipboard and Bits and Pieces pack.  

For journaling, I  utilized one of the tags in the Bits and Pieces and layered a die cut floral cluster underneath. You can also spy one of the beautiful Washi Tapes that coordinate with the line which I  placed over the navy/white stripe border sticker from the Combo Sticker sheet. I  also added two die cut heart prints at the bottom of my tag; one of which I  adhered with pop dots to add dimension. 

The Bits and Pieces pack also includes smaller journaling spots such as the gold yellow framed one you see here. I'm always a big fan of the typed sentiment stickers in the 4x6 Stickers as they make a wonderful addition to your title or just if you want to add something extra to your page! 

One of the beautiful things about the Heart collection is that you will find embellishments and papers that include gold foil!  Here is a small pennant from the Bits and Pieces that I  adhered to the top of my photo with pop dots.  Also included are die cut gold foil hearts

Thank you for stopping by the blog today!  I  hope this inspires  you to create a page about someone you love that is in heaven with the Heart collection! Have a great day!

Supplies

Hi everyone! Our loved ones are always gone too soon from our lives but with the new 'Heart' paper collection from Simple Stories, you can preserve all of those wonderful memories. This collection is full of gorgeous, soft colors and beautiful sentiments and images to commemorate those we miss.

I couldn't not make a mini album to show off this fabulous collection full of blooms, stars, hearts and gold accents! Plus, I recently took a Coptic stitching class by Paige Taylor Evans and needed to make a Coptic book to keep the lesson fresh in my mind. This adorable mini has chipboard covers and five multi-tiered 'signatures' that will hold a ton of photos and mementos with lots of interactive pull-outs, flips and even some hidden pockets!

No somber colors here- just a spectacular mix of colors and patterns to happily reminiscence about your loved ones. The shine of the metallic gold accents are the perfect highlight for all of those joyous memories! All of the stickers, chipboard, washi tape and decorative elements layer together  beautifully.

To match the lovely metallic accents of the collection, I used a gold metallic thread for my stitching. You can see some of the pretty Coptic stitches here on the spine. I also wrapped my paper tassels with the same thread for even more shine!

Visit my YouTube channel to get a closer look at all of the beautiful details of this splendid paper collection and see more pages of this mini album! 

Supplies

Hello Friends, 

It's Kristine Davidson here today to share a layout I created using the Heart Collection. This collection is more about celebrating and scrapbooking loved ones we've lost and those we want to cherish in our scrapbooks. I wanted to use this collection to celebrate my niece's sweet face instead. Something different and a bit of different direction with this collection. I tend to do that on many of my projects. I am showing you another way to use this collection in case you love it and don't necessarily want to scrapbook that many pages of loved ones lost.

This layout is called LOVE LOVE LOVE - I love her face, the way she makes silly smiles and grimaces and makes me laugh out loud! I used the SN@P Basics papers for my background along with a white piece of cardstock. I layered all 3 papers to form my background. I cut up small pieces of paper 1" by 4" from the 6x8 paper pad. This allowed me to use smaller patterns and many different papers from the collection. 

Once my background was done, I added the strips of paper, the 3x4 photo and then started layering with flowers and hearts. I scattered the hearts on the paper more on the right of the page than middle.
This just makes it easier on the eye.

Adding the circle LOVE LOVE LOVE from the Bits & Pieces adds more details and enhances the page title.

Of course I added small drops of glimmer glaze to add texture and finished off with some journaling.

Hopefully I gave you a bit of inspiration or something to think about for your next layout.
You can find more projects on our instagram accounts - @SimpleStories_ and @KristineDavidson.

Have a great day friends!

Supplies

I confess that I’ve always had a hard time making Sympathy and Miss You cards.  It’s never easy saying good bye  or  expressing myself  when I just can’t seem to find the right words to say.

The Simple Stories new HEART Collection allows me to convey my feelings without having to search for the right words.   The journaling cards in the collection are beautifully worded, and heartfelt.

The papers in the collection are contemporary -  yellow, teal and navy, with plaids, stripes, florals, hearts and dots that are fresh and classic at the same time.

The Simple Basics Kit includes solid 12” cardstock sheets perfectly coordinated with the pattern papers.  They’re perfect for layering and mixing with the pattern papers.

I used die cut bits and pieces and chipboard stickers to embellish the journaling cards that take center stage on each of my cards.  I added sentiments from the 4x6 sticker sheets to look like journaling.

I know these handmade cards will convey my heartfelt thoughts and let the recipient know how much I care.

Supplies

Hi! Odessa here with some sunshine-y SN@P! pages made using the nautical Cruisin’ kit. When I first opened up Cruisin’ I was drawn to the rich blues, reds and yellows throughout the collection. I paired it with some fun photos and made a few pocket pages with it.

First up is my album cover. I used the new Robin’s Egg SN@P! binder which has a lovely blue spine that goes perfect with Cruisin’. I was torn between it and red but I wanted to keep the sea inspired colour theme going. I covered up the front of the binder with the Lost at Sea cardstock and embellished the corner with a simple cluster of Bits & Pieces, chipboard stickers and smaller stickers. I finished off the cover with a cute strip of washi where the binder spine and cardstock meet.

My first two page layout using Cruisin’ features a 6x8 layout on the left and some pockets full of fun on the right. You can really do anything in a 6x8 album, I love it!

I used some plain light coloured cardstock from the Simple Basics coordinating cardstock from the collection and layered different cardstock, stickers, chipboard and enamel dots around a watery photo. I had to include those cute nautical flags from the Cruisin’ chipboard. I used a scalloped boarder photo from the combo sticker sheet to give the page a nice edge that I echoed on the 4x6 photo on the other side of the layout.

I filled my pockets with a 4x6 photo and a couple of cut apart journaling cards from the Cruisin’ cardstock. I used oodles of phrase stickers from both the combo sticker and 4x6 sticker sheets and more enamel dots and chipboard to finish it off.

The next layout in my SN@P! album has a few more photos and cards. I just love the contrast between the peaceful blues and bright yellows in Cruisin’ so much!

The left side of this layout is more peaceful with some of my fav recent photos, a simple journal card and a few well placed embellishments. I had a square photo I wanted to use that I attached to a piece of the coordinating solid Simple Basics Cruisin’ cardstock and added some washi and chipboard accents.

The right side of this layout is packed with more fun and colour with lots of yellows. I filled up some 2x2 pockets with some of the journal cards cut from the 2x2 Elements cardstock and filled the larger pockets with a photo and some journalling. I added some more stickers, chipboard and bits and pieces to round it out and balance the peaceful feeling of the right side with a ton of fun.

I had a ton of fun using the Simple Stories Cruisin’ Collection with some fav watery photos and I hope I’ve inspired you.

Supplies

Hello Simple Stories friends!  Nathalie here today with a new project that celebrates the fun excursion days at sea in my native Ecuador.   I was so happy to receive the new Cruisin' collection from Simple Stories as it fits all those special pictures of the many excursions we went on while visiting my family back home.  So let me show you what i created.

To start this layout, i chose a cut file from The Cut Shoppe and used it to create the anchor from the Set Sail paper and the helm from the Man Overboard paper.   A bit of hand stitching was added around the shapes to bring some texture and dimension to the page.

These two pieces were then attached to the b-side of the 2x2 element paper using some foam adhesive  so that they create depth on the background of the piece.

The beautiful chipboard stickers from the Cruisin' collection were ideal to create the title of this page.  I simply added them to the top right corner of the helm along with some stars.   Before adding the picture, i trimmed the page a bit, and glued it to  the  Explore the Shore paper.   This helped framing the page completely.

I used pieces of ephemera and stickers to create clusters at the corners of the picture.  Just love all the fun elements that make it so easy to bring the sentiments of the day to the page.

This page was so fun to put together, and just love how it turned out.   The fun Cruisin' collection from Simple Stories is not just perfect to document your cruising memories.  Make sure to check it out, you will love it!!!

Supplies

Hey y’all! It’s Courtney Sawyer here today, and I am sharing the layout that I created using the Let Freedom Ring Collection. This collection is just adorable and I knew that I wanted to use it to document one of my little’s first Independence Days. Here’s a look at the layout that I created.

For this layout I used the entire Let Freedom Ring Collection pack with the Basics Paper Pack and a scrap of gold glitter paper that I had in my stash. I decided to go with a cut file, I tend to use them a lot when I have several patterned papers that I want to showcase. This is the free cut file Count Your Lucky Stars from Paper Issues.

I started with the Walnut Cream paper from the basics set with the cut file. The color on this wood grain is very close to the All American sheet in the Let Freedom Ring collection, so I thought it would be perfect to use.  After I cut it out I used the pattern papers to fill the empty stars. I used three of each pattern throughout the cut file. I hadn’t decided where I was going to add my photo when I started backing everything. Once I finished backing it I added foam tape to give it some dimension. Then I layered it to another basics paper Hickory Cream.

I used the 6x12 sticker sheet that is included when you purchase the collection kit and embellished my layout. I also cut out a few stars from the All American sheet to use as extra embellishments. I used a collage of pictures from my sons first Fourth of July and paired it up with a 3x4 card from the 3x4 and 4x6 Elements Cut A Part Sheet. I used that as my title.

I hope that you were inspired by this collection and can’t wait to see how you use it!

 Thanks for stopping by!


Supplies

Good morning everyone! Anya Lunchenko here today to share with you a set of cards I made with the “Little Princess” collection. This line is so adorable that I could keep going on and on with creating more cards!
 
 
I created my cards in sets of two. The first set uses pink polka dot paper and a navy blue color combination, which I absolutely adore! For one of these cards I fussy cut the oval shape from one of the cards and used it as a divider between two patterned papers, which created an interesting design. I decorated both cards with stickers and a lot of fussy cut flowers from one of the papers in the collection.


The second set of cards share the light blue/navy blue color combination. The starting point for both of these cards were 3x4” elements from the collection. I added a few coordinating pieces of paper for layers and emphasized the design on the element cards with stickers and more fussy cut flowers. I finished all the cards with a few Enamel Dots and a sprinkle of white Nuvo Drops.


Supplies

Hi there Simple Stories fans! Nicole here today to share a project using the new Heart collection. This collection has such a soft feeling to it, it is perfect for a mixture of different projects.

I cut a series of hearts using several different patterns from the 6x8 paper pad - cutting one small, medium and large sized. Each heart was layered and stitched together and adhered with a little foam adhesive between the layers to really make them pop.

A simple title using a 4x4 elements card, some chipboard and a few stickers all adhered together with some machine stitching. Fussy cut some tiny flowers from patterned paper and adhere to the page with a little foam adhesive to fill in any open areas.

I hope you are inspired to create a project from the Heart too!

Supplies

Hello, Simple Stories friends! It's Jana Eubank. Today I'm using the Dad Life collection to document my husband's relationship with our son.

My husband and son are the only boys in our family of six, which means they have to stick together! They often hang out together and have developed a special bond... do I dare say that my son has become "Dad's Favorite" by default?! This photo is a snapshot I took of them before heading out on a road trip together. It was the perfect opportunity to document their relationship!

I used the Snap Basics Aspen/White Notebook paper for the background of this page. I love using this paper for layouts, especially when I have a lot of journaling to add. The journaling lines are built right in!

Sometimes it can be difficult to find a masculine collection to work with our photos about the boys and men in our lives. Dad Life to the rescue! I love the colors of this collection soooo much! The gray, slate blue, orange, yellow, and black are a nice change of pace and are just perfect for scrapbooking the guys.

I also really love all of the phrase stickers! I couldn't resist adding them to the embellishment clusters at the top and right side of the page.

The rocket ship is adorable, too! I added it to the top right corner of my photo, along with several hearts, stars, and phrase stickers. I die cut a few scribbly circle shapes to tuck behind the photo for an additional punch of black!

I love layering the stickers and elements together. Here I used the "#1 Dad" sticker as the title for this page, and then added one of the 3x4 cards next to it to act as a subtitle. I cut a piece of the plaid paper in a strip and then trimmed the ends to look like washi tape to "hold down" the card. At the bottom of the card I popped up the sneaker sticker on foam tape.

I'm so grateful that my husband and son are such great friends. It makes my heart smile every time they plan a trip or activity together. It's a relationship I am grateful to have captured and recorded on this page. 

Supplies

Hello everyone!  Dorymar here today sharing a beautiful 8x6 Sn@p Album, I designed with the colorful Cruisin’ Collection.  When I saw this collection, I fell in love instantly with the primary colors, elements, and designs.   My favorite color is red, and this collection have a ton of beautiful embellishments with this color. That’s why I decide to use the Red Snap Binder to work with this collection!

To design the cover, I used Lost at the Sea Paper as a background and a combination of various embellishment from the combo sticker and 6x12 chipboard stickers.  I select the Let’s Cruise sticker as a title for my Sn@p and jute ribbon to give the nautical touch! All the elements are so beautiful that they are very easy to place, they look fantastic!

I started the pages of the album, giving space to that traditional photo that you take in the corridor on the way to the ship. Letting know that you will see next will be magnificent. Here you can see the famous sea phrase "Bon Voyage", the flags and the anchor all of them are from the 6x12 chipboard stickers, they are so useful and fun.  I glued all of elements cluster to the photo mat using foam tape to give dimension. 

This collection is so beautiful that I had infinite ideas to create this project and make it fun. That's why I decided to create my own embellishments using several pieces of the collection.   

In this page I cut out some strips from the border of the paper for the background in combination with other pieces cut from paper.  Then I add my little fun DIY embellishments for finishing touches. They look so beautiful!

In these spreads you can see how I used some of pieces cut out from the gorgeous paper from the collection and create layers behind the pictures.  I chose to add cluster my DIY’s embellishments and some phrases from the chipboard sticker and stickers sheet around of the photo mats.

The 4x6 Stickers Sheets have a lot of fun phrases and cute elements. In these spread I used some of them to decorate cluster on the left side of the photo mat. I also added fun phrases from the Sticker Sheet and accents with the enamel dots and beautiful stars from the from the bits and pieces.

One of the elements that I liked the most, were the adorable whales, on this page I used them in combination with the big heart with the beautiful phrase "you, me & the sea" to document that photo with your favorite person. Isn’t adorable? This is the perfect collection to document your vacations aboard a cruise, it has magnificent elements, colors and fun phrases. I hope this project inspires you to work with this beautiful collection.

Supplies

Hello friends! It’s Kristine Davidson with you today and I am sharing a layout I created using the Cruisin’ Collection. This collection is filled with all things related to a cruise. I have to admit I have never been on a cruise vacation but Today I can show you how to use this same collection with less of a cruise theme. 

The picture here is of my cousin playing in the sand in the Bahamas. He was enjoying the sun, the sand and of course his toys. It wasn’t related to a cruise but the multi colours in this kit allowed me to use some great patterned pieces and misc embellishments. 

I used the blue and white dotted papers as my base while using the white side a sheet from the  Simple Basics papers. These are great for background bases and so much more! Once I finished sewing my background base I added strips of paper from the collection and a great assortment of Bits & Pieces. Some of the pieces have been backed with dimensional adhesive and tucked under the photos and strips of papers. 

I added a 2x2 piece of paper with Best Vacation Ever and a 3x4 piece with Soak Up the Sun. These pieces can be used as a title for your page or added as extras. I used one of them for my title. 

I added some enamel dots, a few fishies and some Journaling to finish my page. I hope you were inspired by my layout today and ready to create with your Cruisin’ Collection!

Supplies

Hi everyone! Tara here with Secretbees Studio  The 4th of July is one of my favorite holidays; we are celebrating our nations' independence, the weather is sunny and hot and red is my favorite color! Plus, it's another excuse to plan a fun filled get-together with friends and family.

I love making my own paper decorations for the holiday and the 'Let Freedom Ring' paper collection is full of patriotic colors and images that will coordinate with everything red, white and blue! To welcome my guests for the big day will be this star filled wreath that is bursting with fun! 

To go along with all of the star shapes, there is a mixture of vibrant pinwheels, rosettes and fringe flowers as well as festive paper curls! I used a combination of Silhouette Studio designs and die cuts for the shapes as well as fussy cutting stars from the patterned paper.  It's a good sized wreath too,  measuring around 14 inches across.

I covered a wooden circle wreath frame with strips of the patterned paper before layering all of the festive shapes, stacking some higher than others with foam adhesive. I even tucked in a few of the collection stickers as well as a 3x4 journal card commemorating the big day! Although cutting all   the shapes took a bit of time, this project was completed in just a few hours and looks amazing. I will look forward to hanging this on my front door for the celebration!

Supplies

It's the final day of our New Release Reveal and we are finishing with an exciting addition to the Say Cheese family! Say 'hello!' to Say Cheese Halloween!

Bibbity, Bobbity, BOO! Simple Stories casts another spooktacular spell with the SAY CHEESE HALLOWEEN collection! Ghoulies and Ghosties dressed in colorful costumes celebrate as they frolic along not-so-scary streets. This fa-BOO-lous collection is perfect for documenting your lil' spook's magical moments this Halloween!

View the full SAY CHEESE HALLOWEEN collection HERE. Visit us on Facebook &Instagram for chances to WIN the new SAY CHEESE HALLOWEEN product before you can buy it!

Shipping end of June 2019.


Hi there!  Nathalie with you today bringing you a new project very dear to my heart.   A couple years ago, i fell in love with the simple set Heart collection, and bought doubles of each piece (which still sits nicely in my favorite stash drawer), so imagine my joy when Simple Stories announced that they will be relaunching my beloved HEART collection as a complete collection!  Well, i quickly went through  my picture folder to find the last picture of my kids with my grandfather to create this page using this beautiful collection.

Unfortunately, we lost my grandfather a bit after this picture was taken, so i set to bring the feelings the picture conveys to live.  For this, I pulled a cut file from JustNick studio, copied and welded two of the images so that it created the column of hearts, and had my Silhouette cut if from white cardstock.

The empty heart spaces were backed with different papers from the collection found in the 6x8   paper pad.  A bit of foam adhesive in between patterned paper and cut out create that soft shadow/ dimension on the page.

The cut  out was glued to the b-side of  the So Loved paper - i had this paper trimmed about one quarter of an inch on each side, and attached to the b-side of the 2x2 Elements paper.  Before securing the cut out to the page,  i used some gold ink and the Always in my Heart Stamp set to add a few hearts to some places in the background.

 Once i glued the background, i used some of the Snap cards to back and create layers behind the picture , and attached it to the bottom left side of the cut out.        I chose to add a cluster of embellishments (stickers, ephemera and chipboard stickers) to the corners of the picture.  

To finish the page, i added a title for this page by mixing ephemera and a few stickers. A few lines of journal complete this fitting tribute to my "Papacito". 

I hope you too are inspired by the new HEART collection from Simple Stories. It truly is the perfect collection to express your love. As always please do not hesitate to contact me if you have questions on how it all came together.

Supplies

It's Day 2 of our New Release Reveal!

Trick or treat with the sweetness of PINK! Halloween shows off its softer side in the new HAPPY HAUNTING collection. You'll go batty over the bewitching shade of blush accenting pretty pumpkins, patterned posies, and ghoulish gingham. It's to die for!

View the full HAPPY HAUNTING collection HERE. Visit us on Facebook & Instagram for chances to WIN the new HAPPY HAUNTING product before you can buy it; stay tuned tomorrow for even MORE new product reveals!

Shipping end of June 2019.


Pages