Simple Stories is pleased to announce our Fall and Winter 2019 NEW RELEASES! Join us over the next several days as we introduce you to each new collection!

Spend an autumn afternoon on a worn, weathered porch with the new FALL FARMHOUSE collection by Simple Stories. You will 'fall' head over heels for pumpkin-filled wagons, farm trucks, charming wreaths, and rocking chairs as you record your family's memories. The unique colors of deep teal, harvest gold, and pumpkin orange are perfectly paired with leaf green and pale peach. It's pumpkin spice and everything nice!


Shipping to retailers August 2019.


View the full collection HERE. Visit us on Facebook & Instagram for chances to WIN the new Fall Farmhouse collection kit before you can buy it!

Shipping to retailers August 2019.

Hi!  It’s Jeanne here today!  I’ll let you in on a secret… Halloween is my favorite holiday!  I love the bright colors .. I mean orange and purple?  YES!  I’m there!  It’s a time of year when the ordinary  is transformed into the extra ordinary and you can become anyone or anything your mind can conjure.  Pumpkins come alive with jack o lantern faces and a simple cape can transform you into a super hero.

The new Say Cheese Halloween is all of these things rolled into a paper collection.  The collection includes bright papers in stripes and dots, bits and pieces printed die cuts of pumpkins, skulls, bats and haunted houses.

What makes this collection twice the fun is the Say Cheese element of the most magical place on earth!

All the collection elements are perfectly coordinated and would make a great addition to your Say Cheese journaling albums!  I love the die cut  Kids Bits and Pieces for making scenes.

This cute little witch is dancing around a cauldron of green punch for the party.  A string of decorative garland hangs over her head.

This little girl is waling through the “cemetery”, a front yard decorated with punny head stones.  The grassy hills are made from cut waves of colorful pattern paper.

ARRGHHH!  Ahoy matey!   Two pirates are trick or treating under a full moon as bats swoop across the night sky.

This cool dude with the shades is outside a haunted house.  The wrought iron fence is covered with warning signs of spooky things ahead.

EIGHT CARDS!  I told you I love Halloween!  You’ll have loads of fun making cards, and documenting your favorite spooky memories with this amazing collection!

Supplies

Odessa here with some spooky pages using new Happy Haunting. These fun collections from Simple Stories are my fav - a little sassy, great colours and tons of cute icons. Visually telling my family stories is so important to me, not just because it’s fantastic to have cherished and every day moments in a physical and more interactive form, but also because focusing on all the fun we have makes my day! I love a cute collection like Happy Haunting which helps me visually tell my story in a way that emphasizes how much fun we have making memories together.

I had a ton of goofy Halloween costume photos so to start out my pages I printed a bunch as 2x2 squares and mixed them up with some of the 2x2 cards from the cut apart card stock. I added some fun stickers (Trick or Treat Yo’Self!) and filled up those tiny pockets. 

It’s a great way to get a bunch of photos on one page and set the tone for the rest of the pages. The colours in Happy Haunting are so great so I tried to include them all in the tiny pockets.

On the other side are some Halloween night photos with one of my FAVOURITE cut apart journal cards in the whole collection.

The next page is a bunch of more random Halloween season photos. On the top of each protector is a 3x4 photo and a 3x4 Happy Haunting Journal card.

The bottom of both sides of the page is a 3x4 photo laid over 4x4 cards from Happy Haunting to make a 4x6 card. My photos are a little more “lifestyle” than family fun so I really let the sass of Happy Hauntings shine through.

I used the cute banners from Happy Haunting on opposite corners of the page to pull all together and create some balance. I used pink as the star of the page with orange and black accents. I love how unexpectedly perfect the colour combo is in Happy Haunting! I hope this look at my pages has inspired you to tell some spooky stories!

Supplies

Hello Friends!

It's Camping Season here on the East Coast of Canada and today I'm sharing a layout using the Super Cute Happy Trails collection. This collection is perfect for those outdoor adventures in camping, fishing, bird watching and so much more!

On my layout today is called - Adventure Outdoors I used 4 mini photos of a camping trip and created a multi photo layout. These are always a challenge for me but I find using smaller photos makes it so much easier for me.

To start I used a piece of paper from the SN@P! Basics Paper Pack - Hickory Cream Grid. If you don't have this collection in your stash it is a must! It is perfect for backgrounds!

I used a dark brown from the Happy Trails collection for a layer of color and then added 3" strip of green and 1 small 1/2" strip of red. You can use any of the papers in this collection but I wanted to focus more on the Bits & Pieces instead of the patterned papers.

I placed my photos 3x3" and then added some wonderful diecuts to finish off my layout. Adding dimension to elements is of course a must for me so I added pop dots on most of the diecuts and finished off with some journaling and my title.

As you can see it's so easy to create a cute camping page with this collection. SO get out there and play outdoors and take some pictures ;)

Please come join us on Instagram if you haven't already Simple Stories and Kristine Davidson

Enjoy!

Supplies

Hey y’all! Courtney here and I’m sharing the layout that I made using the Say Cheese Halloween collection.

I’m scrapping an older picture of my two bigs, and boy does this make me miss them being little. They were so cute in their adorable costumes! I don’t have as many pictures of them floating around, most of my old photos were on poor quality phones, or on CD’s that aren’t recognized any more. So it makes me very happy when I have good one to scrap. Anywho, on to the layout!

I chose two different cut files to use on this layout. The webs came from Paper Issues and it’s the free file called Web background. For this one I used my knife tool to separate a web and then I just made them different sizes. I backed those with the paper Spooktacular. I really focused on using the teal color. After I backed those I cut out the word Beware and it’s from the cut shoppe. It’s called the Open Alpha and I backed it in the purple side of the 2x2 paper. My background is the Paper Frankly Frightful and I matted my picture with the FaBOOlous paper.

I did create more than three main clusters, but I kept with an odd number of clusters, then I added a few little things here and there that I felt I needed to still balance out my layout. My moto is “More is more”, and I feel like I definitely went that route. I couldn’t help myself tho! There are so many perfect pieces to add to any layout.

This collection is perfect for all of my cute Halloween pictures. They are a ton of adorable elements. I used the Combo sticker sheet, the Icon bits and pieces, and the Happy Kids bits and pieces to embellish this layout. I also sprinkled a few enamel dots from the Little Princess and the Oh Happy Day collections. Am I the only one that feels like every layout needs a little cluster of enamel dots?


I hope you were inspired to scrap some Halloween pictures! I can’t wait to see what you create!

Supplies

Hello everyone! Anya here today and I am excited to share another mini album with you that I created using the Cruisin' collection. I love making shaped mini books and for this time I made it in a shape of a ship. The album measures about 5x7” and fits 3x4” photos perfectly.

To create this mini album I downloaded a digital “ship” cut file and cut all of the white pages for the book with a Silhouette. I used the “internal offset” feature to create a slightly smaller shape of the page to cut the patterned paper and covered the white cardstock pages with coordinating papers.

One of my favorite ways to add more photos to mini albums is by adding “cards” that open and have spots for two photos inside. All I did is create a 3.25x4.25” card base from white cardstock. To the front of each card I adhered one of the 3x4” elements from the collection and then added them to mini book pages.

After decorating all of the pages with layers of patterned papers, stickers and bits and pieces, I punched holes on each page and added rings to hold the book together. I used a larger ring size knowing there will be more bulk in the book after I add photos to it.

I really enjoy making these shaped mini books and hope to have inspired you to make something similar. Have a wonderfully creative day!

Supplies

Hello Simple Stories fans! Nicole here today to share a project using the Happy Trails collection. I love the rich tones and patterns in this travel inspired collection and knew right away that I wanted to document about one of our favorite summer activities.

I wanted to use various different papers in this collection to capture a photo from a recent beach excursion. The colors just matched perfectly, so I decided to back a large title cut file with a few different patterns from the collection kit.

It is a great way to add a lot of pattern in a simple and collective way onto your project. Plus, I just love a good large title!

Fussy cutting some pretty florals from the collection kit helps add some softness around the photo and throughout the title too. It's a great way to add in another layer of colour and bring all the colors of the page together too.

Supplies

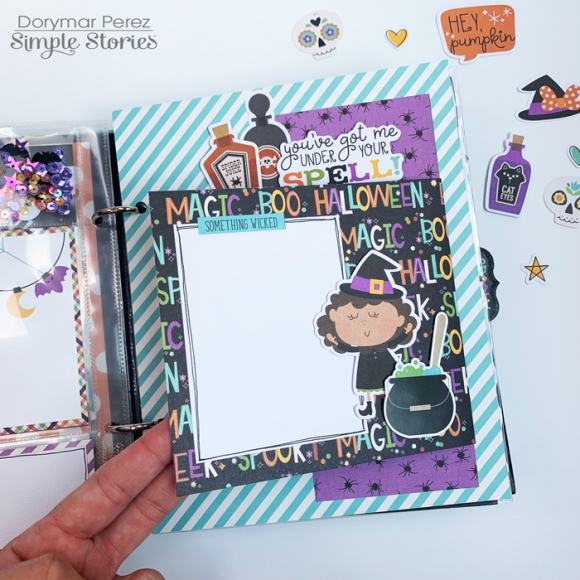
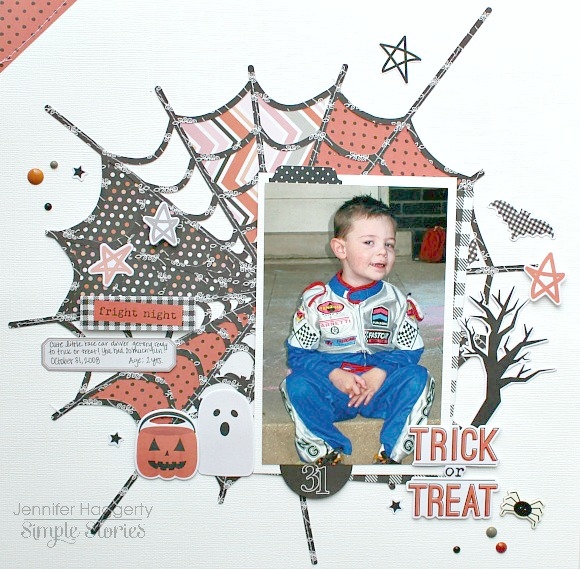
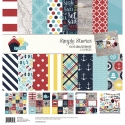
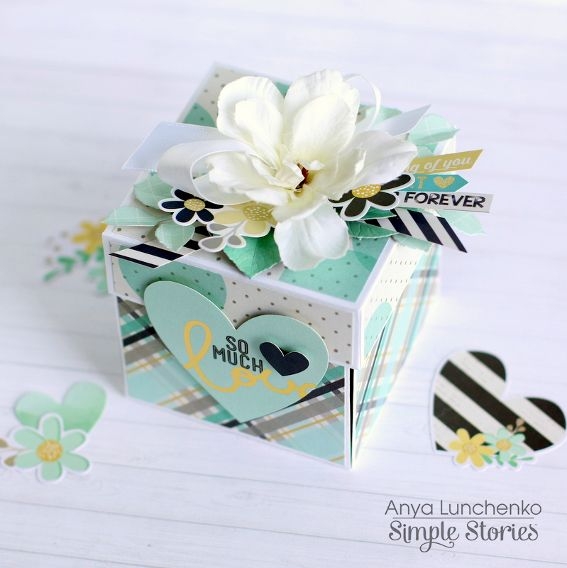
Camping in the mountains is one of my favorite places to be! The fresh air, the slower pace, the night sky exploding with stars, and the sound of a crackling campfire all inspire me to soak up life and reset my way of thinking. Hi, Everyone! It's Jana Eubank! The NEW Happy Trails collection, with its cheerful colors and images, makes me want to pack up the trailer right now and head out for a weekend in the woods! 

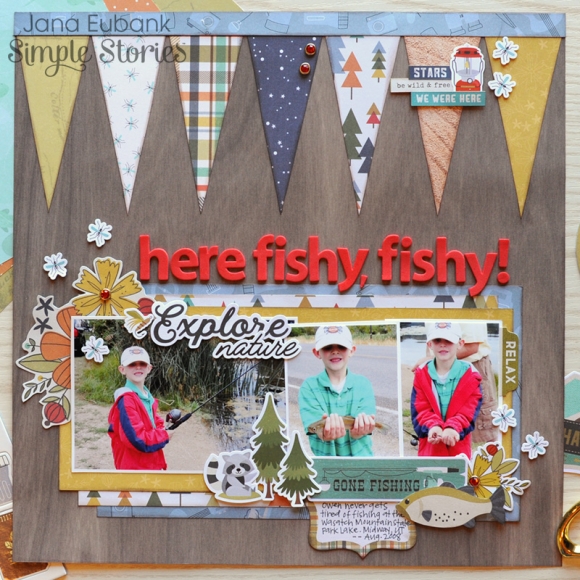
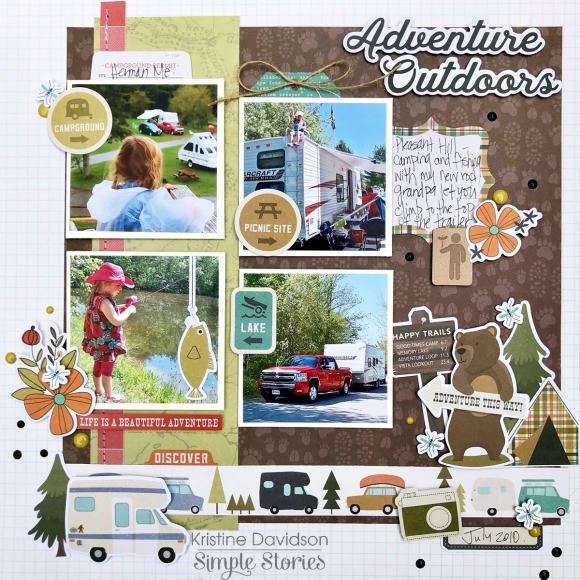
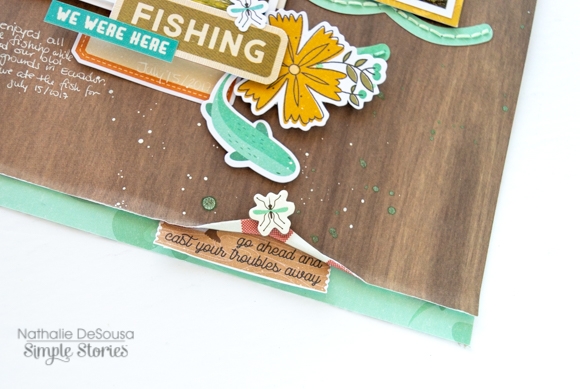
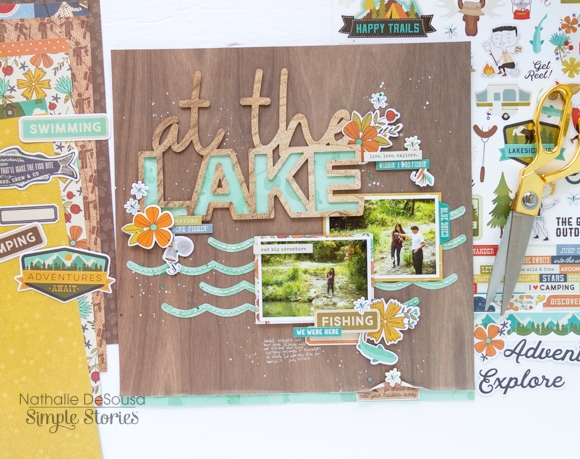
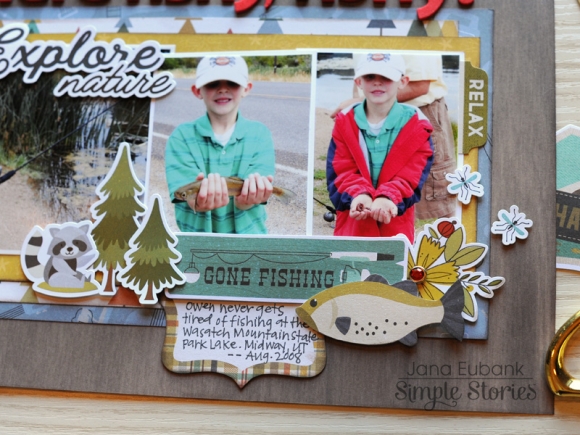
This page features photos of my son when he was younger fishing at a small roadside pond near one of our favorite camping sites. There he could catch and release as many fish as he would like and was his FAVORITE thing to do on our camping trips.

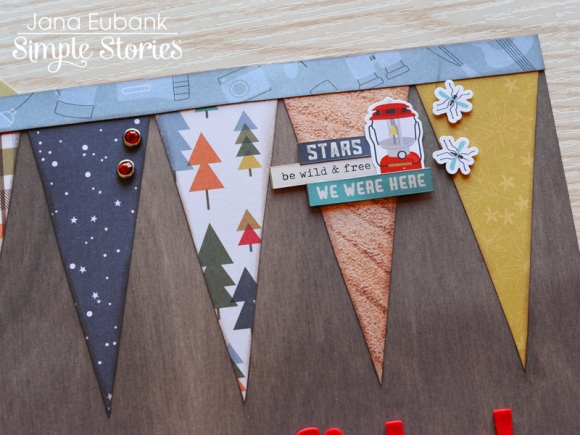
I LOVE every single pattern in the Happy Trails collection and wanted to find a way to include as many of them as I could on this page. I created a triangle-shaped template that I used to create long pennant shapes to go across the top of my page. I added a few red gem brads to one of them and a cluster of stickers and Bits & Pieces die cuts on another.

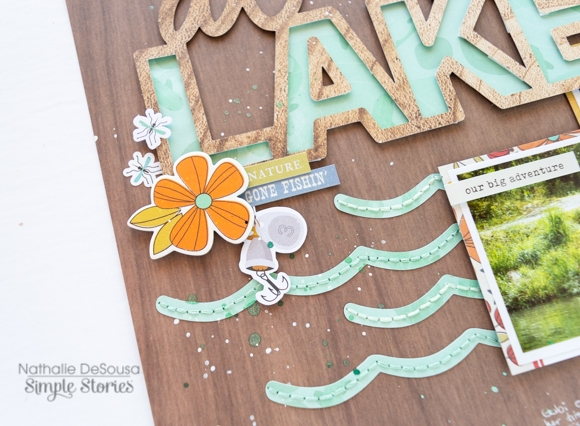
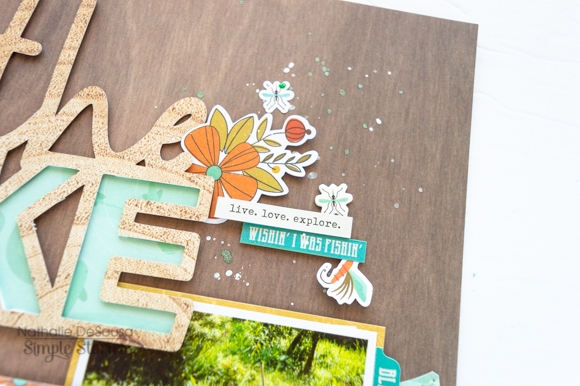
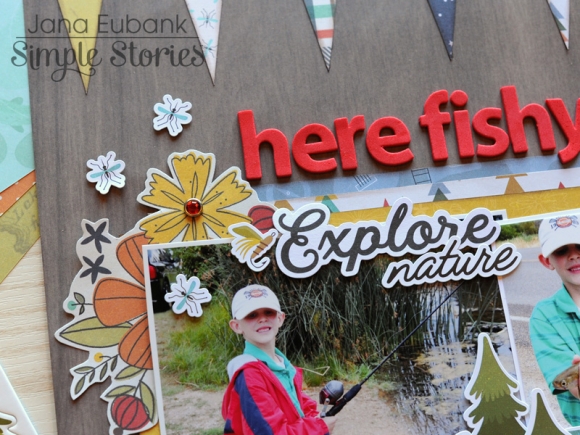
I fussy-cut this large floral from the 4x4 Elements paper to accent the left side of my photo strip. I added a red gem brad to the center of the yellow flower and then added  word die cuts to fill in the empty space in the top right corner of my photo.

I added the "Gone Fishing" die cut below the two smaller photos, along with a bit of journaling on the plaid journal block from the Journal Bits & Pieces pack. I fussy cut the fish from another die cut to accent the right side, and then tucked in a flower sticker on the right.

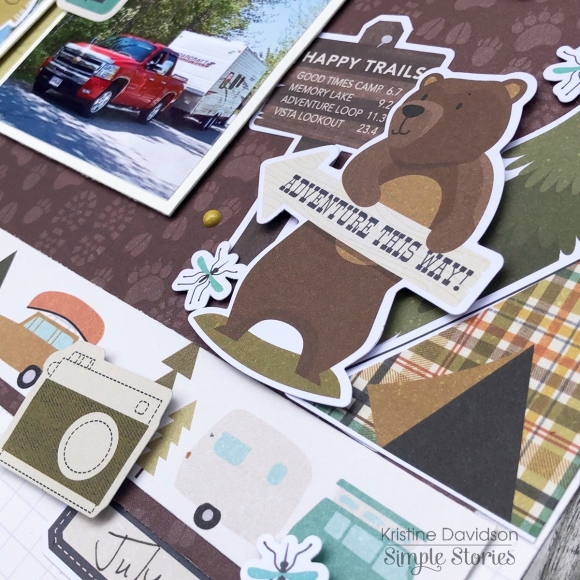
On the left side, I created a fun little sticker forest scene with the raccoon and a pair of fluffy pine trees. CUTE!

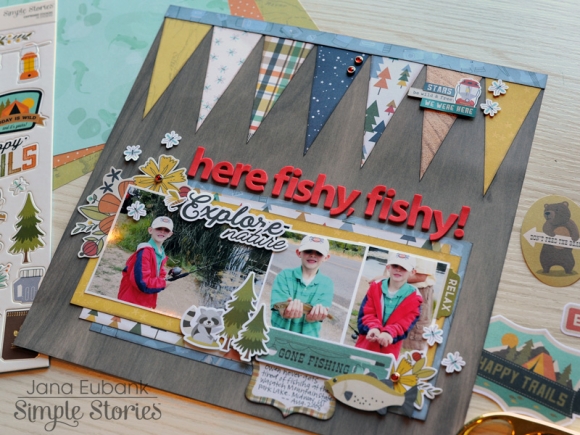
I almost always create three embellishment clusters in my page designs, and when I do, I like to add something that ties them all together. In this case, I used the ADORABLE mosquito die cuts! (Probably, the one and only time I will think mosquitos are adorable. Ha!)  How cute are they buzzing around each section of this page?!

If you haven't had a chance to get out and do some camping yet this summer season, I think the Happy Trails collection gives you the perfect reason to go! *wink!* Get out there and take some outdoorsy photos so you can come home and scrapbook them with this amazing collection! Happy Camping!

Supplies

If you were excited to see the Say Cheese 4 collection, the new Say Cheese Halloween collection is going to bewitch you. It’s Dorymar today and I want to present my most recent project with this super colorful and fun collection. This album has a lot of space to take pictures of all your family and friends, you can’t leave a photo without documenting because this album is perfect for the occasion.

I decide to use the New Teal 6x8 Sn@p Binder to make this album because the collection has some super bright colors, and this gives the perfect touch to make it a super cute Halloween project.  For the cover I wanted to recreate a Halloween scene and for this I used the “Spooktacular” and the “Boo to You” papers as a base.  I fussy cut the haunted house on the Spooktacular paper, all match with the fun elements and stickers of the collection. This make the cover looks perfect!

These binders have a lot of space for pictures and document stories, but this time I want to share with you how I make additional space in the album and give it an interactive touch.  This gives me the opportunity to have fun finding pockets and opening flaps to find the chilling elements.

Another important detail of this project is how I used the beautiful stamps of the collection to make borders and personalize journaling cards.  In the pictures below you can see how they complement perfectly.

The children in this collection are super adorable the more I see them the more I love them.  They allow me to create funny scenes inside the album, perfect for documenting my pictures soon.

I hope you have enjoyed this project and I hope it will inspire you to create beautiful projects this Halloween!  Thanks for stopping by!

Supplies

Hello! It's Jennifer here today to share a layout I  created with one of the new Halloween collections!  I  know its only July but I'm always so excited when the new fall and Halloween lines are debuted!  Happy Haunting has the traditional orange and black colors with greys and pinks mixed in! I  began with white cardstock as my background. Using the B side of Jeepers Creepers, I  cut out my spider web on the Silhouette. I  then added different prints to fill in the negative spaces of the web.

For my title, I  popped up the "Trick or Treat" die cut from the Happy Haunting Icon Bits and Pieces pack. The Icons are full of cute Halloween shapes as well as some fun sentiments!  I  also added a few enamel dots from my stash as well as a spider from the 6x12 Chipboard

The Happy Haunting line also includes Journal Bits and Pieces full of additional sentiments and of course, journaling spots! (If you are wondering whether you need both Bits and Pieces packs, you do!).  Here, I  used a grey-lined rectangle journal spot to document a little information about my page.   I  then added a fun sentiment above using pop dots.  

I  really love the whimsical shapes included in the Icons Bits and Pieces! Here I used two die cuts at the left of my photo, popping up the jack-o-lantern with foam tape.  I  also used one of the half-circle die cuts from the Journal Bits and Pieces to slide under the bottom of my picture.

Thank you for reading today! Be sure to check out the entire Happy Haunting collection as well as what Simple Stories has coming up next by visiting the Products page!

Supplies

Hi everyone! Father's Day may be over but if you are like me, you have some leftovers of the paper collection you used for cards and other Father's Day crafts. Everybody could use a super cute tool caddy for their desk or workbench and I used my extra paper scraps to make this winning tool caddy that is made even more useful with a lazy susan base underneath so it easily turns!

The lazy susan base, which is four inches square, was bought on Amazon. There are other sizes available as well but I thought this would be a great size for the caddy. The sides and bottom of the caddy were put together from heavy chipboard before being covered in the bold and bright patterned papers from the Simple Stories 'Dad Life' paper collection.

The caddy holder is three inches square and almost four inches tall which is plenty big to hold a large assortment of tools. After covering the chipboard sides with the playful patterned paper, I layered on a couple of picture frames along with the charming shape and sentiment stickers. I used lots of foam adhesive too, for extra dimension!

For added pizazz, I topped off the base with colorful brads and added in matching enamel dots on some of the embellishments. The frames, on two sides of the caddy, are open at the top so the pictures can easily be slipped out and changed for lots of variety.  

This caddy is not only adorable but useful as well. Any dad would love to be able to look at and use this every day! You can see this caddy in action and also check out how to make one of your own on my YouTube channel!

Supplies

Hi there!

Nathalie with you today with a new layout all about the glorious outdoors.   There is nothing like fresh air and good company to create great memories, and when the new Happy Trails collection from Simple Stories arrived at my door, i quickly pulled a few of those memories to create this page.

I am a sucker for wood grain paper, so i quickly pulled the Happy Camper paper to cut the title from it using a cut file from the Silhouette store.  At the same time,  the letters and waves were also cut from the Lakeside paper.

The title was backed with the patterned paper and foam adhesive to create a bit of dimension on the layout.   The waves were then hand stitched to the Love You S'more paper, and then the title was glued in place above the waves.

I used the Happy Trails 3x4 and 4x6 element papers to back the pictures, and then attached them to the bottom of the title.   I used elements from the Chipboard and cardstock stickers as well as both Bits and Pieces packs to create the clusters around them.

To break up all the wood grain of the background, i decided to trim the bottom of the page a bit and back it with a piece of the Lakeside paper.   A small fold was created at the bottom of the page,  here i added a few stickers and pieces of ephemera to bring a bit more interest to the page.

To finish the page,  i chose to add clusters at the  corners of the title work, so that they bring the colors of the collection, and celebrate my daughter's fishing adventure.

I hope this has inspired you to document those sweet and glorious outdoor adventures using the new Simple Stories Happy Trails collection.   Remember to check it out, you are going to love it!

Supplies

Jeanne here today and I’m taking you sea side with the new Simple Stories Crusin’ Collection!   I’ve got SIX cards to share to day so let’s get started!

Crusin’ is a compilation of nautical images, papers in navy, aqua, yellow and red.  The paper prints include stars, stripes, dots and plaid.   There are coordinating enamel dots, stickers, chipboard, die cut images and even a three pack of washi tapes so creating a SNAP! 

The Simple Basics Kit contains coordinating solid card stock sheets perfect for adding layers, borders or accents to your designs.

The nautical sentiments and images make perfect cards for friends and family headed out on a cruise, or seaside vacation.    I just love the images that bring back memories of good times at the beach,  going crabbing, or sailing with my son.   I can almost smell the ocean breeze and feel the sun on my face.

I love to make scenes with mixed pattern paper.  Hand cut curvy waves turn into backgrounds of sea or sand.   The Bits and Pieces and 6x12 Chipboard images are perfect for making scenes or grouping for collage style cards.

There’s loads of sentiments to choose from.  You’ll find them in the Bits and Pieces, Chipboard Stickers as well as the 4x6 stickers and the 12” Combo Sticker you’ll find in the collection kit.

These cards are perfect for all the sea loving people in your life.  The nautical theme appeals to the guys and the gals, and the images will bring a smile to your face.

Supplies

Hi! Odessa here with some SN@P! pages using the Heart collection. The colours and papers are so nice in this collection, I was so inspired!

I used a Robin’s Egg SN@P! binder which went well with Heart. I was really inspired by all the diamonds so I covered the binder in them! I cut down a piece of cardstock to fit and then tore the diamond shapes by hand from the Missing You Cardstock and stuck them down to the cardstock. I added in a few hearts around the page to add some more dimension.

The diamonds really reminded me of quilts so I pulled out my sewing machine and stitched up the rows of diamonds before I attached the cover to my binder. I added some simple stickers in the corner and it was all done! I love the homey cozy quilt feel of this.

For my layouts I used some recent family photos from a few days away that were special to me. On the right I did a single page layout using one of my favourite phots and on the left a SN@P! page with some more photos, journal cards and stickers. I just adore the gold foil throughout Heart!

I decided to bring the torn and stitched paper feel from the cover to the inside so for my single page layout I tore strips from various Heart collection cardstock and layered them around my photo. I also added in some strips of washi here and there to add more dimensions before I stitched a few rows across the page. The Heart collection is full of great handwritten style word stickers so I added one to my photo.

I had some more photos to get in my binder so I did a second page with Heart. This spread is full of things in pockets with a cute 4x6 vertical protector in the middle full of SN@P! cards, stickers and more. Throughout the layouts I folded washi over corners of photos to give it a vintage photo album feel.

On this card I layered some of the gorgeous Heart washi tape to personalize the journal card a little more. Throughout my layout layering is a major theme! The colours and patterns lend themselves so well to oodles of layers and mixing and matching.

These vertical SN@P! protectors are one of my fav things. Sometimes I’ll fill them up with photos and sometimes I’ll fill them up with bits of ephemera and cardstock from the collection I am working with like I did with Heart here. It’s a great way to add dimension to a layout and sneak in some extra pieces that didn’t quite make it to my layout.

When you flip over the vertical protector my last page pops out. I added in some journalling, stamping, stickers and more to keep it all together. There were a lot of background people in my bottom photo so I used various hearts from the collection to create a boarder around my family and hide all that. I hope this peek into my pages has inspired you!

Supplies

Hello Friends! 

It's Kristine Davidson here today and I'm sharing a layout I created using the Cruisin' Collection. I used a photo of the cruise ship my friend and her Mother in Law took last February. I highlighted the ship, the ports of call and of course the date the cruise was taken. 

My background was created with a white piece of cardstock but you could use the gorgeous Simple Basics sheets that come with this collection. I added a few strips of paper in assorted sizes to use more color and texture. 


I used a 4x6 photo and mounted it on dimensional adhesive and of course added more on the stickers and diecuts. I didn't want to add to many diecuts around the photo since my photo was the focal point for my layout. Instead of doing clusters around the photo I added the elements on the bottom of my page. 

My journaling was created on a piece of white cardstock that I cut in strips to place them on my layout. I was debating on using my own handwriting but I thought typed up would be better. 

I added a small cluster of stickers and diecuts on the right of my photo. This can be another small photo if you wish or use a 2x2 piece with an image or title even. 

I hope you enjoyed my layout today. This collection is super cute for beach scenes and Cruise Ships!

Find us on Instagram @SimpleStories_ and @KristineDavidson

Supplies

Hey y’all! Courtney here on the blog today sharing a layout that I created using the really cute Crusin’ line. Now I haven’t been on a cruise lately, but we did just come back from a long beach trip. I have a ton of pictures that will go so perfectly with this collection.

I chose these two precious pictures of my youngest on his daddy’s shoulders. I chose to do two 3x4 pictures that I matted on the Ports of Call individually and then double matted them on the Ahoy and the Seas the day paper

The background paper is Lost at Sea and it’s cut down ¼ of an inch and matted on the 4x4 elements sheet. I also used a free cut file from paper Issues called Sailing into summer that I backed on Man overboard and the lined card from the 4x6 element sheet.

I used the 6x12 chipboard sheet, the combo sticker sheet, the 4x6 sticker sheet, and the bits and pieces to create my clusters around my photo.  The title came from the bits and pieces pack and I added some foam to give it dimension.

I finished my layout with three clusters of enamel dots and some gold splatters. I also added a little bit of my handwriting to journal about this sweet moment.

Thank you so much for checking the blog out. I hope I inspired you!

Supplies

Hello Simple Stories friends! Anya here today and I would like to share an explosion box with you that I created using the beautiful “Heart” collection. Even though the main theme for this line is about memories of people we lost, it doesn't mean we can't use it for other projects as well.

To create this box I used a scoring board and some white cardstock. My box measures 3” from all sides and the lid is 1” tall. In order for the lid to fit the box nicely, you need to make it about 1/16” larger then the size of the box. After creating the basic shape of the box, I like to cover all the panels with patterned paper, leaving a thin white border.

My favorite part is to decorate all the panels with little pieces and stickers. The sides don't have to be very similar in design - the basic idea here is to distribute the colors evenly among them. By adding some of the pieces to panels with pop dots, you will create dimension, which always makes this type of project more interesting.

Supplies

Good morning, Nicole here today to share a layout created with the Dad Life Simple Set. This collection has a great masculine feel to it, and great for pages all about Dad - BUT, also great about pages about boys too!

To easily combine the masculine patterns in this Simple Set, I cut some pie shapes on my digital cutter and arranged them in a circular shape around a circle shaped title as well.

I added some texture to the design with some simple machine stitching, running around and over the edges of the patterned paper. I repeated the same design in three areas of the page to fill in the background. 

I Fussy cut a few stars from the My Hero patterned paper and used popped them onto the page with foam adhesive to embellish any open areas. I then added few enamel dots to add tiny pops of color around the page.

Everything came together beautifully!

Supplies

Pages