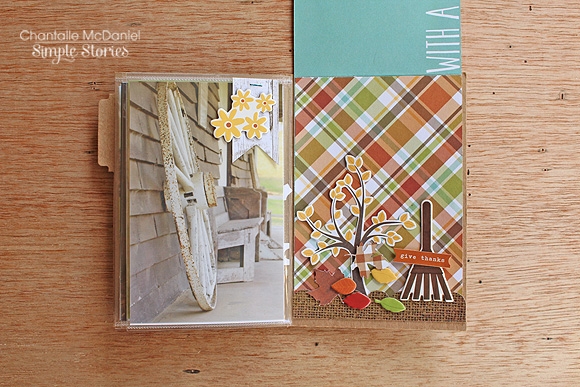
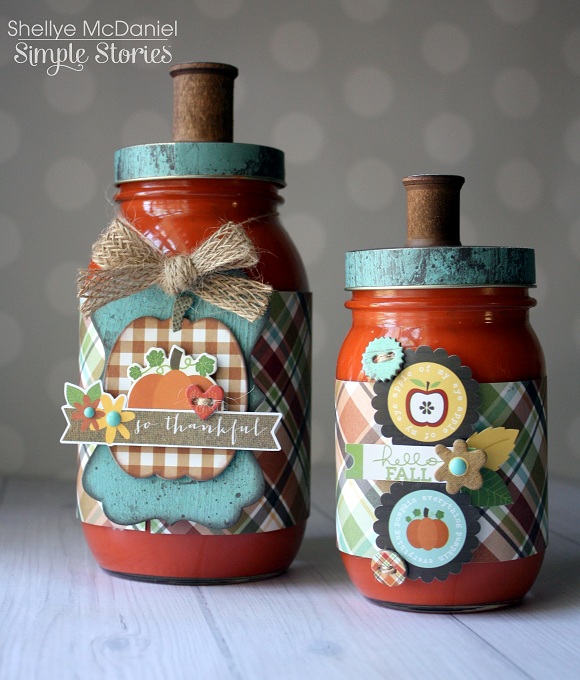
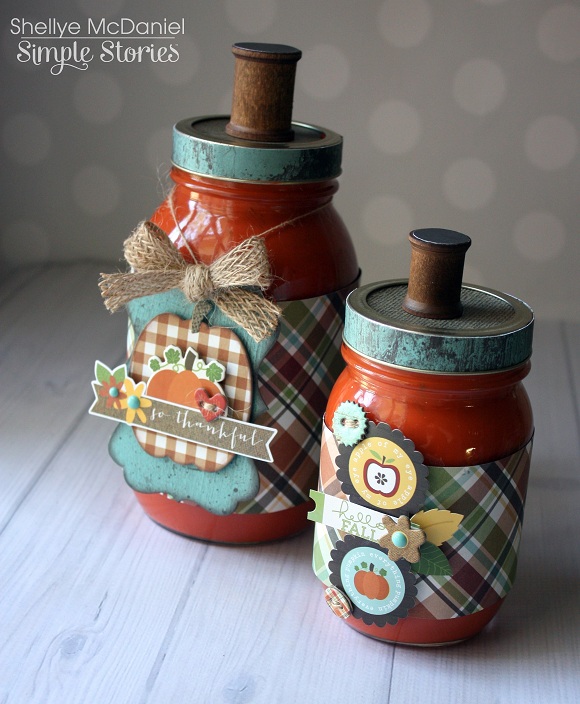
Create this pumpkin duo with your favorite pieces from the "Pumpkin Spice" Collection, a couple of recycled glass jars and burnt orange acrylic paint!
 

Before decorating either jar, a generous amount of burnt orange acrylic paint was squirted into the bottom.  After reattaching the lid (securely), the jar was shaken and rolled around until the interior was completely coated.  Next, I placed the jars upside down onto a thick mat of newspaper and allowed the excess paint to drip off.  You may need a sponge brush just to touch up some spots if needed.  I also used a heat tool (or hair dryer) to complete the drying process.
 

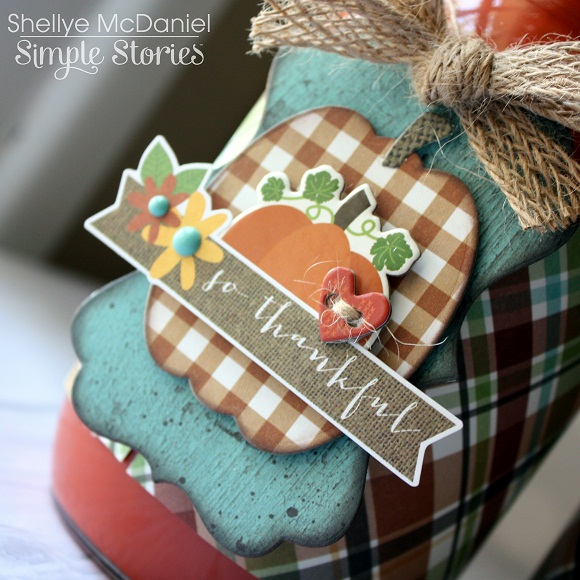
The largest pumpkin is a standard Mason jar size.  To it, I cut a strip of "Autumn Splendor" paper to 3.75"X12" and taped it in place around the jar with high tack adhesive.  I used a couple of dies that I had on hand to create a cute tag for the front.  The tag was distressed around the edges with a walnut ink and then embellished with goodies from Pumpkin Spice.
 

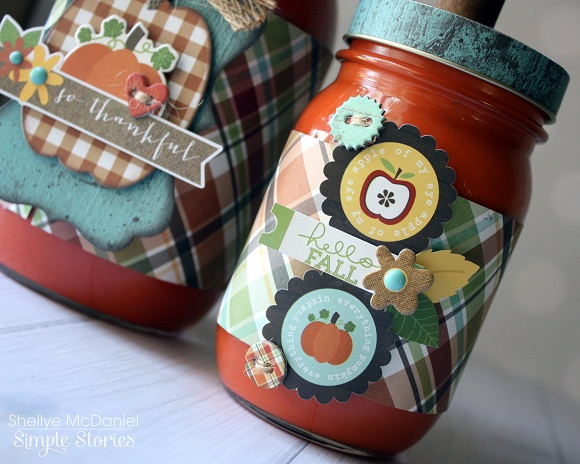
The second pumpkin is a smaller 2.75"X5" jar.  The same paper was cut to 2.5"W and just enough to wrap around the jar completely.  After threaded the chipboard buttons with jute, they were attached with a glue dot.
 

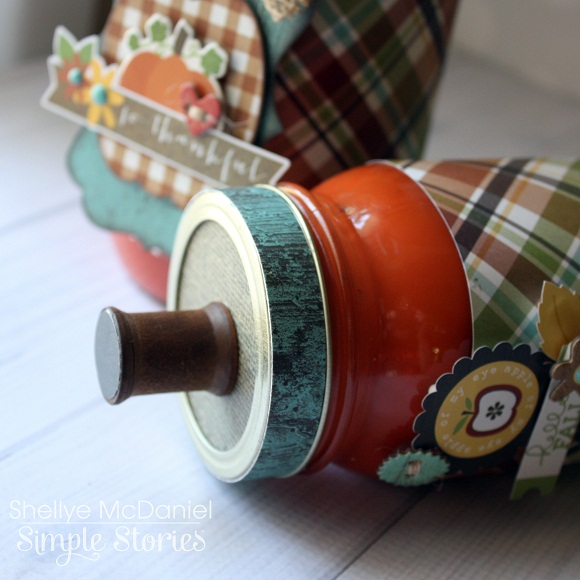
The bands of the lids were covered in a strip of the turquoise barn wood paper from the Simple Basics pack.  A wooden spools was inked with walnut ink and added to the top for the stem.
 

What an adorable display or gift for the upcoming Autumn season!  I can't wait to share them with my visiting guests soon.  I hope you've enjoyed!

Supplies

Click here to download your free copy of the We Are...Family SN@PBOOKING Guide or visit the Project Downloads page to download it as well as other free downloads!

Howdy!  Layle here with you today.  Welcome to Day 5 of the Simple Stories & The Cut Shoppe Product Swap! 

Both design teams have swapped products and will be sharing on our blogs all week long.  Join us for some great inspiration as well as a chance to win a prize package from both The Cut Shoppe & Simple Stories! 

Today design team member Ashley Horton wraps up our week with The Cut Shoppe with 2 fabulous layouts!  And hey, did you know she's also the talent behind The Cut Shoppe?!
________________

Hi my name is Ashley, and I am addicted to my Silhouette Cameo!  It's true...not a layout goes by, that doesn't incorporate some type of die cutting, using the Cameo.  I love creating fun, modern cut files for The Cut Shoppe and I'm excited to share two layouts with you today using some of the Fall sets in the Shop along with the We Are Family and Pumpkin Spice collections.
 

One of my favorite looks to use on a layout, is a large die cut backed with multiple patterned papers.  I started this layout by cutting the I Heart Plaid cut file from the So Very Loved patterned paper in the We Are Family collection.  Once the heart finished cutting, I used a mix of patterned papers from the collection to back the inside shapes of the heart.  This is a great technique if you're using papers from a 6x6 paper pad, or have a lot of scrap pieces that you want to use up!


After I finished backing all of the open spaces on the heart, I added it to the center of the layout.  Then I backed the words in the title, that I also cut on the Cameo, with some of the same patterned papers.  I wanted to add a positive and negative look to the title around the heart, so I also cut the word "Heart" from the Tall Type cut file set.  I wanted the word to stand out, so I enlarged the letters and cut them from the Making Memories patterned paper.


When the title work was finished, I added my photo to the center of the heart.  I like to layer my photo and embellishments over the die cut elements, to give dimension to the layout.  I also like to draw attention to my photo, by clustering various embellishments, so I added some of the Bits & Pieces, stickers and wood veneers from the collection.


On my second layout, I used the Tall Type cut file to create a large title element.  I cut the title letters from the Pumpkin Spice Simple Basics Apple Cider/Gingham patterned paper.  Then I placed the title and photo on the Acorn/Gingham background paper in a vertical design.
 

I wanted to balance the vertical look of the title and photo, with a horizontal embellishment grouping.  I placed several different types of embellishments from the Pumpkin Spice collection on both sides of the photo.  Once the embellishments were in place, I added some machine stitching to add texture and interest to the embellishing.


And here's a fun side note about something on this layout.  See the patterned paper triangles in the corner?  Those were left over from the "Fall Is My Happy Place" layout from last month.  My first round of triangles for the quilt design on that layout, ended up being just a bit too large for the design.  So I thought it would be fun to add some quick machine stitching and place one of the triangles in each corner on this new layout.  That's why it's a good idea to keep things like that lying around for future layouts!
 
 
I hope you've found some inspiration today for using die cuts on your layouts.  It's a great way to add your own unique look to a project, and some patterned paper from your favorite Simple Stories collection + your electronic die cut machine can go a long way in creating fun looks on your projects!
 
___________________

Now for even more fun!!  Enter via the Rafflecopter widget below and we'll draw one lucky winner on Sunday to win a Pumpkin Spice collection pack!  

a Rafflecopter giveaway

After you enter, head on over to the The Cut Shoppe blog to see what their team has created.  Make sure to enter there as well - they're giving away a $25 gift certificate to their store!

Want to follow The Cut Shoppe and keep up with all of their great projects & products?  Here you go!

Website: https://www.etsy.com/shop/TheCutShoppe?ref=ss_profile

Facebook: https://www.facebook.com/thecutshoppedigitalcuts

Instagram: thecutshoppe

Blog: http://thecutshoppe.blogspot.com

We hope you've enjoyed the swap this week with The Cut Shoppe and have been inspired!!

Howdy!  Layle here with you today.  Welcome to Day 5 of the Simple Stories & The Cut Shoppe Product Swap! 

Both design teams have swapped products and will be sharing on our blogs all week long.  Join us for some great inspiration as well as a chance to win a prize package from both The Cut Shoppe & Simple Stories! 

Today design team member Nicole Harper joins us with a pocket page 
________________

School is back in session, we've had a few cool days around here and the veggie plants are starting to die off...but I'm not quite ready to say goodbye to summer!! Seemed like the perfect reason to reach for my Summer Vibes stash and have fun :)

I am a HUGE fan of clear elements in my pocket pages these days, and the transparency pieces in the Summer Vibes collection kit seem made to shine all on their own. I used several die cut shapes from The Cut Shoppe, love how easy they are to use! The 'lifeguard on duty' cut file from Life's A Beach set in their shop paired perfectly with a photo of my daughter + her fellow coworkers from this summer. I cut it from white cardstock, and then added gold metallic embossing powder to it...then just stapled it to the 'hello' transparency and slipped it into the upper right pocket. 

It's fun to kind of get a 'sneak peek' of what's coming up on your next pocket page by allowing the transparencies to stand alone. 

The EmotiCards set is right on trend and cuts like a dream...I backed the 'happy days' card with the B side of a 3x4 Summer Vibes card and added a few doodles. After placing it into a 4x6 pocket, I reailzed that the van diecut fit perfectly alongside it, so I just tucked it in the same 4x6 pocket. Again, this allows for some 'clear' pocket space, which I LOVE!! The 2x12 pocket along the left side was filled with some random Bits & Pieces, and I sealed each little pocket with the Fuse tool (WOW!!)...versatility at it's finest, and I didn't have to limit myself to just one or two diecuts. ;)

Just a friendly reminder, that photos are for embellishing as well...they aren't sacred relics that should only be handled with care, lol. I added stickers to both of the photos at the bottom of this page, so don't hesitate to give it a go!! ;)

Don't say farewell to summer just yet...there are still plenty of warm + sunny days ahead!!
:)

________________

Now for even more fun!!  Enter via the Rafflecopter widget below and we'll draw one lucky winner on Sunday to win a Pumpkin Spice collection pack!  

a Rafflecopter giveaway

After you enter, head on over to the The Cut Shoppe blog to see what their team has created.  Make sure to enter there as well - they're giving away a $25 gift certificate to their store!

Want to follow The Cut Shoppe and keep up with all of their great projects & products?  Here you go!

Website: https://www.etsy.com/shop/TheCutShoppe?ref=ss_profile

Facebook: https://www.facebook.com/thecutshoppedigitalcuts

Instagram: thecutshoppe

Blog: http://thecutshoppe.blogspot.com

Join us again here tomorrow for more inspiring projects!

Supplies

Howdy!  Layle here with you today with a 3rd post for today!  Welcome to Day 4 of the Simple Stories & The Cut Shoppe Product Swap! 

Both design teams have swapped products and will be sharing on our blogs all week long.  Join us for some great inspiration as well as a chance to win a prize package from both The Cut Shoppe & Simple Stories! 

Today design team member Chantalle McDaniel is back again with another fabulous project using our Claus & Co. collection!  
________________

Hello! I’m back with another project I have created using The Cut Shoppe cut files and the new Claus & Co collections!
 
All I want for Christmas
 
My final project is this Christmas page using Claus & Co. This collection, with it’s sparkly red foil elements, has fun and tradition all bundled in to one gorgeous package!
 
 
All my DS wants from the Man in Red is an Xbox One. His list is a pretty concise one! I love capturing my children’s script on a page if I can. It will be a joy to look back on in years to come. I’ve layered up a large 4x6 Sn@p card with a cute chipboard frame and some gift ephemera from the Bits & Pieces and chipboard stickers.
 
 
For my title, I have layered up The Cut Shoppe’s Tall Type with various patterns, raising some letters and matting negative areas. I’ve added a couple of small enamel dots over a dot pattern for a bit of interest.
 
 
So that my red letters stand out a bit more on the red star print background, I have given them a clear heat emboss finish.
 
 
I have gone ahead and adhered a pen directly to my page for a bit of fun and to echo the list theme. A cute expression sticker applied to the pen appeals to Mr Claus himself!
 
 
Once again, thank you so much for joining me, If you would like to see more of what I get up to, you can find me on FB and Instagram @chantallemcdaniel or pop in to my blog (copasetique.blogspot.com)
 
________________

Now for even more fun!!  Enter via the Rafflecopter widget below and we'll draw one lucky winner on Sunday to win a Pumpkin Spice collection pack!  

a Rafflecopter giveaway

After you enter, head on over to the The Cut Shoppe blog to see what their team has created.  Make sure to enter there as well - they're giving away a $25 gift certificate to their store!

Want to follow The Cut Shoppe and keep up with all of their great projects & products?  Here you go!

Website: https://www.etsy.com/shop/TheCutShoppe?ref=ss_profile

Facebook: https://www.facebook.com/thecutshoppedigitalcuts

Instagram: thecutshoppe

Blog: http://thecutshoppe.blogspot.com

Join us again here tomorrow for more inspiring projects!

Howdy!  Layle here with you today with a 2nd post.  Welcome to Day 4 of the Simple Stories & The Cut Shoppe Product Swap! 

Both design teams have swapped products and will be sharing on our blogs all week long.  Join us for some great inspiration as well as a chance to win a prize package from both The Cut Shoppe & Simple Stories! 

Today design team member Chantalle McDaniel is back again with another fabulous project using our We Are...Family collection!  
________________

Hello! I’m back with two more projects I have created using The Cut Shoppe cut files and the new We are Family and Claus & Co collections.
 
 
Five, on an adventure
 
As you can see, this is not my usual ’style’ of scrapping. I love experimenting and I wanted to showcase how beautifully Simple Stories can compliment a bit of a mixed media approach. 
 
 
I’ve kept the ‘Funky Florals’ cuts very clean so they stand out against the bright background. I’ve also used a thicker white topstitch thread to machine stitch them to my page for extra definition. I just love the mix of pretty florals and funky elements in this collection.
 
 
Everything in We are Family is totally delicious. I could never pick a favourite Simple Stories line, but this collection is certainly up there! 
 
 
The embroidery hoops and little frame prints caught my eye. I love the decorative edging of the frames. For my main photo, I wanted to make a feature out of one of the largest frames I could find, which was on the sheet of 2x2 & 6x8 Elements. I have treated it with crackle paint and ’squished’ the edges to give it a gallery feel…
 
 
To create this look, I simply hand cut the frame out, leaving a bit of a border of the surrounding news print. I then gave it a generous coat of Crackle Paint, which I applied with a small paintbrush. Let the paint start to air dry first and then, once the first cracks start to appear, you can speed up the drying process with a heat gun. The more crackle paint you use, the thicker the cracks will be.
 
 
The organic feel of these Funky Florals compliment my page perfectly.


________________

Now for even more fun!!  Enter via the Rafflecopter widget below and we'll draw one lucky winner on Sunday to win a Pumpkin Spice collection pack!  

a Rafflecopter giveaway

After you enter, head on over to the The Cut Shoppe blog to see what their team has created.  Make sure to enter there as well - they're giving away a $25 gift certificate to their store!

Want to follow The Cut Shoppe and keep up with all of their great projects & products?  Here you go!

Website: https://www.etsy.com/shop/TheCutShoppe?ref=ss_profile

Facebook: https://www.facebook.com/thecutshoppedigitalcuts

Instagram: thecutshoppe

Blog: http://thecutshoppe.blogspot.com

Join us again here later today for one last inspiring project from Chantalle!

Howdy!  Layle here with you today.  Welcome to Day 4 of the Simple Stories & The Cut Shoppe Product Swap! 

Both design teams have swapped products and will be sharing on our blogs all week long.  Join us for some great inspiration as well as a chance to win a prize package from both The Cut Shoppe & Simple Stories! 

Today design team member Chantalle McDaniel joins us with a really fun mini book created using our 4x6 Photo Booklet & Pumpkin Spice collection!
________________

Hi everyone! Chantalle here and it’s so great to be back with you again and sharing some of the projects I have created with the stunning new lines and some awesome cut files! As you will see, I have had loads of fun and have included some tips for you along the way. Let’s jump in!
 
My first project is a little mini album about a recent camping trip my family and I went on. Now I will confess, living in a fairly tropical climate, we don’t get the true seasonal experience. In Brisbane, we have to head inland to get a bit of that lovely chill - which is exactly what we did when we went camping at beautiful Kenilworth Homestead.
 
Autumn Camping mini album
 
 
The SN@P! Photo Booklets are a perfect way to get a head start on a mini, if you are pressed for time. The sleeves make it a breeze to insert photos and you can jazz up the pages and cover with some cute embellishments.
 
 
Bits & Pieces are a perfect embellishment to use as they add variety without too much height, which could bulk up a mini album.
 
 
I recently treated myself to a fun Fuse Tool which came in very handy for this project as it meant I could add more custom sleeves to my album, like this cute shaker pocket!
 
 
Inside, I have used some super sweet little ‘Leaf it to me’ cuts which I cut from a sheet of Pumpkin Spice ‘Acorn/Gingham’. I’ve also added a chipboard sticker, some sequins and a bit of glitter for sparkle.
 
 
Turning the page, on the left I’ve used a 3x4 Sn@p card with an awesome woodgrain print chipboard frame. Some more teeny leaves dot the right hand page. You will notice for these tiny cuts, I have removed the inner leaf line, as my Cameo blade could be a bit sharper and I couldn’t get it to cut cleanly at such a small size.
 
 
In the next spread, I have created a flap that lifts to reveal my next page. I haven’t included any journalling yet, as I really don’t like showing off my handwriting ;) 
 
 
When I cut my larger leaves, I saved the leaf line and have used them as an embellishment, echoing the sticks in the brazier by adhering them over the photo.
 
 
Turning the page, I have again created an extra little 3x4 pocket with the fuse, into which I have popped a 3x4 Sn@p card. This lifts up to reveal my two children spellbound by one of the horses on the property.
 
 
The last spread uses some more sweet leaf Cut Shoppe cuts as well as some Bits & Pieces and chipboard stickers (those tiny leaves are totally adorable!), creating an Autumn scene.
 
 
Before I go, I want to share how I created my cover. Using the ‘Leaf it to Me’ cut file, I adjusted the size of the leaf to suit my project, and then set about cutting a custom stamp from the file, using my Silhouette and the stamp material you can purchase separately.
 
 
The stamp material needs it own special mat and you will need to adjust your rollers to fit this smaller size.
 
 
The actual stamp material is a lot thinner than a regular clear stamp, but it works very well. Be careful when removing it from the mat as it tends to grab a bit in places and just needs to be freed by pulling it gently from the rest of the leftover stamp material. I used my custom leaf stamps with some Versamark Dazzle to create a lovely watermark leaves on the kraft stock.
 
 
Thanks so much for joining me today! I will be sharing two more projects with you a bit later on today!
________________

Now for even more fun!!  Enter via the Rafflecopter widget below and we'll draw one lucky winner on Sunday to win a Pumpkin Spice collection pack!  

a Rafflecopter giveaway

After you enter, head on over to the The Cut Shoppe blog to see what their team has created.  Make sure to enter there as well - they're giving away a $25 gift certificate to their store!

Want to follow The Cut Shoppe and keep up with all of their great projects & products?  Here you go!

Website: https://www.etsy.com/shop/TheCutShoppe?ref=ss_profile

Facebook: https://www.facebook.com/thecutshoppedigitalcuts

Instagram: thecutshoppe

Blog: http://thecutshoppe.blogspot.com

Join us again here later today for another inspiring project from Chantalle!

Howdy!  Layle here with you today.  Welcome to Day 2 of the Simple Stories & The Cut Shoppe Product Swap! 

Both design teams have swapped products and will be sharing on our blogs all week long.  Join us for some great inspiration as well as a chance to win a prize package from both The Cut Shoppe & Simple Stories! 

Today design team member Nancy Damiano joins us with this beautiful layout using our We Are...Family collection!
________________

Hi there Simple fans!  Today I'm using the new We Are…Family collection and a beautiful cut file from The Cut Shoppe to highlight two vacation snapshots.
 
 
I used the pie heart cut to create a border of colorful hearts across the page. I love the intricate design of the hearts.  I layered them on some of the more neutral patterns from the We Are…Family collection so that the cut would really stand out. Some fun chipboard words and a cluster of enamel dots add dimension and interest to the border of hearts.
 
 
I used a chipboard arrow, journaling and large date created with Photoshop to divide the design of the layout. I think it’s a fun, colorful way to break up the photo section from the embellishment section.
 
 
Now on to my Life Documented Planner!  I usually like to photograph the clean, freshly decorated planner pages without all of the writing for my planner posts. This time though, I’ll give you a real-life peek at what it looks like once I get my life in it!
 
 
And the back to school rush in the Northeast begins! I like the weekly overview to keep me organized with a snapshot of what's going on in any given week. I use the calendar icons and little bit of washi tape to add some color.
 
 
This week started with a shopping list headed with alpha stickers in two sizes, colorful washi and sticky notes. I like that I can easily move around the stick notes to other days if I don't accomplish them. 
 
 
I kept a yellow, aqua, gray color scheme for the week to keep the design streamlined. A little pop of pink typewriter is a fun touch for a day spent meeting creative deadlines.
 
 
​I add removable sticky notes for grocery store lists. This makes it easy to remove and stick to the back of my cell phone - the one thing I won't forget to look at! And that's a peek of my life, lists and plans for this week. Nine months and counting in my Simple Stories Life Documented planner and still going strong!
 
Thanks for stopping by and make sure to check out the Cut Shoppe!
________________

Now for even more fun!!  Enter via the Rafflecopter widget below and we'll draw one lucky winner on Sunday to win a Pumpkin Spice collection pack!  

a Rafflecopter giveaway

After you enter, head on over to the The Cut Shoppe blog to see what their team has created.  Make sure to enter there as well - they're giving away a $25 gift certificate to their store!

Want to follow The Cut Shoppe and keep up with all of their great projects & products?  Here you go!

Website: https://www.etsy.com/shop/TheCutShoppe?ref=ss_profile

Facebook: https://www.facebook.com/thecutshoppedigitalcuts

Instagram: thecutshoppe

Blog: http://thecutshoppe.blogspot.com

Join us again here tomorrow for more inspiring projects!

Howdy!  Layle here with you today.  We've got a fun week planned for you - a Simple Stories & The Cut Shoppe Product Swap! 

Both design teams have swapped products and will be sharing on our blogs all week long.  Join us for some great inspiration as well as a chance to win a prize package from both The Cut Shoppe & Simple Stories! 

Today design team member Cari Locken joins us with this super, summery layout -
________________

I was so excited to have a chance to play with some cut files from The Cut Shoppe.  There's some adorable designs in the shop and you must definitely check it out.
 
My first layout is titled Birds of a Feather and I used the new We Are...Family collection.
 
 
I used Flocked & Feathered cut file which has a great combination of designs. I used the feathers, bird and title .


I cut the designs from patterned paper. Here's a look at the cute little bird.
 
 
The title I cut from some teal colour paper so that it would pop off the brown background.
 
 
I love how the designs added a fun element to the layout.
 
 
The second layout that I'd like to share with you is titled Be Awesome (from Words to Live By file) and I used the new Pumpkin Spice collection.
 
 
I wanted to title to stand out yet blend in (make sense? haha) so I used some black card stock
 
 
I love all the background designs that are the Cut Shoppe and I chose Trendy Trellis to put on my layout. I sized it a bit smaller than the original file so that it would measure about 8" x 8". I cut this from a piece of green patterned paper from the Simple Basics Kit (in the Pumpkin Spice collection).
I also used the photo slide design from the Say Cheese cut files  to place  my journaling inside.
 
 
I added some more colour with the little xo circular design which is from the Round Up cut file.
 
 
I had fun putting this layout together.
 
 
Thanks for stopping by and make sure to check out the Cut Shoppe!
________________

Now for even more fun!!  Enter via the Rafflecopter widget below and we'll draw one lucky winner on Sunday to win a Pumpkin Spice collection pack!  

a Rafflecopter giveaway

After you enter, head on over to the The Cut Shoppe blog to see what their team has created.  Make sure to enter there as well - they're giving away a $25 gift certificate to their store!

Want to follow The Cut Shoppe and keep up with all of their great projects & products?  Here you go!

Website: https://www.etsy.com/shop/TheCutShoppe?ref=ss_profile

Facebook: https://www.facebook.com/thecutshoppedigitalcuts

Instagram: thecutshoppe

Blog: http://thecutshoppe.blogspot.com

Join us again here tomorrow for more inspiring projects!


Click here to download your free copy of the Pumpkin Spice SN@PBOOKING Guide or visit the Project Downloads page to download it as well as other free downloads!

Supplies

Hello Everyone!  It's Marie back again, this time talking about a mini album I put together to document the time we spend with our extended family.

I started off using a 4x6 Sn@p! album and covered the front using a pretty patterned paper from the We R...Family collection.  I like to keep my covers relatively flat so they fit on a shelf easier, so I just finished things off with a couple of coordinating stickers.

I started off using a 4x6 Sn@p! album and covered the front using a pretty patterned paper from the We Are...Family collection.  I like to keep my covers relatively flat so they fit on a shelf easier, so I just finished things off with a couple of coordinating stickers.

At this point my family is living all over the country, actually all over the world, so it is harder and harder for us to see each other.  We try to make a point of all gathering together at least every couple of years and picking up where we left off.

I did my best to mix up the photos in my album with both posed pictures and candid shots.  I think the pictures that represent us the best are when we are at play.  I added a 3x4 journaling cards in between my photos which list some of our favorite activities.

When I add 3x4 inserts in between my pages I like to add tabs to the side to make it easier to see and lift.  Just add matching shaped stickers back to back and you have a tab.

I hope you've enjoyed a glimpse inside my album today, and will have fun documenting your own family memories!

Supplies

Hello Friends! Rebecca Larson here bursting at the seams with excitement for one of the newest releases to hit the digital store - I...AM!  Earlier this year, I...AM took CHA by storm.   All of us digi scrappers, had to use some restraint and patience for it to be released this summer.  Finally….its here!!
 
I knew I wanted to use this charmer to document some pretty exciting things happening in our family. For the last few years we have been in the process of adopting from the Philippines. It has been a long treacherous haul. Lots of tears, bureaucratic red tape, and way too much paperwork! The uncertainty of it all can drive the light hearted mad!  Last month, we got word that our daughter's traveling documents were ready, and she was approved to come home!   Although taken by the last minute notice of this, we booked our flights and were headed to the Philippines three days after our notification!  I am excited to archive our travels at a future date, but the first thing I wanted to document was the first meeting with our daughter.  I fell in love with some of the candid photos my husband took of us, and knew they would be the perfect fit with the I AM collection.
 
I love the versatility of the kit! I wanted to start off with a blank canvas, so I took the robin egg blue “I AM” page, and enlarged it to hide the elements attached to the paper.
 
 
With a blank canvas, I dragged and dropped, several elements that I wanted to use as the background. I really wanted to pull in all the colors of this palate to frame the photos I had chosen. I also stacked 3 of the 2x3 gray cards horizontal.
 
 
I finally added the photos (using a free poloroid action that I found on DeviantArt.com), a title (used the letters from the expressions, with a clipping mask from the cards), and added some text  I am excited to print it and add it to my collection of stories. Thanks for stopping by! 
 
School themed digital kits have long been a favorite of mine, something about the bright, bold colors and fun elements included just speaks to the crafty part of my brain.  So I'm excited for back to school time and the selection of digital school themed kits that Simple Stories has added to the digital store!  I decided to have fun with two of the collections available, although if I would have had more time on my hands I would have used them all.  
 
I started with the digital Elementary collection which has sort of a neat distressed feeling to it.  I had a picture in mind from my son's first day of first grade last year (we still haven't started school this year!) and the digital collection picked out, then I had to dig around for some inspiration.  I went to my trusty go-to source for ideas and inspiration - Pinterest.  I found this awesome typography piece hat I knew I wanted to include on a page and I loved the mix of colors and fonts.  I didn't use any real rhyme or reason in choosing the fonts, I just wanted a mix.  I love how it turned out and I wanted it to be the focus of my page so I minimally embellished the rest of the page.


The other digital kit I chose is the bright & clean digital School SN@P! Set along with the digital 12x12 Pocket Page Variety Pack.  I love the super bright colors and the pops of contrast in the blacks!  They worked perfectly with the chalkboard I made to document my son's first day of school each year.  The cards in this set are perfect for documenting that first day of school milestone - or any school-related milestones throughout the year!
 
 
I had so much fun playing with these kits and I'd love to see what you all have done with them as well.  
Hi everyone! Allison here with a layout using the awesome So Rad collection and I have another sketch to share that mixes up the traditional scrapbooking style with the SN@P! Pocket Pages. 
 
 
You can download the full sketch with measurements and placements here.
 
The left side of the sketch is designed in a traditional scrapbooking style while the right side uses photos and cards together with the SN@P! Pocket Page, Design 5.
Here is my layout based on the sketch:
 
 
My boys, Drew and Jackson, have been on a big kick of taking jumping photos. They think it is hilarious to see what kind of pose we can capture mid-air and will jump until they are exhausted trying to get the perfect jump-pose. Our porch has proven to be an excellent launch pad for their silly jumping poses and I’ll always end up with some pretty comical pictures out of it. 
 
 
Being a mom of boys, I always look forward to new boy and masculine collections from Simple Stories. So Rad is my new favorite! I love the colors and the elements that seem to perfectly match and compliment the photos of my sons. What a fun collection!!
 
 
I cut out the large chevron/zig zag design from the 2x12, 4x12 & 6x12 Elements paper and used it to create a large arrow design. I also added some strips of patterned paper and my title and then finished it all with some Bradz, stars, stickers, and enamel dots. 
 
 
At the bottom of the top photos I created a little cluster of embellishments with more stars, stickers, die cuts, chipboard pieces, and enamel dots. 
 
 
At the top of the photos I added a word sticker and accented it with more stars, Bradz, and enamel dots.
 
 
I used the empty space at the top of the photo for my journaling. If you didn’t have the empty space in the photo like mine you could always move the journaling strip up above the photo.
 
 
On the right page I used photos and 4 x 6” and 4 x 3” cards with the the SN@P! Pocket Page, Design 5. 
 
 
I added a tiny little star to the fun “Awesome” card. I love the cards that have a big word or phrase on them! They always tend to be my go-to card for Pocket Pages!


I added little clusters of embellishments to the empty spaces on my larger photos to match the little clusters on the left page. 
 
 
I instantly loved the #RAD die cut and used foam adhesive to give it some dimension on the 4 x 3” card.
 
 
On the bottom 4 x 3” card I added some stitching around the star and word stickers to the center.
 
 
I used two chipboard frames with two smaller photos and then accented it with some arrow stickers and stars. 
 
I hope you all enjoy the new sketch! 

Hello, again!   This is Amber, founder and creative director of Simple Stories.  I'm here for another installment of my monthly Document IT blog feature.  With the end of summer quickly approaching and fall on its heels and a new school season, I was inspired to use our new We Are...Family collection in my Life Documented Planner this month.  This collection seemed fitting, after all, since the majority of what I do in my planner is all abut family!

I used one of the We Are...Family SN@P! Journal Pages to change up the front of the August monthly divider - I just adhered it directly to the divider and added a Life Documneted August 3x4 SN@P! Card with a piece of We Are...Family Washi Paper Tape.

I had fun decorating the monthly dividers to fit the family theme using lots of different We Are...Family products including Washi Paper Tape and Bits & Pieces.  I even trimmed a few 2x2 squares from the SN@P! Pack to fit inside a few of the days in the month!  It was a busy month, lots of stuff going on, all centered around our family :)

The backsides of all of the Monthly Dividers have a pre-designed page to jot down notes, memories, etc.  This month I wanted to do something different, so I printed, trimmed and adhered the August Month In Review FREE Printable (you'll find the free printables at the end of this post!) to that page and simply listed all of the important things that happened that month; I love that I have an instant review there of the entire month!  

I wanted a visual reminder of what its all about – my family – so I added one of our Vertical 4x6 Pocket Pages with a family photo; it's so nice to have that photo at a glance in my planner :)  

Where it’s the start of the new school year, our schedule has changed from the first of the year.  What better time to bring out a family schedule where we can keep track of it all – list the name and any regular schedule activity – along with washi tape.  I even added the boy girl icons from clear stickers – we’ve also included tons of these options in our free printables to fit any family situation!

A little something fun I did for the month – I love the wood striped bookmark that is included in the We Are...Family SN@P! Journal Pages – these coordinate perfectly with our 6x8 SN@P! Binders and planner products so I simply added a few clear stickers and inserted in my planner.

What's fun about using our products to customize your planner is that we have so many options and themes, the possibities are endless.  We include all of the accessories like journal pages, clear stickers and even 2x2 squares that work not only with your scrapbooks, but also with your planner!  

FREE PRINTABLES!


Now we get to the really fun part!  We've designed these FREE printables for August to give you a taste of the We Are...Family collection!

Click here to download August's Free Life Documented Printables.

There are a 3 free printables this month, including:

August Month in Review
Family Schedule
People Cut Outs

TIP: The August free printables are on a single PDF document with 4 pages - print off what you want and the quantity you need.  We've added cut marks to each printable, so you can easily trim your pages to size.  

Thanks so much for letting me share how I've customized my planner this month!

Click here to download your FREE copy of the So Rad eBook!  Visit the Project Downloads page for other free downloads!

Hey there friends!!
 
I am so happy to share this new Pocket Page I put together!  And let me tell you why I am happy…First, I love this So Rad collection!!  Having a boy who is teetering on the edge of becoming a teenager, I am often short on paper options that will work for him.  Second, I get to create a page about my boy!!!  Love this kid.
 
So here we go…a pocket page featuring Riley and So Rad…
 
 
These papers and embellishments worked perfectly!!!  Not too juvenile and the colors are spot on!!
 
 
I really like the slight distressing in this line with the “brush stroke” details.
 
 
I just used the “Awesome” on the bottom of the 6x12 portion of the So Rad 2x12, 4x12 & 6x12 paper as the starting point for my title and added stickers and Bits & Pieces.
 
 
The design on this 4x6 Journaling Card also created the perfect “starting point”.  I layered stickers and personalized it with “Riley”.
 
 
A few small photos of my crazy kid.  Love the grey!!!
 
 
As always, Simple Stories makes the creating so easy!!  I designed this page like a “god” scrapbook page with the help of the pockets and I love how it turned out!
 
 
If you have boys in your life and you want a great line to help tell their story, definitely check out So Rad!  Thanks for stopping by and happy crafting!!!


Pinterest is such a great tool for us, as crafters.  I love to check through my feed and look for inspiring images...and they are not always necessarily craft related, but can trigger an inspiring idea that can be translated to paper crafting.  I decided to browse through Pinterest for some design ideas for the two layouts I'm sharing today, using the new We Are Family collection and Pumpkin Spice collection.  And here's what I came up with!
 
I started my first layout based on a fun hexagon graphic.  I loved the multi-colored look of the hexagons and the way they were arranged.  I cut 7 hexagon shapes on my Silhouette Cameo, from Cardstock and then cut the same sized hexagon from patterned papers included in the We Are Family collection.


After the patterned paper hexagon shapes were cut, I hand cut each shape into six pieces.  Then I mixed the patterned papers and layered each piece back over the Cardstock hexagon shape, to create a patchwork look.  I added texture around each of the hexagons, with machine stitching.
 
 
I wanted to continue the hexagon theme with my photos, so I cut both of those into the shape, too!  Then I arranged all of the hexagons into the same pattern, shown on the graphic.  I love that the hexagons created perfect embellishment spots on the layout, and I used a mix of Bradz, Chipboard, wood veneers, stickers and enamel dots from the We Are Family collection.


I finished the layout with my title, and used a mix of letter stickers and die cut letters.  I wanted the title to stand out, so I placed it below the hexagon design.
 
 
For the second layout, using the Pumpkin Spice collection, I found a gorgeous quilt image and knew it would be perfect with my photo and the theme of my layout.  The geometric design was really eye-catching and it gave me the opportunity to incorporate a lot of the patterned papers in the Pumpkin Spice collection.


This technique may look difficult, but it's really easy.  I started out cutting the patterned papers into 2.5x2.5 inch squares.  Once I had the squares cut, I hand cut on a diagonal across each of the squares to create triangle shapes.  After all of the triangles were cut, I machine stitched around the outside edge of each one.  Then I began piecing the triangles back together on my background paper.
 
 
I wanted my photo to be the focus of the layout, so I cut around the edges leaving a White photo mat, to help it stand out from the colorful background and placed it in the center of the design.  I clustered a few Chipboard pieces and stickers around the photo to help draw your eye to the center of the page.


Once my photo was in place, I had to decide where to add the title and some other embellishments.  I didn't want to cover a lot of the geometric design, so I decided to add my title and embellishments in the empty spaces of the outside triangle shapes.  And to bring in some more patterned paper (because you can never have enough patterned paper on your layout!) I created a border around the edge of the layout, and then machine stitched with White thread.
 
It's really fun to think outside the box, when you're looking for a design for your layout!  Inspiration is all around, and can come from a color scheme, advertisement, quote, art piece...the possibilities are endless!  This could also be a great way to get out of a creative rut, if you're feeling stuck.  So challenge yourself to look for inspiration in unexpected places.  Write your ideas down, sketch them out or snap a quick photo on your phone to reference later, when you are creating!


Supplies

Pages