Lisa Dickinson's Blog Posts

HelloFall-1_W

I knew the Happy Harvest Simple Set would be the perfect pairing with my pumpkin patch photos. The only problem is which cute pattern to choose! I ended up selecting a floral, a stripe, and a gingham, along with an orange paper from the Old School Simple Set.

HelloFall-2_W

One of the 3x4 cards made a quick and simple title for my page.

HelloFall-3-W

To create a page border, I punched circles from various colored cardstock and topped them with lots of the stickers from the set. A few buttons complete the whimsical accent.

HelloFall-4_W

So grab your fall photos and the Happy Harvest Simple Set and get creating!

Supplies

Hello scrappers! It's Lisa Dickinson here with you today, sharing some tips on getting mileage out of those paper collection kits! For me, that means they have to work with both girl and boy layouts. Even if the papers tend towards masculine (lots of plaid or wood) or feminine (lots of florals) I love to find ways to incorporate them into any type of design!

Today I'm working with the Vintage Blessings collection, a great mix of prints in autumnal colors and patterns. Since the first layout features my daughter, I wanted it to have a more girly feel. But instead of working with only the floral patterns or softer colors in the collection, I chose to add feminine flair by creating flowers from several of the patterned papers.

ThankufulEveryday1_W

I hand-cut petals from a variety of papers and then adhered each bloom atop a piece of scrap white cardstock. Then I added machine stitching around each petal and adorned the centers with plain wood buttons. Once finished, I trimmed out each flower and adhered them on the page to frame my photo.

ThankufulEveryday4_W

ThankufulEveryday3_W

The resulting design has a definitively feminine feel even with plaids, ginghams and stripes included. And the flowy script title reinforces the page theme as well. Now, let's see how I used the same paper collection for a boy layout!
LoveTOday1_W

In this design, I wanted to focus on more masculine approach since the page is about my son. Though I used many floral papers, I incorporated them into a chevron pattern so they would seem overly girly. And I mixed in some darker plaid ad a few gingham patterns to balance the florals.

LoveTOday2_W

For the title, I chose the blocky die-cut Silhouette cut file, Love Today, and cut it out of gray cardstock to further reinforce the masculine theme. A few simple chipboard embellishments finish off this page!

LoveTOday3_W

So don't shy away from papers just because you think they'll only work for one gender! Try these tricks for using them on any type of page you might want to create!

SaveSave

Supplies

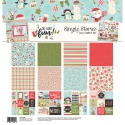
Hello Simple Stories fans! It's Lisa Dickinson here today, and I'm excited to share some new layouts with you featuring two new lines from Simple Stories, Very Merry and Oh What Fun!

When it comes to inspiration for my scrapbook layouts, I have numerous go-to sources. From Pinterest boards to billboards, magazine ads to menus, clothing catalogs to car brochures, I can often find art elements to replicate on my pages. But sometimes inspiration is more easily found - like in the scrapbook product right in front of you!

SSpackage

For the Christmas-y page below I was inspired by the packaging on the new Very Merry Collection Kit. The vertical snippets of patterned papers perfectly displayed the array of colors and patterns and inspired me to do a similar treatment in my design.

JustBelieve1_W

I simply cut eight 1.5" wide pieces of paper and arranged them across the bottom of my layout, much like they were set up on the packaging.

JustBelieve3_W

After topping the patterned strips with a paper ribbon & twine, I layered a few tags and ephemera below the bow to serve as both my embellishments and title.

JustBelieve2_W

It was a page that came together quickly without a lot of fuss, thanks largely to the inspiration provided by the packaging!

_____________________________________

SSpackage2

On another page, I took a cue from the 3x4 Elements paper in the Oh What Fun line and printed my photos the same size (3x4). This made it easy to arrange a page design using alternating photos and journal cards:

OhWhatFun1_W

To help my title stand out, I cut out the "Oh What Fun!" circle from a larger (4x6) journal card and mounted it with foam adhesive. The circular shape helps soften all the straight lines in this design, and the bold black & white really pops off the page.

OhWhatFun2_W

I typed my journaling on another 3x4 block and embellished it with a simple sticker across the top edge.

OhWhatFun3_W

A bit of baker's twine, a few chipboard snowflakes, and some white brads are all that was needed to complete the page. 

OhWhatFun4_W

So the next time you're stumped by how to begin a page, look no further than your scrap table. You just might find inspiration in your favorite scrapbooking products!

Supplies

Pages