September 2015 Blog Posts

Howdy!  Layle here with you today with a 3rd post for today!  Welcome to Day 4 of the Simple Stories & The Cut Shoppe Product Swap! 

Both design teams have swapped products and will be sharing on our blogs all week long.  Join us for some great inspiration as well as a chance to win a prize package from both The Cut Shoppe & Simple Stories! 

Today design team member Chantalle McDaniel is back again with another fabulous project using our Claus & Co. collection!  
________________

Hello! I’m back with another project I have created using The Cut Shoppe cut files and the new Claus & Co collections!
 
All I want for Christmas
 
My final project is this Christmas page using Claus & Co. This collection, with it’s sparkly red foil elements, has fun and tradition all bundled in to one gorgeous package!
 
 
All my DS wants from the Man in Red is an Xbox One. His list is a pretty concise one! I love capturing my children’s script on a page if I can. It will be a joy to look back on in years to come. I’ve layered up a large 4x6 Sn@p card with a cute chipboard frame and some gift ephemera from the Bits & Pieces and chipboard stickers.
 
 
For my title, I have layered up The Cut Shoppe’s Tall Type with various patterns, raising some letters and matting negative areas. I’ve added a couple of small enamel dots over a dot pattern for a bit of interest.
 
 
So that my red letters stand out a bit more on the red star print background, I have given them a clear heat emboss finish.
 
 
I have gone ahead and adhered a pen directly to my page for a bit of fun and to echo the list theme. A cute expression sticker applied to the pen appeals to Mr Claus himself!
 
 
Once again, thank you so much for joining me, If you would like to see more of what I get up to, you can find me on FB and Instagram @chantallemcdaniel or pop in to my blog (copasetique.blogspot.com)
 
________________

Now for even more fun!!  Enter via the Rafflecopter widget below and we'll draw one lucky winner on Sunday to win a Pumpkin Spice collection pack!  

a Rafflecopter giveaway

After you enter, head on over to the The Cut Shoppe blog to see what their team has created.  Make sure to enter there as well - they're giving away a $25 gift certificate to their store!

Want to follow The Cut Shoppe and keep up with all of their great projects & products?  Here you go!

Website: https://www.etsy.com/shop/TheCutShoppe?ref=ss_profile

Facebook: https://www.facebook.com/thecutshoppedigitalcuts

Instagram: thecutshoppe

Blog: http://thecutshoppe.blogspot.com

Join us again here tomorrow for more inspiring projects!

Howdy!  Layle here with you today with a 2nd post.  Welcome to Day 4 of the Simple Stories & The Cut Shoppe Product Swap! 

Both design teams have swapped products and will be sharing on our blogs all week long.  Join us for some great inspiration as well as a chance to win a prize package from both The Cut Shoppe & Simple Stories! 

Today design team member Chantalle McDaniel is back again with another fabulous project using our We Are...Family collection!  
________________

Hello! I’m back with two more projects I have created using The Cut Shoppe cut files and the new We are Family and Claus & Co collections.
 
 
Five, on an adventure
 
As you can see, this is not my usual ’style’ of scrapping. I love experimenting and I wanted to showcase how beautifully Simple Stories can compliment a bit of a mixed media approach. 
 
 
I’ve kept the ‘Funky Florals’ cuts very clean so they stand out against the bright background. I’ve also used a thicker white topstitch thread to machine stitch them to my page for extra definition. I just love the mix of pretty florals and funky elements in this collection.
 
 
Everything in We are Family is totally delicious. I could never pick a favourite Simple Stories line, but this collection is certainly up there! 
 
 
The embroidery hoops and little frame prints caught my eye. I love the decorative edging of the frames. For my main photo, I wanted to make a feature out of one of the largest frames I could find, which was on the sheet of 2x2 & 6x8 Elements. I have treated it with crackle paint and ’squished’ the edges to give it a gallery feel…
 
 
To create this look, I simply hand cut the frame out, leaving a bit of a border of the surrounding news print. I then gave it a generous coat of Crackle Paint, which I applied with a small paintbrush. Let the paint start to air dry first and then, once the first cracks start to appear, you can speed up the drying process with a heat gun. The more crackle paint you use, the thicker the cracks will be.
 
 
The organic feel of these Funky Florals compliment my page perfectly.


________________

Now for even more fun!!  Enter via the Rafflecopter widget below and we'll draw one lucky winner on Sunday to win a Pumpkin Spice collection pack!  

a Rafflecopter giveaway

After you enter, head on over to the The Cut Shoppe blog to see what their team has created.  Make sure to enter there as well - they're giving away a $25 gift certificate to their store!

Want to follow The Cut Shoppe and keep up with all of their great projects & products?  Here you go!

Website: https://www.etsy.com/shop/TheCutShoppe?ref=ss_profile

Facebook: https://www.facebook.com/thecutshoppedigitalcuts

Instagram: thecutshoppe

Blog: http://thecutshoppe.blogspot.com

Join us again here later today for one last inspiring project from Chantalle!

Howdy!  Layle here with you today.  Welcome to Day 4 of the Simple Stories & The Cut Shoppe Product Swap! 

Both design teams have swapped products and will be sharing on our blogs all week long.  Join us for some great inspiration as well as a chance to win a prize package from both The Cut Shoppe & Simple Stories! 

Today design team member Chantalle McDaniel joins us with a really fun mini book created using our 4x6 Photo Booklet & Pumpkin Spice collection!
________________

Hi everyone! Chantalle here and it’s so great to be back with you again and sharing some of the projects I have created with the stunning new lines and some awesome cut files! As you will see, I have had loads of fun and have included some tips for you along the way. Let’s jump in!
 
My first project is a little mini album about a recent camping trip my family and I went on. Now I will confess, living in a fairly tropical climate, we don’t get the true seasonal experience. In Brisbane, we have to head inland to get a bit of that lovely chill - which is exactly what we did when we went camping at beautiful Kenilworth Homestead.
 
Autumn Camping mini album
 
 
The SN@P! Photo Booklets are a perfect way to get a head start on a mini, if you are pressed for time. The sleeves make it a breeze to insert photos and you can jazz up the pages and cover with some cute embellishments.
 
 
Bits & Pieces are a perfect embellishment to use as they add variety without too much height, which could bulk up a mini album.
 
 
I recently treated myself to a fun Fuse Tool which came in very handy for this project as it meant I could add more custom sleeves to my album, like this cute shaker pocket!
 
 
Inside, I have used some super sweet little ‘Leaf it to me’ cuts which I cut from a sheet of Pumpkin Spice ‘Acorn/Gingham’. I’ve also added a chipboard sticker, some sequins and a bit of glitter for sparkle.
 
 
Turning the page, on the left I’ve used a 3x4 Sn@p card with an awesome woodgrain print chipboard frame. Some more teeny leaves dot the right hand page. You will notice for these tiny cuts, I have removed the inner leaf line, as my Cameo blade could be a bit sharper and I couldn’t get it to cut cleanly at such a small size.
 
 
In the next spread, I have created a flap that lifts to reveal my next page. I haven’t included any journalling yet, as I really don’t like showing off my handwriting ;) 
 
 
When I cut my larger leaves, I saved the leaf line and have used them as an embellishment, echoing the sticks in the brazier by adhering them over the photo.
 
 
Turning the page, I have again created an extra little 3x4 pocket with the fuse, into which I have popped a 3x4 Sn@p card. This lifts up to reveal my two children spellbound by one of the horses on the property.
 
 
The last spread uses some more sweet leaf Cut Shoppe cuts as well as some Bits & Pieces and chipboard stickers (those tiny leaves are totally adorable!), creating an Autumn scene.
 
 
Before I go, I want to share how I created my cover. Using the ‘Leaf it to Me’ cut file, I adjusted the size of the leaf to suit my project, and then set about cutting a custom stamp from the file, using my Silhouette and the stamp material you can purchase separately.
 
 
The stamp material needs it own special mat and you will need to adjust your rollers to fit this smaller size.
 
 
The actual stamp material is a lot thinner than a regular clear stamp, but it works very well. Be careful when removing it from the mat as it tends to grab a bit in places and just needs to be freed by pulling it gently from the rest of the leftover stamp material. I used my custom leaf stamps with some Versamark Dazzle to create a lovely watermark leaves on the kraft stock.
 
 
Thanks so much for joining me today! I will be sharing two more projects with you a bit later on today!
________________

Now for even more fun!!  Enter via the Rafflecopter widget below and we'll draw one lucky winner on Sunday to win a Pumpkin Spice collection pack!  

a Rafflecopter giveaway

After you enter, head on over to the The Cut Shoppe blog to see what their team has created.  Make sure to enter there as well - they're giving away a $25 gift certificate to their store!

Want to follow The Cut Shoppe and keep up with all of their great projects & products?  Here you go!

Website: https://www.etsy.com/shop/TheCutShoppe?ref=ss_profile

Facebook: https://www.facebook.com/thecutshoppedigitalcuts

Instagram: thecutshoppe

Blog: http://thecutshoppe.blogspot.com

Join us again here later today for another inspiring project from Chantalle!

Supplies

Howdy!  Layle here with you today.  Welcome to Day 2 of the Simple Stories & The Cut Shoppe Product Swap! 

Both design teams have swapped products and will be sharing on our blogs all week long.  Join us for some great inspiration as well as a chance to win a prize package from both The Cut Shoppe & Simple Stories! 

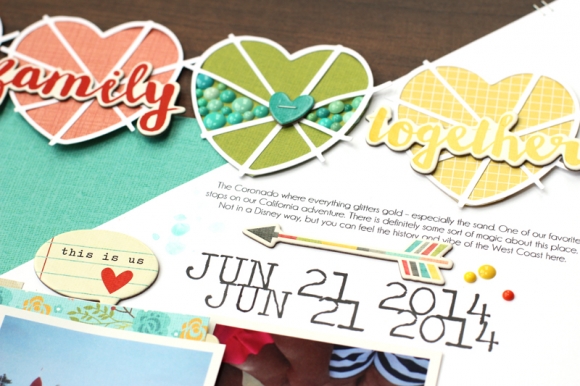
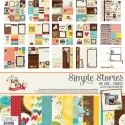
Today design team member Nancy Damiano joins us with this beautiful layout using our We Are...Family collection!
________________

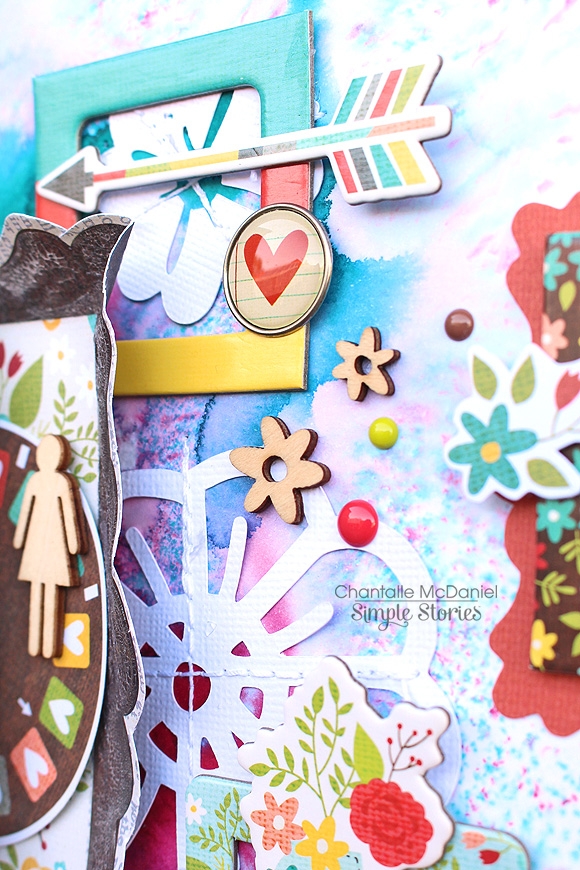
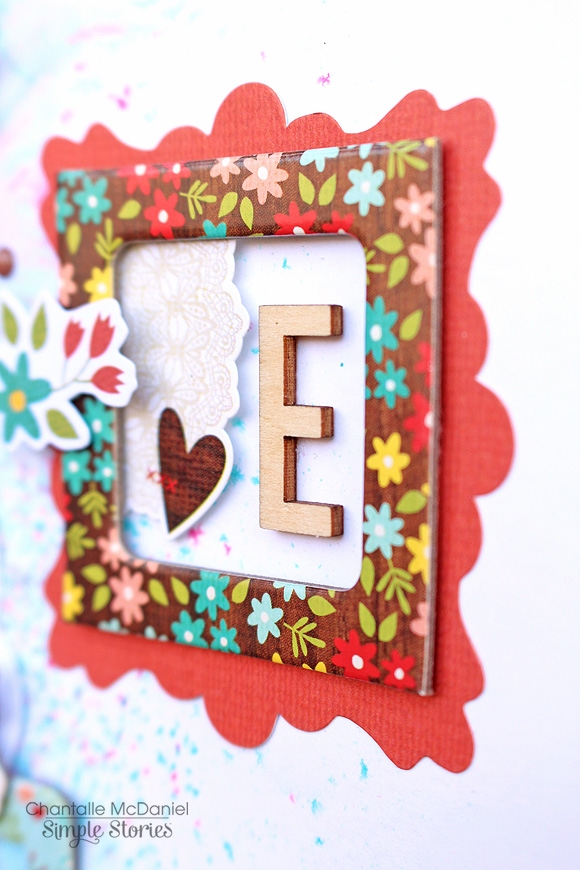
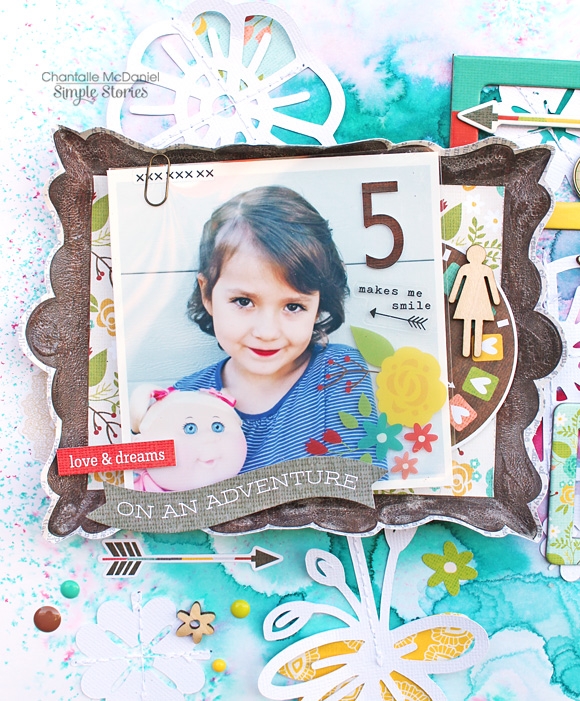
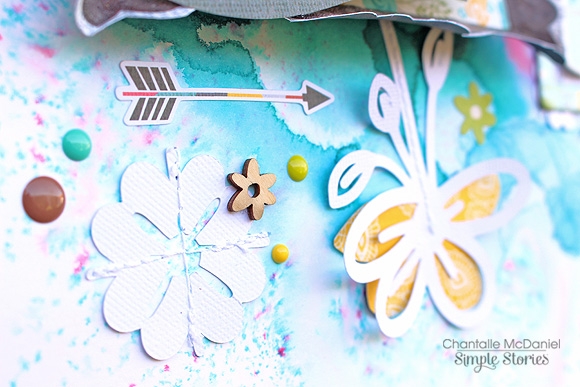
Hi there Simple fans!  Today I'm using the new We Are…Family collection and a beautiful cut file from The Cut Shoppe to highlight two vacation snapshots.
 
 
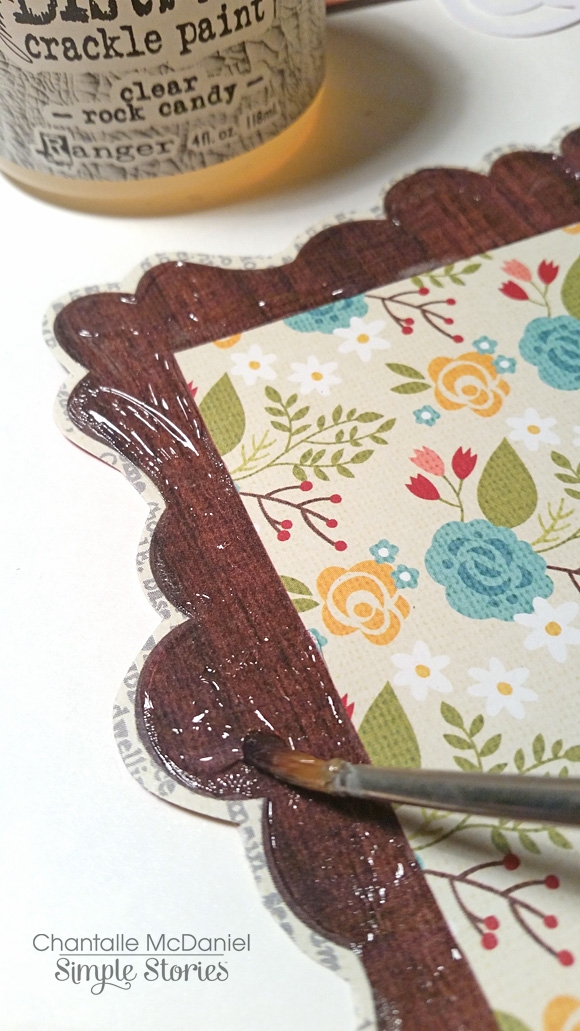
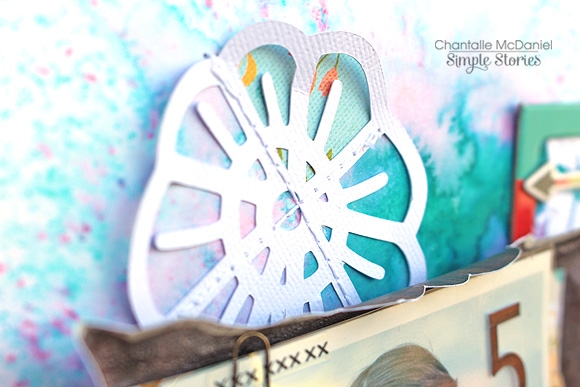
I used the pie heart cut to create a border of colorful hearts across the page. I love the intricate design of the hearts.  I layered them on some of the more neutral patterns from the We Are…Family collection so that the cut would really stand out. Some fun chipboard words and a cluster of enamel dots add dimension and interest to the border of hearts.
 
 
I used a chipboard arrow, journaling and large date created with Photoshop to divide the design of the layout. I think it’s a fun, colorful way to break up the photo section from the embellishment section.
 
 
Now on to my Life Documented Planner!  I usually like to photograph the clean, freshly decorated planner pages without all of the writing for my planner posts. This time though, I’ll give you a real-life peek at what it looks like once I get my life in it!
 
 
And the back to school rush in the Northeast begins! I like the weekly overview to keep me organized with a snapshot of what's going on in any given week. I use the calendar icons and little bit of washi tape to add some color.
 
 
This week started with a shopping list headed with alpha stickers in two sizes, colorful washi and sticky notes. I like that I can easily move around the stick notes to other days if I don't accomplish them. 
 
 
I kept a yellow, aqua, gray color scheme for the week to keep the design streamlined. A little pop of pink typewriter is a fun touch for a day spent meeting creative deadlines.
 
 
​I add removable sticky notes for grocery store lists. This makes it easy to remove and stick to the back of my cell phone - the one thing I won't forget to look at! And that's a peek of my life, lists and plans for this week. Nine months and counting in my Simple Stories Life Documented planner and still going strong!
 
Thanks for stopping by and make sure to check out the Cut Shoppe!
________________

Now for even more fun!!  Enter via the Rafflecopter widget below and we'll draw one lucky winner on Sunday to win a Pumpkin Spice collection pack!  

a Rafflecopter giveaway

After you enter, head on over to the The Cut Shoppe blog to see what their team has created.  Make sure to enter there as well - they're giving away a $25 gift certificate to their store!

Want to follow The Cut Shoppe and keep up with all of their great projects & products?  Here you go!

Website: https://www.etsy.com/shop/TheCutShoppe?ref=ss_profile

Facebook: https://www.facebook.com/thecutshoppedigitalcuts

Instagram: thecutshoppe

Blog: http://thecutshoppe.blogspot.com

Join us again here tomorrow for more inspiring projects!

Howdy!  Layle here with you today.  We've got a fun week planned for you - a Simple Stories & The Cut Shoppe Product Swap! 

Both design teams have swapped products and will be sharing on our blogs all week long.  Join us for some great inspiration as well as a chance to win a prize package from both The Cut Shoppe & Simple Stories! 

Today design team member Cari Locken joins us with this super, summery layout -
________________

I was so excited to have a chance to play with some cut files from The Cut Shoppe.  There's some adorable designs in the shop and you must definitely check it out.
 
My first layout is titled Birds of a Feather and I used the new We Are...Family collection.
 
 
I used Flocked & Feathered cut file which has a great combination of designs. I used the feathers, bird and title .


I cut the designs from patterned paper. Here's a look at the cute little bird.
 
 
The title I cut from some teal colour paper so that it would pop off the brown background.
 
 
I love how the designs added a fun element to the layout.
 
 
The second layout that I'd like to share with you is titled Be Awesome (from Words to Live By file) and I used the new Pumpkin Spice collection.
 
 
I wanted to title to stand out yet blend in (make sense? haha) so I used some black card stock
 
 
I love all the background designs that are the Cut Shoppe and I chose Trendy Trellis to put on my layout. I sized it a bit smaller than the original file so that it would measure about 8" x 8". I cut this from a piece of green patterned paper from the Simple Basics Kit (in the Pumpkin Spice collection).
I also used the photo slide design from the Say Cheese cut files  to place  my journaling inside.
 
 
I added some more colour with the little xo circular design which is from the Round Up cut file.
 
 
I had fun putting this layout together.
 
 
Thanks for stopping by and make sure to check out the Cut Shoppe!
________________

Now for even more fun!!  Enter via the Rafflecopter widget below and we'll draw one lucky winner on Sunday to win a Pumpkin Spice collection pack!  

a Rafflecopter giveaway

After you enter, head on over to the The Cut Shoppe blog to see what their team has created.  Make sure to enter there as well - they're giving away a $25 gift certificate to their store!

Want to follow The Cut Shoppe and keep up with all of their great projects & products?  Here you go!

Website: https://www.etsy.com/shop/TheCutShoppe?ref=ss_profile

Facebook: https://www.facebook.com/thecutshoppedigitalcuts

Instagram: thecutshoppe

Blog: http://thecutshoppe.blogspot.com

Join us again here tomorrow for more inspiring projects!


Click here to download your free copy of the Pumpkin Spice SN@PBOOKING Guide or visit the Project Downloads page to download it as well as other free downloads!

Supplies

Hello Everyone!  It's Marie back again, this time talking about a mini album I put together to document the time we spend with our extended family.

I started off using a 4x6 Sn@p! album and covered the front using a pretty patterned paper from the We R...Family collection.  I like to keep my covers relatively flat so they fit on a shelf easier, so I just finished things off with a couple of coordinating stickers.

I started off using a 4x6 Sn@p! album and covered the front using a pretty patterned paper from the We Are...Family collection.  I like to keep my covers relatively flat so they fit on a shelf easier, so I just finished things off with a couple of coordinating stickers.

At this point my family is living all over the country, actually all over the world, so it is harder and harder for us to see each other.  We try to make a point of all gathering together at least every couple of years and picking up where we left off.

I did my best to mix up the photos in my album with both posed pictures and candid shots.  I think the pictures that represent us the best are when we are at play.  I added a 3x4 journaling cards in between my photos which list some of our favorite activities.

When I add 3x4 inserts in between my pages I like to add tabs to the side to make it easier to see and lift.  Just add matching shaped stickers back to back and you have a tab.

I hope you've enjoyed a glimpse inside my album today, and will have fun documenting your own family memories!

Supplies

Hello Friends! Rebecca Larson here bursting at the seams with excitement for one of the newest releases to hit the digital store - I...AM!  Earlier this year, I...AM took CHA by storm.   All of us digi scrappers, had to use some restraint and patience for it to be released this summer.  Finally….its here!!
 
I knew I wanted to use this charmer to document some pretty exciting things happening in our family. For the last few years we have been in the process of adopting from the Philippines. It has been a long treacherous haul. Lots of tears, bureaucratic red tape, and way too much paperwork! The uncertainty of it all can drive the light hearted mad!  Last month, we got word that our daughter's traveling documents were ready, and she was approved to come home!   Although taken by the last minute notice of this, we booked our flights and were headed to the Philippines three days after our notification!  I am excited to archive our travels at a future date, but the first thing I wanted to document was the first meeting with our daughter.  I fell in love with some of the candid photos my husband took of us, and knew they would be the perfect fit with the I AM collection.
 
I love the versatility of the kit! I wanted to start off with a blank canvas, so I took the robin egg blue “I AM” page, and enlarged it to hide the elements attached to the paper.
 
 
With a blank canvas, I dragged and dropped, several elements that I wanted to use as the background. I really wanted to pull in all the colors of this palate to frame the photos I had chosen. I also stacked 3 of the 2x3 gray cards horizontal.
 
 
I finally added the photos (using a free poloroid action that I found on DeviantArt.com), a title (used the letters from the expressions, with a clipping mask from the cards), and added some text  I am excited to print it and add it to my collection of stories. Thanks for stopping by! 
 

Pages