Hello, Simple Stories Scrappers! Jana Eubank here with a fun way to add additional photos or journaling to a scrapbook page.

My youngest daughter did the most adorable thing for our family last St. Patrick's Day. She made signs and love notes for each person telling us how much she loves us and how lucky she feels to be in our family. 

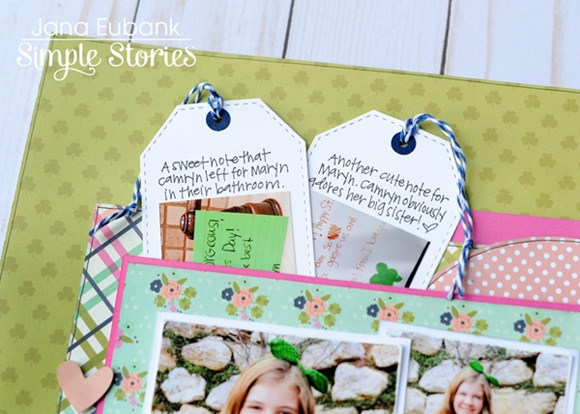
I used pictures of her holding a "Happy St. Patrick's Day, Family!" sign for the main photos on this page, but I also wanted to include images of the other notes she had created. My solution? Tags!

I used a manual die cut machine to create a couple of tags (you could also use tags purchased from an office supply store), added photos and journaling to them, and then tucked them in between the layers of my page design!

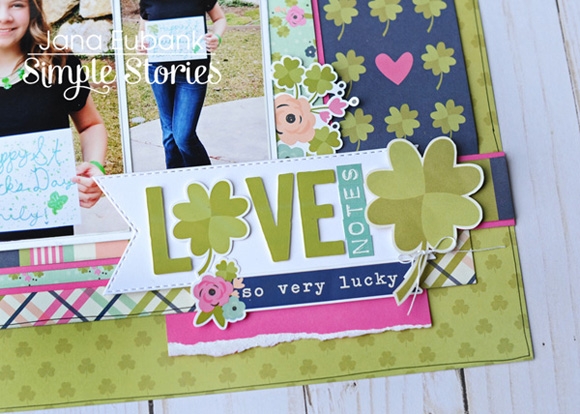
Next, I used the "LOVE" letters from the St. Patrick's Day 6x12 Stickers as the main word in my title, Then I sprinkled the floral and heart stickers around the page for a girly feel!

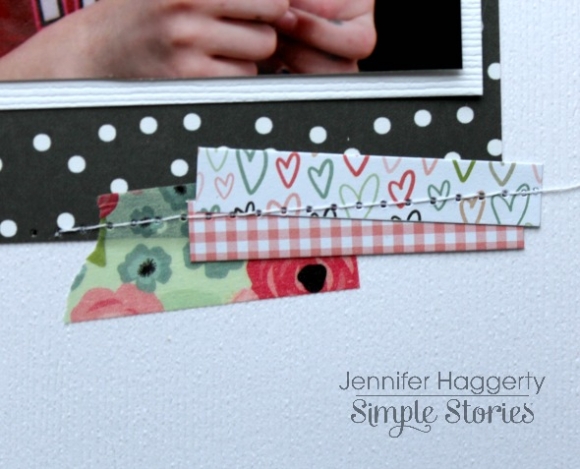
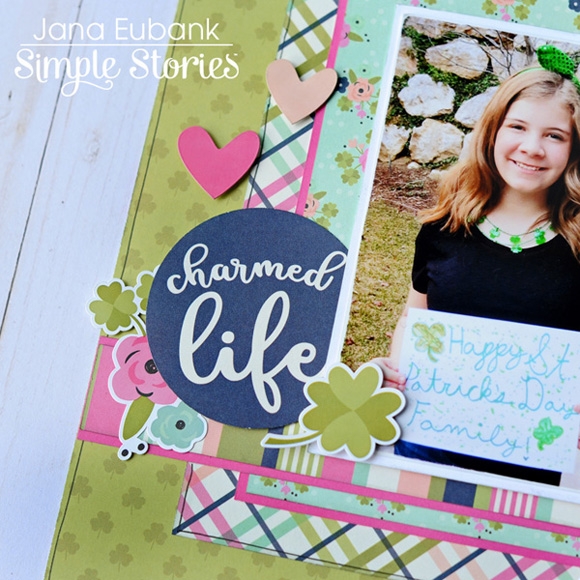
I loved the navy 3x4 journaling card with the rows of shamrocks with a single heart and wanted to incorporate it into my page design somehow. I decided to place it to the right of my photos as an additional background layer. 

Next, I punched the "charmed life" circle from another 3x4 Journaling Card to add navy to the other side of the page. The "So Very Lucky" banner sticker below the title repeats the navy color around the page, grounding the design and creating a visual triangle. 

Have you created a page lately about the people that you feel "lucky" to know? The St. Patrick's Day Simple Set is the perfect way to do it!

Supplies

Hello friends, Linsey here! Top of the morning to you! With St. Patty's Day right around the corner, the new St. Patrick's Day Simple Set is a perfect excuse to whip up some fun party favors, cards, and other cute projects! It's also the perfect set to scrapbook your St. Patrick's Day festivities! I really enjoyed playing with these super cute papers and stickers and making this fun test tube treat ensemble! 

Plastic test tubes are a really fun way to present little treats, such as MnM's like I chose to fill my tubes with. This Test Tube Holder Tutorial was used to create the holders with study card stock, then the really fun part, decorating the holders with the St Patrick's Day Simple Set! 

Since all the stickers in this simple set are so cute, it was hard choosing--so I used pretty much all of them to decorate my treat holders. :)  I even used a few stickers to make 2 mini banners. Some pretty ribbon, twine and gold sequin trim was added to each test tube, as well as a fancy ivory button and white spiral stamen to the centers of each bow. These are great to give to friends and neighbors and if you're lucky enough to be having or attending one, these are a perfect favor for all the St Patrick's Day party guests to take home with them! 

Thanks so much for stopping by today! I hope you've gained a bit o'inspiration from my festive test tube treat favors!

Supplies

It's February & love is in the air!  Document your love story with the Romance collection - the marriage of traditional pinks paired with punches of mint & black offer the perfect palette to capture those memories with your one true love. 

When it comes to paper crafting, it's all about the paper, right?  Regardless of what 'lovely' project you're working on, paper is the perfect starting point.  These are some of the Romance papers we just can't get enough of, especially the heart on brick pattern!

Stickers, chipboard & die cuts - OH MY!  Romance is sure to have just the embellishment you need to add that loving touch to all of your projects.   That mint floral washi, tho!

From layouts and cards to mini books planners & traveler's notebooks, the possibilities are endless with this heart warming collection.  These projects should help to get you inspired to create any time of year, not just February!   

Be sure to check out & follow our Romance Pinterest board for more sweet project inspiration.  Happy crafting!

SaveSave

Hi everyone, it’s Kelly today on the blog with my planner setup for February. This month I used the St. Patrick’s day Simple Set, the Seasons A5 sticker tablet and the Wood and Gingham 12x12inch paperpad.

I punched some hearts from different color gingham papers and layered them on the ‘This month’ page. In addition, I used the February stickers from the Seasons sticker tablet.

I have a confession: I looooove to make diy paperclips. It is so fun to do, it costs little time and the end result is so cute and functional.

This week I decorated my vertical planner pages with some punched butterflies and stickers from the A5 Bloom stickertablet.

I used a SN@P 6x8 pocket page, punched some extra holes and created a pocket insert for my planner to write down some extra to do’s and things I don’t want to forget.

Thanks for reading my blogpost, have a nice day!

Supplies

Hello Simple Stories fans and fans of love in general!
I’d love to share a post I created for my DH which captures a really sweet, fun time we had in the park together, while our kids played. He had recently got a new phone and we were trying out all the settings on the camera. It was so much fun and I love the pics that came out of our impromptu ‘photo session’.
 
 
The new ‘Romance’ collection was perfect for documenting this photo. The gorgeous brick work print on a sheet of ‘Love Story’ was hard to resist!  I used it as focal point and then went about fussy cutting some florals from various papers in the collection, until I had a good mix of sizes and colours.


There are lots of beautiful hearts in this collection too and I played with the shape, adding some stickers and creating some sweet, dimensional embellishments.


The title has been set above and below some text, which I typed onto my background paper using my typewriter. The stickers are from the Combo Cardstock Sticker sheet which has loads of sweet shapes and sentiments.


I’ve also used some of my (very precious, lol) wood veneer from one of my all-time favourite collections ‘Life in Color’. The little camera shapes were just the perfect finishing touch for this page. (I also asked myself, what good they were just sitting in a box somewhere… use the things you love so you can actually see them!)


The idea for these accordion hearts came from some stickers  I have in my stash. I pulled them apart and cut a few shapes out of a sheet of ‘4x4 Elements’. I scored them at 1/4 intervals on a score board and folded them up. Pretty impressed with how they turned out, even if they are not 100% perfect. I often do this and I think it’s a great way to not only save a bit of money, but also create a few awesome goodies you can use again and again.


Wishing you lots of happy crafting. I can think of no better way to show love, by making something from the heart or simply filling up our own buckets and creating from a place of joy!
 
Happy Valentines Day
 
Chantalle
 

Supplies

Roses are Red, Violets are Blue
Carpe Diem "Romance" is perfect
for you!

Valentine's Day is just around the corner. I am using the Romance Collection to add Love in my planner. I wanted to use my Black Blossom Personal Size Planner. I think it's a perfect combo.


 I made this dashboard by using the 12x12 Sweetheart paper as the background. I then added some chipboard pieces. I cut out the 3x4 journaling card and I used "Happy Valentine's Day" as my main focus. I layered some papers that I cut out made into shape of a tag.

 Be Mine Pocket Love

Layout for the week of Valentine's Day. I used mostly the 4x6 Romance stickers since they are small and fits better in the personal planner.

Did you plan something special for your love ones? I am hoping to go on a dinner date with my husband while my oldest son babysits our 2 year old daughter.

 Here I cut out some of the 12x12 papers and added adhesive pockets so I can put some of the journaling cards.

Thank you for stopping by and I hope you're able to celebrate Valentine's Day with your special someone.
Come and Follow me for more Inspirations on my Instagram @J4Fashion

Supplies

 
Hi There!! It's Lisa here with you today. Seeing as it's February, the official month of 'Love' I thought I'd create a 12x12 layout about something we as a family love. And what better collection to use, the 'Romance' collection.


 This background paper here is such a perfect backdrop to my story. I do love texture and although there is no texture as such to this page it really does look like it should have some. Seeing that eye catching heart there in the middle, as soon as I looked through the collection, I was instantly drawn to this 12x12 and had to use it straight away.


I wanted to add more of a contrast though to the page to help the elements stand out more. By scraping some white paint over the centre of the design this was just what I needed. Enough to do what I needed it to, but not so much that it covered the design of the paper. I needed that heart to stand out.
You can really see here how the pieces from the 'Bits and Pieces' pack really POP!! That paint worked just perfect.
 
 
I teamed up the 'Bits and Pieces' with some of the Chipboard Stickers and the 4x6 Stickers from the coordinating pack too. To help the shape of the heart stand out even more, I sewed around the outside. Not only does this help it to stand out it adds a wonderful texture to my page. See here how I've woven my stitches under and over the heart. I love seeing detail like this on my pages.
 
 
I printed off some wording and cut into strips to document the things that we love about our favourite Disney Resort. It was such a fun way to add journaling to a page. Keeping it in the shape of the heart. Thinking back to the heart as being the original inspiration for this page.


I've enjoyed making this page so much and I'm so happy with the result.Why don't you document something either you or you and your family really love this month. I hope you've enjoyed this today. If you would like to watch me creating this page and also looking through the 'Romance' collection that I received. Please watch my video here.
Thank you.
 

Supplies

Good morning Simple Stories fans! Nicole here today to share a project using the new Crafty Girl collection, released at 2018 Creativation just a few weeks ago!

I was inspired by so many things in this cheerful collection! I just love the fun mix of bright colors and had to use a lot on my project. I started with the awesome rainbow patterned paper and then added some smaller strips along each side of the page, including using some of the washi tape from the Crafty Girl collection along the right side of the page. 

I couldn't help but use the Crafty Girl as part of my title too, so I had the chance to scrap a page about some of my favorite crafty peeps that I have the priviledge of knowing! So perfect to document those relationships in our lives, right?

I absolutely love the  Live.Love.Create paper and had the urge to fussy cut out a ton of flowers and vines to embellish my project. A little bit of hard work goes a long way! I love how they brighten up the white on white diecut background I added using my digital cutter and file from Justnick.

Supplies

Hello again, I’d like to show you how I set my Ivory A5 Carpediem planner up for January using the Sub Zero collection by Simple Stories.

As always I started by decorating the pockets using an assortment of the ‘bits & pieces’ and chipboard pieces. I also like to use some of the 12x12 papers which I cut down to fit, this ties in all the colours nicely.

The next thing that I do is make a dashboard, I cut my chosen 12x12 paper to size and use the Carpediemplanner A5 punch for the holes. Using the cut aparts is a great way to add detail to your dashboard. 

I also made a pocket divider, it’s very simple to do.  Use an existing divider to draw around as a template but leave the bottom with a few extra inches to fold up, then just punch the holes and use some double sided tape or glue on the sides of the pocket. These are useful to keep your stickers, journaling cards or like I’ve done, co ordinating paper tags which you can use to journal on, list make or even add some sticky notes too. 

I hope you’ve enjoyed a peek inside my January planner, you can find more detailed pictures on my IG account  https://www.instagram.com/heartsbyemma

Supplies

Hi everyone! Tara aka Secretbees Studio! I have a new mini scrapbook to share today and it is a cutie! All of this cold weather has put me in the mood to scrap some winter photos with the adorable and charming 'Sub Zero' paper collection from Simple Stories! The bright colors, cute critters and fun motifs are perfect for preserving all of your winter adventures!

I created a staggered chipboard mini with some album builder Accu-Cut dies for lots of visual interest. This way you can see from one glance all of the colorful and snow-themed pages! Each page has a different shape and is covered in the fun patterned paper and then embellished to the hilt with all of the sweet  chipboard, bits & pieces and sticker designs!

There is definitely a 100% chance of fun creating with this collection! I used it here to document a ski vacation our family took but it would also be wonderful to show off those fun snow days full of sledding, snowman building and snowball fights!

Supplies

Hi Simple Stories fans !It's Lisa Dickinson here today with an easy technique for adding lots of color and pattern to a page - a bold border!

Style1_W

This fun, hand-drawn border is a free cut file from Juliana Michaels that I backed with several pattern papers from Simple Stories. 

Style2_W

I chose a mix of striped, plaid and dot patterns (with plenty of color!) from the Cabin Fever and Life is Ruff collections. 


Style3_W

I added some brad and sticker accents to a few of the circles for added dimension and texture.


Style4_W

In the upper right corner, a cluster of stickers, washi tape & metal accents complete the page.

Supplies

As papercrafters, sometimes a paper collection comes along that makes you immediately think of a set of photos, an event, or a memory.  When I saw the Romance collection, I knew some beautiful pictures of my son and daughter-in-law would work perfectly in an album.

I love the vintage, romantic feel of this paper line.  The cover was easy to embellish by layering several 3x4 cards.
 
These gorgeous photos were taken by Hillary Leah Photography here in Georgia, and I just love that the pictures worked so well with the beautiful blues and pinks in Romance.  
I used the 12x12 collection kit, along with the chipboard pieces and  4x6 stickers.
 
I hope I've inspired you to use Romance for lots of different projects, not just Valentine's Day.  It is so pretty for weddings, date nights, everyday family photos, or even baby pictures!  Enjoy!

Supplies

Hi there!

Nathalie with you today, bringing you some inspiration just in time for Valentine's Day.   And what better way to document your especial one than to use the beautiful Simple Stories's "ROMANCE" collection.

All the floral motifs in the Romance collection are beautiful, so a bit of fussy cutting was all that was needed to create the clusters that frame the picture of my husband and I on our Thanksgiving walk.

Since the picture of us was taken at a bridge, I was inspired to continue the pattern of the formation onto the background of this page.   There are so many beautiful embellishments in this collection, that it was so easy to combine them to create the title for this page.

The collection is perfect to document all those special moments in your life, not just Valentine's Day.   Remember to check the collection, you will love a bit of "ROMANCE" in your life.

Remember to contact me if you have questions on how this came together. Take care.

Supplies

Hello everyone and happy February!   I am here today to show you how I used the Romance line to bring a little love to my planner.  As usual, I started off making a simple dashboard using the Hello Love  12 x 12 paper and elements from the 12 x 12 Cardstock Sticker Sheet.

I used the Forever Washi Tape down the center of the pages for my weekly layout and started building up the layers from there.  I was in love with the bunting sticker on the 12 x 12 cardstock sticker sheet so I cut it apart and used it across both pages.  I stuck down some larger elements from the Bits and Pieces pack for important events during the week and also my flight information for a weekend trip.

I utilized so many of the functional stickers from the 4x6 stickers to create layers on the page and call attention to the various appointments and events I had during the week.

Since I was travelling over the weekend I didn’t have too much to put in my planner (sometimes I like to travel without a set schedule) I wrote in the few events my daughter would attend while I was away and filled the remaining space with more stickers from the 12 x 12 Sticker sheet.

Hello its Jennifer and I'm back to share another page I  created using the Romance collection!  There is so much about this line to love: from the die cut hearts to the delicate floral prints!  For my second layout, "XOXO", I  did a traditional Valentines page and documented photos of my children from their classroom parties. These are definitely sweet memories for me since both kids are out of elementary school!

I  love to cluster my smaller embellishments together such as the die cut hearts from the Bits and Pieces pack. You can also see one of the gorgeous floral clusters from the Combo Sticker Sheet.  I  have always been a dimensional scrapper and use pop dots with my die cuts, as well as mix in chipboard pieces such as the small butterfly. One of the many reasons why Simple Stories rocks is the variety of embellishments! I  love having choices!

How cute are these  "XOXO" letters that are found on the 6x12 Chipboard sheet?  They make for a great title accented with coordinating stickers and chipboard pieces!

​One of the 4x6 Sticker sheets has small "washi" type strips of patterns that are perfect to layer! Here, I  used two along with the Forever Washi Tape to accent my photo followed by stitching through with my sewing machine!


​Thank you for stopping by today! What is your favorite embellishment from the Romance collection? 

Hello everyone!  Dorymar here today sharing a beautiful mini album I designed with the lovely ROMANCE COLLECTION.  When I saw this collection, I fell in love instantly with the pastels colors, elements, and designs. St. Valentine’s day is just around the corner and this project is a unique way to celebrate love and friendship: the perfect gift for your loved ones!

The mini album consists of 6 pages filled with lots of interactive elements and details.

You can see how each paper coordinates perfectly with each other and how interactive and fun the pages are. Flowers, arrows, hearts, and pastels colors are so lovely!

I couldn’t resist adding all the elements of the Bits and Pieces pack because they are too perfect for the occasion. I used twine to give texture and to give some dimension to the arrows and tags!

Here is a very fun and interactive page full of pockets, tags, 3 x 4 cards and a huge beautiful element and phrases.

I love how this project turned out! I can’t wait to add pictures! I hope this project inspires you to create with the wonderful Romance Collection from Simple Stories.  Come and visit me on my Instagram at https://www.instagram.com/dorymar_pl/

Happy scrapping!

Supplies

Hello again creatives! Leah here with you on the blog today. It's a new year, which means it's time for a new planner setup that better serves my goals for 2018. I am using this planner, along with a traveler's notebook, as my two main planning and memory-keeping systems. I began my new setup in my A5 cream blossom Carpe Diem planner by giving the front of my planner a fresh makeover using the new “I Am” collection. This collection is full of butterflies and blossoming florals, which symbolize new life, new beginnings, and growth. All of the motivational and confidence-boosting sentiments in this collection are great for reminding you to keep faith in yourself as you take on your goals for the new year.

This year, I have a goal to engage in more art therapy. I loved mixed media so much and I haven't been taking out my art supplies often enough. My creative soul has really been feeling the weight of not prioritizing that creative time. For this reason, I created a mixed media dashboard for the front of my planner that is full of color! Every time I see this dashboard, I am reminded of how much fun I had creating it, which motivates me to get my supplies out. I used lots of texture on this dashboard with watercolor, glitter, chipboard stickers, doilies and lots of layering. I love stapling on butterflies so that the wings lift off the page. This phrases I used here are some of my favorites from the collection that I find most inspiring.

In my pockets, I also added lots of texture with similar elements as listed above, but I even got my sewing machine out. I love how sewing on paper can add such a handmade, personalized touch to embellishments.


I always love incorporating photos into my planner pockets, so I printed these tiny photos out and made them into a simple banner. This is one of my favorite pocket pieces I made and it was so easy to create! I used my sewing machine to sew through the banner, but I used to hand stitch elements like this before I finally figured out how to thread my machine.

For more creative inspiration using this beautiful collection, stay tuned on the Simple Stories and Carpe Diem Planners Instagram accounts!

Supplies

Hello! It's Lisa Dickinson here today sharing a heart-filled layout with you! 

PurrfectLove1_W

I've used the Life is Purrfect Simple Set on this page, but the design would work perfectly for a Valentine's themed layout - or any layout about LOVE!


PurrfectLove2_W

Use baker's twine to highlight a title and make it stand out from other die cuts.


PurrfectLove4_W

Buttons are perfect for filling extra white space in the design.


PurrfectLove3_W

Layer multiple stickers for a custom page accent - this one helps balance on the pattern & color on the left side of the page!


PurrfectLove5_W

Don't be afraid to use lots of pattern on a page. The Simple Set papers are meant to be mixed and matched to your heart's delight!


Supplies

Pages