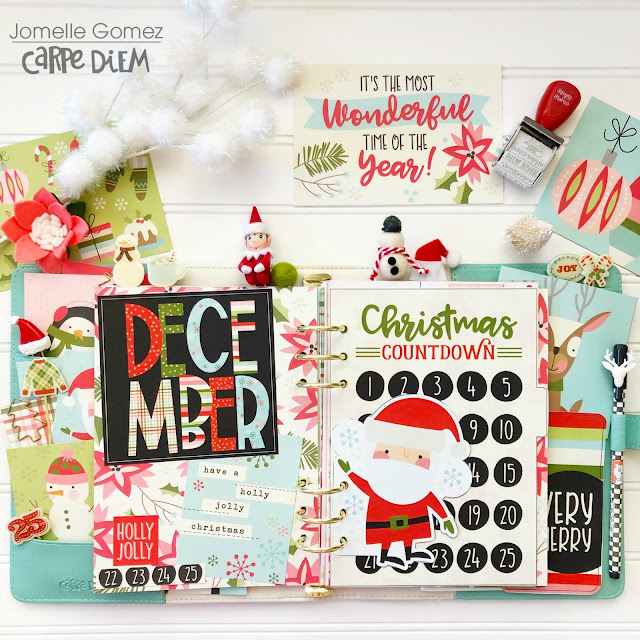
Hi everyone, its Meredy here getting ready for the New Year.  I know, I know it is not yet Christmas, but never too early to start planning, right?  I hope you are all having a wonderful holiday season and are looking forward to the New Year.  I have a lot to accomplish in January so I started a new planner and have been adding to it here and there over the last few weeks.

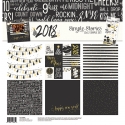
I made a quick set up for the New Year using the “2018 “ Simple Set

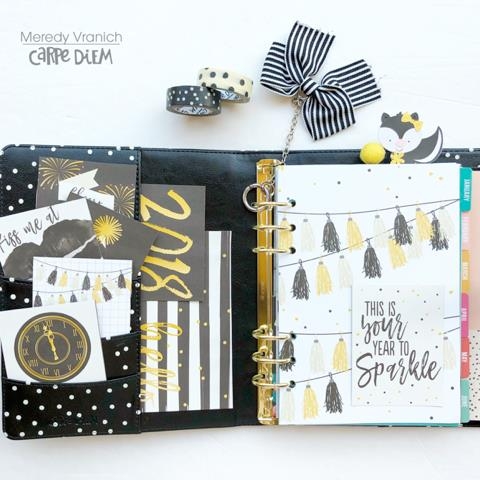
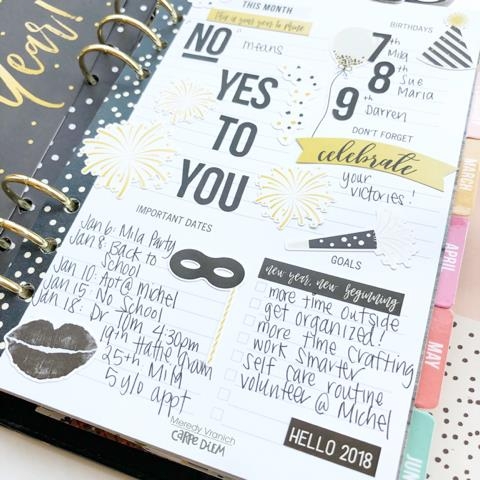
I haven’t done too much in the planner, but I did spend some time creating a monthly overview.  I have to be honest, I usually skip this page, but I was surprised how helpful it was to spend some time thinking about the coming month.

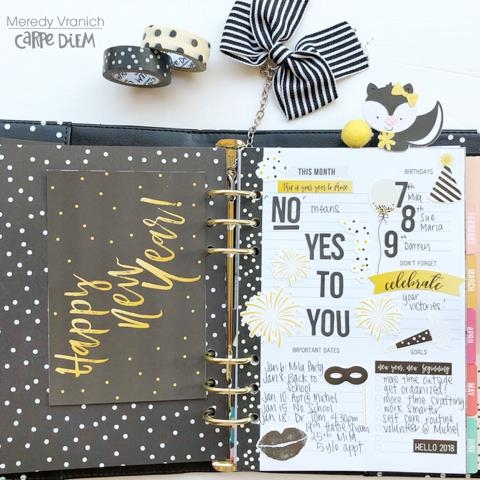
I put my theme for 2018 at the top (I am attempting so say “NO” more often) and a few birthdays which was a nice reminder that I better get shopping!

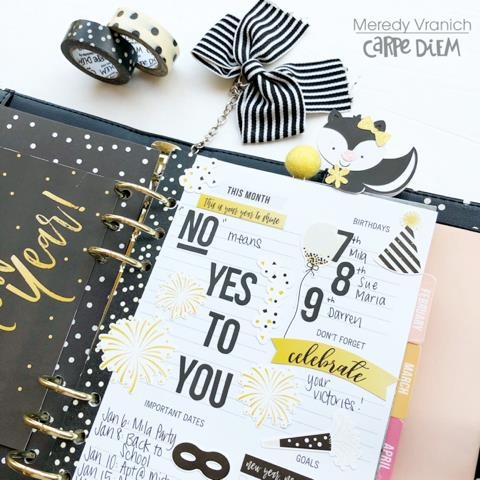
The bottom portion has a space for important dates and my goals for the month. 

This page didn’t take long at all, but I already feel ready for next month.  Wishing you all a Healthy and Happy New Year!

Supplies

I decided to document the Christmas gift that my husband and myself have treated ourselves to this year. A new coffee machine. We've been having problems with ours for so long now and as we both work from home, we do like to make decent coffee. So this little story need to be documented this Christmas.


I used the 'Sub Zero' collection to tell this story. The Wintery elements are just so perfect. I love a Winter line that isn't overly Christmassy. So this is perfect for me.
 
I really like the contrast here between the white card that I used and the creamy colours in this collection. For me it represents the snow in Winter along with the coziness that you feel at the same time.
 
I used one of the 6x4 and a 4x3 Element. These 12x12 Element sheets are great to cut up and use. I've layered them up here to home my photo and my journaling.


I really liked the idea originally of lots of white space, but once I'd created the middle section, the page just didn't look finished to me. So I continued on and used the coordinating Washi from the collection and some of the die cuts from the Bits and Pieces pack. It was just what I needed to finish the page.


 I have a short video here of this page being created.
 
I love this paper collection so much and I love that I can use it on all my Winter stories and not just for those over Christmas.  I have so many more ideas now.


Supplies

Hello everyone ! It's Mindi here with you today. Even though it is not even Christmas yet I have been thinking about the New Year. Have you seen the new Simple Set called 2018 yet ?  Is is so fantastic and I am beyond excited to share with you my pocket pages that I have created. 

To begin my New Years Eve pages I wanted to start out with a fun front page. I cut down one of the 12x12 pages and made it into a title page. On the other side I cut down a page protector to add some layers and interest. 

This next set of pages includes lots of photos and a fun sticker that I spread over two pockets. 

More stickers from this awesome simple set and I made some custom journaling cards.

Thanks for coming to the blog today. I want to wish you all a wonderful Holiday Season and a Happy New Year.

Supplies

Hello creatives! Welcome back to the Simple Stories blog. Leah here and I can't wait to show you how my December Daily traveler's notebook album is coming along! You can follow along with my progress over on my Instagram where I've been posting layouts regularly, and/or you can stay tuned to my YouTube channel where I plan to share a week of pages at a time when I reach those milestones. Today, I'd like to show you day five since it was such an eventful day. I ended up dedicating four pages to the stories.

I love using my paper scraps to add fun elements like pockets to my pages. I cut a tag out of a 6x8 paper (from the Very Merry paper pad) and journaled the story of “Queen Olivia” on the back. Tucking the tag into the pocket gave this page a fun interactive feature.

I got to spend the rest of the day with the Queen, a.k.a. my niece Olivia, which is why I have so many stories to tell for day five. These photos were from lunch – what a goofball she is. Four years old with a personality quadruple the size of her body. Never a dull moment with this silly elf around!


If you'd like to see a walk-through of the entire first week of my December Daily, check out the video below.

https://youtu.be/WseuweoAHEc

Completing a full week in my December Daily is a big accomplishment for me. This is the third year I've tried starting this project, but this is the first time I've gotten this far. Turns out the traveler's notebook format is a game changer for me. My TN insert is already bursting at the seams with holiday cheer!

As usual, this month is flying by, but I hope your December has been going well and that you've had some time for a little festive fun. Happy holidays friends!

Hello! Its hard to believe another year is coming to a close! Soon we will turning the calendar and celebrating the new year!  Simple Stories' new Simple Set is the perfect collection to document your favorite NYE photos or create a layout about those New Years resolutions! I am loving the black and white colors with gold mixed in! 

For my layout, "This Is Your Year To Sparkle",  its all about yearly traditions!  We've had our own NYE countdown with our kids since they were little! We would even get out pots and pans and let them make as much noise as they would like!  I  scrapped one of my favorite photos of my daughter from one recent year.

I  began with using a fun star background cut file with white cardstock from Just Nick. I then used one of the 3x4 cards for my title from the Journaling​ Card Element Sheet that is included in the set.  Repeating patterns or shapes is a favorite technique of mine so I  got out my star punch and created a line of stars around my photo and title. ​I added in a few of the coordinating stickers from the 6x12 Sticker Sheet as well as some sequins from my stash! The little sentiments included are the perfect accent to my cluster of stars!

Happy Christmas! Here’s a look at how I began setting up my Black Vintage Floral CarpeDiem TN, using the gloriously classic, traditional Very Merry collection by Simple Stories.

I’ve stuffed the pockets full to bursting with bits & pieces, chipboard pieces and elements from the 12x12 sheets! 

I’ve used paper from the collection to cover one of the ‘Beautiful’ inserts and decorated with pieces from the Snap pack, washi tape and alpha stickers.

Once again I’ve had fun adding, tip ins and flaps to my pages.

I wanted to include a month to view page and had such fun adding lots of stickers from the Very Merry collection and a peek a boo flap!

I hope you’ve enjoyed a peek inside my Christmas TN, you can find more detailed pictures on my IG account  https://www.instagram.com/heartsbyemma

Hello!!  It's Lisa, I'm here today to show you just how much fun I've been having with the 'Sub Zero' collection. I created this 12x12 here using some Disney photos of our's taken in the Summer at the Winter Summerland Mini Golf, which is Christmas themed. I love that you get to play golf in the 90's sunshine and listen to Christmas music. There's even fake snow!!    


I do love a white background, but I also love to create a frame for my pages. I just feel it finishes them off. My photos really needed those thick white borders. The colours are so similar to this paper line that they would have been lost on this page otherwise. It really helps them to stand out.


I used one of the stickers from the 12x12 sticker sheet and added some printed strips to create the title. I really enjoy doing this.I alternated sticking the sticker and die cut snow flakes with tape and 3d foam dots to add extra depth.


And this 'Snow Much Fun' was cut from one of the 3x4 Element sheets. It's what pulled this whole page together for me. Thinking of the fun that we had on that day and using the lime green which I continued throughout the page in the form of paper strips and snowflakes to bring it all together. This is the favourite part of this layout for me.
 
I do have a video here where I show everything from this collection that I have received and you can also watch this page being made by myself. I hope you enjoy.
 
This page just makes me smile. I love all the bright colours and jolly elements. It's just perfect for the fun time that we had and just goes to prove that you can still have 'Snow Much Fun' even in Florida in the hot August sun.  
 

Supplies

Hello there! Linsey here today sharing my latest altered project, a fun and festive 3D decoration that is sure to ring in the holidays with cheer! I used the absolutely delightful Very Merry Collection to alter my alarm clock, transforming it into a tiny winter scene leading to Kringle's Bed & Breakfast Inn! Enjoy!

This was so much fun to design and I love how it all came together! This collection is so merry and bright, it is almost impossible to not be filled with the holiday jolly when using it. There are so many sweet details, I couldn't resist using a little of everything. A happy snowman greets all guests and visitors with visions of holiday cheer along the way to 25 Kris Kringle Lane. Warm blankets, presents, caroling and hot cocoa all await you at Kringle's B&B--I don't know about you, but I'm ready to make my reservation! 

I hope you like my project and feel inspired to create some holiday magic with the Very Merry Collection too! Thank you so very much for stopping by! Have a creative and blessed day! Happy crafting!

Today I want to show you how I used the ‘Oh What Fun’ Simple Set in my Robin’s egg personal planner. I wanted a Christmas and winter feeling, but without using the traditional Christmas ephemera like trees, santa’s, snowmans, etc. The ‘Oh What Fun’ collection has beautiful papers with striped, floral and gingham prints which I will mainly use in this setup.

For the front dashboard, I cut out lots of flowers from the ‘Christmas Wishes’ paper and layered them with some beige little punched flowers in the right lower corner. I punched these little flowers out of the left-over paper scraps and glued two flowers in the left upper corner. I added a sticker ‘tis the season and some enamel dots to finish the dashboard.

If you know my style by now I love to stuff the front pockets of these binder planners. I used papers, stickers and sticky notes from the Bloom collection. I made a flag paperclip with pieces of paper, enamel dots and the sticker ‘Jingle all the way’. Lastly, I tore out two sticker sheets from the Bloom mini tablet and tucked them into the side pocket. This way I always have some extra stickers in my planner.

I used the Today tablet to write down my shopping list to bake some fun Christmas cookies. I can easily take this list with me to the grocery store.

I hope you enjoyed this winter setup, for more inspiration go to my Instagram page: https://www.instagram.com/createplannernl/.

Have a nice Holly Jolly day!!

Supplies

Hello Friends its Kristine Davidson with you today.  I will be sharing a layout using the cutest winter collection called “Oh What Fun” .  A winter collection with red, pink and blue … yes please!
I used a cut file for my background in this page. I thought it would showcase all the different papers in this collection. 

As you know the winter months make it really hard to photograph a nice white background .. sorry about the lighting!

I wanted a bit of black included in this layout. I added black doodles around the entire cut file, some in the penguin on the top left hand corner, in the journal tag and in the JOY cut out letters. I feel that this brings the layout together. Because my background is white and the picture is a bit white in the background the colors in this layout just pop!

Thanks for visiting us at Simple Stories today, if you enjoyed my layouts please come find me on instagram @KristineDavidson

Have a great day!

Supplies

It's the most wonderful time of the year! Happy Holidays everyone. Jomelle here today and I want to share with you my Holiday Planner Set up. 
I used the Oh What Fun Collection and the Free Printables to set up my Holiday Planner in my Cream Blossom A5. The colors in this collection are so sweet and so fun.

 
This Christmas countdown and the Santa are from the Free Printables.I printed the pages on regular computer paper, so I glued them on a cardstock so they don't feel so flimsy when I turn the page.
 
 
The one thing I enjoyed the most is creating my Monthly Layout. I used mostly the 12x12 Stickers to decorate my layout.
 
 
Here are some more of the Free Printable pages that I decorated.
 
 
Thank you for stopping by. For more inspirations follow me on my Instagram @J4Fashion.
 

Supplies

Recently I shared a project using some simple triangles on the blog and today I am back to share how I used the leftover supplies (+ a few extra too!). I started on the mission of using up leftover triangle pieces from the Very Merry collection kit. I had cut several from various papers in the collection kit for my other project and did not want the rest to go to waste!

I was inspired by a Nordic sweater pattern I saw in some holiday advertising at one point for the pattern on my project. I was determined to use those triangles to make the Nordic pattern on my own page.

The trick for this was where to start with the pattern, I wanted it to balance out fairly even along the top and bottom edge of my project, so I had to lay out the pieces like making a quilt and then make a few adjustments along the way. I did try to mix up the pattern and color for the pieces as I went, so I wouldn’t have a big red or green area and the shapes were fairly balanced. The best part is that as the papers are double sided, you have so many pattern options available to you for mixing and mingling!

Once my pattern was all down, I added some machine stitching and then embellished with the great chipboard set from the Very Merry Collection! LOVE the Merry Christmas title and all the florals are great to add some circular elements on the page too!

I started off by making Paperclips from the Oh What Fun Collection. I will never tire of making them. 

I made dividers and planner book marks. I love how the traditional colors are mixed with pastels.

Journaling cards are the perfect size to add to your planner. I love the variety it gives and all in the convenience of a card.

I just love the Christmas countdown, all you need to do is laminate it, and add stickers for each day. When done stickers are easily removed.

Supplies

Hello, friends! Jana Eubank here. Christmas can be a hectic time of year, but I always enjoy hunkering down in my craft room on a cold, snowy day for a bit of scrapbooking. Pulling out older holiday photos make me realize how quickly time passes by and to always savor each and every holiday spent with family and friends.

I began the page with the Season's Greetings paper from the Very Merry collection. I love the large floral in the corner! After placing my three photos in a triangle, the large floral perfectly fills the empty space and helps to frame the design.

I placed two strips of patterned paper on the right hand side of the page to anchor my photo grouping (Let It Snow striped paper and the green confetti dot of the 3x4 Journaling Cards paper). I used my sewing machine to zig-zag stitch in between the two paper strips and then added some chipboard snowflakes and phrase stickers at the top for decoration.

I could not resist adding that darling red truck to this page. It's almost as if the truck is delivery the presents that my family members are opening in the photo above! Ha! A fussy-cut floral piece from the Peace On Earth paper peeks out from behind the photo to finish things off.

I cut another larger flower cluster from the Peace On Earth paper to accent the bottom of my main photo and fill the space above my sticker title.

Finally, I added journaling to the left side of the page. Now this layout is ready to be put in our Family Album! I can't wait to get together with family again this year. Christmas is such a beautiful time of year!


See you again soon!

Hi, it’s Emma, I’d like to show you the beginnings of my beautiful Cream Blossom CarpeDiem TN which I’m setting up for Christmas with the gloriously sweet Oh What Fun Simple Set Collection.

I’m sure you’ll agree the colours work fabulously together!

As always, the first thing I like to do is decorate the pockets to tie in with the theme, I’ve used, scraps of papers, stickers and also fussy cut the penguin to peep out and make me smile every time I open up my TN!

I am quite new to using TNs so I’m learning what my ‘style’ is, but one thing I’ve found I love to do is add ‘tip ins’, this is where I’ve used washi tape to attach little extras, you can see how I’ve done this with the Christmas Countdown. 

I’ve also made a flap to lift using the same technique. How sweet is the deer!

I have enjoyed decorating the pages with the stickers, bits & pieces I’ve punched out from the 12x12 papers and then of course another of my favourite things to do, layering with word strips!

I hope you’ve enjoyed a peek inside my Christmas TN, you can find more detailed pictures on my IG account  https://www.instagram.com/heartsbyemma

Supplies

Hello Friends its Kristine Davidson with you today.  I will be sharing 4 cards I created using the sweetest Winter Collection called “Oh What Fun” .  

Using some of the journal elements from this collection makes it so easy to create the cutest holiday cards. I added some twine, dimensional adhesive, and a few enamel dots to create the perfect holiday cards.


Thanks for visiting us at Simple Stories today, if you enjoyed my layouts please come find me on instagram @KristineDavidson

Have a great day!

Supplies

Hey Simple Stories fans! Nicole here today to share a fun holiday project with you. Sometimes I get overwhelmed with all the great products to use for my projects. Truth is, I do better with smaller pieces of paper! So for this project, I literally broke it down for each of the patterned papers for my project and built my own design element on my project. I like to cut several pieces so that I have more than enough choices as I work through my project, also leaving me with enough for a bonus project later too!

I chose most of the papers in the Very Merry collection and then trimmed them down into simple squares, and then again in half into some basic triangle shapes. You really can do a lot with just a few triangles on your page!  I started on the bottom edge of my project and worked my way up along the left edge of the page, creating a holiday tree shape along the way. I tried to mix up the color and pattern of the papers as I built that fun tree on the side of the page.

Since the left side of the page was quite busy with the large tree, I kept things to a minimum on the right side of the page. I added a fun photo of my son along grouped with some of the stickers in the 4x6 sticker pack from the Very Merry Collection. Love that woodgrain paper from the Sn@p Basics collection, it works so well with the colors in the Very Merry collection!

Hi everyone! It’s Tara with Secretbees Studio and I have the sweetest tags to share today! Christmas is getting closer and it is never too early to start the wrapping of your gifts. Sometimes, instead of using fancy paper, I prefer just kraft and then I can really light up the packages with super cute tags! And the ‘Very Merry’ collection is full of the most adorable holiday images in awesome traditional colors!

Tags are the perfect way to use up your small paper scraps and left over embellishments from a collection! I had already used the ‘Very Merry’ collection on another project but held on to those last few pieces of patterned paper and decorative pieces I had left. I took some large manila tags and small white tags that I had in my stash and just got busy adding scraps and stickers and ephemera galore! All of the pieces in this collection look so beautiful together!

I did add in a few tiny details in the form of wooden stars and hearts, colorful enamel dots and festive twine. I also couldn’t resist making lots of paper curls to give these tags that final flair! The backs of the tags are totally blank so I have plenty of room to write in the lucky recipients name. Now to just get the Christmas shopping done! Thanks for visiting!

Pages