Hi!  Nichol here with a layout and card featuring the Sweater Weather collection (with a little Legacy thrown in since it matches in color so well). 

First up I created a layout featuring some old photos of my two oldest kids when they were small and sweet! I wanted to scrapbook these less than perfect photos because of the emotion and memories they evoked. To make the photos shine, I die cut one of the 12x12 Sweater Weather patterned papers using a design from the Silhouette Online Store. I sized the circles to fit across a 12x12 page. I die cut the "inside" pieces of the circles from Sweather Weather and Legacy 6x6 patterned paper.

To make the title really "pop" I combined plenty of chipboard stickers from the Sweater Weather Chipboard Stickers. Grouping the images together makes the maximum impact (plus aren't these little critters the cutest!).

Any of the circles I didn't fill with patterned paper, I filled with sweet photos. Then I added Sweater Weather Cardstock Stickers, DIY Burlap Stickers, Sweather Weather Enamel Dots and sequins to round out the design. 

I loved those little Sweater Weather critters so much that I grabbed the cardstock versions and put together a quick card. 

I embossed a cardstock background for subtle texture and die cut a filmstrip frame, then popped these cute critters inside the openings. I love creating cards like these with stamped and colored critter images however they can be time consuming. These sweet critters took no time and made this card come together in a matter of minutes! Love.

Want to see how I put both of these fall-themed projects together? Check out the video below:

Supplies

Hi Simple Stories fans, Rebecca here! I've always liked Halloween, but once I had little kids who loved to dress up, I started to really enjoy it! A few years ago, the whole family started dressing up and that made it even more fun. I thought it would be great to have a mini album and add our Halloween photos in each year.

I think I've mentioned before that I am not much of a mini album master? And then Simple Stories SN@P! entered my life and now I am a mini album fiend! So of course I turned to a black faux-leather SN@P! album and Simple Stories Frankie and Friends Collection to document our Halloween's past.

 The album came with several different varieties of page protectors like this full 6x8 pocket that holds the title page.

 After the introduction on the left, I started with last year's photos. Since the album is a two-ring binder I can just open and add new pages here each year!

I love chopping a 4x6 photo in half to fill two side by side 3x4 pockets like I did on the bottom left. On the right, the 12x12 Collection kit includes a sheet of 3x4 journaling cards for telling each year's story.

 I was sure to date each journaling card so I could remember what year the following photos were from.

 The Frankie and Friends collection also includes a sheet of paper with cards that cut down into the 2x2 square size.

The nice thing about all the cards and papers is they are double sided so when the backs show they are equally as cute!

It is so fun to flip through the pages and watch as time reverses and the kids get smaller lol!

For each year I included one open journaling card to jot down a few memories.

I even printed some 4x4 photos for the right side here. I cut a long strip of lined paper to journal on and decided to mix my handwriting in here since typing one or two words on every line sounded too tedious!

The Frankie and Friends collection kit also includes a sheet with 4x4 cards which I included here.

And last but not least- my oldest's first Halloween.

And all this was done in one weekend! Eight years worth of Halloween all documented and plenty more room to add future Halloweens!

Supplies

Hello everyone !! It's Mindi here with you today to share a few Life Documented pages using the Say Cheese SN@P! Set. 

During our last trip to Disneyland, back in 2012, we went for a whole week. As you can imagine there were a million photos. I divided some up into days but for this layout I gathered up all of the photos from Cars Land and put them together in one [ocket page spread. 

The Say Cheese SN@P! Set is so perfect for all of your Disney memories. I picked out a 4x6 card to make a title card with and quickly got down to business. The combination of fun, colorful cards with the fun pieces made this whole layout come together perfectly and easily. 

Here are a few close ups of some of the fun journaling cards and photos from our trip. 

I combined one of the 4x4 squares with a 2x4 strip of photos. I just love all the misc. journaling cards and squares. They are already beautifully embellished for you. This makes it super easy to finish a layout in record time. I finished off this card with a star and a few embellishments. 

This journaling card on the left might just be my favorite one from the collection. With the pie chart on the top and the journaling spots down on the bottom. It was fun trying to think back about our time in Cards Land and how it was spent. I used a strip of vellum over the top of the pie chart to document what it represented.

As you can see in the second page of my layout, I wanted to make sure and highlight the amazing neon lights that came on at night. 

This "insta magic" card was another one of my favorites. I put it next to one of my instagram photos and love how it turned out. 

I needed some more journaling space so I used the empty space in the middle of the card. Since I used vellum for my journaling I added a few stickers underneath to try and highlight some of the words in my journaling. I then added some enamel dots to hold down the vellum and to add dimension. 

It's really that easy to create an amazing pocket page or album using the Say Cheese SN@P! Set.  So go on and get those Disney photos scrapped !! We all know you have some :)

Hello Simple Stories fans, it's Cari with you today.  I decided to dig into my Legacy collection and I'm so glad that I did.  These papers are so rich & warm.  Perfect for a variety of photos from many years past to present day.  So I decided to use a photo from our family shoot last Thanksgiving and simply converted the colour photo to black & white (because the original colours in my photo really didn't go with the colour scheme).  This photo captures all the children in a tree - yes as soon as we found a spot for picture taking they were all up the tree in a blink of an eye!!! Kids will be kids!

I love the turquoise floral background paper and I added pops of that same colour with a few embellishments, such as the die-cut flowers, stickers and I also cut out this Silhouette polaroid pic frame on my Silhouette in the same colour.

I love the tree theme in this collection and decided to use this Silhouette cut file of the tree and layered that overtop of the tree on the journal card.

The 2" x 12" strips make creating a page so easy & quick. I love that! I simply used one vertically and another horizontally and this providing a starting point for my layout.

With all the matching embellishments and co-ordinating products it makes is so much fun to add finish off a layout!!

Thanks for joining me today!

Hi everyone! Lisa here with you today to share a couple of Christmas cards I made with the festive, new DIY Christmas collection. Are you thinking, wait a minute, did she just mention Christmas cards? In October? Why yes, I did. It's never too early to get started. This way you're done before the craziness of the holiday season arrives. So let's get the festivities going and take a look at the cards I made. :)

The patterns in the 6x6 Paper Pad are smaller so they're perfectly sized for card making, plus the DIY Christmas collection has a wide variety of embellishments to choose from. Having these options really makes cards come together quickly and easily.

This first card, Hello Santa, was fun to put together. Once I had the patterned paper combination figured out, I layered embellishments from the Tags & Twine and A2 Card Layers pack, adding in a sticker, chipboard pieces and enamel dots.

This next card, Happy Holidays/Merry Christmas, uses the same products as the card above, plus elements from the Journal Layers pack. If you want to create cards, each with a unique design, it's best to stick with one collection and to use similar products from that collection.

I hope these cards have inspired you and you're now ready to break out some DIY Christmas and get started making your own holiday cards. Don't forget to make a list and check it twice. Santa would like that. :)

Supplies

Hi there!  Wendy with you today sharing some layouts I created with the Legacy collection!

Love

We attended my little brother's wedding the beginning of September and I was able to grab this picture of the happy couple.  Their wedding was in a barn complete with cowboys boots and everything; perfect color scheme for the Legacy collection.  

I wanted to keep the focus on this picture of the couple so I matted the picture with a Sn@p Card before I placed the photo on my flower background.  I chose the flowers because of the red flowers the couple used in their wedding.  I used a few other 3x4 cards and Sn@p Cards to layer behind my photo to add some layers and color variations. 

The green background, I felt really made the photos colors pop, giving the page a rich feeling.  I chose the red Sn@p Cut to give a title to my page and some visual interest to balance my embellishment cluster on the bottom of the page.

My bottom cluster helped to ground my photo and add in a few wedding type details.  These were mostly pieces I fussy cut from the various papers and cards from the collection, my favorite type of embellishing!

What Matters Most

My next layout was also snapped at the wedding and so I just continued to create with the Legacy collection.  My design also stayed very similar with the focus on my photo with warm colors to match the venue of the wedding.

On this layout I wanted to use the family border strip and the 3x4 card.  I loved the saying on another card and so I fussy cut the words to use as my title, highlighting them with some pen work.

I again used a Sn@p card behind my photo to mat my photo and a few bits & pieces to break up the blockiness of the design.  An embellishment cluster, a punched border with a pop of yellow added in a few last minute touches to finish up the layout.

Hi everyone! Allison here with a Life Documented layout using the Frankie and Friends collection. I've also got another sketch that mixes traditional scrapbooking with the SN@P! Pocket Pages.

You can download the full sketch with measurements and placements here.

The left side of the sketch is designed with a more traditional style of scrapbooking in mind, while the right side uses photos and cards with the SN@P! Pocket Page, Design 4.

Here's my layout based on the sketch.

Usually, our October is pretty jam packed with fun fall events and one of my favorites is Halloween. There is so much fun to be had! Picking out or making costumes, trick-or-treating, trading candy, and ending the night in a sugar coma!

With so much variety and fun designs, Frankie and Friends was a great match for all of Halloween pictures. I love the cute little jack-o-lanterns and candy corn!

I tend to use stitching a lot on my layouts and one of my favorite things to do is use stitching to enhance a design on a piece of patterned paper.

In this case, I used black thread to stitch over the spider web design on the 6 x 8" background piece.

I also add a little extra to the web by adding a long stitched line ending with a large chipboard spider.

For the title I used a combination of the alphabet stickers and chipboard pieces. I love the little pops of color in some of the letters of the alphabet stickers!

For the right page I used a combination of cards and photos with the SN@P! Pocket Page, Design 4.

I really like the 2 x 12" pocket on the SN@P! Pocket Page, Design 4. You can either use the 2x12 strip from the 2x12, 4x12, 6x12 Elements sheet of patterned paper or you can do like I did and create you own 2x12 design.  I used a combination of 2x2" photos and 2x2" squares from the 2x2 & 4x4 Elements patterned paper. To finish it all I added a few stitched lines to the frame the squares.

If you are creating a Halloween page, you have to include a picture of the loot! I remember, as a kid, my favorite part was getting home and dumping out my plastic pumpkin bucket to see what candy I had come home with. I thought the "Where's the candy?"  4x6 card would be perfect for a few pictures of what the boys brought home. The chipboard candy corn was the perfect accent!

I used the two 4x6 pockets for pictures of close-ups of each boy in their costume.

My youngest put a slight twist on a pre-packaged costume and went as, what he called, a spider ninja!  I added a few small stickers and die cut pieces to the photos.

I took advantage of some empty space in a photo and added the chipboard haunted house, the chipboard "tricks and treats" banner, and a few die cut stars.

I'm using the 12x12 SN@P! faux leather album in black for all of my Life Documented layouts. The quality of the faux leather is fantastic and I love the stitching accent on them. I also used the 12x12 SN@P! Pocket Pages, Design 4 from the Variety Pack. I enjoy using several different styles of Pocket Pages and since the Variety Pack has so many great options, I have a lot to choose from.

I hope you enjoy the new sketch and for those that take part, have a safe and Happy Halloween!    

Supplies

LifeDocumented

Happy fall everyone!  Marie here today to share some new Life Documented pages using the School SN@P! Set.


School_FullSize

Kids bring home a lot of papers and art projects from school.  I like to save everything throughout the school year and then go through it all at one time, saving out my favorite photos and projects.


School_Page1

This way I have a nice variety of photos and papers to represent that grade level.  These pages show my son's 5th grade year, and include everything from his science fair project to a ukulele concert.


School_Notes

I tend to find a large number of handwritten notes (usually from girls) in his backpack.  I saved a couple of those in one of the 3x4 pockets. I'm sure he'll appreciate that some day.


School_Insert

To store additional artwork I added in a 6x8" clear pocket page as an insert.  I simply added a small tab sticker along the side which is included with the SN@P! Set. These inserts are a perfect way to store school memorabilia, class photos, invitations, and so on.

School_Page2

And finally to wrap things up I had to include a photo from his favorite subject... recess! 


I'm using a 12x12 SN@P! Faux Leather Album in teal for all of my Pocket Pages.  I have to say no matter what season it is, the beautiful, rich color of this album really makes my photos pop.  And for this spread I used Pocket Pages in Design 3, and a 6x8 Pocket Page as an insert.


Thanks for stopping by!

Supplies

Hey everyone!  Andrea here with you today to share a fun mini album I made using the Frankie and Friends collection.  I love Halloween, and I love this collection!  This album was a blast to make, and the cool cardboard coffin box makes it double as a decoration.

Here it is:

I decorated the top of the coffin with papers and embellishments; I cut the paper to the shape of the box and layered, layered, layered!

The cute saying on the inside of the lid is from the Bits and Pieces from the collection.

The pages of the album are chipboard.  I cut those to shape, then covered and decorated them.  They are done on both sides.

I punched holes and tied the pages together with pieces of fabric.

The album stores perfectly in the box, so it can be packed away and pulled out each year with the Halloween decorations.

I tied a few pieces of fabric around the outside of the box to finish it off.

And that’s it!

Thanks for joining me today!  I hope you’re inspired to create a fun and unique mini album of your own.

Supplies

Hi there, it's Emily.  Fall is here! Literally, the first day of fall and immediately the temperature dropped here in southern Ohio. I couldn't wait to use the new "Sweater Weather" collection on a project, but I am one of those crafters that has a lot of trouble crafting projects out of season. I can never bring myself to do the Christmas in July.... and fall projects before summer is a little much for me as well. Since it's "officially" fall, and it's now cold, I was able to play a little with this fun fall collection!

I created this mini album using tags. I thought this would be really cute to fill with some candid photos this fall. 

I used the collection kit along with the chipboard stickers and the bits & pieces from this collection. 

I didn't fill the pages yet, but the collection kit comes with so much that I have plenty to add into my album once I take those photos this fall and add them in. 

Thanks for stopping by! 

Supplies

It's beginning to look a lot like a DIY Christmas!  Hello, friends...Shellye along today with a quick home decor project and even quicker card using the new "DIY Christmas" Collection from Simple Stories!

First up is a 3-D distressed star that I purchased from Hobby Lobby; they have some really beautiful wood pieces available that require no painting, just a little embellishing :)

There are a couple of different ways that you can go about getting the right size star for the inner-part of the shape.  Press a piece of wax paper down into the shape and then use a stylus or pencil to trace the pattern onto the wax paper.  For mine, I used a piece of vellum and stylus for tracing.  Cut the shape out and then transfer onto your favorite DIY Christmas paper.  And if you're inclined, add a trim of baker's twine around the edge of your shape after you've glued it in place...this will help to hide any imperfections.

 Next I made a trio of basic paper-pleated rosettes by cutting two strips of 1.5" paper for each.  Score the strips at every 1/2" mark and accordion fold.  Glue the two strips together, end-to-end.  Punch a 1.5" circle for both the front and back of the rosette and glue in place at the center.  Place a heavy bottle of glue or small punch on top of the rosette until it has dried. 
 

I embellished around the backside of the rosettes with a silver tinsel trim that I found in the Christmas aisle at Hobby Lobby.  The poinsettias were made using the "Layered Poinsettia" dies from Spellbinders.  To the centers I added one of the larger enamel dots from the DIY Christmas Collection.  There are so many ways that you could decorate such a star...just have fun experimenting with this crafty Christmas collection!

Lastly I have a quick, quick card!  This quick card was made even quicker with the new DIY Christmas A2 Kraft Card Bases!

Using the 6X6 Paper Pad from the collection, I cut the chevron paper to 4"X5.25" and then trimmed away a portion of the chevron pattern.  Next I cut a matching sized paper from the holly pattern and adhered it to the card front.

The chevron paper was then lined up with the holly paper (top and bottom) and attached with foam adhesive.  I used some of the baker's twine from the Tags & Twine and made a border along the edge of the cut chevron...I like to use a fine-point glue pen for this.

You will find really cute tags and die-cuts in the DIY Christmas Tags & Twine set, the A2 Card Layers and Chipboard Stickers.  Make an assembly line of prepared card bases and have the kids and grands help decorate the fronts!

I hope that you've enjoyed the spotlight on this ultimate papercrafting collection!

Supplies

Hello fellow Simple Stories fans! Lisa here to share the new Sweater Weather collection with you. Today is the first day of fall here in the States (if you can believe it) so the timing of this post couldn't be more perfect!

I have two layouts to show you today. The first features a photo I actually took this spring, as the Japanese maple outside of my craft room was deepening toward a lovely shade of crimson. I put off scrapping this photo because it looked like a fall photo and didn't go with any product I had on hand. Turns out, I waited for good reason. The colors in Sweater Weather complement the photo so nicely and the embellishments work well with it too.

Let's take a closer look at various parts of this page. I backed the die cut Polaroid-style frame from the Bits & Pieces pack with a photo overlay and then a 3x4 journaling card. I added machine stitching to keep everything in place and embellished on top of the overlay with a chipboard sticker and enamel dots.

This next detail shot shows you the title area. This layout is called "All Heart". I used the chipboard letters that spell out the word "Fall" to create the first part of the title, leaving off the "F". A die cut arrow from the Bits & Pieces pack, layered over the chipboard letters, as well as some other hearts form the second part of the title, "Heart".

This last image shows the detail just above the frame.

This next page, "Let's Talk Turkey on the Shelf", is about a family tradition we started a few years ago. It's a variation on the ever-popular Elf on the Shelf, but geared toward the days leading up to Thanksgiving. Our turkey's name is Gallop, shortened from the species name for a wild turkey (gallopavo). He is a plastic Hallmark figurine passed on to me by my Mom. Gallop arrives on the first day of November and leaves Thanksgiving Eve so he doesn't end up on our dinner table. During this time, he gets into all sorts of trouble, like spilling the cat food while trying to feed the cat, but he does sweet things too like leaving chocolate truffles and inspiring messages. Although my daughter is now 13, she's already asked that Gallop visit us again this year.

Here are some detail shots of the page. This first one shows the title area. I used the fabulous cranberry script letters from Sweater Weather mixed with the green mini alpha stickers from Cozy Christmas.

This second image shows how you can layer up some of the Bits & Pieces with chipboard stickers, using foam adhesive to pop the acorn die cut off the page.

In this last picture, you can see more of the die cut Bits & Pieces, mixed with some of the stickers. Don't you just love the script words? I guess I do since I used three of them on this page! :)

I hope you enjoyed seeing Sweater Weather in action today, both on a fall-themed page and a layout with a spring photo. It's such a wonderful collection! It will have you wishing for changing leaves, pumpkins, apple picking and cozy sweaters in no time (or at least get you in the mood to scrap your seasonal photos).

Howdy!  Layle here with you today.  Welcome to the last day of the Simple Stories & Therm O Web Product Swap! 

Both design teams have swapped products and will be sharing on our blogs all week long.  Join us for some great inspiration as well as a chance to win a prize package from Therm O Web! 

Last up this week is Teri Anderson with a Say Cheese Life Documented pocket page spread -

________________

Hello there, Simple Stories fans! Teri here today, and I'm here with another Life Documented project. I'm excited to share with you a couple pages made with SN@P! Say Cheese.

I just got back a couple weeks ago from a fun trip to Disneyland. My aunt and I took part in the Disneyland Half Marathon Weekend. Sure, we had a great time running! But we had just as much fun exploring the park when we weren't running! So, of course, I just had to document the experience.

SN@P! Say Cheese was the perfect set to use for these pages because most of my pictures from the experience are of my aunt, me and the park's characters. The feel of the SN@P! set and the memories of just being in Disneyland just go well together.

Like any good tourist, I picked up a few trinkets to bring home. I think it will be fun in the future to look back and see what I paid for them so I included my receipt on this page.

I folded the receipt up, put a strip of Supertape (from Therm-o-Web) on the back of it and adhered it to a SN@P! card.

Here's how the card looks when the receipt is all folded up.

And here's how it looks when it is unfolded. The paperclip holds the Say Cheese tag in place. 

Kinda fun, right?

I used another fun technique on my right page. I made a shaker with the "We're all ears!" SN@P! card/ 

I'm almost afraid to admit how easy it was to pull it off.

Here's what I did: I adhered a strip of Supertape at the top of the SN@P! card. I then slid the card (with the red tape liner still on it) into the pocket. Then I dumped a few sequins into the pocket. 

Only after that, I removed the liner. The end result? A super cool, super easy to make shaker pocket!

I think the cool thing about this technique is you can still slide a SN@P! card in the pocket when you go to use the backside of the Pocket Page.

See where my hand is? Yep. I'll totally be sliding a SN@P! card when I use the backside of this page to document another event in the future. 

So before I go, let's talk about albums for a minute (or two). I'm using a 12x12 SN@P! faux leather album in red to document all of my 2014 adventures in. I frequently scrapbook out of order so I like that the album's ring binding allows me to do that. I used the SN@P! Pocket Pages Design 3 and Design 5 for this spread. I love that Simple Stories offers so many different styles of pages. I think it helps keeps my pages interesting by being able to use the different page styles.

Therm-o-Web supplies:

Supertape

Sticky Dot Mini Roller

Mounting Adhesive Tape

__________

Now for the fun part!  Enter via the Rafflecopter widget below and we'll draw one lucky winner on Sunday to win this awesome prize from Therm O Web! 


After you enter, head on over to the Therm O Web blog to see what their team has created.  Make sure to enter there as well - they're giving away a prize featuring our new Sweater Weather Collection!

a Rafflecopter giveaway

Want to follow Therm O Web?  Here you go!

Web:  www.thermoweb.com

Facebook: www.facebook.com/thermowebmimi

Blog: http://blog.thermoweb.com/

Twitter: https://twitter.com/ThermOWeb

Instagram: http://instagram.com/thermoweb

Pinterest: http://www.pinterest.com/thermoweb/

Thanks so much for joining us this week for the Simple Stories & Therm O Web product swap!  We hope you've found some great inspiration!  Check back tomorrow for the winner :)


Howdy!  Layle here with you today.  Welcome to Day 5 of the Simple Stories & Therm O Web Product Swap! 

Both design teams have swapped products and will be sharing on our blogs all week long.  Join us for some great inspiration as well as a chance to win a prize package from Therm O Web! 

Today Donna Jannuzzi shares a few cards and a layout -

________________

Hello Everyone! Donna here with you today as your host for the 5th day of our Simple Stories & Therm O Web Product Swap.

First up, I have two cards to share with you using the new Legacy collection.

I have been a longtime fan of Therm O Web adhesives. My favorite tape runner happens to be their Memory Tape Runner XL. But for this product swap I was given the opportunity to try out the Sticky Dot Mini Runner, and I have to say, I really liked it! It is smaller than the standard tape runner which makes it perfect for projects such as cards.

On my second card I used Therm O Web’s Decorative Photo Corners

The photo corners add a nostalgic touch to the card while also highlighting the Sn@p! card I used in place of a sentiment.

Next is a layout I created using bits and pieces from a few different collections:  Sweater Weather, Legacy and Hello Baby.

One of our favorite annual trips is when we go apple picking. It is nowhere near sweater weather here in Southern California (the high for this past weekend was 104 degrees!) But if you wait too long into the season to go apple picking there is nothing left! So we headed out a couple of weekends ago to visit a new farm, and ended up having a wonderful time.

I don’t know if I‘ve ever shared this tip with you here on the blog, but I like to remove the prongs from my brads using wire cutters. Therm O Web’s Zots are perfect for adhering brads to your pages. You don’t have to worry about punching a hole in your page or having the prongs sticking out the back of your layout. It makes it a lot easier to slide layouts into page protectors too.

I loved the light brown wood grain paper from the Hello Baby collection and wanted to use it as the background for this layout. A few embellishments from Sweater Weather and Legacy completed my page.

__________

Now for the fun part!  Enter via the Rafflecopter widget below and we'll draw one lucky winner on Sunday to win this awesome prize from Therm O Web! 


After you enter, head on over to the Therm O Web blog to see what their team has created.  Make sure to enter there as well - they're giving away a prize featuring our new Sweater Weather Collection!

a Rafflecopter giveaway

Want to follow Therm O Web?  Here you go!

Web:  www.thermoweb.com

Facebook: www.facebook.com/thermowebmimi

Blog: http://blog.thermoweb.com/

Twitter: https://twitter.com/ThermOWeb

Instagram: http://instagram.com/thermoweb

Pinterest: http://www.pinterest.com/thermoweb/

Join us again here tomorrow for the last day of our product swap! 


Howdy!  Layle here with you today.  Welcome to Day 4 of the Simple Stories & Therm O Web Product Swap! 

Both design teams have swapped products and will be sharing on our blogs all week long.  Join us for some great inspiration as well as a chance to win a prize package from Therm O Web! 

Today Heather Leopard shares a fabulous Christmas layout!

________________

Heather's here with a fun way to use up those itty bitty scraps you've been hoarding. You know what I'm talking about...the ones that are a bit too small to do much with but you just love Simple Stories sooo much that you can't bear to throw them away!?!? Anyway, I challenged myself to use them up and I thought I'd pass the challenge along to you.  Take a look at what I created using the new Cozy Christmas collection.

I love this photo of my daughter holding her gigantic stocking that's filled to the brim with little goodies. I knew I had to create a re-create a jumbo sized stocking for this page.

How to:

  • Using your favorite stocking cut file, enlarge it to fit the page. If it has circles already, move to step 2. If not, draw circle cut lines. Cut your stocking.
  • Cut another stocking the same size but this time without the circles.
  • Next, place your stocking with circles cut out over the offset stocking and draw the circles so you know what areas to cover with your scraps.
  • Remove the stocking with the circles and add shimmer using glitter spray from Thermoweb. If you forget this step, just do what I did and cover your pattern paper with the circle cut-outs.

  • Take your scraps of varying shapes and sizes and line them up in whatever way they fit. You may have to trim a bit here and there.

  • Once you've placed all your scraps, place the stocking with circles cut out over the background. Stitch around the stocking and around each circle. Adhere or stitch to the page.
  • Add the stocking trim at the top and embellish to your liking.
  • Add your photo in the upper right side of the page or you can layer it over part of the stocking.. I chose to place it where it is to ensure it remained a key focal point on the layout vs. getting lost by mixing in with the stocking.

  • Add your title in an open space on the stocking.

Many thanks to Therm o Web for the wonderful adhesive and glitter spray and to Simple Stories for the amazing Cozy Christmas collection.

__________

Now for the fun part!  Enter via the Rafflecopter widget below and we'll draw one lucky winner on Sunday to win this awesome prize from Therm O Web! 


After you enter, head on over to the Therm O Web blog to see what their team has created.  Make sure to enter there as well - they're giving away a prize featuring our new Sweater Weather Collection!

a Rafflecopter giveaway

Want to follow Therm O Web?  Here you go!

Web:  www.thermoweb.com

Facebook: www.facebook.com/thermowebmimi

Blog: http://blog.thermoweb.com/

Twitter: https://twitter.com/ThermOWeb

Instagram: http://instagram.com/thermoweb

Pinterest: http://www.pinterest.com/thermoweb/

Join us again here tomorrow for more inspiring projects!


Howdy!  Layle here with you today.  Welcome to Day 3 of the Simple Stories & Therm O Web Product Swap! 

Both design teams have swapped products and will be sharing on our blogs all week long.  Join us for some great inspiration as well as a chance to win a prize package from Therm O Web! 

Today Kirstine Davidson shares a few 6x8 Life Documengted pocket page spreads -

________________

Hello Friends! 

It's Kristine with you today and I am here to share with you my October 2012 Life Documented spread using the NEW Seasons SN@P! Set!

Often times we are overwhelmed by products and photos. It's hard to decide what to use - what not to use and this post is just that! I decided for the month of October I was going to simplify and use a few photos and few products. What's awesome about the Seasons SN@P! Set is that you can do several spreads with just a few cards! 

I first sorted all the FALL/AUTUMN/HALLOWEEN Cards, Insta Squares & Pieces and a few Stickers. Some cards I wouldn't use such as Halloween cause I didn't have any photos of hubby and i being ghostly! But what i did instead is use the B Side of the card for a coordinating background to my photo! 

If you look closely to the Autumn Filler Card - I Sprayed it with Thermo Web Glitter Dust. I love this stuff!! It gives my card a glitter effect in seconds! 

I love the simplicity of this spread. I only took a few cards, cut up some pieces from 3x4 cards or 4x6 cards and added Stickers using Thermo Web - 3D Foam Sticky Strips and Zots 3D. 

Here are individual pages of my spread. 

Look at this filler card - even the dots are glittered!! SO Easy with a little spray! 

Here are 2 more close up shots - 

So with just a few awesome SN@P! products you can create an awesome spread for your LIfe Documented album. No stress on which products to use, just select a few from the Seasons SN@P! Set and you are ready to create!

Thermo-Web Adhesive
ZOTS™ SINGLES • SMALL
ZOTS™ SINGLES • 3-D
3D WHITE FOAM STRIPS 1/2"

Glitter Dust - Silver
Sticky Dot Mini Runner

__________

Now for the fun part!  Enter via the Rafflecopter widget below and we'll draw one lucky winner on Sunday to win this awesome prize from Therm O Web! 


After you enter, head on over to the Therm O Web blog to see what their team has created.  Make sure to enter there as well - they're giving away a prize featuring our new Sweater Weather Collection!

a Rafflecopter giveaway

Want to follow Therm O Web?  Here you go!

Web:  www.thermoweb.com

Facebook: www.facebook.com/thermowebmimi

Blog: http://blog.thermoweb.com/

Twitter: https://twitter.com/ThermOWeb

Instagram: http://instagram.com/thermoweb

Pinterest: http://www.pinterest.com/thermoweb/

Join us again here tomorrow for more inspiring projects!


Supplies

Hi Simple Stories fans! Rebecca Keppel here today with a Simple Stories SN@P album documenting the fun of summer. Simple Stories created the SN@P albums and pieces with people like me in mind. People who love the idea of mini albums, but kind of freak out at the idea of making them lol!  When you typically create layouts and design with a larger space such as 8.5x11 or 12x12, the smaller format can be a bit scary. Not so with SN@P! albums. Much of the work is done for you and the parts that are not done are super user-friendly. You can easily complete an entire album in one weekend. I used the Good Day Sunshine collection to make a SN@P album documenting all the fun we had this past summer. The Teal Chevron Burlap album is gorgeous as is, but I decided to tie some trims and add a 4x6 card with stitching for the cover mounted on a scallop cut piece of wood grain paper. It's always nice to have the year on the cover too.

The inside cover page says it all, doesn't it?!

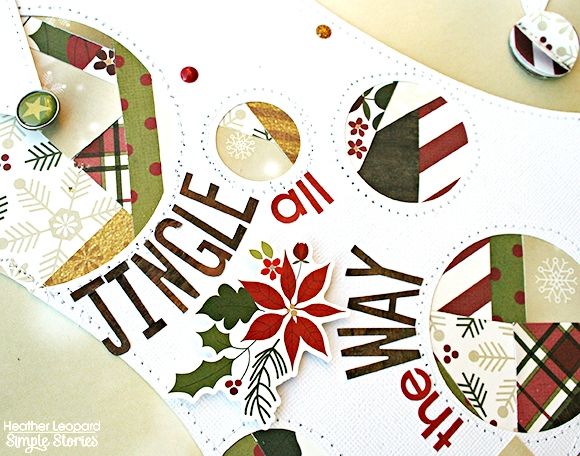
The first page features the last day of school! Anyone already looking forward to that again? The 6x8 SN@P! pages feature awesome die cut pages and they really don't need any embellishing at all, they create such a statement on their own. I love how you can see the next page through the die cut letters.

 I am in love with the Pocket Page formulation here. It includes two 4x4 pockets perfect for either Instagram photos OR the 4x4 cards and four 2x2 pockets again perfect for mini photos or cards. The sun die cut page is AWESOME! I loved backing it with a sky page :)

 I used the full 6x8 pages to introduce each month of the summer.

 On the back of the intro page I used a typewriter to journal about the main events from that month. On the right you see another die cut page. This is one that came with the album. It is awesome as-is, but I thought it was fun to spritz it with some coordinating mist.

 Another die cut page - LOVE THEM - and you get a bunch in the pack. This Pocket Page is fun for a bunch of photos and one journaling card.  I like to mix handwritten and typed journaling in one album.

Love that the 3x4 cards are double sided so the green polka dot is just the backside of the card from the previous page. I simply added a chipboard sticker to spice it up ;) On the right you can see a couple of pictures that were smaller than the pockets. One is mounted on a 4x4 card, and one is stuck in a pocket with a 2x2 card behind it. Don't worry about having just the "right" size.

 In this whole spread there is really only one 4x4 photo, but it feels like there is lots going on thanks to the Good Day Sunshine cards, brads, stickers and SN@P pages.

 Here is July's introduction. No photos at all here, just journaling.

 The SN@P cuts are fun too. On the left one is backed with a 4x6 card so you see a fun pattern through the lettering.

 I used the 4x6 transparencies on a photo from the previous page and the one on the left here. What's nice about the 4x6 pockets is that you don't need to adhere the transparency, just slip it into the pocket in front of the photo.

 The banner die cut SN@P page is another of my favorites. I love that it is a unique size and shape that allows you to see the page behind it.

 The 6x8 pages can also be used to highlight one large photo like I've done on the right here.

 And again here on the left. Stickers and chipboard can be fun on the empty space of a photo.

 Here is the introduction of August the final month.

 Here I have more journaling and a 4x6 photo that I made into a vertical strip collage before printing. On the right is the last title page and introduces our last weekend of the summer.

 I had fun added little bits to the top of pages with binder clips. The Today is a Simple Stories die cut available here in the Silhouette online store.

 Last, but not least, the final page to my album.

This album was fast and simple to pull together, but I love the colors, the bits and pieces and of course all the memories it holds! I can't wait to make my next SN@P! album!

Supplies

Hi Everybody ! Mindi here with you today sharing a few pocket page layouts using a combination of Cozy Christmas and Christmas SN@P!. They go together so perfectly ! 

I have a confession to make. I love Christmas. I love Christmas Paper. All things related to Christmas. 

I could work on Christmas projects all year round. Lucky enough for me, I still have yet to finish my December album from 2013. Kind of forgot about it actually, crazy enough. 

Here is my first page. I started out with one of the Cozy Christmas SN@P! pages as a background. I fell in love with the cut out stars and it was the perfect size for my album, especially since it matched perfectly with the theme of our "family/lights photo shoot". I decided to make my photo smaller in size, as to not cover up all of the stars and knowing that I wanted to embellish around the photo. 

For the back side of the SN@P! page I went with the same look as the front. A smaller photo and some embellishments.    It was paired up with a 6x8 pocket page. 

I had fun with this filler card. I took one of the SN@P! cards and cut it down. That way I had room for my fun layered circles on the bottom. I started out with a bunch of 1 inch patterned paper, punched out circles. Finished it off by lining them up and layering them on top of each other in a staggered way for a fun textured look.  

I was having so much fun with my album that I just keep right on going. Finishing off the other side of the pocket page.

I just love these SN@P! cuts! They are such an easy and fun way to add a little bit extra to your layouts. Originally the wood grained snowflake cut piece was 4x6. I cut it in half and added a strip of patterned paper to the end, adding patterned paper to the back side here and there. 

I finished off the pocket page by adding a few embellishments to my journaling card and photo. Adding both the bits and pieces and the enamel dots to my layouts are always something that I love to do. They let me be creative, while adding texture and making each one unique.

For this particular project I am using the 6x8 SN@P! Binder in Red. It is the perfect size for something like this and I love both the creme and the red color of the album. 

Thanks for joining me today !  

Pages