December 2016 Blog Posts

Hello again crafty friends! Leah here to show you the beginnings of my December Daily album. I attempted this project a few years ago, but I failed a few days in. When I first started prepping for the project this year, I started with SUCH excitement and confidence. I had a ton of fun decorating the cover! I’m using the 6x8 Striped Holiday SN@P! Binder for my album this year.

Before I jump into my album, I thought I'd share an A-HA moment I had as I worked on this in the hopes that it might help YOU along the way :)

On December 1st, I started strong. I took a few photos and noted the story I wanted to tell for that day, even though I knew I wouldn’t be able to assemble my album pages on that day. As the December days continue to pass, I am trying to stay diligent in recording the details. As I sat down to start pulling layouts together for the first couple of days of December, I quickly remembered why I failed at this project before. I have this frustrating tendency to overthink everything. It is always a challenge for me to set aside my eagerness to keep adding more details until my layouts are “just right.” As much as I try to avoid the fact that I can be quite a perfectionist, that trait of mine rears its ugly head during daily projects like this. “Perfection” is a very relative idea that varies from person to person. For me, my joy and my demise are in the details. I need and love the meaningful details that I put into my layouts, but I can also spend a lot of time pulling those details together sometimes. I really enjoy the process, no matter how long it takes me but for a DAILY project, extensive time spent on every page of my album WILL eventually overwhelm me and burn me out. I thought I had learned this lesson the last time I tried to create a December Daily album, yet there I was again, as I sat down to start the first pages of my album, questioning whether I would actually be able to fulfill my commitment to this project. I am determined though, so I pushed through the self-doubt and told myself that I’m going to take this one day at a time and do the best I can. There is no time limit.

After my first couple of layouts, I started to find a rhythm. I figured out a few things about myself that are starting to help my layouts come together easier.

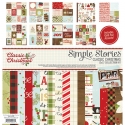
1) I MUST limit my products. I have chosen to use the Classic Christmas collection from Simple Stories and a few other supplies from my stash, but I have to make sure I never have too many choices around me or I will start feeling overwhelmed.

2) I need a special, organized space to work on my album. Before December 1st, I set everything up on my dining room table and organized my supplies where I could easily see them all. Now, this space most definitely does not stay clean as I start working. Try as I might, I am a very messy crafter. However, I have made a huge effort to make SURE that when I am done crafting for the day, I tidy up and put everything back in its designated spot. This has been critical for me because a messy space is not welcoming, and I need to come back to this space every day in December.

3) Something as simple as arranging my page protectors in my album stressed me out SO much. With everything else I have to think about in December, I was not about to let this be the thing that did me in. I read Ali Edward’s blog post on her foundation pages and she actually provides a link to the map of how she arranged her page protectors. If you are someone who tends to stress over details, I highly recommend giving yourself a pass on this one and mimicking the arrangement of Ali’s page protectors, or create a simple formula by laying out all the types of pocket pages you have and just arranging them in the same pattern over and over. You can make adjustments later if necessary.

4) Because I know that I tend to overcomplicate things, I tried really hard to keep it simple. I saw these beautiful, simple pages that all my crafty friends were putting together and wished I could do the same. I tried to conform to this simple style with the clean lines and beautiful design, thinking that’s what I needed to do so that my brain did not become overwhelmed with adding the decor instead of focusing on the stories I wanted to tell each day. Well, I couldn’t do it. This is the most important lesson I have learned from this project so far: you have to make your project YOU. Yes, I needed to find some balance. Realistically, I cannot spend hours a day making layouts for this album. However, I can make it more “me” by adding crafty details and giving it more of a “messy” and handmade vibe. That is not everyone’s style and that’s okay! Some friends I know are documenting their December memories as mini albums, or in a traveler’s notebook or planner. You really have to find a memory-keeping system and style that is going to work for you, because not only will you hit roadblock after roadblock if you try to conform to something that isn’t you, but the entire purpose of this project is to document YOUR stories. The memories will mean more to flip through in the future if you can connect with the perspective in which they were being documented - through your eyes, in your style.

So without further ado, here are the first few pages of my December Daily. I began with stating my “reason why” for this album, or my intentions for what I wanted this album to be. This year, I really want to focus on slowing down and enjoying the magic of the Christmas season. I typed up my journaling on this free printable from Ali Edwards, and then printed it out in a 6x8 size using Photoshop.

I cut down a patterned transparency from Michaels to use as a dashboard in the front of my album. I just traced a page protector to get the correct size and then punched holes for the rings. The gold cutout star is from my stash and I used the speckle patterned paper from The Reset Girl collection to put behind it. I LOVE the simplicity of that pattern so much and the cream and black colors coordinate so beautifully with the gold on the transparency.

Before I got into creating daily layouts, I decided to add a few more details to the front of the album. This calendar is from a set of Classic Christmas SN@P! Pages that I cannot wait to use throughout this album. They are going to add a lot of interest in between the pocket pages! I added some cream pom pom ribbon from my stash under the “December.” I then stamped the dates and added lots of Classic Christmas embellishments, such as stickers, die cuts, stamps, enamel dots and washi tape. As a planner girl, decorating calendar pages is my thing. I had so much fun with this!

One other element I added to the front of my album uses some of the free Classic Christmas printables Simple Stories offers. You can find and download them here! I used the “Making a List” pages and cut them down so I could add patterned paper to the background and a few other embellishments. I also printed another set of these list pages out separately for my planner. I scribbled the messy notes on those and then rewrote everything neatly in my album. I used gold glitter washi at the top of both pages and added my title using black foam Thickers on the left page, and the white letter stickers on the right are from the Classic Christmas Expressions cardstock sticker sheet. At the bottom of the left page, I added a couple of cardstock stickers and a small die cut from the Classic Christmas SN@P! pack. On the right page, the “Merry Christmas” is a chipboard sticker from the collection.

My layout for December 1st began with a large 6x8 photo of some festive peppermint mochas I made for my husband Patrick and I.

The story I decided to tell was about how Patrick and I assembled and decorated the tree while we watched Christmas movies and sipped on our mochas. After the tree was decorated, our cat Minerva, a.k.a. our resident tree inspector, gave it her stamp of approval.

On the right side of the layout, I chose a photo of Minerva with the tree and printed it in a 4x6 size. I chose a couple of 3x4 SN@P! cards for the top pockets and began embellishing. I used some washi tape, a word strip sticker, a couple of die cuts, and a chipboard sticker from the Classic Christmas collection. The gold numbers I’m using for my album are pocket pieces from the collection. I stamped the date on the journaling card and stamped the stitching pattern from The Reset Girl roller stamp in several places for a little extra detail.

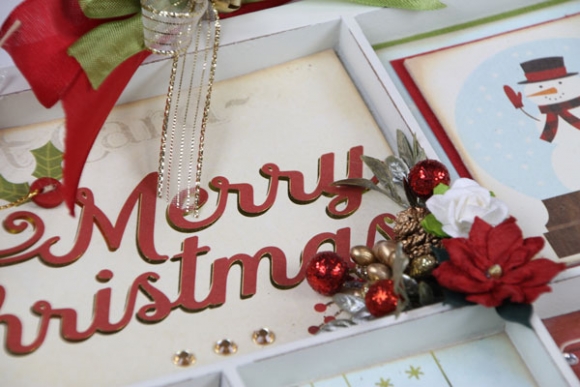
As far as the album cover, I used one of my favorite patterned 12x12 papers from the collection on the front. I cut it down to the proper size and inked the edges. I used black foam Thickers for my title. Under the title, I used gold glitter washi tape with a couple of wordstrip and decorative stickers from the Classic Christmas collection.


The snowflake is a cheap wooden ornament I got at Michaels and I love the dimension it gives to the album cover. I punched a circle from one of the light blue papers in the 6x6 paper pad as a background for the year. The addition of the light blue into the otherwise traditional Christmas colors of this collection is one of my FAVORITE details. The icy blue really brightens the collection in a beautiful and unique way.

I lined the inside of the album using this patterned paper from The Reset Girl collection. I love how the bold pattern adds a modern spin to the Classic Christmas collection. I use bold black and white prints often throughout the album. The cute little red stocking adhered to the front of my album is from the Target dollar spot and I added a couple of chipboard stickers to dress it up.

I will be adding lots more pictures of my album to my Instagram throughout December, and maybe, just possibly…I might be filming a YouTube video or two for the first time. We will see how that goes! I’ll be sure to keep you updated on my Instagram. Head on over to the Simple Stories and Carpe Diem Planners Instagram accounts to see all of the other amazingly gorgeous ways the Christmas and winter collections are being used!

Supplies

Good morning!

I am so excited for the upcoming holidays.  I love our family traditions and giving gifts to others.  One of the biggest gifts I can give to my son, is memories.   I drag him to see Santa multiple times a year, have him help me make treats for our neighbors, we give to Toys for Tots and feed the homeless Christmas afternoon.  The biggest gift he can give me, is smiling for photos so I can preserve our memories.  This is a photo from last year when we visited Santa at my son's school.   My son seems bigger than Santa!  


I love love love the SN@P!  Pages.  Meant for the 6x8 SN@P! Albums, but so fun to use on a layout!  I used the half circle Santa.  I placed half of my title on this piece.  


Look at all of these little bits that I collected from the Classic Christmas to help my layout come together.  


_______________________________


Yes, you read the title of my layout correctly.  


It snowed here on March 28th last year.  I realize I live in New England, but still, snow at the end of March is plum crazy!  We were not prepared.  Our boots, shovels and scrapers were all put away.  However, our house looked beautiful on this day.  Fresh and clean with cover of snow.  


When I saw all the houses throughout the Classic Christmas collection, I knew I would be using them on this layout.  


Trouble was, it wasn't a Christmas spread, it was a March spread.  So, I picked through the collection for items that could help me document my memory without it feeling Christmasy.  So, ignore the wreaths on the windows and see how it all came together!  


I started by fussy cutting the blue snowy paper with scissors, backed the entire piece with foam and applied to white cardstock.  (that is the sky)

The bottom white part was for my houses.  (that is the snow!)


Every year, about this time, I have the habit of bring out my stickles and pearl pens.  I used a pearl pen for this layout.  I used the stars on the paper as my guide on where I placed my dots.  Looking at it from afar, it looks like a snow filled sky.  I carried this to the bottom of the layout to the stars on the red paper too.  

Supplies

Hi, everyone. Lori here, sharing some of the fun from behind the scenes at Simple Stories.

One of our favorite things we love about working at Simple Stories is the relationships we create with our customers and our retail store owners. Each of us share a passion for scrapbooking, organizing or planning, and that shared passion has allowed us to build many professional and personal relationships. We love the people we interact with, and we love our community!

Sometimes our retailers create projects for us, either as assignments or as gifts, and when we receive them we fall in love with their creations. Today’s project we’re sharing is a Classic Christmas wood tray display given to our owner, Amber Crowell,from Karen Petersen of Mom & Me Scrapbooking in Salt Lake City, Utah. Isn’t it beautiful?

To create the backgrounds for the openings in the display tray, Karen selected various sizes of Journaling Card Elements from our Classic Christmas collection. Look closely how she added personality to some of the openings. Rhinestones are added to catch the light, and look how sweet this small deer and Christmas tree look placed in a 3x4 frame.

Layering embellishments is of the most important things to think about as you’re creating a display tray. As you’re gathering your extra embellishments, you can browse the jewelry aisle, the sewing aisle, the floral aisle and even the miniatures section in your local craft store. A miniature mason jar and a ginger man button add tiny character to the candy cane card, while small circle shapes that are painted and inked come to life as ornaments once Karen placed a Christmas tree charm and shaped buttons with twine on top.

Small sprigs of holiday flowers and greenery add quick personality to this 4x6 opening in the frame. Don’t forget to build layer upon layer of berries, leaves and flowers to make the small bouquet seem more realistic.

This project is so beautiful and creative! Thank you, Karen, for such a wonderful gift. We’ve picked out the perfect spot in our office to display it for everyone to enjoy.

We've showcased this project as the final projects for our 12 Days of Crafting we've been sharing on social media.  If you missed the projects, we've compiled all 12 in a PDF that you can download and enjoy - click here to be inspired!

Happy Holidays!

Hello there! Today I'm sharing two layouts created using the Classic Christmas collection! There is nothing like a classic Christmas color scheme, and the added gold foil touches are just lovely.


My first layout was inspired by the poinsettias featured throughout the collection. I found a cut file in the Silhouette store that allowed me to layer petals on top of one another to create a full flower. This could easily be done with scissors and paper as well! I used two different reds for the petals, and glued the flower down at the center of my page. I placed my photo in the center of the flower, and added a couple of journaling cards as layers. I don't do pocket pages, but I ALWAYS pick up a SN@P pack because they make such wonderful layers!
 

For my title, I mixed the sticker sheet and chipboard to create "Joy & Cheer". I kept most of my embellishing pretty simple since the flower is the center of attention. A few die cuts and clear stickers were all I needed! Finally, I finished the page with a stitched border.


This next layout is my favorite! I wanted to use several family photos from Christmas Eve. They are blurry and not great lighting, but they capture important traditions and moments we share. I wanted to emphasize the togetherness that happens at Christmas, and the song "Have Yourself a Merry Little Christmas" kept coming to mind, I typed it out in Silhouette Studio, and cut it out from a background paper using my Cameo. 
 
 
I emphasized a few of my favorite lines by backing them in a brighter color. I used a photo editing website to create tiny photo strips for my layout. I backed them on SN@P cards for easy layering! I stitched around the layers in gold for added interest. I fussy cut poinsettias from patterned paper, and placed them around my photo. My title is a beautiful gold chipboard element!
 
 
While looking to find a finishing touch, I stumbled upon a perfect sticker that says "All Hearts Come Home for Christmas". I love that sentiment, and I feel like that sticker was meant for this page!
 
 
I had so much fun creating these festive layouts, and I am definitely in the mood to scrap more Christmas pictures! Thank you for joining me today, I hope you feel inspired to use the Classic Christmas collection!

Supplies

Season's Greetings! Violet here, sharing how I used my Striped Holiday SN@P! Binder with the Mistletoe Kisses collection. The reds, pinks, greens, and blues with a touch of silver, made a perfect place to store my photos in a fun creative way. 

I started off by decorating the front of my binder. I cut out the snowman from one of the journaling cards and cut out a huge circle and made an ornament. I glued the snowman to the circle. I used stickers and ephemera and washi tape to embellish the front.

As I open up my binder I  added a photo of my family and on the other side I added a picture of my hubby reading to our granddaughter. I added some of the journaling cards to the clear SN@P pages. These SN@P binders are awesome, for a visible view of precious memories I was able to capture on camera. I added some ephemera and star confetti to the inside to make it a little more holiday-ish! 

Of course I had to capture a picture of the top of my SN@P Binder with Mistletoe Kisses paperclips. I absolutely love how the peek out from the top. And they are perfect for holding those snap pages closed. You can see that in some of the photos I posted. 

I can't wait to fill this up with all the new memories we will be making this month. Thank you once again to everyone who took time to stop by the blog. I wish everyone a Wonderful Christmas and Happy New Year.

Supplies

Hello Simple Stories friends!

Marcia here today with some Classic Christmas inspiration. There are so many things I love about this collection, the plaid patterns, the classic red and green colors, ... did I mention the plaid? Oh yes, plaid is showing up everywhere. At first I thought this collection would be so great for scrapping my guys, but then I found these pictures of my daughter with reindeer antlers on her head and wearing a plaid dress. Adorable! I had to scrap those pictures with the Classic Christmas collection. Here is 'Reindeer Games' ...

I fussy cut this cute reindeer out and gave him a red nose with one of the enamel dots. Now it matches my daughter's red nose!

So many fun things to layer; the die cut bits and pieces, the gorgeous bradz, and even a roller stamp to add a few Christmas phrases.

This collection has some festive washi tape too. You can see the red stripped washi under my photos and the christmas words washi over my center photo and at the bottom of my layout. The metal clips are super adorable too. 

___________________________________

I don't know about you, but I love crafting for Christmas. I make a lot of cards to mail out. Lots of my Aunts and Uncles I don't get to see very much and a Christmas letter and a card helps keep in touch with them. Unfortunately some are in senior care facilities and I like my card to double as Christmas decor for them. These Christmas box cards are just the ticket ...

This JOY card has lots of beautiful layers. Here is what it looks like from a top down angle.

and best of all ... they fold flat for mailing!

___________________________________

I must still be a little girl at heart, because this sled sure looks like so much fun. I had one just like it when I was little. Hopefully it stirs up fond memories for Aunts and Uncles too.

Along with the sled you can see Christmas presents, a candle lit lantern, and fun ice skates. Doesn't that wreath look great on that door!

Here is what it looks like folded flat.

Thanks so much for stopping by today!

Supplies

Hi everyone and welcome back to the blog today! I can’t quite believe that my kiddos are finishing up their school year this week! It’s been a busy one and we are all looking forward to getting down to the serious business of having lots of holiday fun!
 
It’s a bit of a tradition in our kindergartens and schools to give a little end of year gift to one’s classmates. I’ve got a few examples for you if you are stuck for ideas! Let’s take a look what you can create with just one Mistletoe Kisses Collection Kit (with plenty of leftovers!)
 
 
Let’s start off with these cute little 3x4 cards. I’ve used some plain white cardstock and then mounted some 3x4 journalling cards over the top.
 
 
One sheet of Mistletoe Kisses 3x4 Journalling cards will give you 12 options for card messages. (I like to use a craft knife and ruler to trim up these types of sheets as I find it a lot more accurate.)
 
 
This little reindeer card has had it’s corners rounded and then it’s been very simply adhered directly onto the card using a small hole punch and some metallic twine. One could also create some custom envelopes to match!
 
 
I’ve given him a bit of extra detail in the form of a ‘shiny nose’ using some glossy accents; some sparkly cheeks (Wink of Stella brush pen) and stamped on an extra sentiment with my Classic Christmas Roller Stamp and some co-ordinating ink.
 
 
Hello Mr Elf… My my, haven’t you got a festive cap! I’ve used the roller stamp again on this one, along with a bit of washi tape.
 
 
Do you like to give edible treats? How about a little goodie bag filled with some freshly popped corn and a pretty tag? I simply adore the darling characters in this collection.
 
 
Here is an idea for the girls… some cute Christmas hair clips, complete with mistletoe and bells!
 
 
I’ve created a tag and then cut two lines into it with a craft knife. I then slid the hair clips into these cut areas.
 
 
This goodie bag contains sweet treats!
 
 
The bauble was hand cut from one of the 3x4 cards. I often look to the journalling sheets in a collection kit for extra ephemera!
 
 
How about a pencil with the child’s initial?
 
 
I’ve decorated some pencils with washi tape and then attached a punched initial to the pencil with some metallic twine. Add a teensy bell for extra cheer!
 
 
This all-in-one die is a super cute option for a gift card or voucher.
 
 
The little present slides open to reveal the card and a note.
 
 
Lastly, I have used a SN@P! Photo Flip to hold a special home-baked treat. These fun sleeves come primed with adhesive so you can easily attach them to your project. I have fused my sleeve shut to prevent ants from taking a taste test!
 
 
You can use the area underneath the sleeve to write a little note to your BFF.


Thanks so much for popping in today. I hope you have lots of fun exchanging your festive treats!


Supplies

Hello! It's Jennifer and I'm here today to share a fun mini album I created using one of the new Designer Binders and the Winter Wonderland collection!  This line includes a great selection of patterned papers and embellishments that are perfect for your winter projects!  Another smash hit from Simple Stories!  

I used some older photos of a ski trip my husband and I took to the Catskills in New York. 


I chose to decorate the front of my Designer Binder but it's pretty on its own! I love the cabana stripes of white and Robin's Egg!  My favorite print is the plaid of "Bundle Up" so I wanted it to be prominent on my cover! I used a 2 1/2 inch strip along with a wood grain border sticker from the Combo Sticker Sheet.  I then added little embellishments from the 6x12 Chipboard as well as coordinating Enamel Dots!  How cute is the chipboard snowman? 


For my pages, I used the 6x8 Pocket Pages Variety Pack so I could include different sizes of photos and journaling cards.  I included 3x4 and 4x6 Journaling Elements which are perfect to add a little bit of journaling or coordinating embellishments! 

A must in my pocket pages is creating a see-through pocket with sequins and small embellishments such as die cuts and wood veneer pieces.  I use my sewing machine to stitch around the edges to secure my pocket. 


I am a fan of layers and had fun "dressing up" the journaling cards! Using a shape hand punch or die cuts are great way to add depth to your pages!  I used a pennant hand punch with the multiple patterns and stitched through. I also added some of the journaling spots found in the Bits and Pieces pack.  


Using pop dots or foam tape is also another fun way to add to your pocket pages!  I popped up the pinecone as well as the ticket on my 4x6 Journaling Element Card.  For the "Eat, Sleep, Ski" card I used the skis die cut and popped it up over the print. I love how it turned out! 


Also included in the Variety Pack are pages with 4x4 pockets perfect for the 4x4 Journaling Elements.  I also created my own cards by using patterned paper and embellishments.  

Here, I layered different sizes of circle hand punches as well as pieces from the Bits and Pieces, Stickers, and Enamel Dots to create a fun card!  Note the small stamped sentiment from the Carpe Diem Roller Stamp! 


Did you know Simple Stories has a large variety of cut files here in the Silhouette shop?  Many are the perfect size to place in your pockets such as this "Live Laugh Play" card! I cut it from the B side of  "Silver White Winter"  and backed it with the red/white plaid of  "Snow Cute" 

I used the 6x8 Pocket Page to create a larger page to showcase a favorite photo. I actually used one of the 4x12 Elements layering paper and embellishments to border my picture.  And can you tell I love banners? I used the "Best Time Ever" cut file from the Simple Stories Silhouette shop as well as more hand punched pennants. To finish I stitched through with my sewing machine as well as added a couple cute chipboard snowflakes! 


Of course Winter Wonderland has a variety of 4x6 Journaling Elements!  I wanted to do a spread of this size because my photos are from the early 2000's prior to digital cameras. They aren't the best quality but definitely some of my favorites!  

Another banner! I used the "Frosty" die cut from the Bits and Pieces that I popped up over hand punched pennants. I added the cute ice skates and mittens at the ends of my banner as if they were "hanging" at the ends.  This collection has so many cute little pieces to choose from!  


Thank you for stopping by today! I hope this inspires you to do some creating with Winter Wonderland and the Designer Binders! Have a great day!

SaveSave

SaveSave

Supplies

Pages