February 2017 Blog Posts

Good morning friends! Brenda Smith here and I've got a fun pocket page to share with you using the adorable, the ever-versatile Love & Adore. 

I love the idea of the panorama-sized page protectors and was inspired by one of the 6x12 cut-aparts from one of the elements sheets.  I wanted to make a mirror image of the 6x12 so I took to Photoshop. I downloaded the digital version of the Elements sheet and mirrored it horizontally. Because I do not have a wide format printer, I scaled down (keeping the proportions) until I got to 11". After printing, I glued each piece to a 4x12 strip from the paper, Melt My Heart

I happen to love the configuration of the lower pockets as well. Three 4x6 cards and still space for some 3x4s? Perfection in my book! I always like to make sure the focus remains on my photos while making room for some fun embellishing and details. 

I added some hand-stitched crosses to the outer edge of each panorama sheet. It only takes a few extra minutes of work but I feel like it adds a lot extra visual interest. For this spread, I kept my machine-stitching in plain white so it doesn't stand out too much. It adds a lot of texture without being too in your face. 

I used my fringe stickers to trim some papers from the Love & Adore 6x6 pad  I layered them to make a stage for my photo. The "Hello" is from the 6x12 chipboard

In keeping with the spirit of the mirrored images at the top, I kept the rest of the pocket page spread mostly mirrored as well. I did the same placement of photos and cards on both sides to balance the visual weight of the spread. Mirroring is one of the easiest ways to accomplish this. 

I enjoyed layering elements from the chipboard and the Combo Sticker sheet. I used dimensional foam adhesive on the heart and "you're a keeper" to separate them a little better from the background. 

I usually finish my spreads by finding a few places that could benefit from some machine stitching. I particularly like to sew through letters or phrases. Don't be afraid to sew through chipboard--- just go slow! 

If you are on Instagram, make sure you follow Simple Stories to see even more inspiration with Love & Adore.

Supplies

Hello friends! Today I'm excited to share two fun layouts with you using the Love & Adore collection! The colors and patterns are perfect for all your love-themed photos, but are also versatile enough to be used for a variety of themes. I love doing layouts about my husband, so this collection was just perfect for me!


My first layout was insired by the "With All My Heart" patterned paper. I love the awesome design, and wanted to make it extra special. I cut out the insides of the heart using a craft knife, then traced where each color would be using a scratch piece of paper. Next, I used the 6"x6" pad to find papers that coordinated with the brush strokes, and punched out a million tiny little hearts using a heart confetti punch, I glued down the hearts to the scrap paper, keeping each color within the lines I designated when I traced it earlier.  Gluing down the hearts took a bit of time, but the end result is lovely! It's a great movie-watching activity.
 
 
Once I had the hearts glued down, I added my photo and embellishments. I wanted to cover as little of the punch hearts as possible, so I kept the embellishing simple by primarily using the chipboard.
 
 
I love the way it turned out! 
______________________________________
 
My next layout was inspired by the "2x12, 4x12 & 6x12 Elements" patterned paper. The "Loved you yesterday..." quote is one of my favorites and I couldn't wait to use it on a layout!
 
 
I began by placing the quote to the right side of the page, leaving an edge of white cardstock. I added a scalloped strip of paper underneath, and then stitched it all down. I chose my photo, and added layers of patterned paper behind it, as well as a doily. I glued that down, and added chipboard hearts and the "XO". I wanted to repeat the look of the stained glass heart, so I cut out the same design from the 6"x6" paper pad and slid it behind my photo. 
 
 
Next, I added some splatters of black ink. I grabbed the phrase stickers from the 4"x6" sticker pack and added them going down the edge of my page. I couldn't choose just one, so I used nearly the whole sheet!
 
 
Those are my two layouts using Love & Adore! I had a blast creating with this collection, and I know you will too. Thanks for joining me today!

Supplies

Hello February! Violet here on the blog today to share how I used the Love & Adore collection.  February is one of my Favorite months because of Valentines and my Anniversary Month. Love & Adore was the perfect kit to keep track and creatively plan in my Ballerina Pink Carpe Diem planner. The pinks, yellow, blues, hearts and floral made for a beautiful planning session. 

As I open up my planner my eyes go straight to the dashboard and pockets. I make those two areas my focal point for planning. The Bits & Pieces and stickers were the best part of stuffing my pockets. What I really enjoyed is the SN@P! Pocket Pages that fit perfectly inside my planner. They also add that personal touch to my planner. Did you know the 6x6 paperpad page with squares fit perfectly in the pocket pages? This makes an awesome Dashboard!


I always look forward to getting my monthly view planner set up. Especially, for the Month of February. I used Love & Adore washi tape and stickers, 6x6 paper pad square pieces and enamel dots. The bright colors and black made the perfect color combination for February. Here are a few pictures before the pen.

Thank you every one for taking the time to stop by the blog.  This month I will be celebrating my 21 year anniversary along with my granddaughter's first birthday, my son's 3 year anniversary, my daughter-In-law's birthday and we can't forget Valentine's. I am so thankful that Simple Stories makes it easy for me to plan accordingly... till next time happy planning.

Supplies

Hello! It's Jennifer here today to share my projects using the beautiful Love & Adore collection!  Valentine's Day is right around the corner so this is the perfect line with its pink and red hues! What makes Love & Adore even more awesome is that there are "non-traditional" colors and prints; so of course it can be used for many other themes! 
 
 And that's exactly what I did for my first layout, "Love One Another". I wanted to document one of my favorite photos from our last mission trip to Haiti! Our team member had given one of the ladies her old hooded jacket to keep warm at night. I just love the look of joy on her face!
 
 
I started with a kraft cardstock background and the "Love" Simple Stories Silhouette cut files (I added 'one another' with a font from my Silhouette library).  I then backed the negative spaces with patterned papers from Melt My Heart and So Happy Together.
 
 
The Bits and Pieces pack has many fun die cut shapes to accent your project including journaling spots such as this rounded square!  At the bottom of my journaling, I used a label sticker from the 4x6 sticker sheets to add the date. I also added some of the cute cut out chipboard and sticker hearts as well as coordinating Enamel Dots!  
 
 
At the top of my photo, I layered one of the tags and floral die cuts from the Bits and Pieces and added one of the cute sentiment stickers from the Combo Sticker Sheet. I used another cut out chipboard heart as well as some hot pink/white bakers twine from my stash.  
 
 
I love to cluster small embellishments in the corners of my photos; its something I've always done. And I appreciate that Simple Stories always gives me so many great options!  Here, I used some of the smaller stickers from the 4x6 Sticker Sheets along with a cut out heart sticker.  One of my favorite embellishments are the typed sentiment labels as they are perfect to add a little extra to your page!  How great is this David Bowie quote? Huge kudos to whoever made the decision to include this because I seriously thought it was perfect. 
 
 
______________________________________
 
For my second layout, "XOXO", I decided to go the traditional Valentines route! My friend had given me this photo she had taken of my daughter one her first Valentines Day! I cut 9 inch strips of the different patterns and layered them down my page.  I also added in some coordinating Washi Tape in random spots. I then used my sewing machine to stitch through a few of the strips to secure as well as add some accent.  Next,  I cut a heart background with my Silhouette and white cardstock that I adhered over my strips of patterned paper. 
 
 
For my title, I used the " XOXO" Chipboard pieces from the 6x12 Sheet; I chose to stack them instead of placing the letters in a straight line.  
 
 
Here, I layered some of the sentiment stickers from the Combo Sticker Sheet as well as the 4x6 Stickers.  I also used one of the smaller journaling spots to write down some notes about the photo.  
 
 
As you can see, I definitely layer a lot of embellishments and elements on my pages. If this isn't your style, you can take away pieces you don't prefer. I think the process of experimenting and trying to figure out what works for you is what makes scrapbooking so fun.  ​
 
 
It's tough for me to turn a good banner down as I really love them!  I'm alway excited when Simple Stories includes them on their chipboard or sticker sheets!  I adhered mine across the middle of my page to "break up" the white in the die cut.  
 
 
Thanks for stopping by today and I hope you will check out Love & Adore in its entirety by clicking here!  Have a great day! ​


Supplies

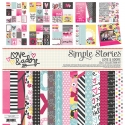
Hello everyone! It’s Leah again, here to show you how I have used the Love & Adore collection to set up my Carpe Diem planner for February. Wowza, January was one heck of a month for me! It was a month full of firsts and trial and error, as I worked really hard to pull together my very first online class (coming to Big Picture Classes in March!). I learned how to film and edit video tutorials too! Now that I’ve gotten the hang of filming, could this mean new adventures with YouTube? Only time will tell! Meanwhile, I am just so relieved to have completed  the class. There is something magical about seeing something come together that you have worked so hard on. After accomplishing such a big goal of mine, now I am feeling SUPER motivated to spend some time laying out my goals for 2017. February 1st feels like January 1st to me. I am kicking things off by setting up my planner for February!

I started by getting creative with making a February monthly divider. I tried something new with this project. I used graph paper from the Basic Inserts pack and got messy with my watercolor paints! Word of caution here: I have used watercolor on the Simple Stories planner inserts a lot and never have issues with the page warping too badly, but you have to be mindful to not use too much water. In this case, I disregarded that. I used more water to get that drippy effect you see. I basically puddled the watercolor toward the top of the paper and then stood the paper up to allow the paint drip down. As a result, I did end up with a pretty wrinkly page but I actually like how it looks, feels like a page out of my at journal. I also glued it down to the existing cardstock divider for February which helped weigh the warped paper down a bit.

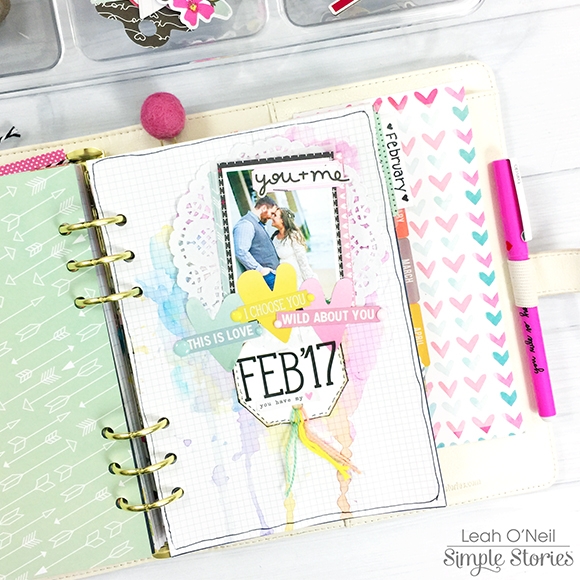
This project actually started out as me playing with watercolor just for fun, but then I liked how it looked and decided to turn it into a monthly divider. Since February is “the month of love,” I focused on a love theme. I used three die cut hearts from the Love & Adore bits and pieces pack and I arranged them in the order of the paint colors – blue heart near the blue paint, yellow heart above the yellow paint, and the pink heart near the pink paint. The colored phrase stickers are from the 12x12 combo sticker sheet. I matched the color of the sticker to its corresponding heart. Then I used enamel dots in the same colors on each end of the phrase stickers.

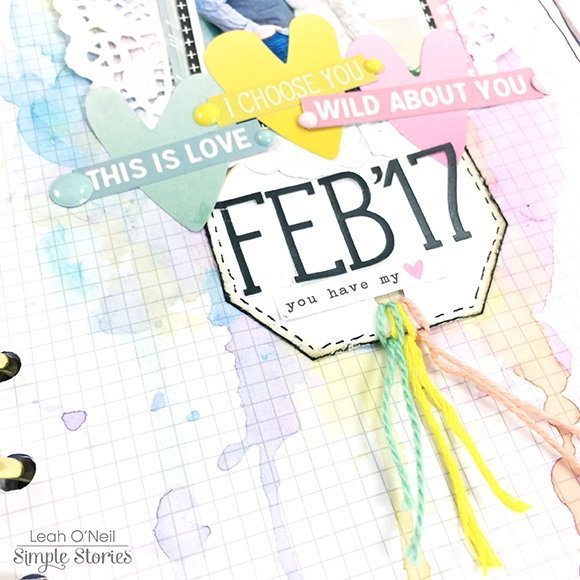
I cut a white piece of cardstock into a small tag shape, punched a hole, and threaded the same three colors through the hole. On the tag, I used alphas from the Combo sticker sheet to indicate the month. Even around  my photo, I used paper scraps to layer in the same color pattern, blue on the left, pink on the right. I really love how matching up the three colors all throughout the layout made it come together so nicely and cohesively!

Every year, my February monthly layouts always end up being my favorite! This year is no exception. I used the Love & Adore collection to decorate.

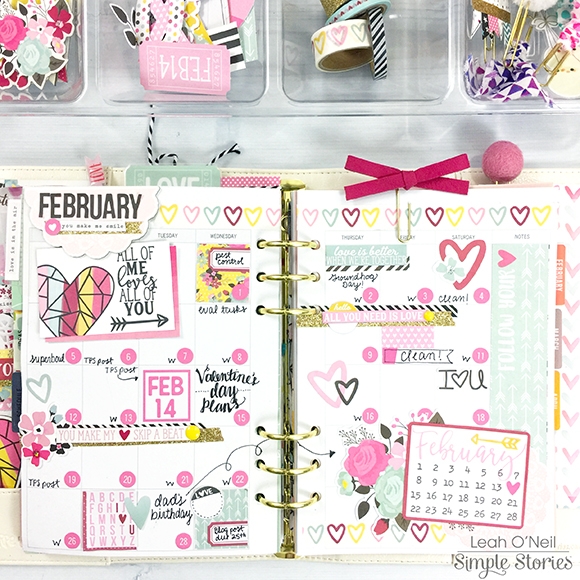
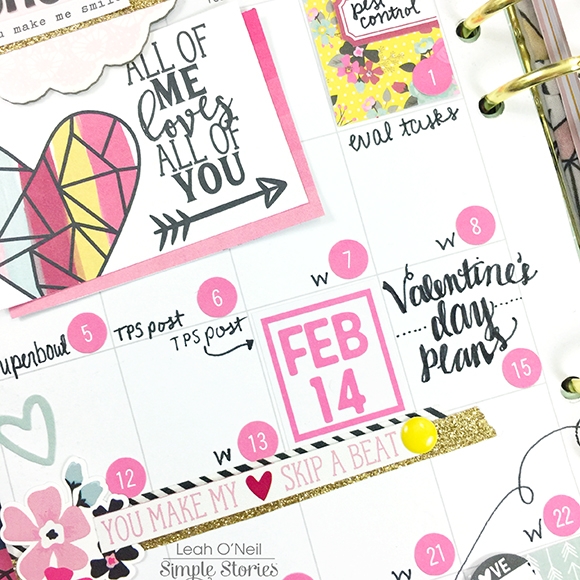
I have always used my monthly view to write in things I need to schedule around. Since January was so chaotic for me, February does not have too many pre-planned obligations. Yay! So I went a little heavier on the decorating. Just a note in case you’ve ever wondered: occasionally, I cover up days with embellishments and because I tend to decorate first, I sometimes end up having to write in a little note and then add an arrow pointing to the date where it SHOULD go. For example, my dad’s birthday is on the 23rd, but I have that day covered up with decor. So I wrote it in a close-ish spot and drew an arrow to where it should be written in.

For the February title, I used a pink doily chipboard piece and then used black alpha stickers to write out the month. I’ve got an Avery index tab on the side of the page with a word strip sticker. The “all of me loves all of you” is one of my favorite pieces from an element sheet in the 6x6 paper pad. I layered a pink piece from the same page behind to help it stand apart from the white background.

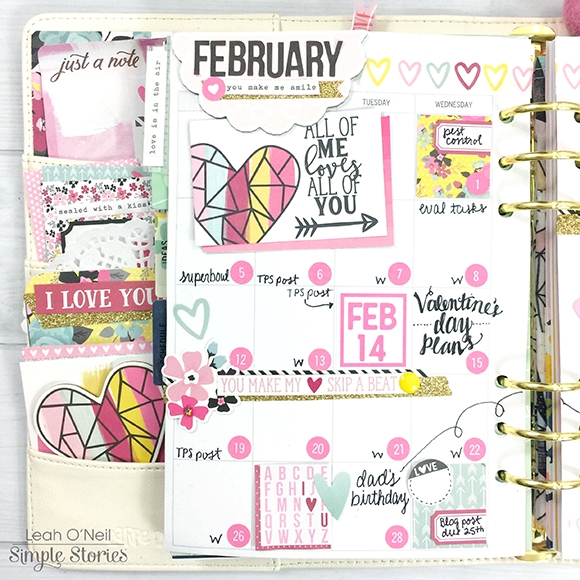
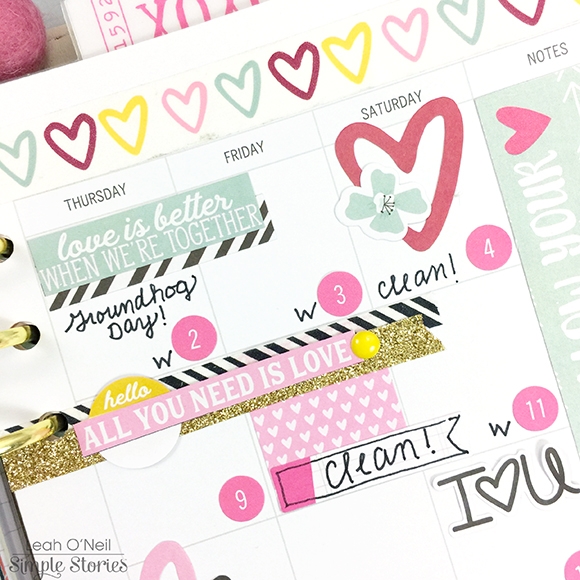
When decorating any monthly layout, I always use lots of stickers from the 4x6 sticker pack in whatever collection I am using. Same goes for this layout. All of the embellishments in this layout are from those stickers, the combo sticker sheet, the bits and pieces pack, and the Love and Adore washi tapes.

All the décor on the right side of the layout is using the same supplies, but that strip of paper covering the notes section, is cut from a sheet in the 6x6 paper pad.

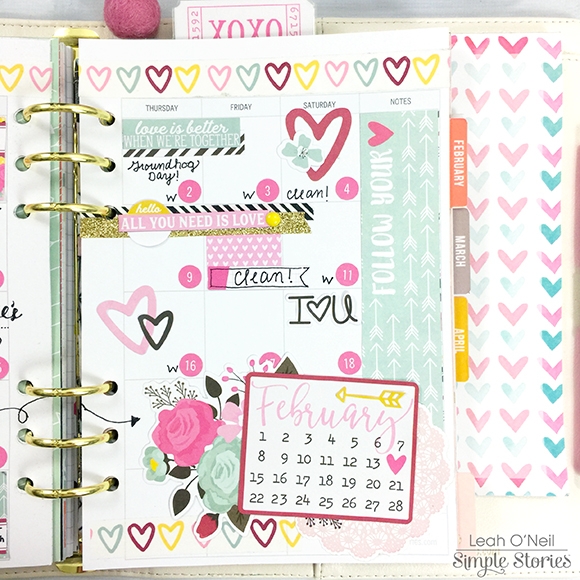
I still feel like there is a decent amount of writing space left on my layout, should anything else come up that needs to be scheduled.

I always love adding larger embellishments in the bottom right corner. Love how this February calendar looks with that huge floral piece!

Last but not least, I put together an easy bookmark using a piece from a 12x12 elements sheet. When I cut the paper down to the size I wanted, I had to cut off the part that said “you will,” so I added the words back using yellow alpha stickers. This bookmark is quite simple to make, I just cut and glued down half a doily and then layered a couple of washi tapes and a floral sticker on top. The bits and pieces pack had a couple of ticket shapes that I used to create a tab for the bookmark and then I laminated it all.

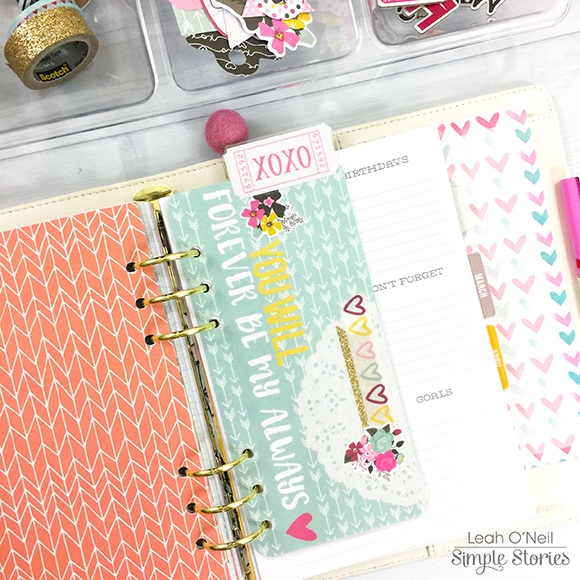
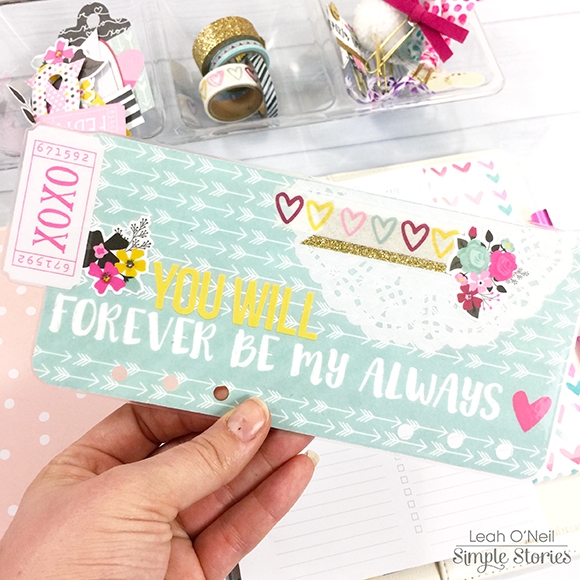
I didn’t add any embellishments to the reverse side of the bookmark because that paper is pretty enough on its own! I like laminating bookmarks because I can stick sticky notes and page flags to them. For example, pictured below are some sticky notes that I have written a grocery list on.

I love how this bookmark tab looks peeking out of my planner!

I am absolutely in LOVE with the Love & Adore collection and cannot wait to keep using it throughout February and beyond. The florals, bright colors and all of the hearts are perfect for the Valentine’s Day season, but I could use this collection any time since I love the style of it so much! Check out the Carpe Diem Planners Instagram account for more inspiration using this collection. I will also be posting more projects using it over on my Instagram as well. I hope to see you there!

Supplies

Hey everyone! It’s Lori here on the blog today sharing a bit of the behind-the-scenes fun from the CHA/Creativation show last month.

Some of you may have already seen the reveal of our new products here on the blog a couple of weeks ago.  We're gearing up to start shipping our new Faith and Domestic Bliss collections next week to retailers, so I thought I'd share some pics from the show along with some of the fun projects that were made using our Faith collection.  

When it comes to the show it's all about seeing, feeling and touching all of the new products; the booth is set up by collection so retailers can do just that!  

We opened one of the new 6x8 pads & hung the papers from the booth - isn't that fun?!

Then of course there's the much loved 'wall of goodness' displaying projects using products from the collection

Creating so many projects for each collection to display at the show is quite the undertaking!  Some of our staff, creative team members and friends of Simple Stories worked their hearts out creating some gorgeous things to display in our booth at the show. We were amazed at the stunning projects they made!

Next up behind-the-scenes is this striking home décor piece using our Faith line. Everyone at the show adored how we added clips and photos to the wood blocks on this display showcasing our owners', Amber & Kevin, cute kiddos, and we adore this family!

One of the repeated elements in our Faith collection is a light bulb. It represents light, and we hope it inspires people in lots of different ways. This sweet project featuring our papers reminds us to shine in everything we do and be who we are. It’s a great project and a great message!

One last Faith project I’d like to share from CHA/Creativation is this treasured tray featuring our Faith collection. There are so many inspiring cards, images, and sayings in this collection, so what better way to see those inspiring messages than to create a hanging display?

As you can see, there are lots of great ideas showcased at the show for everyone to enjoy. I hope you’ve enjoyed seeing a peek into the show, and keep an eye out for more projects from our other new collections, because we’ve got lots more to share!

If you’d like more behind-the-scene peeks into the booth at CHA/Creativation, be sure to check out this fun live video showing more of the Faith collection!  

SaveSave

SaveSave

Hello blogging friends!

I am sharing some fabulous Simple Stories Love & Adore layouts with you today. For this first one, featuring a photo of my niece and her boyfriend, I really wanted to play up the hearts. This awesome cut file is from JustNick Studios. I loved that it had this big "X" in the middle. I thought it was perfect to showcase the Love & Adore washi tape. This heart washi tape is a new favorite of mine. To make the hearts pop even more, I backed portions of the cut file with the beautiful ombre pink pattern paper from the collection.

Here is a closer look at that heart washi tape.

 
That beautiful chipboard sticker banner anchors my photo. I added a pop of yellow with a chipboard sticker heart and enamel dots.

 
The chipboard sticker "XOXO" makes a great title layered over some bits and pieces die cuts. You can also see some of those cute phrase stickers here.
 
 
I love how this layout came together so easily.
 
 
________________________________
 
For my second layout, I wanted to scrap this awesome selfie my daughter took where she is giving her dog a smooch. Take a look ...
 
 
I concentrated most of my embellishments near the photo. The paper is so beautiful by itself  I did not want to cover it up too much, To frame my photo I used a fun new cut file from JustNick Studios called Ring Around My Heart.
 
 
There are lots of gorgeous layers of eye candy here. Check out those phrase stickers I used again on this layout.
 
 
I used the chipboard word "Sweet" for my title and the "I Love Your Face" bits and pieces die cut for my subtitle. Perfect! Just look at that dog's face ... lol.
 
 
In the upper left is another cluster of embellishments. I love tucking the round stickers from the 4x6 sticker sheets underneath so the text at the top peeks out. The sticker I used here says "KISS".
 
 
Thanks so much for stopping by today. Stock up on the Love & Adore collection for scrapping the photos of those you love.

SaveSave

SaveSave

SaveSave

SaveSave

SaveSave

SaveSave

Supplies

Hello everyone ! Welcome to the blog today. I am super excited to be sharing some pocket pages with you that I have created. The Love & Adore collection is simply adorable and so versatile. Its so easy to work with that I decided to use it with some everyday photos from January. Here is a closer look.
 
 
Typically I like to do my pocket pages weekly. This month is going to be a little different. We have had a few family adventures that I want to also add into my album. So I made the decision to save those photos for their own pages and combine week 2 and week 3 together. So that is what I have done here. 
 
For my title card I started out by cutting this awesome heart out from a 4x6 journaling card. I loved the pattern and the color of the heart but needed some more room to add my dates and stuff. I add it to a piece of white cardstock to make the heart stand out more. Since this was going to be my title card I had to figure out where to add my dates. I went with a label and tucked it underneath that hello chipboard piece. 
 
 
I went ahead and chose this journaling card with lots of white space and those hearts in a row at the bottom. I needed a card that I could add a longer story onto it and this one was perfect. The story goes with the photo below it. As you can see those great hearts on the bottom of the card. I accidentally discovered that the leftover/inside piece of the yellow chipboard heart fit perfectly inside these hearts. It adds a little piece of dimension to the card. 
 
The next card holds a photo of my son and has some journaling underneath the photo. I was working in my scrap room while the kids were playing outside one afternoon. My son thought it was so funny to sneak up and shoot his nerf gun at the window. The card itself has some embellishments on it already and it was perfect to add a few stickers and some enamel dots to finish it off. Simple and easy. 


Let's move over to the other side of my spread. It turned out that I had more to say about these weeks then I had smaller pockets. I added in this 4x6 journaling card to recap the week so to speak. On the bottom of the card I added that cute chipboard banner for some eye candy. The color scheme came together super easy this time with a lot of pinks, blues, and reds. I chose to create a filler card with this blue arrow patterned paper. On top of the card I layered some stickers and a cluster of embellishments up at the top. 
 
 
Don't be afraid to cut up your journaling and filler cards and use them as you need. That is what I did here with the watercolor strokes card. Originally it was a 4x6 card and I was looking for a  journaling card for my story about making things. So I cut it down to 3x4 and went from there. I wanted to talk about how we all have been making things lately. My husband has been baking bread and I have been busy making crafty things. I got to work and used a combination of letter stickers and the word sticker "be" as a title for my journaling card. I added some strips of washi tape underneath. It acted as a longer home for my title. 
 
 
I couldn't resist using these big and fun chipboard X and O pieces. So I used them right on top of my photo. It left this perfect little pocket to add my journaling on the other side. I also added in some of the bits and pieces above the X and O chipboard pieces. 
 
 
Thank you all so much for coming over to the blog today. I hope you have some inspiration to use in your pocket pages. Be sure to go out and pick up the Love & Adore collection for all those things you love in your life ! 
 

Supplies

Pages