December 2018 Blog Posts

Hi everyone! Tara here with Secretbees Studio. I know Christmas has just passed and I'm sure you are ready for a break from all of the crazienss! And it's never a bad thing to be prepared for the next holiday! I'm here to give you some gorgeous inspiration for the holiday of love- Valentine's Day!

Since Valentine's Day is all about love I was inspired to create a sweet love letter mini scrapbook that can be filled with pictures, letters, mementos and sweet messages to your sweetheart. It's a pretty standard mini album on the outside- chipboard covers and spiral bound- but there are lots of adorable surprises on the inside!

Between the two chipboard covers is an accordion flap that holds eight envelopes and includes a couple of pockets and the beautiful and romantically themed 'Kissing Booth' collection is the perfect way to show off love and devotion! There are gorgeous patterns with traditional pinks and reds along with other bright colors and the sentiments will definitely put a smile on your face!

I made a variety of envelope sizes and pockets as well as an interactive pull-out made with a strip of the 3x4 journal cards. There are plenty of pages for photos and the envelopes can be filled with mementos or love letters.

Now you can create your own special love letter mini album for that special person in your life or even as a gift for that special couple! Visit my YouTube channel for an in-depth video of this mini and to get more inspiration! Happy New Year and Happy Valentine’s Day!


Supplies

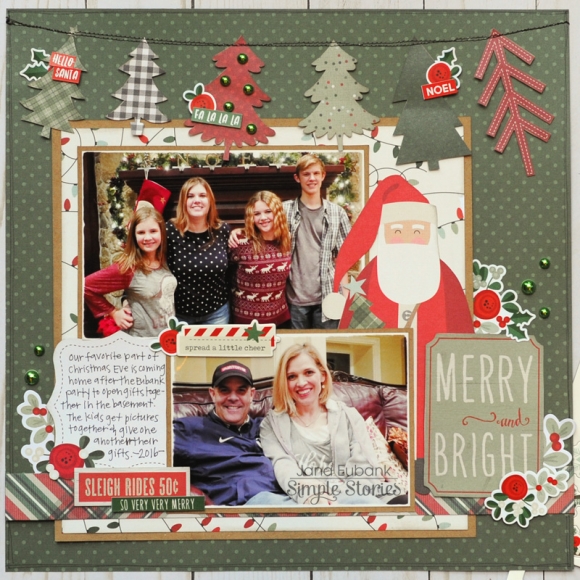
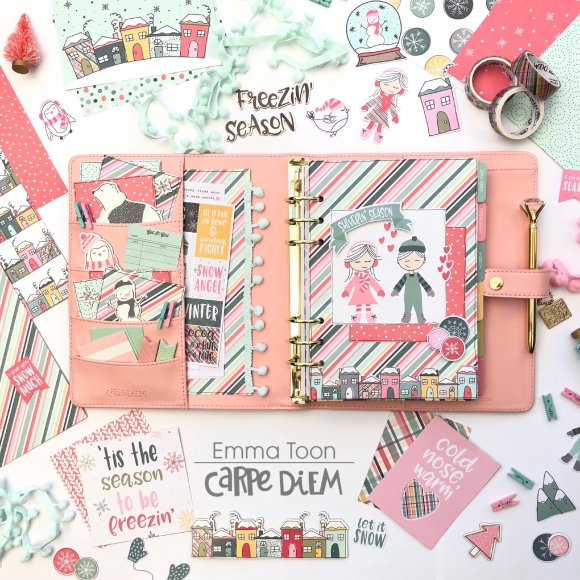
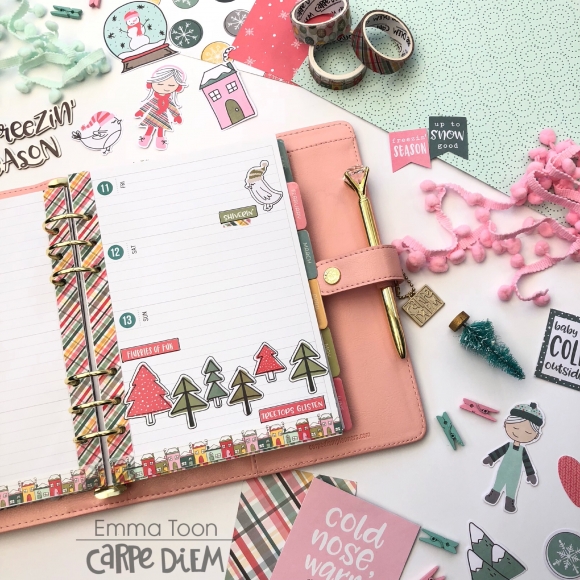
Hello creatives! I hope you all have been having a wonderful holiday season. Leah here with you all today showing you more into my December TN before I start transitioning my setup for the new year. If you’d like to see how I decorated the front pockets and the cover of the front notebook, you can check out my last blog post here. I’m excited to show you how I’ve been documenting December and using the Simple Stories free printables to help me keep track of holiday plans and December stories, and to capture more of “me” in my holiday memories. 

I’ve been participating in the December Daily project for a couple of years now. The holiday season can get a little crazy and very busy, so I’m usually not very successful in sitting down to create every day. Sometimes I have a week or longer that go by where I may not have had time to work on my December Daily album. However, I always try to be as consistent as I can about at least jotting down the stories and memories so I don’t forget them before I can work on crafting the layouts. I’ve been getting a lot of use out of the December free printables to help me do this. I’m keeping the printables in a separate notebook behind my December Daily insert.

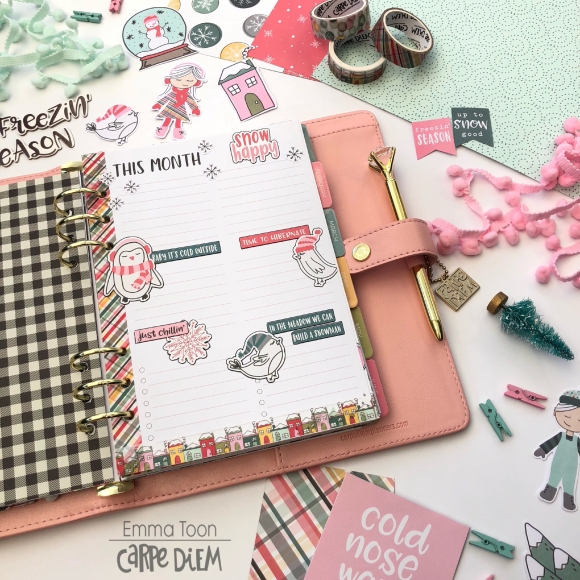
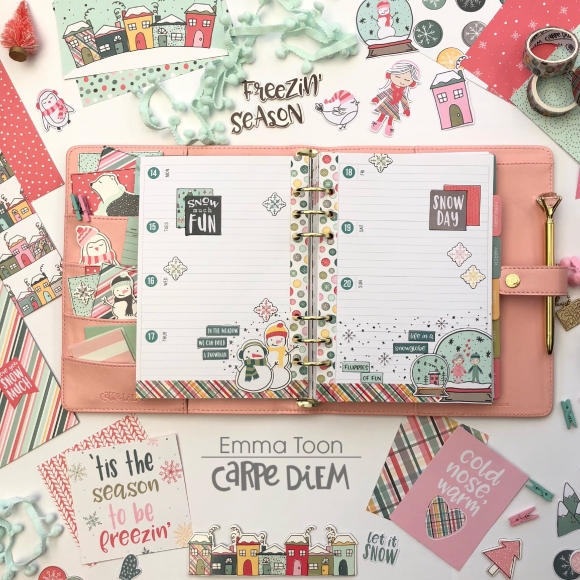
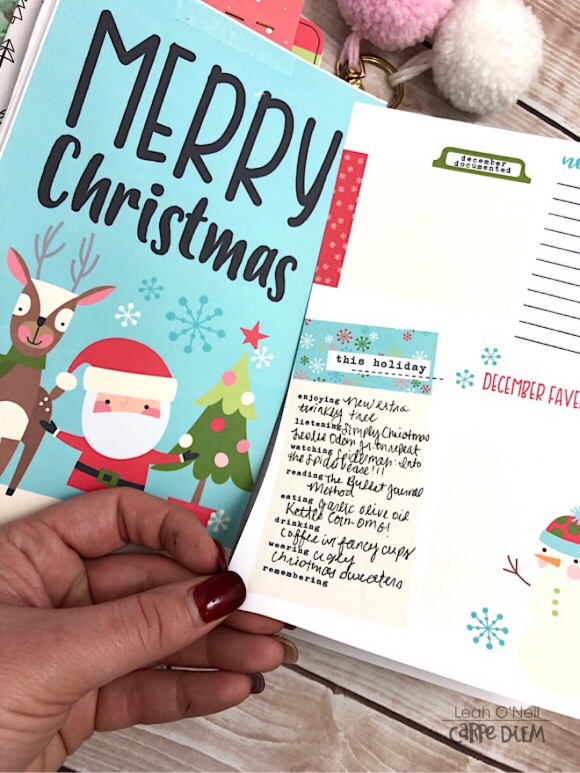
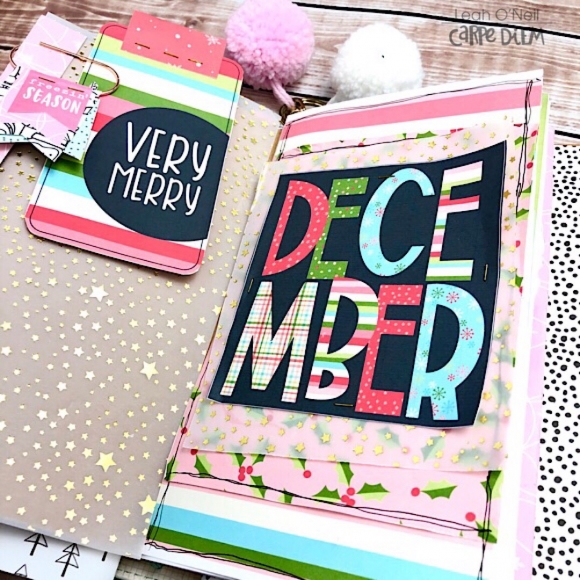
What I love about the free printables is that you can really use and customize them in any way you wish, but they are also cute and festive enough to use them exactly as they are. Not only are they helping me keep track of all my important lists and information throughout the busy holiday season, they have also helped me plan out some of my December Daily layout ideas and document parts of this season of my life that I want to remember.

I am planning to incorporate some of these planning pages and lists directly into my December Daily because they document so much of what I’m actually doing this time of year. These are great “filler” pages for those days in your album where you don’t feel like you have a particularly “document-worthy” story to tell. In reality, we all have days where we are really busy with work or other “boring” life things and don’t do anything eventful. I like to use some of those days to tell parts of my real, personal day-to-day story. While I absolutely love documenting extra special memories like time spent with family or doing fun holiday activities, an important part of this project is capturing the essence of who you are and where you are in your life during this time, and I feel that my lists and planning are a big part of who I am.

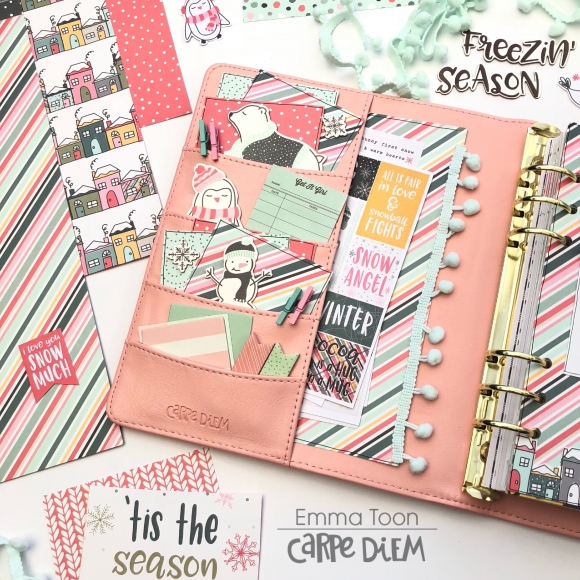
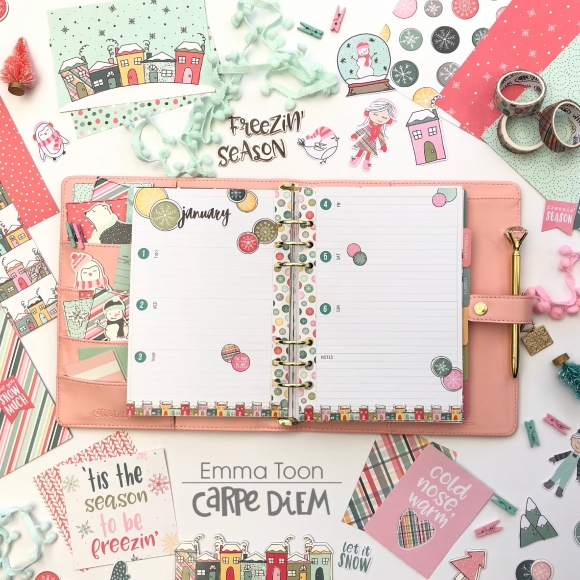
Because I plan to move several of these printables over into my December Daily insert eventually, I purposely chose not to glue them down into the notebook they are in now. I tucked most of these into this notebook and am holding them in lightly with a small piece of clear tape. I also used washi tape or non-permanent/repositionable tape under some pages, but I avoided using anything too sticky that would prevent me from easily moving the pages later.  

I limited myself to using primarily just the printables to keep things simple and functional in this notebook for the sake of time. The goal is to have a notebook to easily jot things down in to plan and track my December.

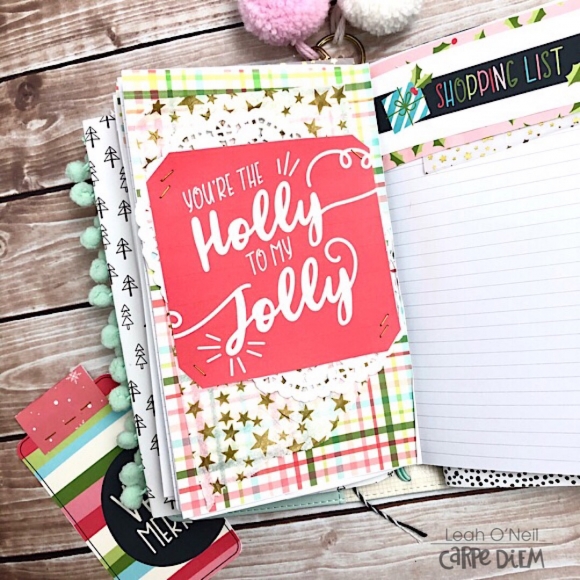
Because I’ve been giftwrapping, I had a couple of doilies and decorative tissue paper laying around that I was able to layer into the pages for a little added flair, but these printables are really so cute on their own, I would have loved them either way.

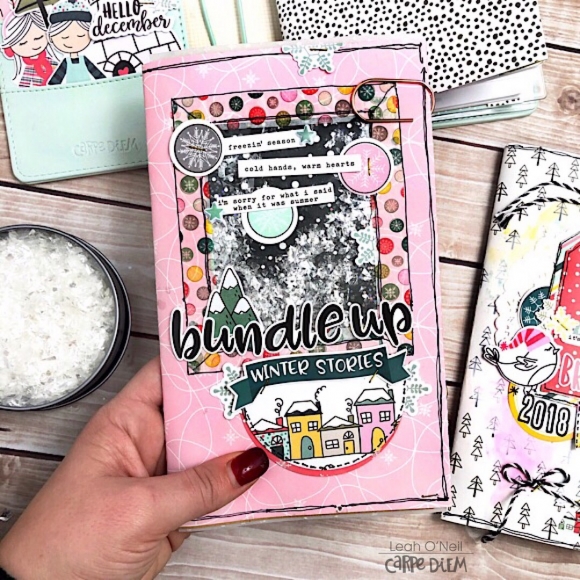
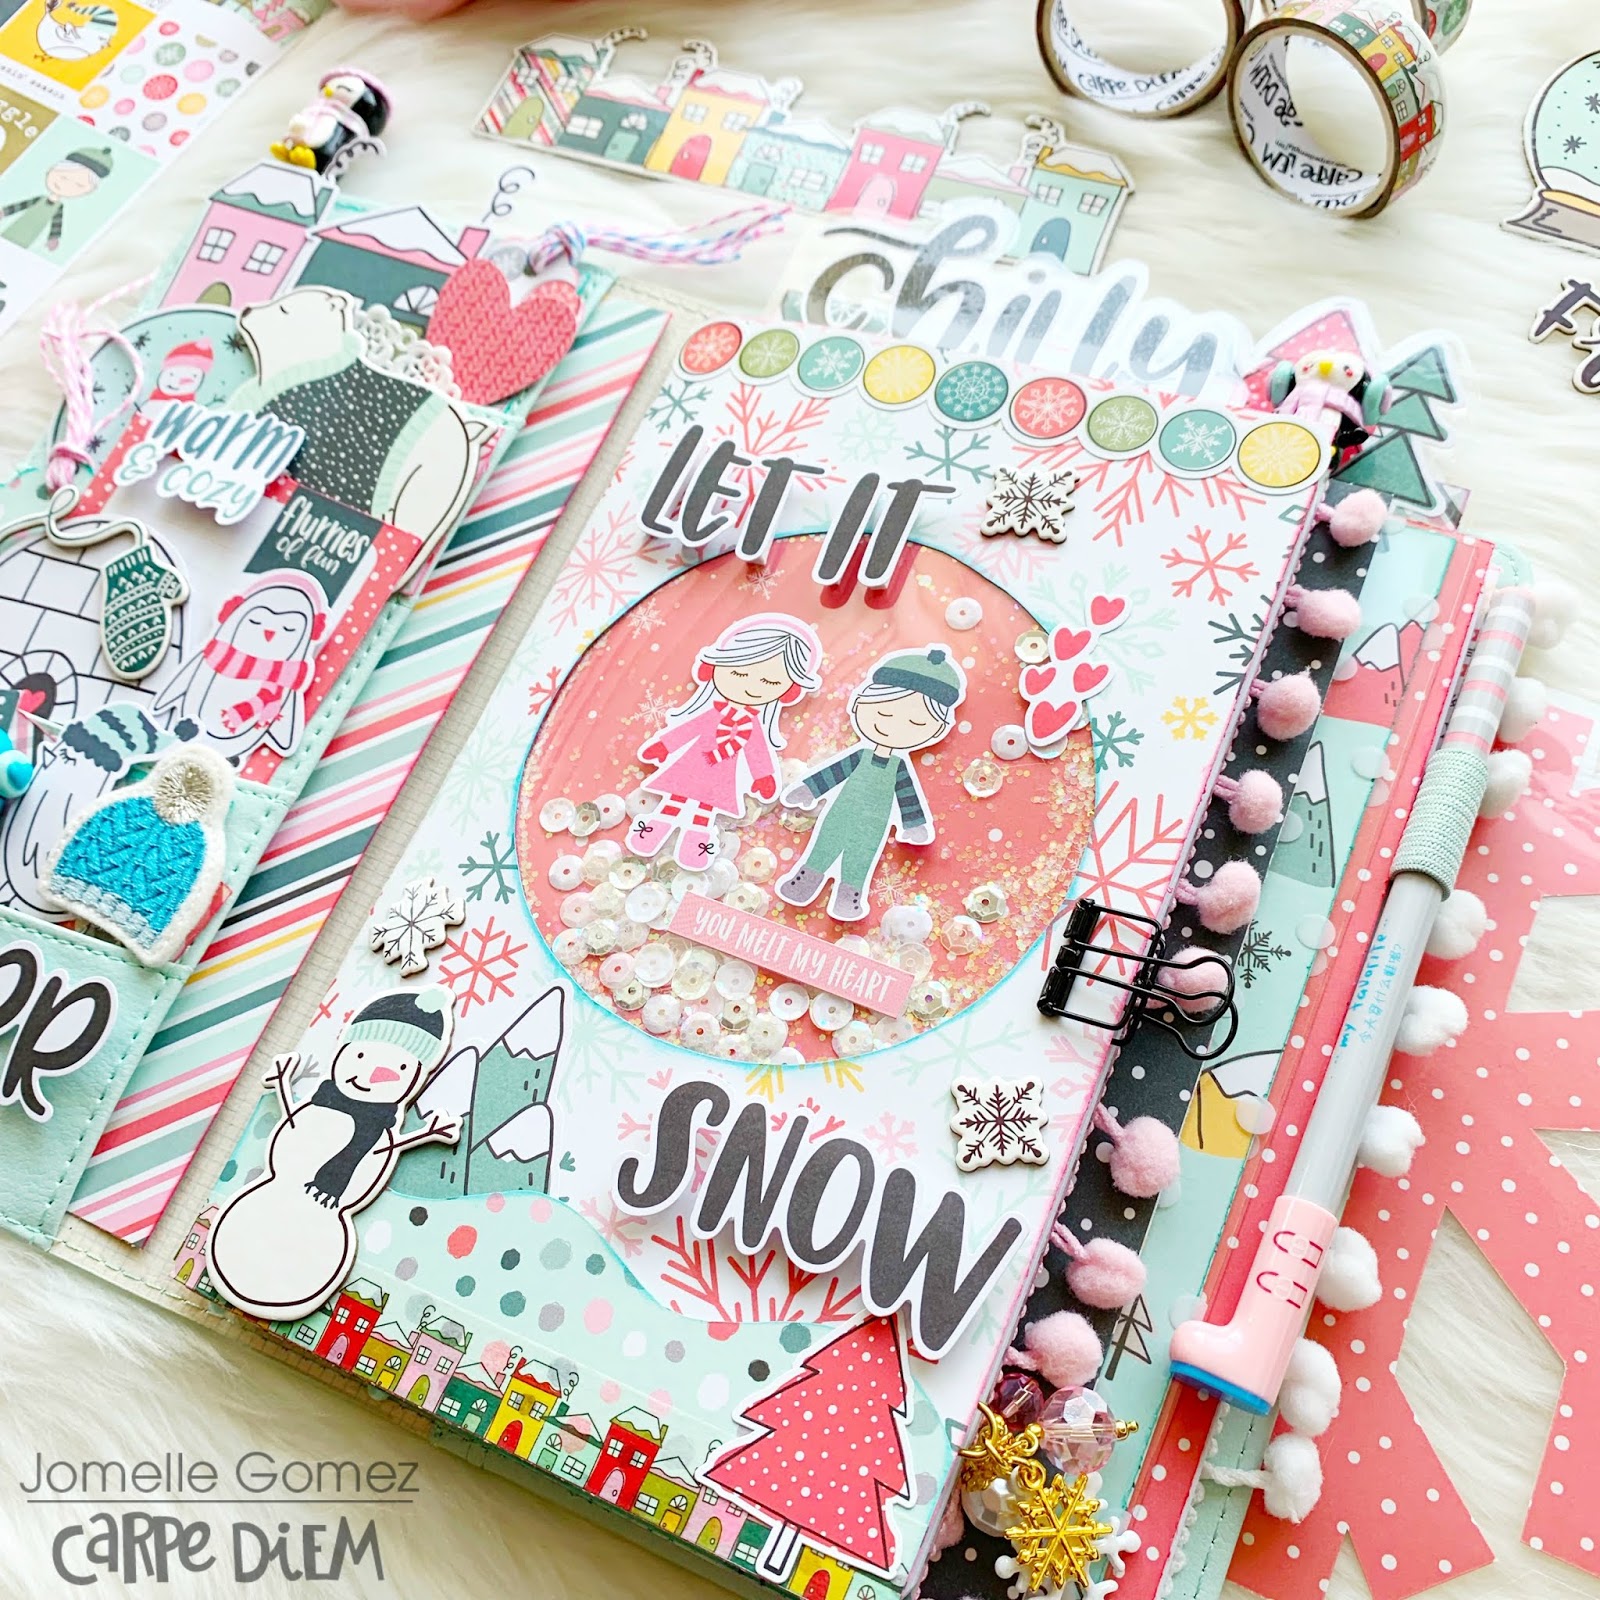
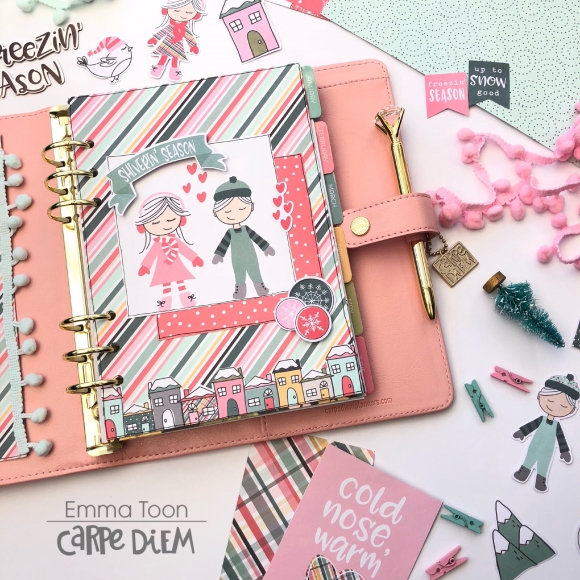
Since this contents of this notebook are so simple and functional, I decided to amp things up for the cover. I’ve shared my process before on how to easily create removable covers for TN inserts, which you can check out here on Youtube, but I tried something new for this one and added an interactive shaker element. The glitter “snow” is such a fun detail to compliment the snowy/wintry theme of the Simple Stories Freezin’ Season collection that I used to create and decorate this cover.

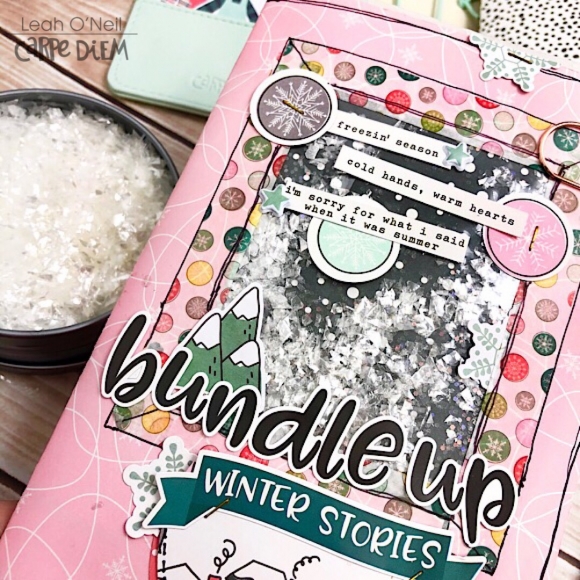
This is the first time I’ve created a shaker insert cover so there were a lot of missteps and errors along the way, which I promptly found ways to cover up and conceal. ;) However, this is definitely a process video I’d like to film for YouTube soon. Let me know over on Instagram if that’s something you’d be interested to see.

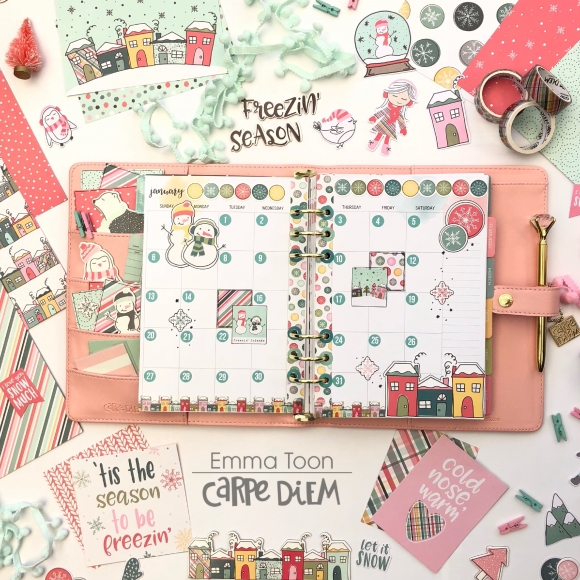
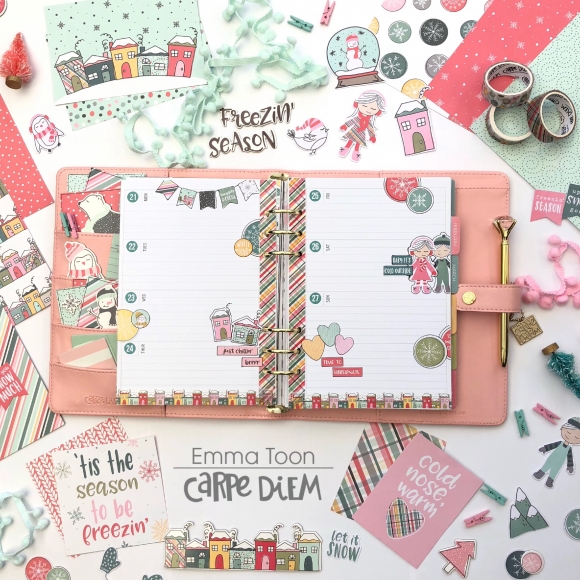
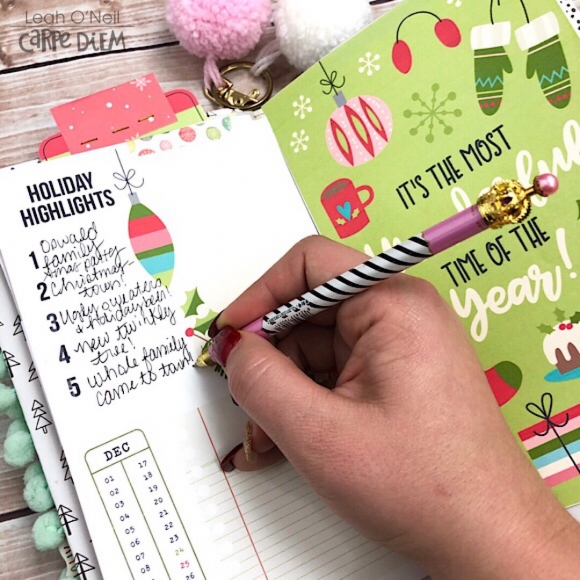
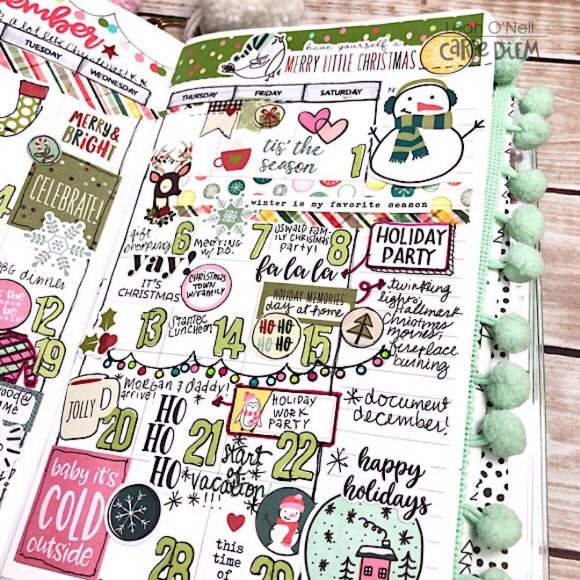
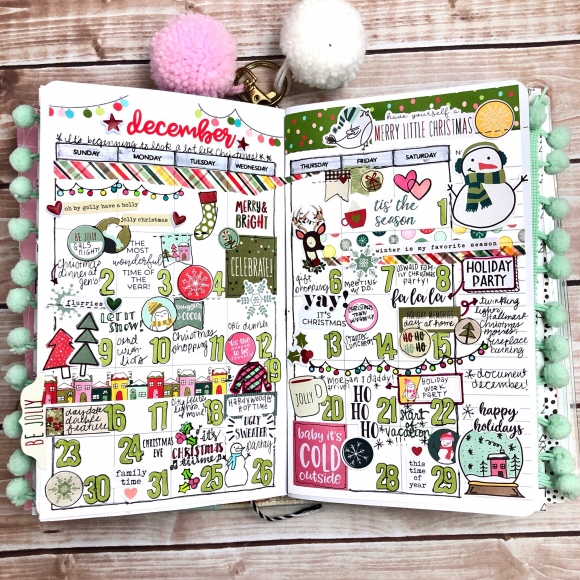
Here is one example of where I’ve already incorporated the monthly calendar from the free printables into my December Daily. I always like to add a calendar in my album that just captures the “main events” from the holiday season. Since this is not where I keep my day-to-day plans, I can really add lots of décor.

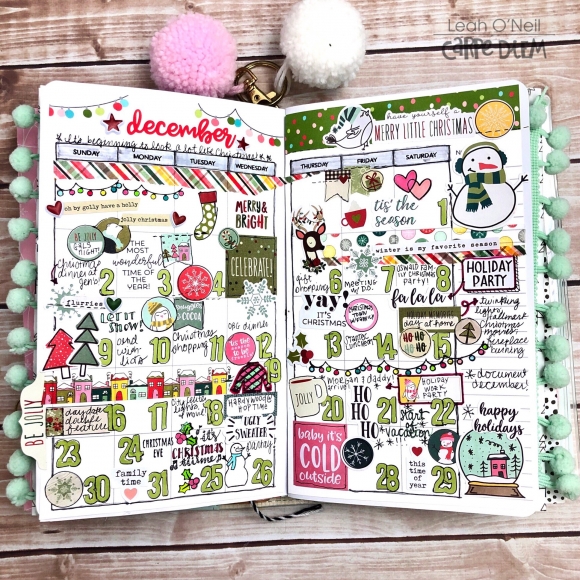
You can see I went a little sticker crazy here… I think my favorite thing on here are the color Christmas bulbs which are a stamp from the Seasons stamp set that I colored in with my Tombow markers. The ugly sweater, holly leaves, and snowman are all stamps from the same set that I added color to as well. You’ll notice I don’t stress myself too much about trying to color in the lines. ;)

Anyway, I’m excited to get to working on more of the pages and layouts in my December Daily notebook. Have you checked out the free printables Simple Stories offers every month? You can check them out here, or via the “Project Downloads” icon on the Simplestories.com home page in the future. Stay tuned here on the blog or over on the Carpe Diem Planners Instagram to see the other fun ways people are using the printables.

Until next time friends, happy holidays!

Supplies

Happy New Year (almost) everyone!  Today I wanted to share a super quick album that comes together easily and would be a wonderful gift for a New Year's party hostess, or your own celebration photos.

I just love the 4x6 snap albums for gifts!  They are easy to create, unique, and perfect for saving memories from a special occasion!
For this album, I used the Simple Stories 2019 collection.  
A little bit of silver and black card stock work perfectly with the black & white scheme in the papers and stickers.
The 4x6 photo pockets make it simple for the gift recipient to add their own photos to the album after the party!
So there it is ... easy peasy!  Hopefully I've inspired you with another handmade gift idea.  
Wishing you all a very Happy New Year!!

Supplies

Can you believe Christmas has come and gone and just like that, it's time to look forward to a brand new year in 2019! Hello friends, Linsey here today sharing some fun and easy New Year's decorations that are sure to make you the toast of the town (or at least, of your own home)!  All you need is the Simple Stories 2019 Simple Set and a bit of inspiration to make this New Year's Eve a sparkling event, no matter how you celebrate!

There are so many ideas for DIY party decor these days and one of my favorites is paper rosette pinwheels! They are easy, quick and make for a fabulous showcase wherever you place them. Make them in a few sizes, then arrange on a wall behind a table or bar for an eye catching backdrop that will have everyone oohing and ahhing! Or hang them from the ceiling at varying heights to add pizazz to any area! There are lots of ways to incorporate rosette pinwheels into any party decor--your imagination is the limit!

Party photo booths are all the rage right now and so are all the fun props that go with it! You can buy them, but why would you when they are super easy to make yourself? Delight your guests with custom handmade photo booth props and save your money for the good champagne! Cheers!

What's a New Year's Eve celebration without party hats? Ring in the New Year right with festive hats for all to wear! When the clock strikes midnight, hats will be off to you!!

A paper banner always adds a festive touch to any decor. Make your own and hang from a mantle, wall or anywhere you want! A banner makes everything better!

And that's a wrap! Thanks so much for stopping by today! I hope you've been inspired by some of these fun and easy DIY decorations and will try them for yourself! Wishing you and yours a very happy, blessed and prosperous New Year!!

Supplies

'Oh the weather outside is frightful
But the fire is so delightful
And since we've no place to go
Let is Snow, Let it Snow, Let it Snow"
 
Oh how I wish it will snow here in Southern California for Christmas. We moved from Chicago to California in 2006 and now I kinda missed having a White Christmas.
 
I want to share with you my Winter Set up in my Typewriter Circles Traveler's Notebook using the "Freezin' Season" Collection. 


This is my first time making a shaker insert cover. The first thing I did was to choose the pattern paper from the collection I want to use as my main cover. Then I cut out a circle in the middle of my insert cover. I then chose another pattern paper as the background. I used a laminated sheet and place it behind the circle I cut out. I added sequins and glitters from my stash on top of the laminate sheet. Then I added the background paper. Super easy.
 
 
 This shaker looks like a Snow globe in the middle of my cover. I used foam adhesive for the words "Let it Snow" to give it the 3D effect.
 
 
I bundled up my pockets with bits & pieces, chipboard stickers, and some of my cute winter paper clips to go with the collection.
 
 
Monthly Layout
I'm starting 2019 with January layout all prettied up. The Freezin' Season is perfect to start the new year. To create this layout, I first added the washi tape in the middle of the page. I used mostly the 4x6 stickers and combo stickers. I fussy cut the houses from the "Hello Winter" 12x12 paper and added it to the bottom of both pages to create my snow village.
 
 
 I already pre-decorated the pages after the month at a glance in the "Monthly" insert. I'm ready to document and journal for the month of January.
 
 
I added the trees from bits & pieces on one of the 3x4 elements and laminated it to make a washi card holder. I wrapped the 3 washi tapes that matches the collection. I can also use this as a page marker.
 
 
I also made a bookmark. I created this by also adding the word "chilly" from the bits & pieces on "Burrrlow Zero" 12x12 paper that I cut out to the size I wanted. Then I laminated it. I added a clear adhesive pocket on the bottom to hold some of the 3x4 elements. I finished it off by adding the houses washi tapes on the bottom.
 
 
I wouldn't mind being "snowed in" in a cozy cabin all bundled up by the fireplace and playing with the "Freezin' Season" collection. I know that I'll have "snow" much fun.
 
 
Cuteness overload is all I can say about the "Freezin' Season" collection. I just love everything about it. Will you experiencing a white Christmas this year?

Hello friends! It's Jennifer on the blog today to share a page I created using the beautiful Kissing Booth collection!  This line has the right combination of vintage and whimsical mixed with its classic prints and florals!  Kissing Booth can be used of course for Valentines Day, but also for weddings, love, or any theme that fits your project!  I  actually documented a photo I  took on a family trip to Michigan this past summer! We stopped to eat at a restaurant that had a large metal heart on the side; of course I  bribed my kids for a photo!

I  began with kraft cardstock for my background then layered the multi-print heart pattern of Love Day across the top third.  For my title, I   used a cut file from Just Nick with white cardstock and three favorite prints (I  LOVE the plaid of Crazy In Love!). I  then added accents such as the cute little hearts from the Puffy Stickers as well as a sentiment from the 4x6 Stickers.

I  always like to utilize the Journaling Elements if possible...especially if there is a ledger/notebook print!  This card from the 3x4 Elements was perfect to jot down information about my photo.  I  did layer another 3x4 card underneath for contrast as well as added a date stamp and sentiment. You can also see additional cute embellishments such as the xoxo tag from the Bits and Pieces and the "jar of hearts" found on the 6x12 Chipboard.

At the top left corner of my page, I  added my own banner using a hand punch. I  found my prints on the 4x6 Horizontal and Vertical Elements.  After stitching through the top with my sewing machine, I  added chipboard hearts and another cute sentiment. 

Thank you for stopping by the blog today! You can see the entire collection of Kissing Booth by going HERE!  Have a great day!  


Supplies

Instead of stringing garland on a Christmas tree, why not switch things up a bit and create a garland from Christmas trees? Hello there! It's Jana Eubank. My page today features a banner of Christmas trees across the top that I fussy-cut from a page of the Merry and Bright 6x8 paper pad.

I arranged the trees in a slight curve and then used my sewing machine to stitch them together. 

After stitching them, I tucked thin foam squares behind each tree to lift them up a bit and then accented a few of them with phrase and flower stickers from the Merry and Bright Combo Sticker Sheet.

I used a journal block from the Merry and Bright SN@P! Cards to add the details about my photos. Cutting around the bracket shape of the journal block adds interest. I added some greenery and phrases from the Bits & Pieces and Combo Sticker Sheet as accents.

Another 3x4 Merry and Bright SN@P! Card makes a quick and easy title for this page, and the large fussy-cut Santa (Merry and Bright 6x8 Paper Pad) is so cute peeking out from behind the photos.

As you take down your holiday decorations this year, try looking at them with new eyes and see if there is an idea you can incorporate into your next scrapbook page. Creating a garland or banner on your layout is a great place to start!

Supplies

Happy Christmas! It’s Emma here with you today and I’d like to show you how I’ve started setting up my Blush Carpediem A5 planner for 2019. I’ve used the new ‘Hello’ Monthly Inserts and the Freezin’ Season Simple Stories Collection. 

Look how well the tab colours from the ‘Hello’ monthly inserts work with the Freezin’ Season Collection! It was as if they were made to go together! I also love how the splashes of colour on the monthly pages tie in beautifully with this collection!

You know how I love my pockets to be pretty and I haven’t scrimped on adding prettiness to them with this set up. I have literally used off cuts of papers to tie the colours in and then my favourite pocket accessories which are chipboard pieces and sticky tabs! 

For the dashboard I’ve used one of the cutest images which is of the girl & boy,  I cut this down from one of the large cut apart 12x12 sheets and then at the bottom I’ve put a row of the stinkin’ gorgeous houses which I fussy cut out from one of the 12x12 sheets. I used some foam sticky pads for a few of the bits & pieces to lift them and also with the ‘shiverin’ season’ banner.

With the monthly insert packs, each month there’s a ‘this month’ page where you can add birthdays, to dos, goals, important dates ect, I’ve choose to add decoration on this page covering those various titles as I don’t tend to use this page and prefer to have it more as an inspiration board, but it’s great to have the option there if it’s something you like to use. 

I love to have a monthly spread that’s full of colour and decoration and I’ve used washi tape and stickers to achieve this look. This is where you can see those watercolour effect splashes of colour I was talking about before. Don’t you agree they look awesome with the Freezin’ Season colours? 

If there’s one thing that’s an absolute must have item it’s the number Sticker Tablet! I would be lost without it! I enjoy choosing a colour that works well with that months collection and not only for the monthly spread but also for every page throughout the month! 

You can see here on the first pages of January how I have used a teal blue colour for the number stickers and decorated really simply by dotting around the coloured circle stickers, over lapping them and having them half off the pages makes them stand out and I also go round each one with a black ink pen, which makes them pop!

You’ll notice on each page I have used washi tape up the sides of the pages and then used the A5 Carpediem punch to repunch the holes. 

To add a little more fun detail to these two pages I’ve used my black ink pen to add little snowflakes which work well with the glorious snow globe stickers.

For these two pages I’ve thrown a little bit of everything at them! Why not ‘eh?! The super cute boy & girl stickers, houses, the colourful circles, hearts and my possibly all time ever favourite washi with the dinky little houses! I’ve even used some of the stickers to make a flag banner across the top of the page. 

I hope I’ve shown you how decorating your pages can literally go from one extreme to the other, you can go all out and chuck everything but the kitchen sink at them or have a little more decorum and go for the less is more option! Whatever your style this collection will have something in it for everyone and with Carpediemplanners bringing out not one but three new monthly insert sets, you’ll definitely find one that’s right for you. 

Enjoy the rest of the festive season and I will be back with you again in the new year! If you would like to see more pictures using Simple Stories products then checkout my IG account.

Supplies

Pages