Courtney Sawyer's Blog Posts

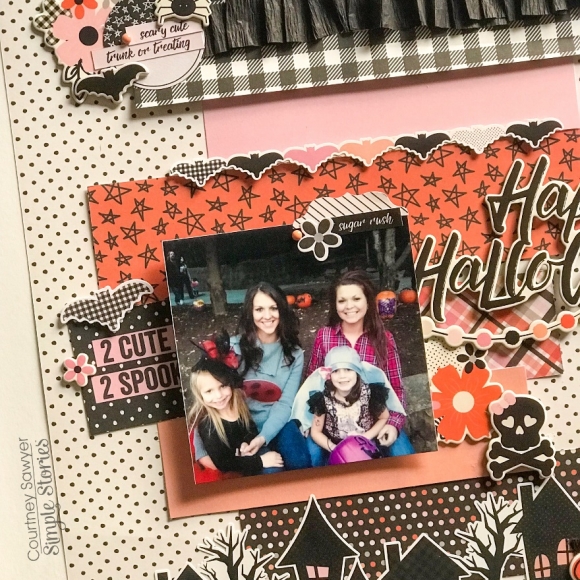
Hey y'all! It's Courtney here! Today’s layout is made with the amazing Happy Haunting line. How fun is this line? When I saw it I knew exactly what picture I wanted to use.

For this layout, I cut out 2-inch strips that varied in length. After that, I randomly placed them on the background page which is Utterly Spooky. I used a few different pages for the strips. I used both sides of Hocus Pocus, Fright night, Bootiful, and the 2x2 elements. I used some black crate paper, the bat border sticker, and the spooky house border sticker to add some different dimension and texture to my pattern.

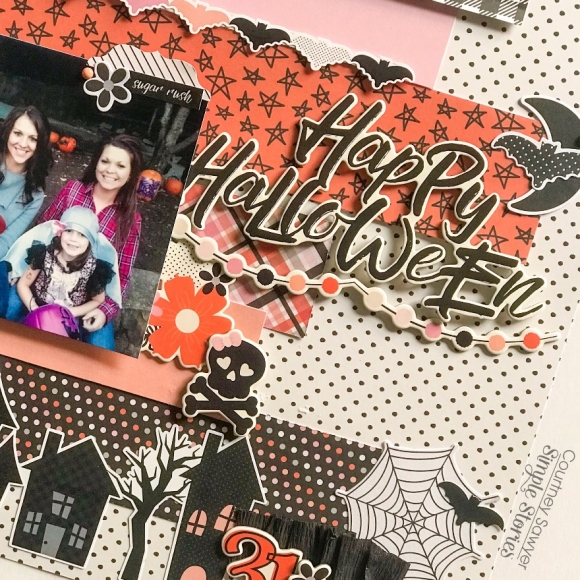
All of my clusters we're a mixture of the chipboard, the combo sticker sheet, the icon bits, and pieces, and the Happy Haunting journal pieces. I embellished each cluster with the small enamel dot from the Spring Farm House collection. I added a tab, tiny word sticker,   and a flower to my photo from the combo sticker sheet.

I hope you are inspired to use this collection!

Supplies

Hey y’all! Courtney here on the blog today sharing a layout that I created using the really cute Crusin’ line. Now I haven’t been on a cruise lately, but we did just come back from a long beach trip. I have a ton of pictures that will go so perfectly with this collection.

I chose these two precious pictures of my youngest on his daddy’s shoulders. I chose to do two 3x4 pictures that I matted on the Ports of Call individually and then double matted them on the Ahoy and the Seas the day paper

The background paper is Lost at Sea and it’s cut down ¼ of an inch and matted on the 4x4 elements sheet. I also used a free cut file from paper Issues called Sailing into summer that I backed on Man overboard and the lined card from the 4x6 element sheet.

I used the 6x12 chipboard sheet, the combo sticker sheet, the 4x6 sticker sheet, and the bits and pieces to create my clusters around my photo.  The title came from the bits and pieces pack and I added some foam to give it dimension.

I finished my layout with three clusters of enamel dots and some gold splatters. I also added a little bit of my handwriting to journal about this sweet moment.

Thank you so much for checking the blog out. I hope I inspired you!

Supplies

Hey y’all! It’s Courtney Sawyer here today, and I am sharing the layout that I created using the Let Freedom Ring Collection. This collection is just adorable and I knew that I wanted to use it to document one of my little’s first Independence Days. Here’s a look at the layout that I created.

For this layout I used the entire Let Freedom Ring Collection pack with the Basics Paper Pack and a scrap of gold glitter paper that I had in my stash. I decided to go with a cut file, I tend to use them a lot when I have several patterned papers that I want to showcase. This is the free cut file Count Your Lucky Stars from Paper Issues.

I started with the Walnut Cream paper from the basics set with the cut file. The color on this wood grain is very close to the All American sheet in the Let Freedom Ring collection, so I thought it would be perfect to use.  After I cut it out I used the pattern papers to fill the empty stars. I used three of each pattern throughout the cut file. I hadn’t decided where I was going to add my photo when I started backing everything. Once I finished backing it I added foam tape to give it some dimension. Then I layered it to another basics paper Hickory Cream.

I used the 6x12 sticker sheet that is included when you purchase the collection kit and embellished my layout. I also cut out a few stars from the All American sheet to use as extra embellishments. I used a collage of pictures from my sons first Fourth of July and paired it up with a 3x4 card from the 3x4 and 4x6 Elements Cut A Part Sheet. I used that as my title.

I hope that you were inspired by this collection and can’t wait to see how you use it!

 Thanks for stopping by!


Supplies

Pages