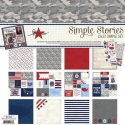
Jennifer Haggerty's Blog Posts

Hello friends! It's Jennifer with you today to share a layout I  created using the very fun Oh, Happy Day collection!  The bright patterns and whimsical embellishments are perfect for just about any theme or project! I  feel, too, that its a bit girly without being over the top!  I  scrapped photos of my teen daughter at her last birthday (and yes that is a Peppa Pig headband!) LOL

One of the many new additions to the larger Simple Stories lines is the Simple Basics Kit which includes coordinating solid papers.  I  don't know about you but I  rarely have matching cardstock so I'm very appreciative of this!  For my base, I  started with the Fuchsia from the Oh Happy Day Simple Basics Kit.  I  then added some strips of bright patterns at the bottom and stitched through with my sewing machine.  For my title, I  utilized the black script words from the 6x12 Chipboard.  You can also spy some of the coordinating Washi Tape which is a great way to accent your pages!

I  matted my photos with white cardstock along with backing them with patterned paper or a solid from the Simple Basics Kit.  I'm a fan of layering not only for additional color but also dimension.  I  snipped a portion of the border sticker on the Combo Sticker sheet and placed it in a spot between photos. Using pop dots, I added this fun die cut sign from the Bits and Pieces pack which includes a large variety of shapes and sentiments!

One of my favorite things about Oh Happy Day is the floral clusters!  I  used a few on my page around my photos and title.  Of course, I  pop dots were involved! The collection has many in the Bits and Pieces pack as well as on the Combo Sticker sheet!  

Adding small stickers or die cuts at the top of a photo is a nice way to accent without being overbearing.  The little birds are adorable plus my daughter is a bird lover so I  had to add one to her page. I  also added a smaller flower with a pop dot as well.  

Thank you for stopping by the blog today! Check out the entire Oh Happy Day collection by visiting the Products page!  You can also see what is up next for Simple Stories!  Have a great day!

Supplies

Hello everyone! It's Jennifer on the blog today to share a layout I  created using the beautiful Spring Farmhouse collection!  This by far is one of my favorite lines of this year; probably in my top five Simple Stories overall! The soft pastel pinks, greens, and yellows are perfect for springtime themed projects and I  love how the black and white gingham is mixed in!  I  documented favorite photos of my kids from a beautiful Easter day (when I  could still get away with dressing them in matching outfits!)

I   began with backing my white cardstock onto the beautiful floral print of Love A Lot. I  then adhered a 2x11 piece of the green gingham of Well Said to the center.  I  adhered and stitched through thin strips of the B side of So Blessed, pulling up on the edges to give it a distressed look. I  was then free to adhere my photos as well as this beautiful sentiment from the Bits and Pieces.  

The Bits and Pieces pack has a variety of shapes to accent your project such as the cute journaling spot I  used here.To accent, I  affixed one of the coordinating Enamel Dots to the center of the flower, as well as utilized a tiny heart sticker from the 4x6 Sticker sheets.  

I  did not want to overload the center of the page with too many embellishments so I  chose a few of the smaller circle stickers from the 4x6 Stickers as well as a floral cluster from the 6x12 Chipboard.


Using a hand punch in my stash, I  created a fun banner to adhere across my page using some of the great patterns in Spring Farmhouse! Using liquid adhesive, I  affixed some black/white bakers twine to the top of my banner to complete the look. I  also added two of the sentiment stickers from the Combo and 4x6 Sticker sheets.  You can also spy some of the fabulous Spring Farmhouse Washi Tape at the bottom. 

One of the many new additions to the embellishments are the Bow Clips! I absolutely adore these and love clipping one at the top of a photo! It adds so much dimension (and cuteness) to your project! 

Thank you for stopping by the blog today! You can see the entire collection by clicking HERE! Have a great day!

Supplies

Hello! It's Jennifer on the blog today to share a layout I  created with the new Say Cheese 4 collection! I  was so excited to hear that Simple Stories was adding on to their Say Cheese line! What is even better is that all of the collections can be intermixed and used together! I originally was going to scrap some of our family vacation photos from this past fall to Orlando, but decided to  pull out some "vintage" pictures of me and my first trip to Disneyland!

I  love all of the new additions in embellishments this year including the Say Cheese 4 Chipboard Word Stickers! They make for great titles as I  used the "Magic" for my layout.  I  accented with some stickers from the Combo Sticker Sheet and 4x6 Stickers. I  also got out my Say Cheese Roller Stamp to add the line of hearts under my sentiments!

Say Cheese 4 also includes a pack of Tags and Frames which I  used to create a banner of sorts across my page! I  love the scallop red/white dot frame backed with a 3x4 Element that I  cut out. I  then added some typed journaling to the center as well as popped up a geotag sticker at the bottom.

Another fun addition of embellishments are these Bow Clips! You receive four different prints in a pack which are great for sliding under a photo or at the top of a page!

To create a colorful background on my white cardstock, I  used the new Magic Dots 6x6 Stencil with some yellow Distress Oxide ink! I  then used some spray ink to splatter reds and blues to my background as well as added some enamel dots from my stash.

I  adore this die cut from the Bits and Pieces pack and thought it would look cute at the end of my frame! 

Thank you for reading today!  Check out the Say Cheese 4 collection in its entirety by going to the Products page! Have a great day!

Supplies

Pages