October 2018 Blog Posts

Hello Friends! 

It's Kristine here today. I am sharing a layout using the gorgeous fall collection called Forever Fall.   I wanted to showcase the papers from this kit and of course the assortment of colors.  The photo is of my niece and a back to school picture. It was perfect for this collection of pinks, blues, and of course the burgundy flowers.

I used a patterned paper for my background instead of a piece of white cardstock. Creating a few layers using strips is a great way to add details and the ability to use more than one piece of paper.  

I did some sewing on the FALL chipboard banner. This helps them stay in place but also adds some texture to the page. The scalloped strip is from the sticker sheet. 

Adding some extra touches to the Fall banner are stickers and also chipboard pieces surrounding the picture.  I placed dimensional adhesive on the photo and some of the embellishments.

This layout is super simple and can easily be duplicated. Once you get your Forever Fall collection try a scraplift of this layout. If you do please share it with me @KristineDavidson.  If you have a few minutes please visit @Simplestories_ on Instagram for behind the scenes, design team projects and so much more!

Enjoy those fall days!

Supplies

Happy Fall everyone! It’s Cara here and Fall is my favourite season. Even if here in Luxembourg I don’t get the beautiful leaves that I grew up with in Nova Scotia. I LOVE me some sweater weather!

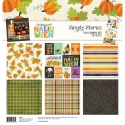
I was so excited to get to decorate my planner for Fall. I received the Forever Fall collection this summer, when it was about a million degrees out, and I was dreaming of wooly scarves, boots and crisp days and the chance to decorate my Traveler’s Notebook. And it's finally here.

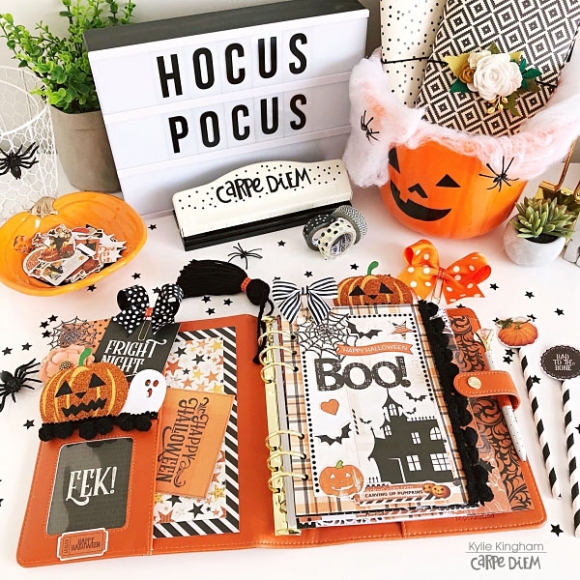
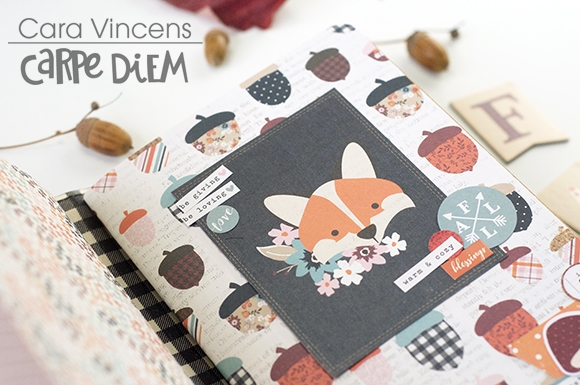
I chose the Typewriter Floral Traveler’s Notebook for the darker colours. I love that chocolate brown interior. I chose my absolute favourites from this collection, because there is so much autumnal goodness, it makes it harder than usual to choose.

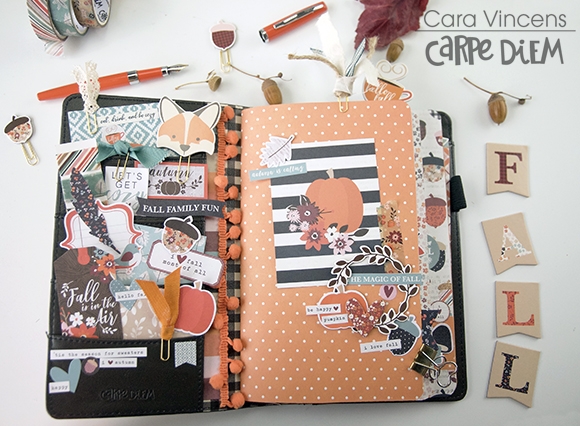
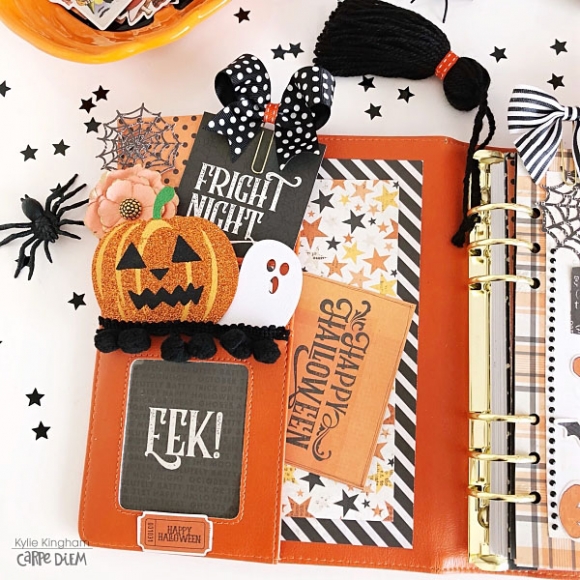
I started with the pockets because that’s the part I like best! Not only to decorate, but I love just looking at the pockets as well. I love a planner that makes me smile when I open it up. That’s also why I decorate that first insert a bit more than the others, but we’ll get to that in a minute.

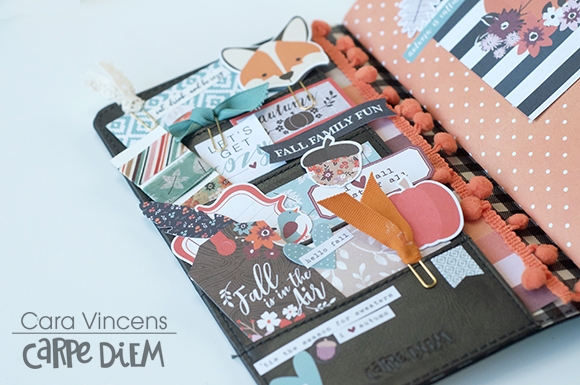
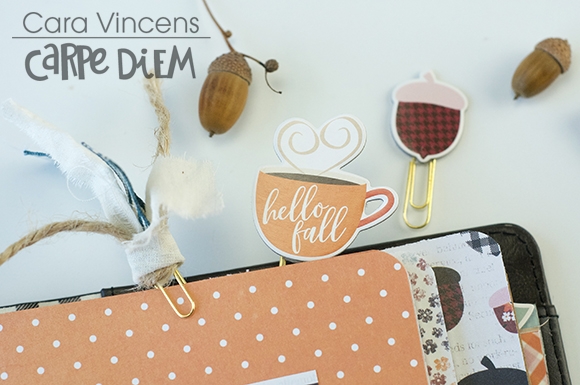
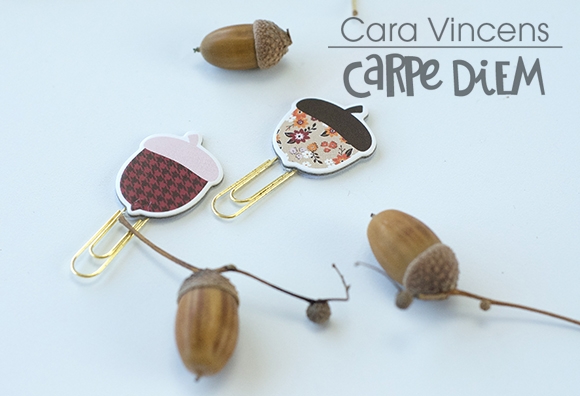
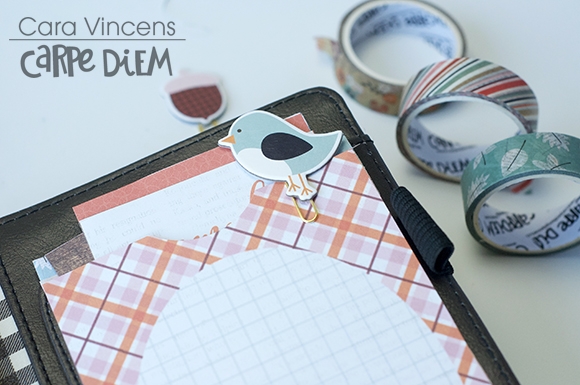
For the pockets I made some clips from the chipboard pieces, I love these patterned acorns.

Oh and that little FOX! So stinkin’ cute. I also made some ribbon and trim clips, because the texture of them has such a Fall feel.

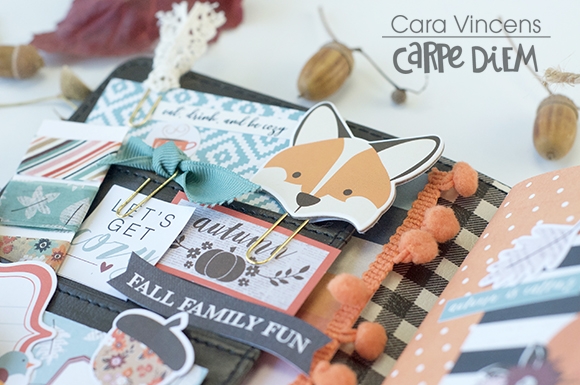
In the pockets I added a mix of clips, die cuts and stickers. I added some washi wrapped on a bit of card to have on hand. Though if I’m completely honest, I never seem to use the washi I take with me, but it still looks super cute in that pocket ;)

In the big long pocket behind all those pockets, I added that gorgeous colourful striped paper and trimmed it with pompoms that, again, have a cosy, fall feel to them. Fittingly, that striped paper is called Get Cosy.

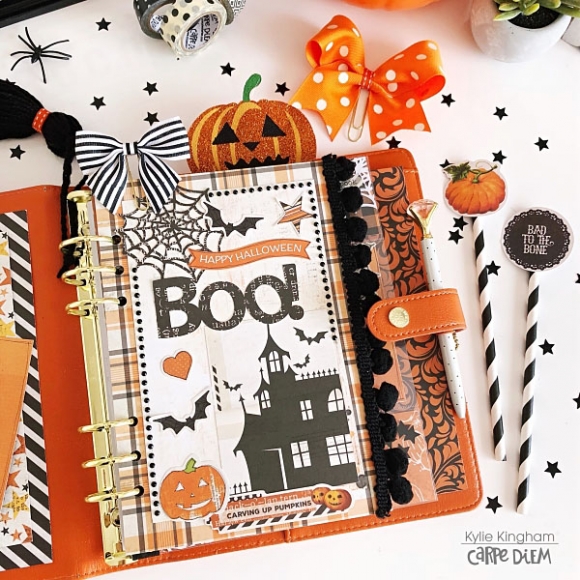
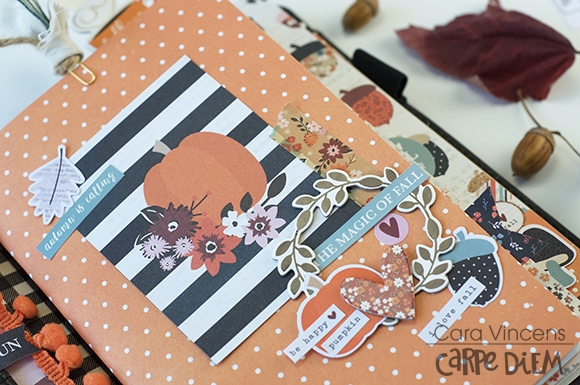
Next I covered all the inserts with patterned papers and decorated the fronts. That first one get a bit more bits and bobs added to it because like I said, along with the pockets, it’s the first thing I see and I want it to be extra pretty. I don’t like to add too too much to the other inserts because it can add a lot of bulk and also because then the cover gets bumpy and it’s harder to write on the pages inside. Sometimes this doesn’t bother me, but lately I’m been in a slim TN kind of phase.

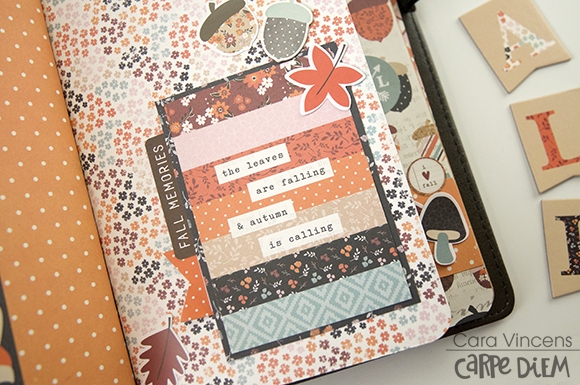
Aren’t these mushrooms adorable? Eep! LOVE!

And of course, I had to add more of the foxes!

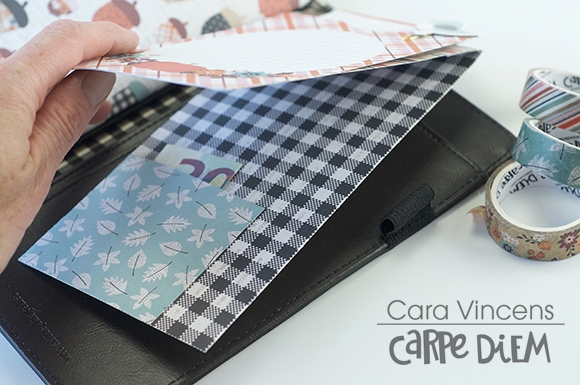
Last I made some extra pockets for that back pocket. These new TN’s have a secretarial pocket instead of the slit, which I LOVE! I can stash lots of things in there, like the 4x6 sticker sheets. In my older TNs that have slits, I loved adding lots of different types of pockets. Including a secret one, which I’ve done here. Don’t tell my kids that’s where I stash my emergency 20€. Going on a unplanned trip to the craft store counts as an emergency right? Who am I kidding? Of course it was planned! ;)

If you want to see how I’ve done this, check out my process video for this setup on my YouTube channel: The Hooting Pirate There are lots of other Carpe Diem videos too, so check those out!

You can also see other ways to use that back pocket in the video here: 5 Back Pocket Hacks

Supplies

Fall is in the air and I love this new line by Simple Stories Forever Fall. 

Using this line made into the most adorable page and cards!!! 

I love the sticker elements and journaling card. The colors are just adorable!!! 

Products for this project are made using the Forever Fall Collection kit.

Supplies

Hello friends! It’s Kylie back today sharing some of my October ‘Spooky’ themed planning pages that I’ve really had loads of fun creating!! This month I am using my lovely Persimmon A5 Carpe Diem planner teamed with the new ‘Simple Vintage Halloween’ collection by Simple Stories. Such a perfect combination!!

I loved all the varying paper prints and how well they all teamed together, making one very Spooktacular planner for the month.

As you will see as I take you through my planner, I have really enjoyed using a lot of the 3 x 4 element sheets. I love to cut apart each card to use and as you can see here I have put some of my favourites in my front pockets. So fun!

I really wanted to create a fold out dashboard for the front of my planner. This was so easy to do as I will explain in a moment. I added lots of fun elements from the collection as well as some rhinestones that I had in my stash. I also had some black pom pom trim to add to the edge of my dashboard. The lettering and spider webs were a cut file I found from the Silhouette Store, that I cut from one of the printed papers.

Here you will see my dashboard folded out. To create it I used my A5 planner divider templates to trace two together side by side so it is double the width. Next I cut it out , and folded it in half before punching the planner ring holes down the left side with my A5 Carpe Diem hole punch. Next, with the top set of ring holes only, I cut a tiny slit from the edge into the ring hole so that it will snap in place when folded back together over the rings. This way you do not need to open the rings to fold it out. A really fun and easy technique and I love being able to add a mood board or some photos to my dashboard.

The back side of my dashboard has yet another 3 x 4 element I have added with some stickers and die cuts to. The flowers were also from my stash.

Do you use your monthly task page?? This is one of my most favourite to fill out thanks to having everything in place to look over at a quick glance.

This closer look shows how I have set my page out. I was totally obsessed with the orange and black polka dot paper so have cut some thin strips to run down the ring side of my pages to look like washi. I also love to use some of the new stamp sets for my pages. I’ve added a few from the Mug Life and Plan it sets.

This month I am using the horizontal inserts again, where I have added more of the polka dot paper to the spine of my pages. Also I have added some of the striped paper to the bottom of each page for some extra colour. I didn’t need the extra space on my inserts for note taking so it was fun to add some more décor to my pages.

I’ve teamed the Bits and Pieces with some more spooky cut files to add décor to my pages as well as elements such as rounded date stickers and more stamps.

I like to use the ruled pages for my note taking each month and have added some strips of paper to opposite corners to co-ordinate with my theme.

Because I can’t resist any of the papers I also made another dashboard featuring both the 3 x 4 elements and 4 x 6 horizontal elements sheets layered together.

Do you like to add mood boards to your planners?? I love to in the form of the 2x2/4x6 Insta-Pocket Pages. Perhaps not so much as a ‘mood’ board but as a creative means of adding a theme for the month. I have used another 4 x6 horizontal card from the elements sheet as well as cutting down some of my favourite papers. I finished it off with some star confetti sealed in some pockets with my fuse tool. These pages are great in your A5 planner. They sit a little wider than my planner and I usually add washi down the spine before re-punching the ring holes.

That concludes my little planner tour for today. I hope you enjoyed seeing it and it has given you some inspiration towards your own ‘Spooky’ Halloween planner. Thanks for stopping by,

Kylie xo

Supplies

Hello everyone!!  Jackie G here on the blog today to share a fun set of Halloween Cards using the fabulous “Happy Halloween” Simple Set.  I am so incredibly excited for Halloween!!  It is my favorite holiday!!  How about you??  I can’t wait to send these spooky cards out to family and friends!!

I decided to make a set of six cards and a matching box to keep them all in!!  These little boxes are so easy to make!!  Perfect for those larger scrap pieces you have left over!!  You can find lots of tutorial on YouTube!!

The first two cards I decided to use black cardstock for the base of my card.  I love being able to write my note in a white gel pen.  I find small details like that make it extra fun for your recipient!!  I made sure to use lots of foam tape on my stickers to give extra dimension!!

On the next two cards I cut apart some of the journaling cards to use as my embellishments.  Again, using lots of foam tape for dimension.  I’m a chunky crafter and feel a card can never have “too much” dimension!!  Sometimes it requires extra postage…but that’s okay!!

The last two cards I used journaling cards as my main embellishment.  These two cards are much simpler than the others but still just as cute!!

Thank you so much for stopping by.  I hope you enjoy these fun and spooky set of cards!!  Make sure to pick up your own “Happy Halloween” Simple Set and craft away!!!

Supplies

Hey, Planner Friends! It’s Rachel again, and I am on the blog today sharing a memory planning spread from September using the new Hello Sticker Tablet, Washi Set and Spiral Planner! I remember thinking back when the revamped I AM collection came out that this collection would make a beautiful planner and would be so fun to have in a giant sticker tablet. Well, (planner girl) dreams really do come true!

This spiral planner is so beautiful and is dated, which is great for Memory Planning! While I bounce in and out of my other planners, I like to stay in the same planner when it comes to Memory Planning. Having pretty dividers like this one lets me jumped right in and get to documenting! I don’t put a lot of pressure on myself to document “all the things” in this planner. Mostly, I want to capture a few moments on the week that help me remember that period of time in my life. With its horizontal layout and lined pages, this planner speaks to the journal lover in me!

For this week, I focused on documenting two things: a busy week at work and a planner meet-up that I help host with my planner bestie, Felicia!

Sometimes, I am asked the question (especially from my family!) “how do you have time to keep up with a project like this?” My response is usually “I make time!” Since this project is helping to tell the story of my life, I try to make it a priority. But that doesn’t always mean I have hours to work on a weekly spread.

After cropping and printing the photos for this week (which I often do in advance), this memory spread came together in 15 minutes one morning before I went to work. Yep! 15 minutes! How, you might ask? Well, for starters I wasn’t rummaging through my planner stash looking for the “perfect embellishment” With one sticker tablet, alpha stickers and a few washi rolls, I was able to spend more time on telling the stories than on decorating. That is something I love about the Hello Sticker Tablet and Washi set - they make any page look beautiful and can be used for pretty much any memory!

I loved finding this “hustle hard” sticker in the Hello sticker tablet and placing it on top of the clipboard sticker to represent my busy week at work.

For the second half of the week, I documented a really fun planner meet-up that my friend Felicia and I put together. With so many photos and so many things I wanted to say, space was limited so I decided to use my We R Memory Keeper Planner Punch Board to punch the restaurant business card from our brunch and slip it into the spiral binding. I then used two butterfly stickers from the tablet to make a little tab for the card, making it easier to turn.

Here is a close-up of one of the photos from this week’s spread. I love the hand ripped floral washi as a layer behind this photo of the ladies getting crafty in our planners. The great thing about this washi size is that you can easily alter it fit your needs.

I love how this sticker cluster came together on the bottom corner. And that little banner embellishing the photo of the ladies up in my craft space? So cute!!

So there you have it! A complete memory planning spread in my planner. Keep up with this project and avoid that “analysis paralysis” by picking a few supplies to work with and get it done! Remember, done is always better than perfect.

Say hello to memory planning. Your future self will thank you for it, I promise!


Pages