March 2018 Blog Posts

Adventure

Hello everyone!  Iris here with my very first layout for Simple Stories.  I am beyond excited (and a little bit nervous) but ready to play and tell stories using the latest fabulous collections!  

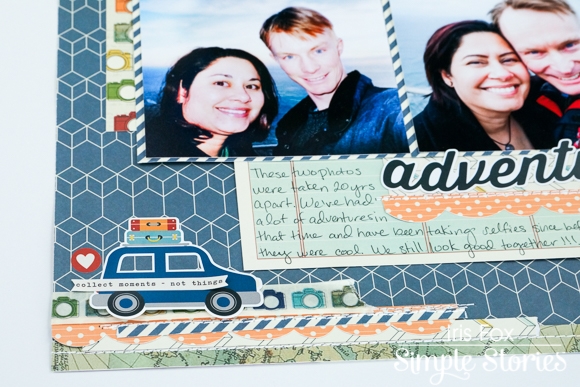
Last month my husband and I made the trek to visit Point Reyes Lighthouse on the Northern California coast. We took a selfie in the same spot we'd taken one 20 years before. Yes, we were taking selfies before they were cool! When I saw the Travel Notes collection, I knew it was perfect to document this story.

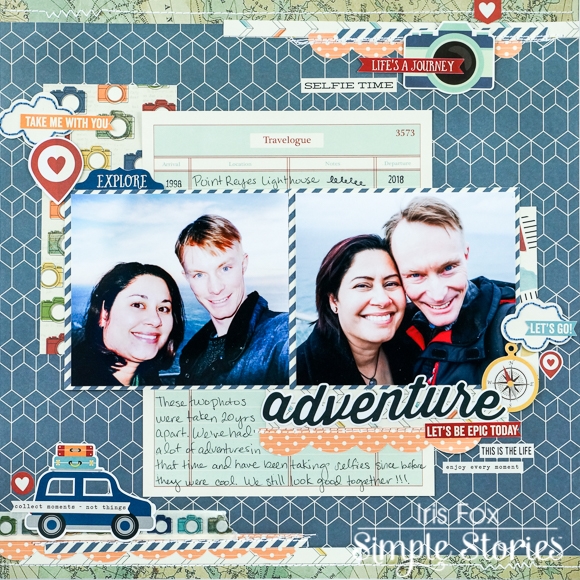
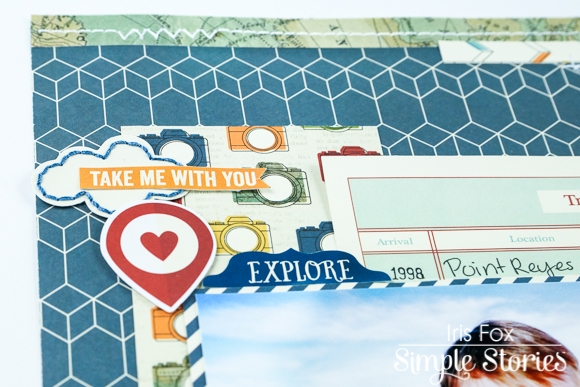
Taking my cue from the ocean, I went for the navy background paper that is the B-side from the 4x4 elements sheet.  The “Travelogue” sheet, reminiscent of the lightkeepers' logs, was a perfect addition to house my journaling.

You're going to love the scale of the patterns on the 6x8 paper pad! I chose a bunch layer a-symmetrically around the photos and in little strips above and below.  How awesome is that blue diagonal stripe for framing photos? The orange polkadot, which I cut in scallops for variety, adds a bright pop to the otherwise slightly muted colors. To bring in some of the white that the title has, I stitched across the strips and scallops. It’s subtle, but reminds me of the white capped waves and adds a bit of texture.

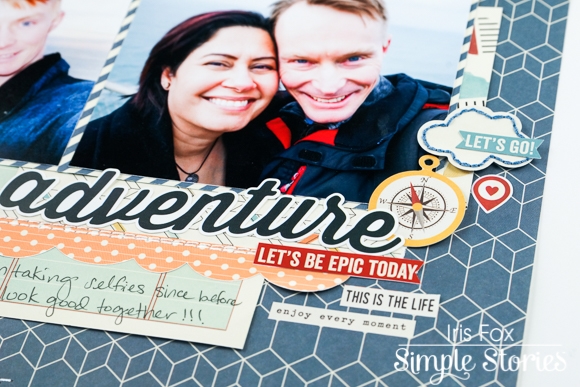
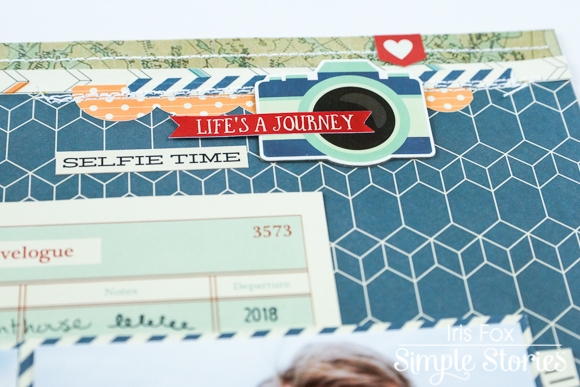
I made clusters in four spots with icons and word stickers - one of my favorite Simple Stories products - and made sure each spot had a red heart to draw the eye up and down the page in a zig zag across the photos.  If there were such a thing as a spirit icon, clouds would be it for me. So imagine how thrilled I was that Travel Notes has a couple in the Bits and Pieces pack. I hand stitched them with blue thread to make them extra special.  I fishtailed some of the word strips, and added pop dots to a few so they would layer smoothly on the clouds and the camera from the Chipboard set.

It can be hard to use washi on a dark background, but I've got a tip for that. Cut two strips and line up the patterns to double it up. Now it stands out, but you can still tell it's washi.

The navy and bluff colors and marine type icons were perfect for this story at the sea, but Travel Notes includes great patterns, icons, and phrases for all sorts of travel.  Happy travels and happy scrapping!

Supplies

​Hello everyone! My name is Florence and this is my first blog post for Simple Stories. I was torn between two lines that I wanted to work with- travel notes or I AM. I am travel lol! Many people see anything travel and they're like "that's totally you." It plays a HUGE part of my life. On the 24th I turn the big ol thirty two and wanted this next year of my life to be documented. I think we as creatives tend to document others. Our children, family, friends, fur babies, but we forget to sometimes add ourselves to that. I am going to solely use this TN for the purpose of myself, my next year journey and the I AM Simple Stories line was a perfect fit!

The I AM line was perfect for this year project of mine. I want to document at least once a week- so 52 memories with at least 32 adventures (doesn't only have to be traveling) big or small. I will be using the travelers notebook for this. I absolutely LOVE a blank notebook. It allows us to have have this open canvas to create something beautiful. And guess what- if you don't like it, there's always a fresh page to turn to that you can start over (I personally glue the pages together if it's that bad then start over!)

It wasn't until the year that I hit 30 when I started truly living life. That's when the travel bug hit me. That year my one little word was adventure, and let me tell you- that set a pavement for me. I wanted to travel and my year of 31 I lived out of my suitcase. I know this year I won't be able to do much traveling BUT- I still wanted to share with you a few of my main goals for this new year of mine. 

I live off of bucket lists. Before it was just something I created for fun. You know a wish list of what I want to see, what I want to do, where I want to go next- but never did I put true effort on crossing it off until 2 years ago. Unfortunately something tragic has to happen before that light bulb in our heads turns on to push ourselves. It wasn't until my Grandma passed away that I decided to be a little jet setter. As you can see above, my list if heavily geared towards traveling. YOURS doesn't have to be!

I would suggest creating a bucket list of things you love doing. If you love Disneyland- maybe going to another Disneyland in a new country could be on that list (PS Disney Sea in Tokyo IS THE BOMB!!!) or if you love running, maybe participating in the Nike Womens Marathon can be on there. The list can be endless- I suggest adding things that you love to the list. Because that will definitely motivate you to make it happen! Until next time sweet friends!

Feel free to find me on instagram for more creative tips and stories instagram.com/livelifeandcreate 

Supplies

 I’m so excited to be on the Simple Stories design team. I absolutely love this adorable I AM line

The colors are amazing and so easy so design with!!! These cute cards are made using the 3x4 journaling cards and I Am collection kit. Adding a few ribbons and buttons and flowers. 

This I Am line is also perfect for making darling layouts!!! This double page spread is all ready for your darling pictures!

This project uses papers from the I AM collection kit and the darling I AM sticker sheet. Use some pop dots for added dimension and a few buttons. 

Supplies

Hey Planner Friends! It’s Rachel Newman and I am thrilled to be on the 2018 Carpe Diem Creative Team. I am a planner girl through and through, and I can’t wait to share with you all the ways I use and decorate my (many) planners! For my first blog post, I want to share how I used the Simple Stories I AM collection to decorate my monthly and weekly pages in my Blush planner for March. But before we get into the planner pages, let’s talk dashboards and planner pockets!

I am more likely to actually use my planner when it is just the right mix of pretty and functional. When it comes to my planner pockets, I try to decorate them enough so that they are pretty to look at, without over stuffing them. For the opening dashboard, I kept it pretty simple with a trimmed down paper from the I AM paper pad and a planner decal. So pretty and still so functional!

I decided to spruce up my March divider with another trimmed down sheet from the paper pad, which I punched and adhered straight to the divider. I love that I can still see a little of the original dashboard peeking out and bordering the floral paper. If you look closely, you can see that the paper has a typewriter print on it! How cool! Lastly, I added a  Sn@P card from the Sn@P Card pack and some washi to complete this dashboard. Simple, but beautiful!

Now, for the monthly spread! First, I created a faux washi down the middle of the two pages with paper from the collection kit.

Then, I filled in my major events using icons from the sticker tablet. I finished up my decorating with stickers and ephemera from the bits and pieces pack.

The weekly spread is next - which is my favorite part to decorate! I consider myself an equal opportunity planner girl. I love trying out a variety of insert formats, so the fact that Carpe Diem inserts are undated means I don’t have to commit to one kind of weekly planning. This week, I wanted to try out the appointment inserts.

I love that these inserts are lined can be used as hourly inserts or can be easily modified to be a completely blank slate! And I cannot get over how adorable the I AM collections looks with all the great little icons and boxes from the new sticker tablets!  

I love adding little pocket cards into my weekly spread for a little inspiration. To make this pocket card dashboard, I placed two butterfly stickers together to create a tab, and punched the card using the planner punch.

Since I like to plan just about anywhere, I always have a storage pouch in the back of my planner filled with stickers, pocket cards and bits and pieces that I can use throughout the month to decorate my pages. The 4x6 I AM sticker pack will easily last me the entire month, with stickers to spare!

I hope you enjoyed getting a peek into my planner setup and process. I look forward to sharing more planner posts with you this year!

Supplies

Hello friends, it’s Kylie with you all today and I am very excited to share my very first blog post as a part of the Carpe Diem Creative Team. I have always loved the Carpe Diem range and today I will be sharing how I have set up my A5 planner for March.

I am using the beautiful, new A5 Mint Blossom planner teamed with the ‘I Am…’ collection from Simple Stories. I instantly fell in love with this planner when I saw it thanks to the gorgeous floral design and pastel colour hues.

I really love creating my own dashboards for my planner and now with the new A5 divider templates, it is such an easy task to do so! Simply trace around your template and cut them out. There are three in a pack and by using each of them as well as flipping on the reverse, it will give you the option of 6 tabbed dividers!

This is the tabbed divider I created for March. The lettering I created using some Alpha dies and I also enjoyed layering many elements to bring colour to my planner.

I’m never shy in embellishing my planner.I love to create pretty dividers and tags like this little one I have sitting over my ‘currently’ page.I also used some of the chipboard stickers to add some dimension to the overall appearance.

The opening page from the monthly inserts is great for adding current important tasks to. I also enjoy adding things I am currently enjoying such as a favourite movie I have seen, a new restaurant we may of found, events we have been doing , etc. This adds a fun memory keeping element to your planner to look back on.

Here are some of my planning pages for the month. I swap and change at times but currently I am using the horizontal weekly inserts.

I adore the Calender Sticker tablet and find myself using this booklet all the time. There is always a cute icon sticker you can find relevant to use in your planning.

They really add such a fun element to your pages!

I also enjoyed using the tabs sticker tablet as well. The clear sticker tabs fit neatly over them making them extra sturdy and less likely to crease.

Here is another example of some inserts I have created this month from the beautiful papers. Whilst they may not have a practical purpose to my planning, I love adding that ‘element’ of pretty to my planner. One divider I created, I have fussy cut some butterflies from the ‘Choosing Happiness’ paper to layer over some printed butterflies in the same colour. The Butterflies have a Rose Gold accent and were SO beautiful!

I also added a ‘mood board’ for the month which I created using some of the pocket pages.

I hope you have enjoyed seeing my planner spread this month and it inspires you in your own planning!

Until next time,

Happy Planning!

Supplies

Hello all of my fellow crafty girls and guys!! I’m Jackie G www.instagram.com/jackiegdesigns !! Today I have a really fun set of cards to share with you. I don’t know about you, but I LOVE crafting with my fellow crafters!! There is something just so special about the fellowship when we are all together!! That’s why I love the collection Crafty Girl, it has so many fun elements. Planner girls, sewing gals, washi tape lovers and more!! So with that said, I thought it would be fun to make two sets of cards with a matching giftboxes to give out to some of my crafting friends!!

For this first set, I used one of the 4x6 journaling cards to be the focal point on my giftbox. This girl is just too cute with those fabulous cat-eye glasses!!! I definitely need to get me a pair of those!!

I used a ton of chipboard elements along with the bits and pieces and combo sticker sheet from this collection to create all of the cards. They all pair up so beautifully and are perfect to make a matching set of cards!!

For the second set, I decided to keep the front of the box plain so my little tag could be the main focus. Again, using the chipboard elements, bits and pieces and combo stickers I popped them all up with some dimensional foam tape for a super quick tag.
This collection is one of my absolute favorites, and like I mentioned before…so much fun to create a gift for your fellow crafty friend!!
 

Supplies

Hello Simple Stories fans!

Marcia here today with a Spring layout I created with the gorgeous Simple Stories Bliss collection. I just love the soft purples, pinks, and greens in this collection with the pops of black. It is so perfect for Spring photos. I dug out some older photos of my daughter where she was wearing a purple jacket and blowing bubbles from the front steps. 

I wanted to use lots of circles on my layout to reinforce the bubble theme. I used a variety of pattern papers and cut my circles in different sizes, arranging them on my layout so the larger circles were in the middle and the smaller ones are at the top and bottom. I mixed in a few circles cut from vellum as well. I even framed one of my photos using a circular cut file.

I like mixing fonts for my title. I used an Outline Alpha here for 'Bubble' as I wanted the letters to resemble bubbles and combined it with the scripty 'Bliss' chipboard text.

The Clear Stickers were perfect for adding even more dimensional bubbles with adorable butterflies or fun text. Then I embellished with more chipboard, adorable bits and pieces, and phrase stickers.

I love how this turned out! I know the Bliss collection would be perfect for your Spring scrapping too.

Thanks so much for stopping by today!

Supplies

Hi Simple Stories fans and thanks so much for coming over to the blog today! Chantalle with you, to share my first layout on the 2018 DT. As you are well aware by now, I adore Simple Stories and am so thankful to be returning to create with the goregous new collections, like the super sweet ‘Mama Llama’ Simple Set.

I lost my Mum when I was a teenager and each photo of her is precious to me. There is definately a strong resemblance between us and it warms my heart every day, to see her face in my own children.

I’ve cut the title for the page from the 3x4/4x6 Elements sheet from the Mama Llama Set. 

Initially I wanted to do a grid design, so I cut a bunch of 3x3 squares. I found it a bit too constricting, so instead I took inspiration from the fun bunting and confetti in this set and machine stitched some bunting lines over the squares, which were adhered in a more loose arrangement on the notebook print background paper which comes from a Sn@p! Basics pack.

Over the stitching, I’ve popped some enamel dots to echo the dotted pink lines in the paper.

This frame is a little DIY number which I created using an older chipboard frame from the retired 'We are Family’ collection. The dark woodgrain looked great with the muted hippy pastels. 

I saw some frames like this on the market recently and I’ve been dying to try making some myself, so I bought some mini pom pom trim from a LSS. It was so easy, I really encourage you to give this adorable embellishment a try! You could use a glue gun to adhere the trim, but mine worked great with the red super strong double sided tape.

Tadaaah!

Some typewritten journalling onto co-ordinating paper and stickers, finished this page off.

This adorable set is perfect for the Mama in your life!

Happy crafting!

Chantalle

Supplies

Pages