Kristine Davidson's Blog Posts

Hello Friends! 

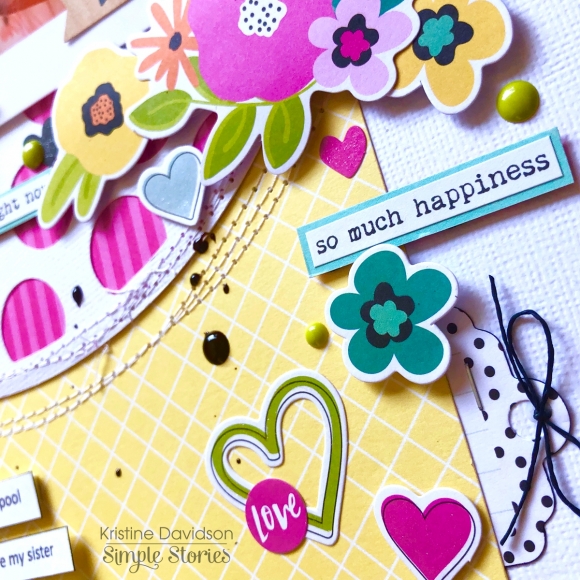
I played with the Oh Happy Day! Collection this week and excited to show you my layout. The colors for this collection are so bright and vibrant - gorgeous for summer pics! I wanted lots of colors on this page and well maybe I over did it with embellishments cut I couldn't stop! I used a picture of my friends girls enjoying a day outside together. They are the cutest gals and have "sweet smiles!"

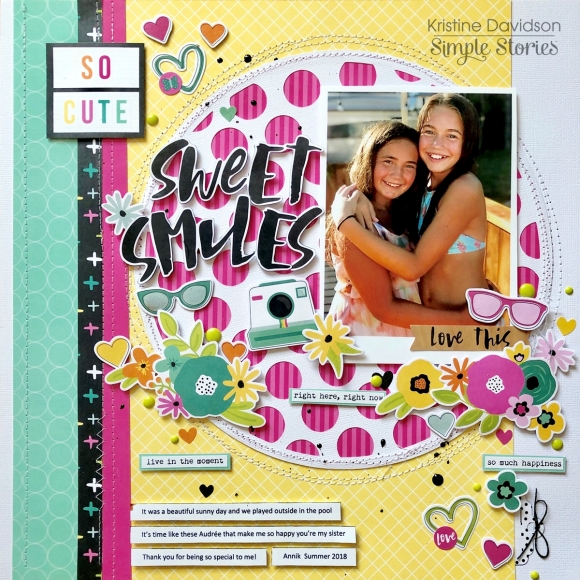
I started creating this layout with a white cardstock base. I wanted to add a cut file but wasn't sure where and what I wanted to do so I took this circle one and added the bright pink patterned paper behind it. 

I added a piece of yellow paper about 8x12" and sewed the cut file on top of it. I did some messy sewing for this one. I wasn't worried about straight lines. 

I added some other papers to the sides of my layout - 3 different ones actually and sewed them as well. Adding some diecuts from the Bits & Pieces package was really easy. I took mostly the flowers and hearts with a few other misc items such as sunglasses,  and the camera. I formed small clusters surrounding my cut file and well maybe went a little crazy with the hearts and enamel dots. 

All these gorgeous colors I couldn't stop! 

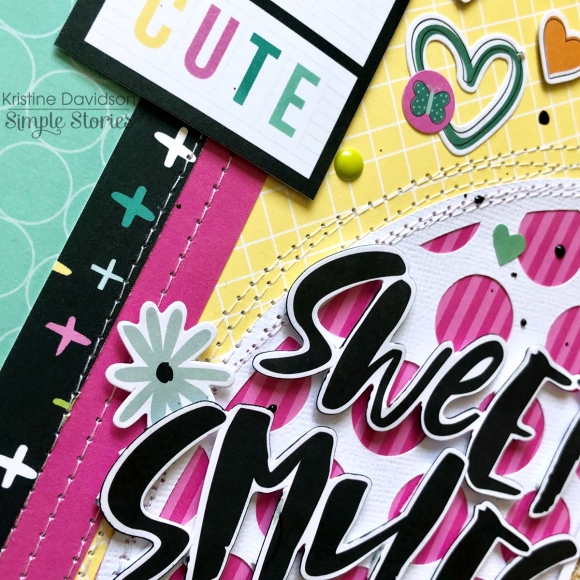
To create the title I used the Sweet and Smile words from the Bits & Pieces package - I was lucky enough to have an extra package and used the S from another word in the package to create Smile(s). 

To add some dimension and give it a contrast on the white cut file I used a black brush marker and traced the edges of the words. This gave me a bit of black detail and kind of make the title stand out a bit more. I of course added dimensional adhesive on the back of my words.

Are you ready to get your own Oh Happy Day collection pack? It has so many awesome papers and fun diecuts too.  Hopefully I gave you a bit of inspiration or atleast something to think about for your next layout. You can find more projects on our instagram accounts - @SimpleStories_ and @KristineDavidson. 

Have a great day friends!

Supplies

Hello Friends,

It's Kristine with you today to share a layout using the Kissing Booth Collection! I cannot get enough of this collection with it's super cute patterns and lovely die cuts. I created another layout using my cousins wedding picture. It's perfect for this collection isn't it?

My layout is called KISS ME.

It measures about 9x12 but I added it to a piece of white cardstock to make it 12x12. I used a black cardstock to mat the layout and create a contrast with the pink/red colors.

I used a quote from one of the 4x6 element cards for my journaling. I didn't want to add my own journaling for this personal layout so I thought that using the quote would be perfect to add some words to the page. Those elements cards are perfect to cut apart!

I printed a picture that measures 5x5" square and I really love this size. I added dimensional adhesive to the photo, the journal strips, and the chipboard pieces.

Adding a few enamel dots, paint splats and some of those tiny puffy hearts created a great little details for me.

Such a great collection to play with - for weddings, valentine's day and many of those special moments. I hope you have a chance to create with this KISSING BOOTH collection and please share your creations with us on social media! You can find me @KristineDavidson and @SimpleStories_

Supplies

Hello Friends!

It’s Kristine with you today and I’m sharing a little LOVE today! I created a layout using the Valentine’s day collection called Kissing Booth. I used a photo of my cousin and her husband for this layout and a cut file from Paige Evans. The cut file allowed me to use several pattern papers and then I was able to add some Bits & Pieces!

Creating layers on layouts always gives such beautiful dimension and even a bit of texture. Add some adhesive that is dimensional under your diecuts and stickers and see what effect this gives your page. You can add layers to titles, photos, diecuts and even your entire cut file on a piece of cardstock!

I added my cut file on a piece of white cardstock and then to add interest and color I added it to the bottom right of my page. The cardstock is cut 10”x10” and gives me space to add some pattern paper on the edge of my layout.

A few enamel dots and some paint splats adds interest to your page and eliminates a bit of that white space. Some prefer not to use splats and that’s okay – why not try some of the small puffy stickers we have. Those are super cute and you can add them anywhere ;)  I added some hearts to my layout and love the little punches of love all over my page!

I hope you enjoyed my layout and come join us on Social Media @SimpleStories_ and myself @KristineDavidson

Supplies

Pages