September 2017 Blog Posts

Today I want to show you how I have setup my new personal Mint Vintage Floral planner! I decided to use the ‘Beautiful’ Simple Stories collection and the matching Carpe Diem products to decorate my planner.

The personal planners have three small front pockets and one side pocket. I filled the pockets with little pieces of scrapbook papers and a few bits and pieces. I teared out two stickersheets of the mini tablet and tucked them in the side pocket! 

In the Beautiful collection you can find a few papers with the vintage floral design on it, I chose the one with a beige background (it’s my favorite) and cut it down to size. A little tip: I always use an existing planner page as a template to quickly cut the paper to the right size and punch the six holes on the right distance! I placed the floral paper behind the clear acetate dashboard, this way I simple personalized my planner.

For this setup I wanted to make a personal pocketpage to hold some extra planner stickers. Besides the fact that these extra pages are functional, I also love to look at them. I chose the pink vintage floral design paper and a piece of paper with beige and pink stripes. First, I have cut the floral paper down to size and then I used my lace borderpunch on the striped paper piece. Next, I glued the piece on the page and cut two mini stickersheets in half and tucked them in the pocket.

What I like about the ringbound planners, is that you can decide what kind of inserts you want. So for this planner I added some daily personal planner pages to create a ‘daily’ personal planner. To decorate the spreads I used some washitapes and stickers from the mini sticker tablet.

The sticky notes are perfect to use as backgrounds on your spreads, I just glue them down and then write on them.

I hope you enjoyed reading this blog! You can find more spreads in my Carpe Diem planners on Instagram createplannernl (https://www.instagram.com/createplannernl/)

Supplies

Hello everyone!  Nathalie with you today.  I am still crushing on the new Simple Stories "BEAUTIFUL" collection... what can I say, "It is BEAUTIFUL".  So I want to share with you all a few more layouts created with this collection.   Let me show you:


You know that feeling when you see a patterned paper, and suddenly the entire layout comes to mind, picture and all!   This is what happened as soon as I saw the "Shine Bright" paper from the Beautiful collection. For starters the name of the paper, and all the gold foil gave me the idea to create a star filled page.


Next i wanted to incorporate one of my favorite and most used techniques, "a large stitched title".   For this i used one  of the Simple Stories' Silhouette Store designs to cut the large "SHINE"  word from one of the papers from the High Style paper pad.  It was then backed with the Shine Bright paper, and then stitched together with pink and gold embroidery thread.


Once the stitching was completed, then I trimmed the page, and stitched on a slant to another of the High Style papers from the pad (I love that all these papers combine seamlessly), and attached the picture to the bottom of the page.


Using the same cut file, a lots of stars were created from different papers from the collection (all the leftover pieces from previous projects), and these were scattered around the page, so that they look as exploding from the bottom corner of  the page.


Using pieces from all the embellishment add ons, small clusters were created along the page, so that they form a visual triangle, and bring attention to the picture, and title of the page.  Here is the final page:


I love the combination of colors, dimension, and texture in this page.   It came together in a heart beat (though the stitching took some time), and the end result is just worthy of the title.  

_____________________________ 


For the second project, I wanted to focus on using the soft patterns of the collection to create a very feminine and simple page about this year's Mother's Day portrait  ( I am so glad i save this picture for the right collection!)


I wanted to keep the page clean and simple, so I reached for some white cardstock for the background of the page.  Then cut two triangles, and two strips from the "CHOOSE HAPPY" paper, and glued them onto the white cardstock making sure to show the b side of the paper  in the strips .  A bit of machine stitching secures is all together to the cardstock.


All the soft patterns in the paper are perfect for recreating flowers on a layout.  For these, I used a steel die to cut the  petals, and a JustNick cut file to create the leaves for the page, and cut them all from the 6x8 paper pad. Then just layer the petals together and glued a small enamel dot from the Faith collection to the center of each flower.


Once all the flowers were ready to glue, then assembly on the page started.   I glued the picture onto the bottom corner the page, and added two large  clusters of flowers, and stems to  the two corners that run along the paper triangle.   


Then added a few pieces of ephemera, and stickers around the  flower clusters.   The pop of black, white, and gold in the pieces make the flowers softer, and bring out the details in each of them.


Finally, I wanted to bring a bit of shine to this page, and what better place than to create a foiled title for this page.  Using the Deco Foil PeelnStick toner sheet, and one of the Simple Stories  Silhouette store cut files, i created the  title for the page.  The paper was so easy to use in the Cameo machine!  Then a bit of gold foil, and some heat from the laminator bring the title to life.


The simplicity of the page is not lost with the soft flowers and stems that decorate the page.   The dimension created on each of the flowers is perfect to bring the patterns on the papers to life, and keep the focus on the picture.   I really love the final look of the page!


I hope you are all inspire to use the patterns, colors and foiled details in the  Simple Stories BEAUTIFUL collection.  It is one of my favorite Simple Stories to date, and i am sure you will also fall in love with it!  Remember i am a comment away if you have any questions on how this came together.


See you all soon!


Supplies

Hello fellow creatives! Leah here with you on the blog today. Happy Tuesday and welcome back to the Simple Stories blog for another dose of creative planning fun! I hope you all are having an awesome September so far. It’s been a pretty busy month for me since I last spoke with you. I got a promotion at work! I’ve been undergoing a total life and culture shock in this new job, all changes for the better as far as I’m concerned, but still a significant adjustment to my life. My schedule is way different, my responsibilities and workload are much more challenging than any job I’ve ever had. I bought a cheap daily planner that I’ve been using strictly for work stuff, but I have a lot of personal life things that need planning as well, especially right now. A lot of home priorities, including my creative time, have fallen to the way-side as I continue trying to find a new work/home balance. It doesn’t help that I’ve been in such a planner funk when it comes to organizing my home and personal life. I have been itching to change up my planning system. I am on that infamous, never-ending quest to find planner peace.

I am still in the process of figuring out what will work best for me as a day-to-day life planner, but something I learned at the start of this year is that I really love using a spiral planner. I think it’s the ease of being able to fold the planner around to lay flat when I’m writing that appeals to me. Imagine my excitement when I found out that Simple Stories was going to be releasing spiral planners! I could not WAIT to get the “Beautiful” one in my hands – it was love at first sight. Well that time has come my friends, and it is everything I hoped it would be!

Not only is the planner simply BEAUTIFUL, as the name suggests, but it is extremely sturdy and well-made. Stay tuned to my YouTube Channel – a thorough review is forthcoming because I love this planner so much it needs to be featured in its own video. The biggest highlight of the planner for me is the amazing paper quality (standard 120gsm, like all other Simple Stories planner inserts), which is pretty rare to find in a spiral planner. The monthly and weekly pages are mostly black and white, which I prefer so I can decorate with any colors and supplies I want. The dividers have the same gorgeous muted colors and stunning designs found throughout the rest of the Beautiful collection, giving this planner a very sophisticated and elegant aesthetic. The gold foil accents are like the strawberry on top of my favorite cheesecake…..assuming my new favorite Simple Stories collection was a cheesecake. ;)

I am excited to show you a couple of weekly layouts I created using products from the Beautiful collection in this gorgeous new planner. For both of these layouts, I used mostly the same supplies - from the Beautiful collection: the sticky notes, die cuts, and A5 sticker tablet. I used several washi tapes from my Simple Stories collection as well: two from the Reset Girl collection, the new butterfly washi from the Bliss collection, and the “Dream Big” washi from the Bloom collection.

Here is the first weekly spread:

The Beautiful 6x8 paper pad is full of charming vintage florals that I cannot get enough of. I used one of the pages that had flowers along the bottom, fussy cut the floral edge out to use on the bottom of my planner spread, and then used the leftover paper to punch out little butterflies to scatter around the layout.

Whenever I add paper butterflies to a project, I usually add a small dot/line of adhesive along the body only so that the wings can lift off the page to add dimension. I’ve done this on scrapbooking and mixed media projects a lot, but it’s also a really fun way to add dimension to your planner pages because it doesn’t actually add any extra bulk. The butterflies just lay flat when you close the planner.

Here is the second weekly spread:

Page flags anyone? I used some in their original form, from the sheet of sticky notes and the sticker tablet. However, I often cut square or round stickers, paper, and washi tapes into different sized flag and banner shapes as well, to add variety and interest to my embellishment clusters.

When I finished these layouts, I was in the creative zone and was so inspired by this collection that I had to keep going. I thought to myself, I dress up the front of my ring bound planners all the time, why not dress up the front of my spiral planner too? I decided to turn the intro page into more of a decorative cover page, much like a dashboard. In the center of the page, I layered a doily, a couple of my favorite die cuts, and a tag I cut out of paper scraps from earlier. I fussy cut some more vintage florals from another 6x8 paper and arranged them around the edges of the page, and then added the paper butterflies and a fancy paperclip as a finishing touch.

To make the front pocket feel a little more special, I left the sticker backing on the big “life is beautiful” chipboard sticker and used some repositionable adhesive to stick it onto the pocket, just in case I wanted to remove it later.

I had such a lovely time playing with the Beautiful collection and my new spiral planner. I’ve never been so excited to film a planner review before! What new planner or collection are you the most excited about? There are SO MANY amazing new products to choose from. Be sure to go check out ALL of the new pretty paper planner things over on the Carpe Diem Planners Instagram!

Supplies

Hello everyone! It's Dorymar back on the blog today! I can’t believe that Autumn is almost here! It is a beautiful season when Mother Nature gives us majestic colors and invites us to be thankful for our blessings. I want to share a beautiful altered project I designed with the stunning Vintage Blessings collection. I took the inspiration from one of the houses in the collection and recreated it with a beautiful "stand mini album" that you can use to decorate the table during this Fall season and showcase your photos during family gatherings. 

¡Saludos a todos! ¡Es Dorymar en el blog hoy! ¡No puedo creer que ya casi es Otoño! Esa hermosa época donde la madre naturaleza nos brinda esos majestuosos colores y nos invita a dar gracias por ser tan bendecidos.  Quiero compartirles un hermoso proyecto alterado que diseñé con la maravillosa colección Vintage Blessings. Utilicé de inspiración una de las casas que encuentras en la colección y recreé la misma con un hermoso “stand mini album” que puedes utilizar para decorar la mesa durante esta época de otoño y exhibir tus fotos durante las reuniones familiares.

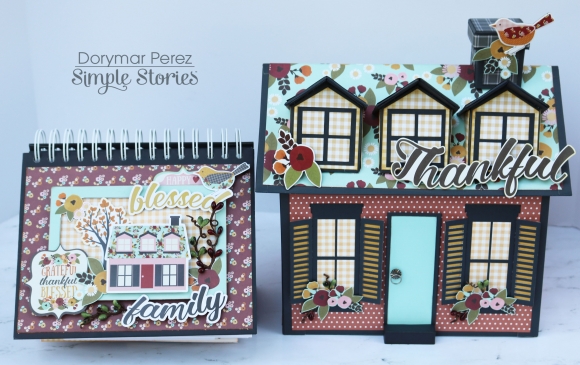
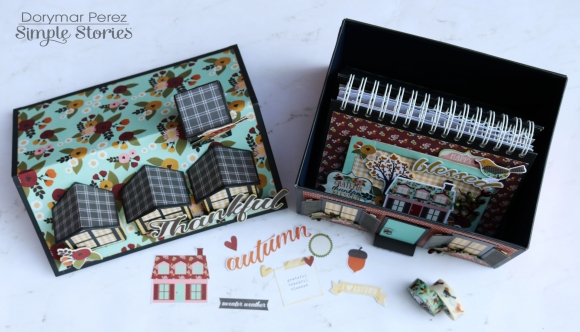
The project is designed to be used as part of the decoration where you can keep the mini album inside the house after the holidays. 

El proyecto está diseñado para ser utilizado como parte de la decoración donde puedes guardar el mini álbum dentro de la casa luego de las fiestas.

To build the house, I used chipboard for the walls and ceiling. Then, I covered them using the Homespum Happiness and Very Blessed papers. To make the windows, I used a cutting file from Silhouette. Also, I used the word "Thankful", the little bird and the flowers from the chipboard stickers to decorate the house. Loved it! 

Para construir la casa utilicé “chipboard” para formar las paredes y el techo. Luego con los papeles “Homespum Happiness” y “Very Blessed” los forré. Para hacer las ventanas utilicé un archivo para cortar de Silhouette. Usé la palabra “Thankful”, el pajarito y flores de los “chipboard stickers” para decorar la casa. ¡Todos hermosos!

For the album cover, I used the beautiful Happy Life paper as background and the frame of one of the 4x6 cards to make a small collage highlighting the theme of this project. As a title, I used the chipboard stickers with the words blessed and family. I also used bits and pieces and chipboard stickers that are super adorable to decorate. I used foam tape to give dimension to all the elements. 

En la portada utilicé el hermoso papel “Happy Life” como fondo y el marco de una de las tarjetas 4x6 para hacer un pequeño “collage” representando el tema de este proyecto. Como título use las palabras “blessed” y “family” de los “cardstock stickers”. Alrededor seguí utilizando parte de los “bits and pieces” y los “chipboard stickers” que son super adorables. Todos los elementos los coloque en “foam tape” para darle dimensión.

The theme of this album is family, home, blessings and giving thanks. In all its pages, you will see the phrases and quotes that you find in the collection’s stickers and in the bits and pieces. All are full of feelings and much love, I adore them! 

El tema de este álbum es la familia, la casa, las bendiciones y dar gracias. ¡En todas las páginas del álbum vas a observar las frases y citas que encuentras en los “stickers” y en los “bits and pieces”! ¡Todas están llenas de sentimientos y mucho amor, las adoro!

On the first page, I made pockets and used the 3x4 and 4x6 cards that are so versatile to make frames and have space for journaling. 

En la primera página, hice bolsillos en donde utilizo las tarjetas 3 x 4 y 4 x 6 que son muy versátiles para hacer marcos y tener espacio para el journal.

On these pages, I used both sides of the Love & Laughter paper. I love these burgundy roses. They look spectacular! To decorate I used the cardstock stickers and one of the quotes that you’ll find in one of the 4x6 cards. 

En estas páginas utilicé el papel “Love & Laughter” por ambos lados. Me encantan las rosas color “burgundy”. ¡Se ven espectaculares! Para decorar usé los “cardstock stickers” y una de las citas que encontrarás en una de las tarjetas de 4x6

The colors and designs in this collection are so perfect! All the elements and phrases match beautifully! On the small page, I used the Grateful washi tape to make the background. Love how it turned out! 

¡Los colores y diseños de esta colección están perfectos! ¡Todos los elementos y las frases emparejan maravillosamente! En la página pequeña, usé el “washi tape Grateful” para hacer el fondo. ¡Me encantó el resultado!

To design this page, I was inspired by one of the chipboard stickers and recreated a window where you can place four 2 x 2 photos. I fussy cut flowers from the So Very Blessed paper and used some of the bits and pieces to decorate this page. 

Para diseñar esta página me inspiré en uno de los “chipboard stickers” para recrear una ventana donde puedes colocar cuatro fotos 2 x 2. Alrededor utilicé las flores del papel “So Very Blessed” para decorar en conjunto con los “bits and pieces”.

The houses, the flowers, the hearts, the messages, all super adorable! 

¡Las casas, las flores, los corazones, los mensajes, todos super adorables!

On this last page, I used the 4 x 4 Elements paper cards to make a waterfall in which you can place up to 4 photos interspersed with the love filled messages of these cards. 

I hope you enjoyed this project using the beautiful Vintage Blessings collection and that it inspired you to create! Happy crafting! 

En esta última página utilicé las tarjetas del papel “4 x 4 Elements” para hacer una cascada en la que puedes colocar hasta 4 fotos intercaladas con los mensajes lleno de amor de estas tarjetas. 

Espero que hayan disfrutado este proyecto con la hermosa colección de “Vintage Blessings” y les sirva de inspiración para crear un hermoso proyecto en esta época tan especial. Happy crafting!

SaveSaveSaveSave

Supplies

Hi, Everyone! Jana Eubank here. Autumn is my favorite time of year to take photos and my favorite time of year to scrapbook. It's a time of getting together with friends and family and a time to count them as your blessings.
 
The unique color combination of the Vintage Blessings collection made scrapping the photos below especially fun. Not only does it include my favorite fall colors of red, orange, yellow, brown and green ... but it feels fresh and exciting with the addition of pink and aqua! 
 
THANKFUL
 
It's no secret that I adore patterned paper and like a colorful fall quilt, had a blast combining together several patterns together with stitching on this page.
 
 
I began with a trio of patterns down the left side of the page. I added a punched olive green border and machine stitching in between each strip. 
 
 
I used more strips of patterned paper behind my family photo and the title, dovetailing the ends of each strip to look like a series of banners stacked on top of one another.
 
 
I handcut several doilies from the Home Sweet Home paper to use as anchors for the different clusters of die cuts and chipboard pieces on each side of the title.
 
 
At the top of the page, you will see more handcut doilies peeking out from behind the tabs and phrases.
 
 
________________________________
 
GRATEFUL
 
One of the highlights for me last year was making some new scrapbook friends through a Facebook group. We live about an hour away from one another, but made plans to get together and scrapbook. We had such a great time!
 
 
Fall is the season of textures, right?! It has been awhile since I have used my patterned scissors and thought it would be the perfect time to add that extra bit detail to this page by edging the large patterned paper circle with a pinked edge.
 
 
I ran the title across the seam of the two photos, accenting it with a couple of flower die cuts from the Bits & Pieces and a few enamel dots.
 
 
I cut the artisan label shape from one of the cards on the 4x6 Vertical Elements paper to use for my journaling. I added a flower die cut with foam squares over the area where I had to cut along the shape.
 
 
Below the journaling I created a happy little scene with a house, tree, and two die cut tickets. Like the ticket says we did all "gather together" at my house for a night of fun!
 
 
Have you made plans to get together with your friends and family this season? If not, come up with a reason to gather ... and then be sure to take some photos with the people you love. You will count them among your blessings as you go to scrapbook those memories in the future.

Supplies

Hello everyone. It's Mindi here with you today. I am so excited to be sharing some pocket pages that I have created with the new Vintage Blessings collection. This collection is full of fall inspired colors and elements as well as a Grateful/Family theme as well. That is what I chose to focus on and I had a bunch of great family photos to use. These photos were from a few years ago when my parents were here visiting for Thanksgiving. We thought it would be fun to go and take some family photos. 
 
 
When I started putting these pages together I thought it would be fun to add a starter page. I thought that It would be different to have a see thru element to divide these pages in my album. These transparency sheets from Grafix are perfect for these types of projects. You can find them in some craft stores and also at Scrapbook.com. I cut it down to the same size of the pocket page protectors and then I cut it down to be 3.5 in width. 
 
 
Since it was going to be a see through element I played around with some of the die cut pieces and ended up using the word Family. It was a great fit as it layered on top of the photo so nicely. I placed it sideways and on the edge for a fun and layered element. 
 
 
Let's talk about this first page for a minute. I knew that I wanted to include a photo of all of us to begin this set of pages. The other bit of information that I wanted to add was the date and what these pages were about. This pink doily paper looked like a great place to add some stickers and other embellishments. 
 
 
Here is a look at the next set of pages. This top left journaling card was so cute with the row of houses on the bottom and it had lots of room for some journaling up above. I added the story about how we originally had plans to have our photos taken by a professional photographer friend of mine but one of my kids was super sick. We waited a few days so that she could get feeling better and headed out to try and get some family photos on our own. 
 
 
One of the things that I wanted to do is to include photos and pages not in page protectors. I had so many photos that I wanted to include that I enlarged this one of my son and added in my album. There was some white space on the photo that I added in some journaling and a sticker that says JOY. 
 
 
I took one of my favorite photos and enlarged it so that it went all the way across my album for a dramatic look. I kept the embellishing pretty simple so that it didn't take away from the photo. 
 
 
On the other side of my big photo I wanted to balance out the photos with some patterned paper and embellishments. I layered some washi tape and some stickers underneath the big house sticker. 
 
 
Putting together a collage of photos is always a great way to add more photos to any project. I added 4 smaller photos together and printed them to use on this page. This bird patterened paper was simply too cute not to use in a major way. So I cut it down and added my photo collage to the corner and finished it off with some embellishments. I sure love the photo stickers. I think I used them on every page. 
 
 
On the other side of the photo collage page I wanted to add in another non photo page. I went with this pink polka dot paper and then embellished it with this darling quilted heart and then some other stickers and die cut pieces. Opposite from the pink page I added in a photo and a journaling card. The two cute birds were a perfect combination to the photo of my two boys. I layered some stickers and journaling in the middle of the journaling card. 
 
 
Here is a look at my last set of pages. A few last photos and journaling cards. I continued with using the same similar embellishments, stamps, and enamel dots for a consistent look. 


Thank you so much for coming over to the blog today. Putting these pages together was so fun. I hope that you found some inspiration today. 

Supplies

 
September is here & that means summer is coming to an end.  It's still sunny & warm where I am, so I'm getting as much use out of the Summer Days collection in my planner while I still can!  Every summer has a story and with the beautiful Summer Days collection it has allowed me to express it through my planners. 


These bright, fun, inspirational papers are perfect for making dashboards to showcase your summer vibes. 
 
 
The journaling cards from this collection are so inspiring and bring so much summer love to any project. I loved including them in my pockets as well as making dashboards. 
 
 
The stickers will make that summer feeling real and make you want to go out and enjoy the sun and an ice cream. 
 
 
Summer memories are full of brightness and happiness just like these chipboard stickers. 
 
 
September is here and that means summer is coming to an end what better way to end the summer than with a notebook where you can dot down what you haven't been able to do this summer as a reminder of what you want to be sure to get done when summer hits next year!. 
 

Supplies

If you’re a card maker like me, it’s never too early to get started on your holiday cards.   There’s so much going around during the holidays that you’ll be glad they’re made and ready to send.  With not one, but three new holiday collections at Simple Stories you’re sure to find one that speaks to you!


Today I’m playing with the Very Merry Collection!  It’s a traditional mix of reds and greens with a fresh look.  You’ll find candy stripes and plaids, and polka dots that look like snowfall!

You’ll also find a sleigh-full of accessories in this collection!  There are chipboard stickers, rolls of washi tape, “Bits and Pieces” die cuts, and stickers that make your paper crafting a breeze.  All the images are printed and die cut ready to work with!

The flowers on my design are chipboard stickers, they add dimension and texture.  Other elements like the December calendar, snowflake, and postcard are from the Bits and Pieces Pack.  The sentiments are both stickers  (Hey Santa – Combo Sticker / Let Your Heart Be Light 4x6” Sticker pack).

____________________________________

My second card is fun and whimsical!  Who doesn’t love Santa?   When my kids were little they used to call him “Ho Ho”!  This is for all of us young at heart.

I love the vintage Santa reminiscent of images from my childhood – his kind face and rosy cheeks are perfect!

There are so many different elements to choose from in this collection!  I had lots of fun looking through the pieces.  I chose pieces that I associate with Santa like the arrow pointing the way to the North Pole, and the Jolly Bingo Card.

Just about every embellishment on this card is from the Bits and Pieces pack.  The only exception is Ho Ho.. I mean Santa LOL!  – he’s a chipboard sticker.

I know you’re going to love making everything you need for the holidays with this collection.. cards, tags, place cards and so much more! 

The Very Merry Collection is just that!  Everything to make spirits bright!

Supplies

Pages